
Easy Start Guide
Page 2
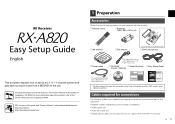
..., the Owner's Manual for connections The following cables (not supplied) are required to build the system described in this product, refer to set up a 5.1- PDF versions of the main unit and remote control used in this document. • Speaker cables (depending on the unit...back surround sound from the following website. AV Receiver UAB 1 Preparation Accessories Check that the following accessories are of the U.S.A. http://download.yamaha.com/ AM antenna FM antenna Insert the batteries the right way round. YPAO microphone Power ...
..., the Owner's Manual for connections The following cables (not supplied) are required to build the system described in this product, refer to set up a 5.1- PDF versions of the main unit and remote control used in this document. • Speaker cables (depending on the unit...back surround sound from the following website. AV Receiver UAB 1 Preparation Accessories Check that the following accessories are of the U.S.A. http://download.yamaha.com/ AM antenna FM antenna Insert the batteries the right way round. YPAO microphone Power ...
Easy Start Guide
Page 4
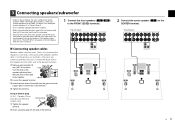
...subwoofer equipped with the unit's metal areas. 3 Connecting speakers/subwoofer • Under its default settings, the unit is configured for the positive (+) terminals. One is for connecting the negative (-) terminals of the terminal. 1 Connect the front speakers (1/2) to the CENTER terminal. Using a banana...; Ensure that the core wires of the terminal. BACK PRE OUT 1 SUBWOOFER 2 EXTRA SP AC IN 1 2 9 3 4 5 2 Connect the center speaker (3) to the FRONT (//\) terminals. BACK PRE OUT 1 SUBWOOFER 2 EXTRA SP AC IN 1 2 9 3 4 5 En 3 d Tighten the...
...subwoofer equipped with the unit's metal areas. 3 Connecting speakers/subwoofer • Under its default settings, the unit is configured for the positive (+) terminals. One is for connecting the negative (-) terminals of the terminal. 1 Connect the front speakers (1/2) to the CENTER terminal. Using a banana...; Ensure that the core wires of the terminal. BACK PRE OUT 1 SUBWOOFER 2 EXTRA SP AC IN 1 2 9 3 4 5 2 Connect the center speaker (3) to the FRONT (//\) terminals. BACK PRE OUT 1 SUBWOOFER 2 EXTRA SP AC IN 1 2 9 3 4 5 En 3 d Tighten the...
Easy Start Guide
Page 5
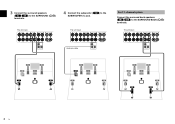
...2 9 3 4 6 5 7 4 En BACK PRE OUT 1 SUBWOOFER 2 EXTRA SP AC IN The unit (rear) FRONT CENTER SURROUND SPEAKERS SURROUND BACK/BI AMP ZONE 2/PRESENCE SINGLE SINGLE CENTER Audio pin cable AUDIO ZONE 2 OUT OUT FRONT SURROUND SUR. The unit (rear) FRONT...SPEAKERS SURROUND BACK/BI AMP ZONE 2/PRESENCE SINGLE SINGLE CENTER AUDIO OUT ZONE 2 OUT FRONT SURROUND SUR. BACK PRE OUT 1 SUBWOOFER 2 EXTRA SP AC IN For 7.1-channel system Connect the surround back speakers (6/7) to the SUBWOOFER (1) jack. 3 Connect the surround speakers (4/5) to the SURROUND (//\) terminals. 4 Connect...
...2 9 3 4 6 5 7 4 En BACK PRE OUT 1 SUBWOOFER 2 EXTRA SP AC IN The unit (rear) FRONT CENTER SURROUND SPEAKERS SURROUND BACK/BI AMP ZONE 2/PRESENCE SINGLE SINGLE CENTER Audio pin cable AUDIO ZONE 2 OUT OUT FRONT SURROUND SUR. The unit (rear) FRONT...SPEAKERS SURROUND BACK/BI AMP ZONE 2/PRESENCE SINGLE SINGLE CENTER AUDIO OUT ZONE 2 OUT FRONT SURROUND SUR. BACK PRE OUT 1 SUBWOOFER 2 EXTRA SP AC IN For 7.1-channel system Connect the surround back speakers (6/7) to the SUBWOOFER (1) jack. 3 Connect the surround speakers (4/5) to the SURROUND (//\) terminals. 4 Connect...
Easy Start Guide
Page 6
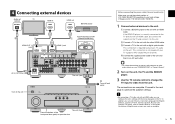
...SURROUND SUR. En 5 Voltages are complete. b Connect a TV to the unit. The connections are AC 110-120/220-240 V, 50/60 Hz. 1 Connect external devices to the unit with a digital optical cable. Proceed to the next page to optimize the speaker settings. • By connecting a TV to the unit with an HDMI ...cable, you can select the on how to connect radio antennas or other HDMI cable. In addition, you set the switch position of ...
...SURROUND SUR. En 5 Voltages are complete. b Connect a TV to the unit. The connections are AC 110-120/220-240 V, 50/60 Hz. 1 Connect external devices to the unit with a digital optical cable. Proceed to the next page to optimize the speaker settings. • By connecting a TV to the unit with an HDMI ...cable, you can select the on how to connect radio antennas or other HDMI cable. In addition, you set the switch position of ...
Easy Start Guide
Page 7
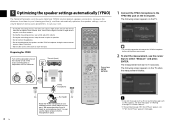
... messages" or "Warning messages" in 10 seconds. If the cross-over frequency is adjustable, set the volume to half. 5 Optimizing the speaker settings automatically (YPAO) The Yamaha Parametric room Acoustic Optimizer (YPAO) function detects speaker connections, measures the distances from using this function at your listening position (same height as possible. • Do not...
... messages" or "Warning messages" in 10 seconds. If the cross-over frequency is adjustable, set the volume to half. 5 Optimizing the speaker settings automatically (YPAO) The Yamaha Parametric room Acoustic Optimizer (YPAO) function detects speaker connections, measures the distances from using this function at your listening position (same height as possible. • Do not...
Easy Start Guide
Page 8
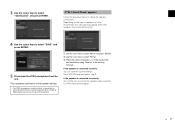
... current settings. b Use the cursor keys to check the speaker connections. Depending on top of speakers or room environment, this message may appear even if the speakers are connected correctly. 4 Use the cursor keys to step 3. If the speaker is connected incorrectly: Turn off the unit, reconnect the speaker cable, and then try YPAO measurement again. c Check the...
... current settings. b Use the cursor keys to check the speaker connections. Depending on top of speakers or room environment, this message may appear even if the speakers are connected correctly. 4 Use the cursor keys to step 3. If the speaker is connected incorrectly: Turn off the unit, reconnect the speaker cable, and then try YPAO measurement again. c Check the...
Easy Start Guide
Page 9
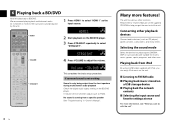
SW L CR SL SR 2 Start playback on the BD/DVD player. 3 Press STRAIGHT repeatedly to adjust the volume. STRAIGHT VOL. Connecting other playback devices Connect audio devices (such as PCM). HDMI1 VOL. DECODE STRAIGHT MUSIC SLEEP ENHANCER PURE DIRECT 1 2 3 4 5 9 INPUT MUTE 6 7 MEMORY... 0 10 TV 8 ENT TV VOL TV CH CODE SET STRAIGHT 4 Press VOLUME to select "STRAIGHT". No sound is only being output from the front speakers...
SW L CR SL SR 2 Start playback on the BD/DVD player. 3 Press STRAIGHT repeatedly to adjust the volume. STRAIGHT VOL. Connecting other playback devices Connect audio devices (such as PCM). HDMI1 VOL. DECODE STRAIGHT MUSIC SLEEP ENHANCER PURE DIRECT 1 2 3 4 5 9 INPUT MUTE 6 7 MEMORY... 0 10 TV 8 ENT TV VOL TV CH CODE SET STRAIGHT 4 Press VOLUME to select "STRAIGHT". No sound is only being output from the front speakers...


