
Easy Start Guide
Page 2
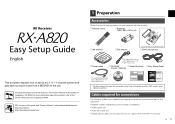
... supports ARC [Audio Return Channel]) En 1 http://download.yamaha.com/ AM antenna FM antenna Insert the batteries the right way round. YPAO microphone Power cable *The supplied FM antenna varies depending on the region of purchase. CD-ROM Safety Brochure (Owner's Manual) Easy Setup Guide *The supplied power cable varies depending on the number of the main unit and remote control used in this guide...
... supports ARC [Audio Return Channel]) En 1 http://download.yamaha.com/ AM antenna FM antenna Insert the batteries the right way round. YPAO microphone Power cable *The supplied FM antenna varies depending on the region of purchase. CD-ROM Safety Brochure (Owner's Manual) Easy Setup Guide *The supplied power cable varies depending on the number of the main unit and remote control used in this guide...
Easy Start Guide
Page 3
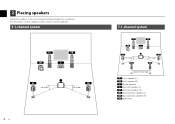
2 Placing speakers Set up the speakers in the room using the following diagram as a reference. For information on other speaker systems, refer to "Owner's Manual". 5.1-channel system 1 2 9 3 4 10° to 30° 10° to 30° 5 2 En 7.1-channel system 1 2 9 3 4 10° to 30° 6 5 10° to 30° 7 30 cm (1 ft) or more 1 Front speaker (L) 2 Front speaker (R) 3 Center speaker 4 Surround speaker (L) 5 Surround speaker (R) 6 Surround back speaker (L) 7 Surround back speaker (R) 9 Subwoofer
2 Placing speakers Set up the speakers in the room using the following diagram as a reference. For information on other speaker systems, refer to "Owner's Manual". 5.1-channel system 1 2 9 3 4 10° to 30° 10° to 30° 5 2 En 7.1-channel system 1 2 9 3 4 10° to 30° 6 5 10° to 30° 7 30 cm (1 ft) or more 1 Front speaker (L) 2 Front speaker (R) 3 Center speaker 4 Surround speaker (L) 5 Surround speaker (R) 6 Surround back speaker (L) 7 Surround back speaker (R) 9 Subwoofer
Easy Start Guide
Page 4
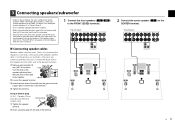
... (rear) FRONT CENTER SURROUND SPEAKERS SURROUND BACK/BI AMP ZONE 2/PRESENCE SINGLE SINGLE CENTER AUDIO OUT ZONE 2 OUT FRONT SURROUND SUR. c Insert the bare wires of the cable into the end of the cable da firmly together. - (black) b Loosen the speaker terminal. BACK PRE OUT 1 SUBWOOFER 2 EXTRA SP AC IN 1 2 9 3 4 5 En 3 If the speaker cables short circuit, "Check SP Wires" will appear on . ■ Connecting speaker cables Speaker cables have two wires. 3 Connecting speakers/subwoofer • Under its default settings, the...
... (rear) FRONT CENTER SURROUND SPEAKERS SURROUND BACK/BI AMP ZONE 2/PRESENCE SINGLE SINGLE CENTER AUDIO OUT ZONE 2 OUT FRONT SURROUND SUR. c Insert the bare wires of the cable into the end of the cable da firmly together. - (black) b Loosen the speaker terminal. BACK PRE OUT 1 SUBWOOFER 2 EXTRA SP AC IN 1 2 9 3 4 5 En 3 If the speaker cables short circuit, "Check SP Wires" will appear on . ■ Connecting speaker cables Speaker cables have two wires. 3 Connecting speakers/subwoofer • Under its default settings, the...
Easy Start Guide
Page 5
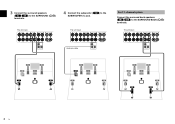
BACK PRE OUT 1 SUBWOOFER 2 EXTRA SP AC IN The unit (rear) FRONT CENTER SURROUND SPEAKERS SURROUND BACK/BI AMP ZONE 2/PRESENCE SINGLE SINGLE CENTER Audio pin cable AUDIO ZONE 2 OUT OUT FRONT SURROUND SUR. The unit (rear) FRONT CENTER SURROUND SPEAKERS SURROUND BACK/BI AMP ZONE 2/PRESENCE SINGLE SINGLE CENTER AUDIO OUT ZONE 2 OUT FRONT SURROUND SUR. 3 Connect the surround speakers (4/5) to the SURROUND (//\) terminals. 4 Connect the subwoofer (9) to the SURROUND BACK (//\) terminals. The unit (rear) FRONT CENTER SURROUND SPEAKERS SURROUND BACK/BI AMP ZONE ...
BACK PRE OUT 1 SUBWOOFER 2 EXTRA SP AC IN The unit (rear) FRONT CENTER SURROUND SPEAKERS SURROUND BACK/BI AMP ZONE 2/PRESENCE SINGLE SINGLE CENTER Audio pin cable AUDIO ZONE 2 OUT OUT FRONT SURROUND SUR. The unit (rear) FRONT CENTER SURROUND SPEAKERS SURROUND BACK/BI AMP ZONE 2/PRESENCE SINGLE SINGLE CENTER AUDIO OUT ZONE 2 OUT FRONT SURROUND SUR. 3 Connect the surround speakers (4/5) to the SURROUND (//\) terminals. 4 Connect the subwoofer (9) to the SURROUND BACK (//\) terminals. The unit (rear) FRONT CENTER SURROUND SPEAKERS SURROUND BACK/BI AMP ZONE ...
Easy Start Guide
Page 6
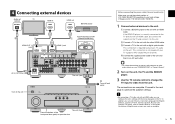
.... 4 Connecting external devices Audio out TV (optical) OPTICAL HDMI in "Owner's Manual". 2 Turn on the unit, the TV and the BD/DVD player. 3 Use the TV remote control to change the TV input to video from the TV and connect it to this guide, illustrations of the front panel door gently to the unit with the menu displayed on -screen menu language from English (default), Japanese, French, German, Spanish, Russian and Chinese. d Connect the supplied power cable...
.... 4 Connecting external devices Audio out TV (optical) OPTICAL HDMI in "Owner's Manual". 2 Turn on the unit, the TV and the BD/DVD player. 3 Use the TV remote control to change the TV input to video from the TV and connect it to this guide, illustrations of the front panel door gently to the unit with the menu displayed on -screen menu language from English (default), Japanese, French, German, Spanish, Russian and Chinese. d Connect the supplied power cable...
Easy Start Guide
Page 7
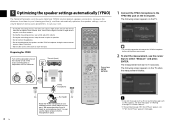
... adjustable, set the volume to half. You can use of a tripod as a microphone stand. The following screen appears on the TV. • To cancel the operation, disconnect the YPAO microphone before starting the measurement. 2 To start in place. 1 Connect the YPAO microphone to select "Measure" and press ENTER. Preparing for YPAO SOURCE RECEIVER HDMI 1 2 3 4 5 6 7 V-AUX AV 1 2 3 4 AUDIO 5 6 1 2 TUNER USB MAIN ZONE 2 NET PARTY HDMI OUT BD DVD SCENE TV NET RADIO Turn...
... adjustable, set the volume to half. You can use of a tripod as a microphone stand. The following screen appears on the TV. • To cancel the operation, disconnect the YPAO microphone before starting the measurement. 2 To start in place. 1 Connect the YPAO microphone to select "Measure" and press ENTER. Preparing for YPAO SOURCE RECEIVER HDMI 1 2 3 4 5 6 7 V-AUX AV 1 2 3 4 AUDIO 5 6 1 2 TUNER USB MAIN ZONE 2 NET PARTY HDMI OUT BD DVD SCENE TV NET RADIO Turn...
Easy Start Guide
Page 8
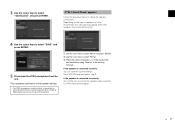
... the speaker is connected incorrectly: Turn off the unit, reconnect the speaker cable, and then try YPAO measurement again. a Use the cursor keys to select "Wiring". If "W-1:Out of the speaker that was identified as on the type of AV equipment). c Check the cable connections (+/-) of Phase" appears Follow the procedure below to check the speaker connections. This completes optimization of the speaker settings. •...
... the speaker is connected incorrectly: Turn off the unit, reconnect the speaker cable, and then try YPAO measurement again. a Use the cursor keys to select "Wiring". If "W-1:Out of the speaker that was identified as on the type of AV equipment). c Check the cable connections (+/-) of Phase" appears Follow the procedure below to check the speaker connections. This completes optimization of the speaker settings. •...
Easy Start Guide
Page 9
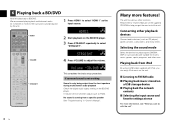
.../MENU OPTION ENTER RETURN MODE TUNING DISPLAY BAND PRESET MOVIE INFO SUR. No sound is only being output from the front speakers during multichannel audio playback Check the digital audio output setting on the supplied CD-ROM to 2-channel output (such as CD player), game consoles, camcorders, and many others. Playing back from a specific speaker See "Troubleshooting" in "Owner's Manual". 6 Playing back a BD/DVD Now let's play back a BD/DVD. HDMI1 VOL. Selecting the sound mode Select the desired sound program (CINEMA DSP) or surround...
.../MENU OPTION ENTER RETURN MODE TUNING DISPLAY BAND PRESET MOVIE INFO SUR. No sound is only being output from the front speakers during multichannel audio playback Check the digital audio output setting on the supplied CD-ROM to 2-channel output (such as CD player), game consoles, camcorders, and many others. Playing back from a specific speaker See "Troubleshooting" in "Owner's Manual". 6 Playing back a BD/DVD Now let's play back a BD/DVD. HDMI1 VOL. Selecting the sound mode Select the desired sound program (CINEMA DSP) or surround...
Easy Start Guide
Page 18
© 2012 Yamaha Corporation Printed in Malaysia ZA83170
© 2012 Yamaha Corporation Printed in Malaysia ZA83170


