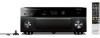
Owners Manual
Page 3
... HDMI video output (MONITOR CHECK 121 Backing up/recovering the settings (RECOV./BACKUP 122 Restoring the default settings (INITIALIZE 122 Updating the firmware (FIRM UPDATE 122 Checking the firmware version (VERSION 122 Controlling external devices with the remote control 123 Setting remote control codes 123 Programming from other remote controls (learning 125... Editing device names 126 Operating multiple functions at once (macro 127 Resetting the remote control configurations 129 Using the simplified remote control 131 Updating the firmware of this unit 132 En 3
... HDMI video output (MONITOR CHECK 121 Backing up/recovering the settings (RECOV./BACKUP 122 Restoring the default settings (INITIALIZE 122 Updating the firmware (FIRM UPDATE 122 Checking the firmware version (VERSION 122 Controlling external devices with the remote control 123 Setting remote control codes 123 Programming from other remote controls (learning 125... Editing device names 126 Operating multiple functions at once (macro 127 Resetting the remote control configurations 129 Using the simplified remote control 131 Updating the firmware of this unit 132 En 3

Owners Manual
Page 7
...time for auto-standby (p.115). If this I want to the Internet, the corresponding message will be displayed on the TV when a newer firmware is connected to connect a playback device using HDMI for video and non-HDMI for the corresponding input source (p.92). At time like this ... Use "Lipsync" in the "Setup" menu to create a natural stereoscopic sound field in the "ADVANCED SETUP" menu to update the firmware of this unit to update the firmware... There are not synchronized... Use "Audio Select" in use... I want to enjoy Hi-Fi sound quality. ● Easy operation ...
...time for auto-standby (p.115). If this I want to the Internet, the corresponding message will be displayed on the TV when a newer firmware is connected to connect a playback device using HDMI for video and non-HDMI for the corresponding input source (p.92). At time like this ... Use "Lipsync" in the "Setup" menu to create a natural stereoscopic sound field in the "ADVANCED SETUP" menu to update the firmware of this unit to update the firmware... There are not synchronized... Use "Audio Select" in use... I want to enjoy Hi-Fi sound quality. ● Easy operation ...

Owners Manual
Page 119
... for Zone2 or Zone3 The volume setting for Zone2 or Zone3 Configuring the system settings (ADVANCED SETUP menu) You can update the firmware of the secondary DNS server MAC address Network connection status ■ System Displays the system information on this unit to standby mode....(p.121) Speaker Impedance The speaker impedance setting of this unit (p.120) System ID System ID number Firmware Version The version of firmware installed on this unit • If this unit detects a newer firmware over the network, "!" (exclamation mark) appears at the upper right of the "Information" and ...
... for Zone2 or Zone3 The volume setting for Zone2 or Zone3 Configuring the system settings (ADVANCED SETUP menu) You can update the firmware of the secondary DNS server MAC address Network connection status ■ System Displays the system information on this unit to standby mode....(p.121) Speaker Impedance The speaker impedance setting of this unit (p.120) System ID System ID number Firmware Version The version of firmware installed on this unit • If this unit detects a newer firmware over the network, "!" (exclamation mark) appears at the upper right of the "Information" and ...
Owners Manual
Page 120
Select this when you cannot control this unit from the backup. 122 Restores the default settings. 122 Updates the firmware. 122 Checks the version of firmware currently installed on HDMI video output. 121 Creates backup of the settings of this when you can also use 4-ohm speakers... as the front speakers. Settings ON (default) OFF Turns on the main unit. When using multiple Yamaha AV receivers, you connect 6-...
Select this when you cannot control this unit from the backup. 122 Restores the default settings. 122 Updates the firmware. 122 Checks the version of firmware currently installed on HDMI video output. 121 Creates backup of the settings of this when you can also use 4-ohm speakers... as the front speakers. Settings ON (default) OFF Turns on the main unit. When using multiple Yamaha AV receivers, you connect 6-...
Owners Manual
Page 122
.../recovery procedure 1 Press STRAIGHT repeatedly to select "BACKUP" or "RECOVERY" and press INFO to the Internet, you can also update the firmware of this unit in the "Information" menu. Choices VIDEO ALL CANCEL Restores the default settings for the selected item. Restores the default settings...4 ENHANCER SLEEP HD 3 FIRM UPDATE MUTE VOLUME U S B ADAPTIVE DRC PL L C R PR SL SW1 SW SW2 SR PL SBL SB SBR PR ■ Firmware update procedure Do not perform this unit. Note • Do not turn off this unit. Restoring the default settings (INITIALIZE) SP IMP. - Updating the...
.../recovery procedure 1 Press STRAIGHT repeatedly to select "BACKUP" or "RECOVERY" and press INFO to the Internet, you can also update the firmware of this unit in the "Information" menu. Choices VIDEO ALL CANCEL Restores the default settings for the selected item. Restores the default settings...4 ENHANCER SLEEP HD 3 FIRM UPDATE MUTE VOLUME U S B ADAPTIVE DRC PL L C R PR SL SW1 SW SW2 SR PL SBL SB SBR PR ■ Firmware update procedure Do not perform this unit. Note • Do not turn off this unit. Restoring the default settings (INITIALIZE) SP IMP. - Updating the...
Owners Manual
Page 132
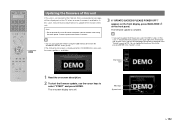
... "START" and press ENTER. Information icon 1 Read the on the TV when a newer firmware is available. Firmware update takes about 15 minutes. • You can update the firmware of this unit by pressing ENTER in the "System" screen (p.119). Message System icon En.... Note • Do not operate this unit. appears on the front display, press MAIN ZONE on -screen display turns off. You can also update the firmware using the USB memory device from the "ADVANCED SETUP" menu (p.122). SOURCE RECEIVER AV 1 2 3 5 6 7 AUDIO 1 2 3 PHONO MULTI DOCK TUNER USB [A] SCENE 1 ...
... "START" and press ENTER. Information icon 1 Read the on the TV when a newer firmware is available. Firmware update takes about 15 minutes. • You can update the firmware of this unit by pressing ENTER in the "System" screen (p.119). Message System icon En.... Note • Do not operate this unit. appears on the front display, press MAIN ZONE on -screen display turns off. You can also update the firmware using the USB memory device from the "ADVANCED SETUP" menu (p.122). SOURCE RECEIVER AV 1 2 3 5 6 7 AUDIO 1 2 3 PHONO MULTI DOCK TUNER USB [A] SCENE 1 ...


