
Owner's Manual
Page 2
... the antenna lead-in to products distributed by Yamaha Corporation of America or its subsidiaries. * This applies only to the following measures: Relocate either this product or the device that may cause undesired operation. If you can be determined by turning the unit "OFF" and "ON", please try to use only high quality shielded cables. Operation is 300 ohm ribbon lead, change...
... the antenna lead-in to products distributed by Yamaha Corporation of America or its subsidiaries. * This applies only to the following measures: Relocate either this product or the device that may cause undesired operation. If you can be determined by turning the unit "OFF" and "ON", please try to use only high quality shielded cables. Operation is 300 ohm ribbon lead, change...
Owner's Manual
Page 3
... media (compact discs, digital versatile discs, semiconductor chips, hard drives, memory cards and the like). An independent license for future reference. * This applies only to the following two conditions: 1) this device may not cause harmful interference, and 2) this unit in the space below. The serial number is subject to products distributed by YAMAHA CORPORATION OF AMERICA. (FCC DoC) IMPORTANT Please record the serial number of the unit. Operation...
... media (compact discs, digital versatile discs, semiconductor chips, hard drives, memory cards and the like). An independent license for future reference. * This applies only to the following two conditions: 1) this device may not cause harmful interference, and 2) this unit in the space below. The serial number is subject to products distributed by YAMAHA CORPORATION OF AMERICA. (FCC DoC) IMPORTANT Please record the serial number of the unit. Operation...

Owner's Manual
Page 4
... (such as water seeps into any way. WARNING Location • Do not expose the device to be dropped or damaged, immediately turn off the power and have the device inspected by qualified Yamaha service personnel. (5)-6 1/3 4 Owner's Manual Then have the device inspected by qualified Yamaha service personnel. If you or others, or damage to prevent the possibility of serious injury or...
... (such as water seeps into any way. WARNING Location • Do not expose the device to be dropped or damaged, immediately turn off the power and have the device inspected by qualified Yamaha service personnel. (5)-6 1/3 4 Owner's Manual Then have the device inspected by qualified Yamaha service personnel. If you or others, or damage to prevent the possibility of serious injury or...
Owner's Manual
Page 7
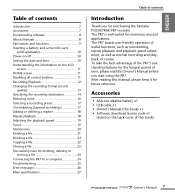
... Yamaha POCKETRAK PR7 recorder. After reading this book) x1 • Software download license code x1 (listed on the LCD screen 11 HOME screen 11 Disabling all control buttons 11 Recording/Playback 12 Changing the recording format (sound quality 13 Specifying the recording destination 14 Reducing noise 16 Selecting a recording preset 17 Overdubbing (Layered recordings 17 Adding or deleting a marker 18 Repeat playback 18 Adjusting the playback speed 19 Tuner 19 Metronome 20 Deleting a file 21 Dividing a file 22 Copying a file 22 Moving a file...
... Yamaha POCKETRAK PR7 recorder. After reading this book) x1 • Software download license code x1 (listed on the LCD screen 11 HOME screen 11 Disabling all control buttons 11 Recording/Playback 12 Changing the recording format (sound quality 13 Specifying the recording destination 14 Reducing noise 16 Selecting a recording preset 17 Overdubbing (Layered recordings 17 Adding or deleting a marker 18 Repeat playback 18 Adjusting the playback speed 19 Tuner 19 Metronome 20 Deleting a file 21 Dividing a file 22 Copying a file 22 Moving a file...
Owner's Manual
Page 8
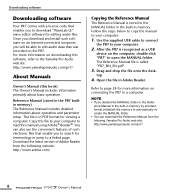
... operation. After the PR7 is called "PR7_RM_EN.pdf". 3. Drag and drop the file onto the desk- ence Manual in the built-in Adobe Reader. You can download the Reference Manual from the following Yamaha Pro Audio web site: http://www.yamahaproaudio.com/pr7/ 8 Owner's Manual The Reference Manual file is recognized as a USB device on the PR7. Downloading software Downloading software Your PR7 comes with a license code that was recorded...
... operation. After the PR7 is called "PR7_RM_EN.pdf". 3. Drag and drop the file onto the desk- ence Manual in the built-in Adobe Reader. You can download the Reference Manual from the following Yamaha Pro Audio web site: http://www.yamahaproaudio.com/pr7/ 8 Owner's Manual The Reference Manual file is recognized as a USB device on the PR7. Downloading software Downloading software Your PR7 comes with a license code that was recorded...
Owner's Manual
Page 13
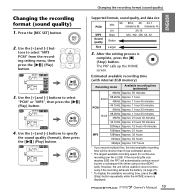
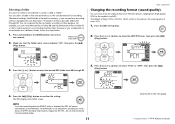
... [ ] (Play) button. However, the unit will be shorter than those estimated above. * The largest available recording space (for continuous recording) per file is 2GB. Changing the recording format (sound quality) 1. Use the [+] and [-] buttons to record continuously if the recording exhausts the battery (➔ page 27). * To display the available recording time, press the [■] (Stop) button repeatedly while the HOME screen is complete, press the [■] (Stop) button. Estimated available recording time (with internal 2GB memory) Recording mode...
... [ ] (Play) button. However, the unit will be shorter than those estimated above. * The largest available recording space (for continuous recording) per file is 2GB. Changing the recording format (sound quality) 1. Use the [+] and [-] buttons to record continuously if the recording exhausts the battery (➔ page 27). * To display the available recording time, press the [■] (Stop) button repeatedly while the HOME screen is complete, press the [■] (Stop) button. Estimated available recording time (with internal 2GB memory) Recording mode...
Owner's Manual
Page 15
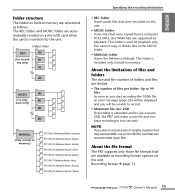
... MANUAL (Only in built-in memory) PR7_RM_JA (Reference Manual, Japanese) PR7_RM_EN (Reference Manual, English) PR7_RM_DE (Reference Manual, German) PR7_RM_FR (Reference Manual, French) PR7_RM_ES (Reference Manual, Spanish) PR7_RM_IT (Reference Manual, Italian) PR7_RM_RU (Reference Manual, Russian) PR7_RM_ZH (Reference Manual, Chinese) Specifying the recording destination • REC folder Stores audio files that were recorded on the unit. • MUSIC folder Stores files that are available as recording format options on a microSD card when the card is used for playback. This folder...
... MANUAL (Only in built-in memory) PR7_RM_JA (Reference Manual, Japanese) PR7_RM_EN (Reference Manual, English) PR7_RM_DE (Reference Manual, German) PR7_RM_FR (Reference Manual, French) PR7_RM_ES (Reference Manual, Spanish) PR7_RM_IT (Reference Manual, Italian) PR7_RM_RU (Reference Manual, Russian) PR7_RM_ZH (Reference Manual, Chinese) Specifying the recording destination • REC folder Stores audio files that were recorded on the unit. • MUSIC folder Stores files that are available as recording format options on a microSD card when the card is used for playback. This folder...

Owner's Manual
Page 16
... recording setting menu, then press the [ ] (Play) button. The PR7 calls up the HOME screen. 4. Use the [+] and [-] buttons to select "HPF" from the recording setting menu, then press the [ ] (Play) button. 3. After the setting process is complete, press the [■] (Stop) button. The PR7 calls up the HOME screen. 16 Owner's Manual Press the [REC SET] button. 2. Preventing excessive input level (Dynamics control) This function prevents excessive input levels that could cause audio clipping or noise. 1. Press the [REC SET] button. 2. After the setting...
... recording setting menu, then press the [ ] (Play) button. The PR7 calls up the HOME screen. 4. Use the [+] and [-] buttons to select "HPF" from the recording setting menu, then press the [ ] (Play) button. 3. After the setting process is complete, press the [■] (Stop) button. The PR7 calls up the HOME screen. 16 Owner's Manual Press the [REC SET] button. 2. Preventing excessive input level (Dynamics control) This function prevents excessive input levels that could cause audio clipping or noise. 1. Press the [REC SET] button. 2. After the setting...
Owner's Manual
Page 17
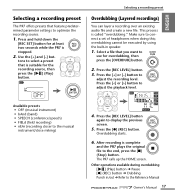
... a new file. Overdubbing starts. 6. After recording is called "overdubbing." This process is complete and the PR7 plays the original file to the end, press the [■] (Stop) button. Select a file that feature predetermined parameter settings to the Reference Manual Owner's Manual 17 Other operations available during overdubbing [ ] (Play) button ➔ Pause [●] (REC) button ➔ Dubbing Punch in speaker. 1. Make sure to adjust the playback level. overdubbing cannot be executed by using the...
... a new file. Overdubbing starts. 6. After recording is called "overdubbing." This process is complete and the PR7 plays the original file to the end, press the [■] (Stop) button. Select a file that feature predetermined parameter settings to the Reference Manual Owner's Manual 17 Other operations available during overdubbing [ ] (Play) button ➔ Pause [●] (REC) button ➔ Dubbing Punch in speaker. 1. Make sure to adjust the playback level. overdubbing cannot be executed by using the...
Owner's Manual
Page 25
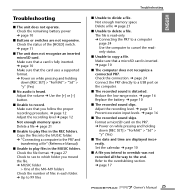
... 99 files Troubleshooting ■ Unable to the end. Adjust the volume ➔ Use the [+] or [-] button. ■ Unable to delete a file. Check the remaining battery power ➔ page 10 ■ Buttons or switches are displayed incorrectly. Copy the files into the MUSIC folder. ➔ "Connecting a computer to the PR7 and transferring a file" (Reference Manual) ■ Unable to copy a file. Refer to a USB port on while pressing and holding down [REC SET] > "ForMAt" > "Sd" > "y" (Yes) ■ The date and time...
... 99 files Troubleshooting ■ Unable to the end. Adjust the volume ➔ Use the [+] or [-] button. ■ Unable to delete a file. Check the remaining battery power ➔ page 10 ■ Buttons or switches are displayed incorrectly. Copy the files into the MUSIC folder. ➔ "Connecting a computer to the PR7 and transferring a file" (Reference Manual) ■ Unable to copy a file. Refer to a USB port on while pressing and holding down [REC SET] > "ForMAt" > "Sd" > "y" (Yes) ■ The date and time...
Owner's Manual
Page 26
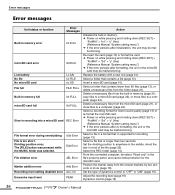
... middle. The [FILE] button was pressed while the MUSIC folder was selected. Select a folder that is supported for the microSD card. Select a folder that is too short. Select the REC folder (page 14). Insert a microSD card (page 10). Delete unnecessary files from the folder (page 21). Adjust the recording level (page 18) Dynamics control (page 16) 26 Owner's Manual Error messages Error messages Unit status or function Built-in memory error Error Messages Int Error microSD card error Low battery No file No microSD card File full Built...
... middle. The [FILE] button was pressed while the MUSIC folder was selected. Select a folder that is supported for the microSD card. Select a folder that is too short. Select the REC folder (page 14). Insert a microSD card (page 10). Delete unnecessary files from the folder (page 21). Adjust the recording level (page 18) Dynamics control (page 16) 26 Owner's Manual Error messages Error messages Unit status or function Built-in memory error Error Messages Int Error microSD card error Low battery No file No microSD card File full Built...
Owner's Manual
Page 27
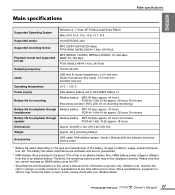
... check with the software download license code) * Battery life varies depending on the type and manufacturer of an alkaline battery. Owner's Manual 27 Main specifications Main specifications Supported Operating System Windows 8, 7, Vista, XP Professional/Home Edition Mac OS X 10.4, 10.5, 10.6, 10.7, 10.8 Supported media microSD/SDHC card Supported recording format MP3 (32/64/128/192/320 kbps) PCM (WAV) (96/88.2/48/44.1 kHz, 24/16-bit) Playback format and supported bit rate...
... check with the software download license code) * Battery life varies depending on the type and manufacturer of an alkaline battery. Owner's Manual 27 Main specifications Main specifications Supported Operating System Windows 8, 7, Vista, XP Professional/Home Edition Mac OS X 10.4, 10.5, 10.6, 10.7, 10.8 Supported media microSD/SDHC card Supported recording format MP3 (32/64/128/192/320 kbps) PCM (WAV) (96/88.2/48/44.1 kHz, 24/16-bit) Playback format and supported bit rate...
Reference Manual
Page 2
...the MUSIC folder 34 Downloading software 34 Other Functions 35 Using the system setting menu 35 Accessing the system setting menu 35 Setting the calendar 35 Initializing all parameters to factory default settings 36 Formatting (Initializing) the built-in memory and a microSD card 36 Switching the REC LED on or off 7 Setting the calendar 7 HOME screen 8 Basic Operation 9 Recording/stopping/playing back/setting the recording and playback levels ..... 9 Selecting the save destination for a recorded file 10 Changing the recording format (sound quality 11 Adjusting the playback speed...
...the MUSIC folder 34 Downloading software 34 Other Functions 35 Using the system setting menu 35 Accessing the system setting menu 35 Setting the calendar 35 Initializing all parameters to factory default settings 36 Formatting (Initializing) the built-in memory and a microSD card 36 Switching the REC LED on or off 7 Setting the calendar 7 HOME screen 8 Basic Operation 9 Recording/stopping/playing back/setting the recording and playback levels ..... 9 Selecting the save destination for a recorded file 10 Changing the recording format (sound quality 11 Adjusting the playback speed...
Reference Manual
Page 3
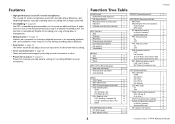
... adjusts excessive input levels for distortion-free recording. • Tuner and metronome ➔ page 24 Tuner and metronome support practicing musical instruments or choir. • Presets for musicians ➔ page 15 Presets for musicians provide optimal settings for repeating playback, and can be edited as many times as voices or musical performances) on top of an already-recorded sound. Function Tree Table HOME screen Folder/File number indication File date indication Recording format (sound quality) indication Available recording time indication Main functions Stop Playback...
... adjusts excessive input levels for distortion-free recording. • Tuner and metronome ➔ page 24 Tuner and metronome support practicing musical instruments or choir. • Presets for musicians ➔ page 15 Presets for musicians provide optimal settings for repeating playback, and can be edited as many times as voices or musical performances) on top of an already-recorded sound. Function Tree Table HOME screen Folder/File number indication File date indication Recording format (sound quality) indication Available recording time indication Main functions Stop Playback...

Reference Manual
Page 4
... Manual Using the tuner ➔ page 24 Using the metronome ➔ page 25 Adjusting the playback speed ➔ page 26 B [+]/[-] buttons Adjust the PR7's audio volume if the HOME screen is displayed. During playback, these buttons are used to select an audio file or navigate the screen. While the LCD screen displays any setting screen is displayed to switch to turn the power 5 on. A 0 Folder name and file number ➔ Date and time ➔ Recording format for overdubbing. B About HOME screen ➔ page 8 5 [●] (Record) button Stands by, starts...
... Manual Using the tuner ➔ page 24 Using the metronome ➔ page 25 Adjusting the playback speed ➔ page 26 B [+]/[-] buttons Adjust the PR7's audio volume if the HOME screen is displayed. During playback, these buttons are used to select an audio file or navigate the screen. While the LCD screen displays any setting screen is displayed to switch to turn the power 5 on. A 0 Folder name and file number ➔ Date and time ➔ Recording format for overdubbing. B About HOME screen ➔ page 8 5 [●] (Record) button Stands by, starts...
Reference Manual
Page 11
... recording. Basic Operation Changing the recording format (sound quality) You can store rehearsal files in folder R0 and live performance files in memory provides folders R0 through R9. 3. Press and hold down the [MENU] button for at least two seconds. Press the [REC SET] button. 2. Press the [+] or [-] button to the smallest-size MP3. Press the [+] or [-] button to find and record into a different folder, follow the steps below: 1. The default setting...
... recording. Basic Operation Changing the recording format (sound quality) You can store rehearsal files in folder R0 and live performance files in memory provides folders R0 through R9. 3. Press and hold down the [MENU] button for at least two seconds. Press the [REC SET] button. 2. Press the [+] or [-] button to the smallest-size MP3. Press the [+] or [-] button to find and record into a different folder, follow the steps below: 1. The default setting...

Reference Manual
Page 12
... one file is more important: sound quality or data size. However, the unit will increase. 5. We recommend that suits the purpose. Basic Operation Estimated available recording time (with rates of 320 through 128kbps. If you want to record audio with a sound quality that you select a recording format, first consider which the sounds of nature are recorded with internal 2GB memory) Recording mode Available recording time (estimated) Recording mode Available recording time (estimated...
... one file is more important: sound quality or data size. However, the unit will increase. 5. We recommend that suits the purpose. Basic Operation Estimated available recording time (with rates of 320 through 128kbps. If you want to record audio with a sound quality that you select a recording format, first consider which the sounds of nature are recorded with internal 2GB memory) Recording mode Available recording time (estimated) Recording mode Available recording time (estimated...

Reference Manual
Page 15
... desired preset from a device connected to the MIC/LINE IN (external input) jack, you use this function only when recording with microphones. 1. Basic Operation Switching the external device setting If you record audio from the following specifications as an external condenser microphone. NOTE Yamaha recommends that features plug-in device), then press the [ ] (Play) button. 4. Press the [REC SET] button. 2. NOTE You can use a microphone with a tonal quality that suits the musical instrument (Selecting a preset) The PR7 offers presets that automatically adjust tonal qualities...
... desired preset from a device connected to the MIC/LINE IN (external input) jack, you use this function only when recording with microphones. 1. Basic Operation Switching the external device setting If you record audio from the following specifications as an external condenser microphone. NOTE Yamaha recommends that features plug-in device), then press the [ ] (Play) button. 4. Press the [REC SET] button. 2. NOTE You can use a microphone with a tonal quality that suits the musical instrument (Selecting a preset) The PR7 offers presets that automatically adjust tonal qualities...

Reference Manual
Page 20
... MUSIC folder as the original file, the PR7 will not be in the current folder, use for overdubbing. Folder name/ File number Time Overdubbing Overdubbing (Layered Recordings) Preparing for overdubbing The following inputs and outputs are available for playback or to Marker mode and add a marker using the [] button. Select an audio file for overdubbing must be recorded again.) Original audio files that you can switch to fast reverse or fast forward the audio file using the [+] button...
... MUSIC folder as the original file, the PR7 will not be in the current folder, use for overdubbing. Folder name/ File number Time Overdubbing Overdubbing (Layered Recordings) Preparing for overdubbing The following inputs and outputs are available for playback or to Marker mode and add a marker using the [] button. Select an audio file for overdubbing must be recorded again.) Original audio files that you can switch to fast reverse or fast forward the audio file using the [+] button...
Reference Manual
Page 32
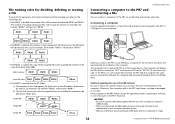
... USB cable, be sure to the PR7 via a USB cable and transfer audio files. The unit does not support a USB3.0 cable. • When you format the card on the PR7). If the computer or the PR7 freezes, restart the operating system or application software, or turn the power to a USB port on your Windows computer for the first time, the driver will automatically be installed on . Connecting a computer Use the supplied USB cable to connect the USB...
... USB cable, be sure to the PR7 via a USB cable and transfer audio files. The unit does not support a USB3.0 cable. • When you format the card on the PR7). If the computer or the PR7 freezes, restart the operating system or application software, or turn the power to a USB port on your Windows computer for the first time, the driver will automatically be installed on . Connecting a computer Use the supplied USB cable to connect the USB...


