
Owner's Manual
Page 3
...FCC Rules. An independent license for future reference. * This applies only to products distributed by YAMAHA CORPORATION OF AMERICA. (FCC DoC) IMPORTANT Please record the serial number of this product in the space below. For details, please visit http://... INFORMATION STATEMENT (DECLARATION OF CONFORMITY PROCEDURE) Responsible Party : Yamaha Corporation of America Address : 6600 Orangethorpe Ave., Buena Park, Calif. 90620 Telephone : 714-522-9011 Type of Equipment : RECORDER Model Name : POCKETRAK PR7 This device complies with this unit in revenue-generating broadcast...
...FCC Rules. An independent license for future reference. * This applies only to products distributed by YAMAHA CORPORATION OF AMERICA. (FCC DoC) IMPORTANT Please record the serial number of this product in the space below. For details, please visit http://... INFORMATION STATEMENT (DECLARATION OF CONFORMITY PROCEDURE) Responsible Party : Yamaha Corporation of America Address : 6600 Orangethorpe Ave., Buena Park, Calif. 90620 Telephone : 714-522-9011 Type of Equipment : RECORDER Model Name : POCKETRAK PR7 This device complies with this unit in revenue-generating broadcast...

Owner's Manual
Page 6
... insert the microSD card in the wrong orientation or upside down, the microSD card and/or the card slot may be damaged. • If the recorder does not recognize the installed microSD card when the power to the unit is turned on, first turn off the power, remove the card, insert...
... insert the microSD card in the wrong orientation or upside down, the microSD card and/or the card slot may be damaged. • If the recorder does not recognize the installed microSD card when the power to the unit is turned on, first turn off the power, remove the card, insert...
Owner's Manual
Page 7
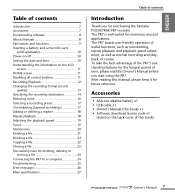
...LCD screen 11 HOME screen 11 Disabling all control buttons 11 Recording/Playback 12 Changing the recording format (sound quality 13 Specifying the recording destination 14 Reducing noise 16 Selecting a recording preset 17 Overdubbing (Layered recordings 17 Adding or deleting a marker 18 Repeat playback 18 Adjusting...20 Deleting a file 21 Dividing a file 22 Copying a file 22 Moving a file 23 File naming rules for purchasing the Yamaha POCKETRAK PR7 recorder. To take the best advantage of the PR7's outstanding features for the longest period of time, please read this Owner's Manual...
...LCD screen 11 HOME screen 11 Disabling all control buttons 11 Recording/Playback 12 Changing the recording format (sound quality 13 Specifying the recording destination 14 Reducing noise 16 Selecting a recording preset 17 Overdubbing (Layered recordings 17 Adding or deleting a marker 18 Repeat playback 18 Adjusting...20 Deleting a file 21 Dividing a file 22 Copying a file 22 Moving a file 23 File naming rules for purchasing the Yamaha POCKETRAK PR7 recorder. To take the best advantage of the PR7's outstanding features for the longest period of time, please read this Owner's Manual...
Owner's Manual
Page 8
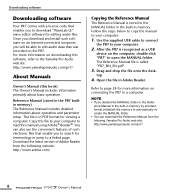
... information about basic operation. Once you download and install such software on an Internet-connected computer, you will be able to the Yamaha Pro Audio website: http://www.yamahaproaudio.com/pr7/ About Manuals Owner's Manual (this software, refer to edit audio data that enable... more information on the PR7. This file is called "PR7_RM_EN.pdf". 3. Download the latest version of such electronic files that was recorded on downloading this book) The Owner's Manual includes information primarily about operation and parameter setup. Follow the steps below to copy the ...
... information about basic operation. Once you download and install such software on an Internet-connected computer, you will be able to the Yamaha Pro Audio website: http://www.yamahaproaudio.com/pr7/ About Manuals Owner's Manual (this software, refer to edit audio data that enable... more information on the PR7. This file is called "PR7_RM_EN.pdf". 3. Download the latest version of such electronic files that was recorded on downloading this book) The Owner's Manual includes information primarily about operation and parameter setup. Follow the steps below to copy the ...

Owner's Manual
Page 9
... 1 Built-in microphones 2 REC LED 3 LCD screen 4 [OVERDUB] button 5 [MARK] button 6 [MENU] button (Press and hold down this button to display the Folder screen.) 7 [●] (Record) button 8 [■] (Stop) button (Power on/Power off by pressing and holding down this button) 9 [REC LEVEL] button 0 [+]/[-] buttons A [] buttons B [ ] (Play) button C [REC SET] button...
... 1 Built-in microphones 2 REC LED 3 LCD screen 4 [OVERDUB] button 5 [MARK] button 6 [MENU] button (Press and hold down this button to display the Folder screen.) 7 [●] (Record) button 8 [■] (Stop) button (Power on/Power off by pressing and holding down this button) 9 [REC LEVEL] button 0 [+]/[-] buttons A [] buttons B [ ] (Play) button C [REC SET] button...

Owner's Manual
Page 11
...screen HOME screen You can use the [HOLD] switch even during recording or playback. • If you turn on the LCD screen 36 7 1 2 4 5 8 1 Remaining battery power 2 Menu items 3 Play/Record/Repeat indicators 4 Meter 5 Playback/Recording time, Remain- Hold "on" NOTE • You can select...the [HOLD] switch upward. Please refer to the "Other Functions" section in the file Option 3 kbps Option 4 File recording start time REMAIN Recording format Duration of four possible HOME screens using the system setting menu. Option 1 Option 2 Folder/File number Current position ...
...screen HOME screen You can use the [HOLD] switch even during recording or playback. • If you turn on the LCD screen 36 7 1 2 4 5 8 1 Remaining battery power 2 Menu items 3 Play/Record/Repeat indicators 4 Meter 5 Playback/Recording time, Remain- Hold "on" NOTE • You can select...the [HOLD] switch upward. Please refer to the "Other Functions" section in the file Option 3 kbps Option 4 File recording start time REMAIN Recording format Duration of four possible HOME screens using the system setting menu. Option 1 Option 2 Folder/File number Current position ...
Owner's Manual
Page 12
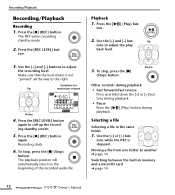
...To stop , press the [■] (Stop) button. Press the [REC LEVEL] but - Playback 1. Up tons to call up the recording standby screen. 5. The PR7 enters recording standby mode. 2. Press the [REC LEVEL] button again to adjust the play- Use the [+] and [-] buttons to the beginning of ...the recorded audio file. Use the [] but - The playback position will automatically return to adjust the recording level. Press the [●] (REC) button. Recording starts. 6. Down Other controls during playback • Fast forward/fast ...
...To stop , press the [■] (Stop) button. Press the [REC LEVEL] but - Playback 1. Up tons to call up the recording standby screen. 5. The PR7 enters recording standby mode. 2. Press the [REC LEVEL] button again to adjust the play- Use the [+] and [-] buttons to the beginning of ...the recorded audio file. Use the [] but - The playback position will automatically return to adjust the recording level. Press the [●] (REC) button. Recording starts. 6. Down Other controls during playback • Fast forward/fast ...
Owner's Manual
Page 13
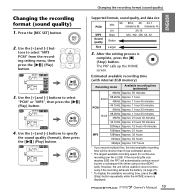
... sound quality (format), then press the [ ] (Play) button. Press the [REC SET] button. 2. Use the [+] and [-] but- Changing the recording format (sound quality) Supported formats, sound quality, and data size PCM MP3 Sound quality kHz bit kbps 96, 88.2, 48, 44.1 (indicated as 88... Approx. 21 hours 128kbps Approx. 32 hours 64kbps Approx. 64 hours 32kbps Approx. 127 hours * If you record multiple files, the total available recording time will automatically continue recording into a subsequent file (when using a microSDHC card). However, the unit will be shorter than those estimated above...
... sound quality (format), then press the [ ] (Play) button. Press the [REC SET] button. 2. Use the [+] and [-] but- Changing the recording format (sound quality) Supported formats, sound quality, and data size PCM MP3 Sound quality kHz bit kbps 96, 88.2, 48, 44.1 (indicated as 88... Approx. 21 hours 128kbps Approx. 32 hours 64kbps Approx. 64 hours 32kbps Approx. 127 hours * If you record multiple files, the total available recording time will automatically continue recording into a subsequent file (when using a microSDHC card). However, the unit will be shorter than those estimated above...

Owner's Manual
Page 14
...then press the [ ] (Play) button. Use the [+] and [-] buttons to select "SD" from the recording setting menu, then press the [ ] (Play) button. Selecting the recording destination folder 1. After the setting process is confirmed, the PR7 automatically calls up the HOME screen. 3. Press ... calls up the HOME screen. 14 Owner's Manual After the setting is complete, press the [■] (Stop) button. Specifying the recording destination Specifying the recording destination Switching between the built-in memory) or "Sd" (microSD card), then press the [ ] (Play) button. 4. Use ...
...then press the [ ] (Play) button. Use the [+] and [-] buttons to select "SD" from the recording setting menu, then press the [ ] (Play) button. Selecting the recording destination folder 1. After the setting process is confirmed, the PR7 automatically calls up the HOME screen. 3. Press ... calls up the HOME screen. 14 Owner's Manual After the setting is complete, press the [■] (Stop) button. Specifying the recording destination Specifying the recording destination Switching between the built-in memory) or "Sd" (microSD card), then press the [ ] (Play) button. 4. Use ...
Owner's Manual
Page 15
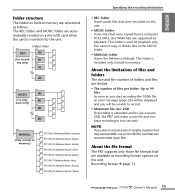
...Italian) PR7_RM_RU (Reference Manual, Russian) PR7_RM_ZH (Reference Manual, Chinese) Specifying the recording destination • REC folder Stores audio files that were recorded on the unit. • MUSIC folder Stores files that are available as recording format options on a microSD card when the card is extended and its size exceeds.... • The number of files per folder: Up to 99 files As soon as you start recording the 100th file, an error message (page 26) will be unable to record audio of lengthy duration that may exceed 2GB, use a microSDHC card that can accommodate large files....
...Italian) PR7_RM_RU (Reference Manual, Russian) PR7_RM_ZH (Reference Manual, Chinese) Specifying the recording destination • REC folder Stores audio files that were recorded on the unit. • MUSIC folder Stores files that are available as recording format options on a microSD card when the card is extended and its size exceeds.... • The number of files per folder: Up to 99 files As soon as you start recording the 100th file, an error message (page 26) will be unable to record audio of lengthy duration that may exceed 2GB, use a microSDHC card that can accommodate large files....

Owner's Manual
Page 16
Use the [+] and [-] buttons to select "HPF" from the recording setting menu, then press the [ ] (Play) button. 3. After the setting process is complete, press the [■] (Stop) button. After the setting process is complete, press ... LO" (for loud sounds), then press the [ ] (Play) button. 4. The PR7 calls up the HOME screen. 4. Use the [+] and [-] buttons to select "DYN" from the recording setting menu, then press the [ ] (Play) button. Use the [+] and [-] but - Press the [REC SET] button. 2. Reducing noise Reducing noise Preventing low-range noise (High...
Use the [+] and [-] buttons to select "HPF" from the recording setting menu, then press the [ ] (Play) button. 3. After the setting process is complete, press the [■] (Stop) button. After the setting process is complete, press ... LO" (for loud sounds), then press the [ ] (Play) button. 4. The PR7 calls up the HOME screen. 4. Use the [+] and [-] buttons to select "DYN" from the recording setting menu, then press the [ ] (Play) button. Use the [+] and [-] but - Press the [REC SET] button. 2. Reducing noise Reducing noise Preventing low-range noise (High...
Owner's Manual
Page 17
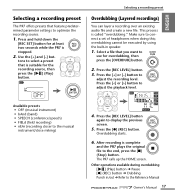
... the built-in /out ➔ Refer to adjust the recording level. The PR7 calls up the HOME screen. Select a file that you want to optimize the recording source. 1. Overdubbing starts. 6. Selecting a recording preset The PR7 offers presets that feature predetermined parameter settings to... [-] but- Available presets • OFF (musical instrument) • bAnd (band) • SPEECH (conference/speech) • FIELd (field recording) • nEAr (recording closer to display the previous screen. 5. Press the [REC LEVEL] button again to the musical instrument/close miking) 4.
... the built-in /out ➔ Refer to adjust the recording level. The PR7 calls up the HOME screen. Select a file that you want to optimize the recording source. 1. Overdubbing starts. 6. Selecting a recording preset The PR7 offers presets that feature predetermined parameter settings to... [-] but- Available presets • OFF (musical instrument) • bAnd (band) • SPEECH (conference/speech) • FIELd (field recording) • nEAr (recording closer to display the previous screen. 5. Press the [REC LEVEL] button again to the musical instrument/close miking) 4.
Owner's Manual
Page 18
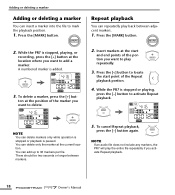
... play back between adjacent markers. 1. ton at the location where you want to mark the playback position. 1. Press the [ A numbered marker is stopped, playing, or recording, press the [+] button at the position of the portion you want to add a marker. Press the [MARK] button. 2. To delete a marker, press the [+] but- Press...
... play back between adjacent markers. 1. ton at the location where you want to mark the playback position. 1. Press the [ A numbered marker is stopped, playing, or recording, press the [+] button at the position of the portion you want to add a marker. Press the [MARK] button. 2. To delete a marker, press the [+] but- Press...

Owner's Manual
Page 19
... Tuner You can set the playback speed in the range of 96kHz/88.2kHz, you to change only the playback speed. • PCM: With files recorded at sampling rates of 50% to tune your musical instrument. 1. tons to specify the standard pitch (A=), then press the [ ] (Play) button. Setting range: 50%-200...
... Tuner You can set the playback speed in the range of 96kHz/88.2kHz, you to change only the playback speed. • PCM: With files recorded at sampling rates of 50% to tune your musical instrument. 1. tons to specify the standard pitch (A=), then press the [ ] (Play) button. Setting range: 50%-200...
Owner's Manual
Page 25
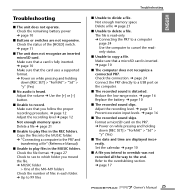
...unit does not recognize an inserted microSD card. Make sure that the card uses a supported format. ➔ Power on the computer. ■ The recorded sound is read-only. ➔ Connecting the PR7 to a computer page 24 Use the computer to cancel the readonly status. ■ Unable to...➔ page 17 Owner's Manual 25 Reduce the low-range noise. ➔ page 16 Replace the battery. ➔ page 10 ■ The recorded sound clips. Troubleshooting ■ The unit does not operate. Check the remaining battery power ➔ page 10 ■ Buttons or switches are displayed incorrectly...
...unit does not recognize an inserted microSD card. Make sure that the card uses a supported format. ➔ Power on the computer. ■ The recorded sound is read-only. ➔ Connecting the PR7 to a computer page 24 Use the computer to cancel the readonly status. ■ Unable to...➔ page 17 Owner's Manual 25 Reduce the low-range noise. ➔ page 16 Replace the battery. ➔ page 10 ■ The recorded sound clips. Troubleshooting ■ The unit does not operate. Check the remaining battery power ➔ page 10 ■ Buttons or switches are displayed incorrectly...
Owner's Manual
Page 26
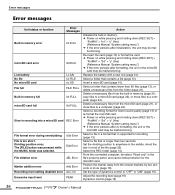
...Set the type of the file (page 22). dUb Error Edit Error File deletion error dEL Error Marker addition error Add Error Recording level setting disabled error ALC On Excessive input level PEAK Action Initialize the built-in the file's property panel, and cancel write-..." > "Int" > "y" (Yes) (Reference Manual "System setting menu.") ➔ If the error persists after initialization, the unit may be malfunctioning. Adjust the recording level (page 18) Dynamics control (page 16) 26 Owner's Manual Re-insert the card (page 10) or format the card. ➔ Power on while pressing...
...Set the type of the file (page 22). dUb Error Edit Error File deletion error dEL Error Marker addition error Add Error Recording level setting disabled error ALC On Excessive input level PEAK Action Initialize the built-in the file's property panel, and cancel write-..." > "Int" > "y" (Yes) (Reference Manual "System setting menu.") ➔ If the error persists after initialization, the unit may be malfunctioning. Adjust the recording level (page 18) Dynamics control (page 16) 26 Owner's Manual Re-insert the card (page 10) or format the card. ➔ Power on while pressing...
Owner's Manual
Page 27
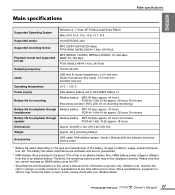
...: REC LED off, no recording monitoring) Battery life for playback through Alkaline battery: MP3 64 kbps approx. 30 hours headphones PCM 44.1 kHz 16-bit approx. 22 hours 30 minutes Battery life for information purposes only. AAA alkaline battery; Yamaha Corp. Also, NiMH battery power voltage is ...Supported Operating System Windows 8, 7, Vista, XP Professional/Home Edition Mac OS X 10.4, 10.5, 10.6, 10.7, 10.8 Supported media microSD/SDHC card Supported recording format MP3 (32/64/128/192/320 kbps) PCM (WAV) (96/88.2/48/44.1 kHz, 24/16-bit) Playback format and supported bit rate...
...: REC LED off, no recording monitoring) Battery life for playback through Alkaline battery: MP3 64 kbps approx. 30 hours headphones PCM 44.1 kHz 16-bit approx. 22 hours 30 minutes Battery life for information purposes only. AAA alkaline battery; Yamaha Corp. Also, NiMH battery power voltage is ...Supported Operating System Windows 8, 7, Vista, XP Professional/Home Edition Mac OS X 10.4, 10.5, 10.6, 10.7, 10.8 Supported media microSD/SDHC card Supported recording format MP3 (32/64/128/192/320 kbps) PCM (WAV) (96/88.2/48/44.1 kHz, 24/16-bit) Playback format and supported bit rate...
Reference Manual
Page 1
... diagram if you want to return to a page after you want to refer to a description of the screen or the various functions of the PR7. RECORDER Reference Manual Using the Reference Manual The PPOCKETRAK PR7 Reference Manual (this book) enables you are using Adobe Reader to display this book, you can...
... diagram if you want to return to a page after you want to refer to a description of the screen or the various functions of the PR7. RECORDER Reference Manual Using the Reference Manual The PPOCKETRAK PR7 Reference Manual (this book) enables you are using Adobe Reader to display this book, you can...
Reference Manual
Page 2
... or off 7 Setting the calendar 7 HOME screen 8 Basic Operation 9 Recording/stopping/playing back/setting the recording and playback levels ..... 9 Selecting the save destination for a recorded file 10 Changing the recording format (sound quality 11 Adjusting the playback speed 13 Fast forward and fast...a marker 17 Jumping to a marked position 18 Deleting a marker 18 Repeat playback between the markers 18 Overdubbing (Layered Recordings 20 Overdubbing mode screen 20 Overdubbing 20 Contents Functions Useful for Musical Instrument Practice 24 Using the tuner 24 Using the metronome...
... or off 7 Setting the calendar 7 HOME screen 8 Basic Operation 9 Recording/stopping/playing back/setting the recording and playback levels ..... 9 Selecting the save destination for a recorded file 10 Changing the recording format (sound quality 11 Adjusting the playback speed 13 Fast forward and fast...a marker 17 Jumping to a marked position 18 Deleting a marker 18 Repeat playback between the markers 18 Overdubbing (Layered Recordings 20 Overdubbing mode screen 20 Overdubbing 20 Contents Functions Useful for Musical Instrument Practice 24 Using the tuner 24 Using the metronome...
Reference Manual
Page 3
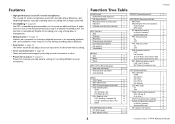
...9 9 13 13 20 17 18 18 9, 21 21 24 25 26 27 28 29 31 30 30 30 11, 27 27, 33 PRESET (Recording preset) REC MENU (Recording settings) MP3 PCM (Recording format [sound quality]) PCM (kHz/bit) MP3 (kbps) SD (Selecting memory) Int (Built-in memory) Sd (microSD card) PRC (Pre...instruments or choir. • Presets for musicians ➔ page 15 Presets for musicians provide optimal settings for recording different musical instruments. This function is tremendously helpful for recording your song writing ideas or arrangements. • Editing markers ➔ page 17 Markers are convenient for locating...
...9 9 13 13 20 17 18 18 9, 21 21 24 25 26 27 28 29 31 30 30 30 11, 27 27, 33 PRESET (Recording preset) REC MENU (Recording settings) MP3 PCM (Recording format [sound quality]) PCM (kHz/bit) MP3 (kbps) SD (Selecting memory) Int (Built-in memory) Sd (microSD card) PRC (Pre...instruments or choir. • Presets for musicians ➔ page 15 Presets for musicians provide optimal settings for recording different musical instruments. This function is tremendously helpful for recording your song writing ideas or arrangements. • Editing markers ➔ page 17 Markers are convenient for locating...


