
Owner's Manual
Page 3
... that may cause undesired operation. COMPLIANCE INFORMATION STATEMENT (DECLARATION OF CONFORMITY PROCEDURE) Responsible Party : Yamaha Corporation of America Address : 6600 Orangethorpe Ave., Buena Park, Calif. 90620 Telephone : 714-522-9011 Type of Equipment : RECORDER Model Name : POCKETRAK PR7 This device complies with this product in the space below. See user manual instructions if...
... that may cause undesired operation. COMPLIANCE INFORMATION STATEMENT (DECLARATION OF CONFORMITY PROCEDURE) Responsible Party : Yamaha Corporation of America Address : 6600 Orangethorpe Ave., Buena Park, Calif. 90620 Telephone : 714-522-9011 Type of Equipment : RECORDER Model Name : POCKETRAK PR7 This device complies with this product in the space below. See user manual instructions if...
Owner's Manual
Page 7
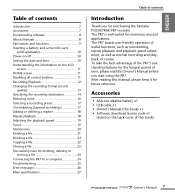
...of time, please read this book) Owner's Manual 7 To take the best advantage of the PR7's outstanding features for future reference. The PR7 boasts user-friendly operation of useful functions, such as overdubbing, repeat playback and playback speed adjustment, ...a computer 24 Troubleshooting 25 Error messages 26 Main specifications 27 Table of contents Introduction Thank you start using the PR7. The PR7 is well-suited for purchasing the Yamaha POCKETRAK PR7 recorder. Table of contents Introduction 7 Accessories 7 Downloading software 8 About Manuals 8 Part names and functions 9...
...of time, please read this book) Owner's Manual 7 To take the best advantage of the PR7's outstanding features for future reference. The PR7 boasts user-friendly operation of useful functions, such as overdubbing, repeat playback and playback speed adjustment, ...a computer 24 Troubleshooting 25 Error messages 26 Main specifications 27 Table of contents Introduction Thank you start using the PR7. The PR7 is well-suited for purchasing the Yamaha POCKETRAK PR7 recorder. Table of contents Introduction 7 Accessories 7 Downloading software 8 About Manuals 8 Part names and functions 9...
Owner's Manual
Page 8
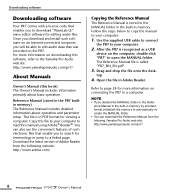
...http://www.adobe.com/ Copying the Reference Manual The Reference Manual is recognized as a USB device on connecting the PR7 to the Yamaha Pro Audio website: http://www.yamahaproaudio.com/pr7/ About Manuals Owner's Manual (this file to your computer: 1. Reference Manual (saved in memory. top. 4.... operation and parameter setup. Once you download and install such software on the PR7. You can download the Reference Manual from the following Yamaha Pro Audio web site: http://www.yamahaproaudio.com/pr7/ 8 Owner's Manual Drag and drop the file onto the desk- Open ...
...http://www.adobe.com/ Copying the Reference Manual The Reference Manual is recognized as a USB device on connecting the PR7 to the Yamaha Pro Audio website: http://www.yamahaproaudio.com/pr7/ About Manuals Owner's Manual (this file to your computer: 1. Reference Manual (saved in memory. top. 4.... operation and parameter setup. Once you download and install such software on the PR7. You can download the Reference Manual from the following Yamaha Pro Audio web site: http://www.yamahaproaudio.com/pr7/ 8 Owner's Manual Drag and drop the file onto the desk- Open ...
Owner's Manual
Page 10
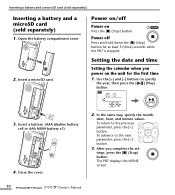
..., press the [] button. 3. To return to specify the year, then press the [ ] (Play) button. 3. tings, press the [■] (Stop) button. The PR7 displays the HOME screen. 10 Owner's Manual Power off Power on Press the [■] (Stop) button. Open the battery compartment cover. 2. Insert a battery. (AAA alkaline...set- In the same way, specify the month, date, hour, and minute values. Power on the unit for at least 3 (three) seconds while the PR7 is stopped. Close the cover. 2. Insert a microSD card. After you power on /off Press and hold down the [■] (Stop) button for ...
..., press the [] button. 3. To return to specify the year, then press the [ ] (Play) button. 3. tings, press the [■] (Stop) button. The PR7 displays the HOME screen. 10 Owner's Manual Power off Power on Press the [■] (Stop) button. Open the battery compartment cover. 2. Insert a battery. (AAA alkaline...set- In the same way, specify the month, date, hour, and minute values. Power on the unit for at least 3 (three) seconds while the PR7 is stopped. Close the cover. 2. Insert a microSD card. After you power on /off Press and hold down the [■] (Stop) button for ...
Owner's Manual
Page 12
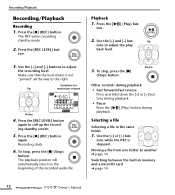
Press the [REC LEVEL] but - ton. 3. Up tons to adjust the recording level. The PR7 enters recording standby mode. 2. To stop , press the [■] (Stop) button. Use the [+] and [-] but - Down Other controls during playback • Fast forward/fast reverse .... ] (Play) but - Press the [●] (REC) button. Moving a file from one folder to the right. To stop , press the [■] (Stop) button. tons while the PR7 is not "pinned" all the way to another ➔ page 14 Switching between the built-in the same folder 1. Make sure that the level meter...
Press the [REC LEVEL] but - ton. 3. Up tons to adjust the recording level. The PR7 enters recording standby mode. 2. To stop , press the [■] (Stop) button. Use the [+] and [-] but - Down Other controls during playback • Fast forward/fast reverse .... ] (Play) but - Press the [●] (REC) button. Moving a file from one folder to the right. To stop , press the [■] (Stop) button. tons while the PR7 is not "pinned" all the way to another ➔ page 14 Switching between the built-in the same folder 1. Make sure that the level meter...
Owner's Manual
Page 13
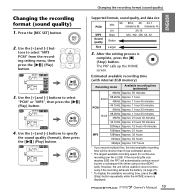
...88.2, 48, 44.1 (indicated as 88) (indicated as 44) 24,16 320, 192, 128, 64, 32 Better Size Larger 5. The PR7 calls up the HOME screen. Estimated available recording time (with internal 2GB memory) Recording mode Available recording time (estimated) 96kHz Approx. 55 minutes ... recording time, press the [■] (Stop) button repeatedly while the HOME screen is displayed. If the recording file size reaches 2GB, the PR7 will be shorter than those estimated above. * The largest available recording space (for continuous recording) per file is complete, press the [■]...
...88.2, 48, 44.1 (indicated as 88) (indicated as 44) 24,16 320, 192, 128, 64, 32 Better Size Larger 5. The PR7 calls up the HOME screen. Estimated available recording time (with internal 2GB memory) Recording mode Available recording time (estimated) 96kHz Approx. 55 minutes ... recording time, press the [■] (Stop) button repeatedly while the HOME screen is displayed. If the recording file size reaches 2GB, the PR7 will be shorter than those estimated above. * The largest available recording space (for continuous recording) per file is complete, press the [■]...

Owner's Manual
Page 14
... Switching between the built-in memory) or "Sd" (microSD card), then press the [ ] (Play) button. 4. After the setting process is confirmed, the PR7 automatically calls up the HOME screen. 3. tons to select a folder (R1, M1, etc.), then press the [ ] (Play) button. Press and hold down... the [MENU] button for playback only), then press the [ ] (Play) button. 3. The PR7 calls up the HOME screen. 14 Owner's Manual Use the [+] and [-] buttons to select "rEC" (REC/for recording only) or "MSC" (MUSIC/for at least...
... Switching between the built-in memory) or "Sd" (microSD card), then press the [ ] (Play) button. 4. After the setting process is confirmed, the PR7 automatically calls up the HOME screen. 3. tons to select a folder (R1, M1, etc.), then press the [ ] (Play) button. Press and hold down... the [MENU] button for playback only), then press the [ ] (Play) button. 3. The PR7 calls up the HOME screen. 14 Owner's Manual Use the [+] and [-] buttons to select "rEC" (REC/for recording only) or "MSC" (MUSIC/for at least...
Owner's Manual
Page 15
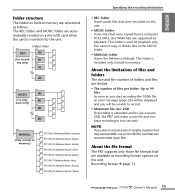
...of folders and files are available as recording format options on a microSD card when the card is extended and its size exceeds 2GB, the PR7 will be unable to 99 files As soon as follows: The REC folder and MUSIC folder are supported for playback only. NOTE If you ...in the MUSIC folder. • MANUAL folder Stores the Reference Manual. Recording format ➔ page 13 Owner's Manual 15 About the file format The PR7 supports only those file formats that were copied from a computer. PCM, MP3, and WMA files are automatically created on the unit. You cannot copy or...
...of folders and files are available as recording format options on a microSD card when the card is extended and its size exceeds 2GB, the PR7 will be unable to 99 files As soon as follows: The REC folder and MUSIC folder are supported for playback only. NOTE If you ...in the MUSIC folder. • MANUAL folder Stores the Reference Manual. Recording format ➔ page 13 Owner's Manual 15 About the file format The PR7 supports only those file formats that were copied from a computer. PCM, MP3, and WMA files are automatically created on the unit. You cannot copy or...

Owner's Manual
Page 16
...buttons to select "LIM" (Limiter), "ALC HI" (for soft sounds), or "ALC LO" (for loud sounds), then press the [ ] (Play) button. 4. The PR7 calls up the HOME screen. 16 Owner's Manual tons to select "DYN" from the recording setting menu, then press the [ ] (Play) button. Use the [+] and...(High-pass filter) The high-pass filter reduces low-range ambient noises, such as footsteps or rumbling caused by the wind. 1. The PR7 calls up the HOME screen. 4. Preventing excessive input level (Dynamics control) This function prevents excessive input levels that could cause audio clipping or...
...buttons to select "LIM" (Limiter), "ALC HI" (for soft sounds), or "ALC LO" (for loud sounds), then press the [ ] (Play) button. 4. The PR7 calls up the HOME screen. 16 Owner's Manual tons to select "DYN" from the recording setting menu, then press the [ ] (Play) button. Use the [+] and...(High-pass filter) The high-pass filter reduces low-range ambient noises, such as footsteps or rumbling caused by the wind. 1. The PR7 calls up the HOME screen. 4. Preventing excessive input level (Dynamics control) This function prevents excessive input levels that could cause audio clipping or...
Owner's Manual
Page 17
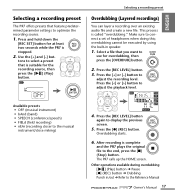
... again to the Reference Manual Owner's Manual 17 Press and hold down the [REC SET] button for at least two seconds while the PR7 is called "overdubbing." Selecting a recording preset Overdubbing (Layered recordings) You can layer a recording over an existing audio file and create a...Use the [+] and [-] but- After recording is suitable for the recording source, then press the [ ] (Play) button. Selecting a recording preset The PR7 offers presets that you want to use for overdubbing, then press the [OVERDUB] button. 2. Press the [+] or [-] button to the musical instrument/close ...
... again to the Reference Manual Owner's Manual 17 Press and hold down the [REC SET] button for at least two seconds while the PR7 is called "overdubbing." Selecting a recording preset Overdubbing (Layered recordings) You can layer a recording over an existing audio file and create a...Use the [+] and [-] but- After recording is suitable for the recording source, then press the [ ] (Play) button. Selecting a recording preset The PR7 offers presets that you want to use for overdubbing, then press the [OVERDUB] button. 2. Press the [+] or [-] button to the musical instrument/close ...
Owner's Manual
Page 18
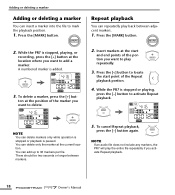
Repeat playback You can insert a marker into the file to play back between adjacent markers. 1. To delete a marker, press the [+] but- While the PR7 is added. 3. ton at the location where you want to mark the playback position. 1. Adding or deleting a marker Adding or deleting a marker You can repeatedly ...
Repeat playback You can insert a marker into the file to play back between adjacent markers. 1. To delete a marker, press the [+] but- While the PR7 is added. 3. ton at the location where you want to mark the playback position. 1. Adding or deleting a marker Adding or deleting a marker You can repeatedly ...

Owner's Manual
Page 19
Use the [+] and [-] but - Play and tune the musical instrument. Key Align with the center segment. 5. The PR7 calls up the HOME screen. Adjusting the playback speed You can set the playback speed in the range of 50% to select "SPD", then press ...", then press the [ ] (Play) button. 3. Press the [MENU] button. 2. tons to select the desired playback speed (expressed as a percentage), then press the [ ] (Play) button. 3. The PR7 calls up the HOME screen. Setting range: 50%-200% 4.
Use the [+] and [-] but - Play and tune the musical instrument. Key Align with the center segment. 5. The PR7 calls up the HOME screen. Adjusting the playback speed You can set the playback speed in the range of 50% to select "SPD", then press ...", then press the [ ] (Play) button. 3. Press the [MENU] button. 2. tons to select the desired playback speed (expressed as a percentage), then press the [ ] (Play) button. 3. The PR7 calls up the HOME screen. Setting range: 50%-200% 4.

Owner's Manual
Page 20
Press the [] button to select "On", then press the [ ] (Play) button. Use the [+] and [-] buttons to select On/ OFF parameter, then press the [ ] (Play) button. tons to specify the beat value, then press the [ ] (Play) button. 4. Setting range: 0/4-8/4 8. The PR7 calls up the HOME screen. 20 Owner's Manual Press the [MENU] button. 2. Use the [+] and [-] but- Metronome Metronome 1. Setting range: 30-250 7. After the setting process is complete, press the [■] (Stop) button. Use the [+] and [-] buttons to select "MET", then press the [ ] (Play) button. 5.
Press the [] button to select "On", then press the [ ] (Play) button. Use the [+] and [-] buttons to select On/ OFF parameter, then press the [ ] (Play) button. tons to specify the beat value, then press the [ ] (Play) button. 4. Setting range: 0/4-8/4 8. The PR7 calls up the HOME screen. 20 Owner's Manual Press the [MENU] button. 2. Use the [+] and [-] but- Metronome Metronome 1. Setting range: 30-250 7. After the setting process is complete, press the [■] (Stop) button. Use the [+] and [-] buttons to select "MET", then press the [ ] (Play) button. 5.

Owner's Manual
Page 21
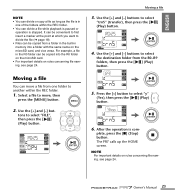
Deleting a file If the available memory space is getting small, or if the folders contain the maximum number of files, delete unnecessary files to select a single file or all files in the folder, then press the [ ] (Play) button. Use the [+] and [-] but- Press the [+] or [-] button to increase the space. 1. Delete only the currently selected file Deleting a file 4. Select a file that you want to select "DEL", then press the [ ] (Play) button. 3. Press the [ tons to delete, then press the [MENU] button. 2.
Deleting a file If the available memory space is getting small, or if the folders contain the maximum number of files, delete unnecessary files to select a single file or all files in the folder, then press the [ ] (Play) button. Use the [+] and [-] but- Press the [+] or [-] button to increase the space. 1. Delete only the currently selected file Deleting a file 4. Select a file that you want to select "DEL", then press the [ ] (Play) button. 3. Press the [ tons to delete, then press the [MENU] button. 2.

Owner's Manual
Page 22
Dividing a file Dividing a file 1. Copying a file 1. Use the [+] and [-] buttons to copy, then press the [MENU] button. 2. Press the [ Select a file to select "dIV", then press the [ ] (Play) button. 3. Use the [+] and [-] but - While playing back the file you wish to divide, press the [ ] (Play) button to pause playback at the point where you want to select "FILE", then press the [ ] (Play) button. tons to divide the file, then press the [MENU] button. 2. Use the [+] and [-] buttons to select "FILE", then press the [ ] (Play) button. 3. tons to select "COPY", then press the...
Dividing a file Dividing a file 1. Copying a file 1. Use the [+] and [-] buttons to copy, then press the [MENU] button. 2. Press the [ Select a file to select "dIV", then press the [ ] (Play) button. 3. Use the [+] and [-] but - While playing back the file you wish to divide, press the [ ] (Play) button to pause playback at the point where you want to select "FILE", then press the [ ] (Play) button. tons to divide the file, then press the [MENU] button. 2. Use the [+] and [-] buttons to select "FILE", then press the [ ] (Play) button. 3. tons to select "COPY", then press the...
Owner's Manual
Page 23
NOTE • You can divide or copy a file as long as the file is stopped. For example, a file in the R0 folder can be copied from the R0-R9 folders, then press the [ ] (Play) button. 5. Moving a file You can divide a file while playback is paused or operation is in memory into the R0 folder on the microSD card. • For important details on the microSD card, and vice versa. Use the [+] and [-] buttons to select "FILE", then press the [ ] (Play) button. Select a file to move a file from one folder to another within the REC folder. 1. Press the [ Use the [+] and [-] ...
NOTE • You can divide or copy a file as long as the file is stopped. For example, a file in the R0 folder can be copied from the R0-R9 folders, then press the [ ] (Play) button. 5. Moving a file You can divide a file while playback is paused or operation is in memory into the R0 folder on the microSD card. • For important details on the microSD card, and vice versa. Use the [+] and [-] buttons to select "FILE", then press the [ ] (Play) button. Select a file to move a file from one folder to another within the REC folder. 1. Press the [ Use the [+] and [-] ...
Owner's Manual
Page 24
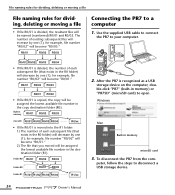
... File naming rules for dividing, deleting or moving a file • If file R0/01 is recognized as a USB storage device on the computer, double-click "PR7" (built-in memory) or "PR7SD" (microSD card) to a computer 1. puter, follow the steps to your computer. The number of each subsequent file (that ... copied, the copy will be assigned the lowest available file number in memory microSD card 3. R0/01 R0/02 R0/03 Connecting the PR7 to open. After the PR7 is divided, the resultant files will become "R0/03." for example, file number "R0/02" will be named (numbered) R0/01 ...
... File naming rules for dividing, deleting or moving a file • If file R0/01 is recognized as a USB storage device on the computer, double-click "PR7" (built-in memory) or "PR7SD" (microSD card) to a computer 1. puter, follow the steps to your computer. The number of each subsequent file (that ... copied, the copy will be assigned the lowest available file number in memory microSD card 3. R0/01 R0/02 R0/03 Connecting the PR7 to open. After the PR7 is divided, the resultant files will become "R0/03." for example, file number "R0/02" will be named (numbered) R0/01 ...
Owner's Manual
Page 25
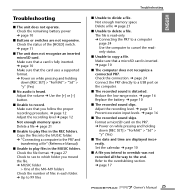
... ➔ page 12 Prevent excessive input levels. ➔ page 16 ■ The recorded sound skips. Check the connection. ➔ page 24 Connect the PR7 directly to copy a file. Adjust the volume ➔ Use the [+] or [-] button. ■ Unable to delete a file. Make sure that the card... SET] > "ForMAt" > "Sd" > "y" (Yes) ■ No audio is inserted. ➔ page 10 ■ The computer does not recognize a connected PR7. Troubleshooting ■ The unit does not operate. Check the status of files in the REC folders. Copy the files into the MUSIC folder. ➔ "Connecting...
... ➔ page 12 Prevent excessive input levels. ➔ page 16 ■ The recorded sound skips. Check the connection. ➔ page 24 Connect the PR7 directly to copy a file. Adjust the volume ➔ Use the [+] or [-] button. ■ Unable to delete a file. Make sure that the card... SET] > "ForMAt" > "Sd" > "y" (Yes) ■ No audio is inserted. ➔ page 10 ■ The computer does not recognize a connected PR7. Troubleshooting ■ The unit does not operate. Check the status of files in the REC folders. Copy the files into the MUSIC folder. ➔ "Connecting...
Owner's Manual
Page 27
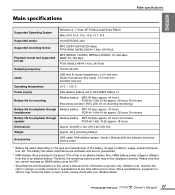
..., storage conditions, usage, ambient temperature, etc. Stereo microphone (line input) 3.5 mm mini; AAA alkaline battery; Yamaha Corp. Owner's Manual (with your Yamaha dealer. Owner's Manual 27 Please note that you cannot recharge an NiMH battery using the PR7. * Specifications and descriptions in every locale, please check with the software download license code) * Battery...
..., storage conditions, usage, ambient temperature, etc. Stereo microphone (line input) 3.5 mm mini; AAA alkaline battery; Yamaha Corp. Owner's Manual (with your Yamaha dealer. Owner's Manual 27 Please note that you cannot recharge an NiMH battery using the PR7. * Specifications and descriptions in every locale, please check with the software download license code) * Battery...
Reference Manual
Page 1
...bar field, then press the key on page 3. The application will search for the PR7 is convenient if you want to refer to a description of the screen or the various functions of the PR7. This feature is illustrated on the computer keyboard. EN RECORDER Reference Manual Using the ...Reference Manual The PPOCKETRAK PR7 Reference Manual (this book, you can go back to the previous view, forward to...
...bar field, then press the key on page 3. The application will search for the PR7 is convenient if you want to refer to a description of the screen or the various functions of the PR7. This feature is illustrated on the computer keyboard. EN RECORDER Reference Manual Using the ...Reference Manual The PPOCKETRAK PR7 Reference Manual (this book, you can go back to the previous view, forward to...

