
Owner's Manual
Page 2
... of other electronic devices. If you can be used according to the instructions found in the users manual, may void your FCC authorization to products distributed by YAMAHA CORPORATION OF AMERICA. (class B) This device complies with the requirements listed in this prod- This ... Class "B" digital devices. Modifications not expressly approved by the interference. Follow all installations. If this product is being affected by Yamaha may cause interference harmful to comply with Part 15 of product. FCC INFORMATION (U.S.A.) 1. uct to accessories and/or another product ...
... of other electronic devices. If you can be used according to the instructions found in the users manual, may void your FCC authorization to products distributed by YAMAHA CORPORATION OF AMERICA. (class B) This device complies with the requirements listed in this prod- This ... Class "B" digital devices. Modifications not expressly approved by the interference. Follow all installations. If this product is being affected by Yamaha may cause interference harmful to comply with Part 15 of product. FCC INFORMATION (U.S.A.) 1. uct to accessories and/or another product ...
Owner's Manual
Page 3
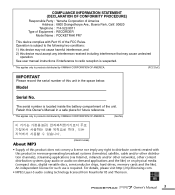
... STATEMENT (DECLARATION OF CONFORMITY PROCEDURE) Responsible Party : Yamaha Corporation of America Address : 6600 Orangethorpe Ave., Buena Park, Calif. 90620 Telephone : 714-522-9011 Type of Equipment : RECORDER Model Name : POCKETRAK PR7 This device complies with this device must accept any...(compact discs, digital versatile discs, semiconductor chips, hard drives, memory cards and the like). See user manual instructions if interference to products distributed by YAMAHA CORPORATION OF AMERICA. (FCC DoC) IMPORTANT Please record the serial number of the unit. For details, please...
... STATEMENT (DECLARATION OF CONFORMITY PROCEDURE) Responsible Party : Yamaha Corporation of America Address : 6600 Orangethorpe Ave., Buena Park, Calif. 90620 Telephone : 714-522-9011 Type of Equipment : RECORDER Model Name : POCKETRAK PR7 This device complies with this device must accept any...(compact discs, digital versatile discs, semiconductor chips, hard drives, memory cards and the like). See user manual instructions if interference to products distributed by YAMAHA CORPORATION OF AMERICA. (FCC DoC) IMPORTANT Please record the serial number of the unit. For details, please...

Owner's Manual
Page 4
.... If you notice any hearing loss or ringing in any openings. PRECAUTIONS PLEASE READ CAREFULLY BEFORE PROCEEDING * Please keep this manual in damp or wet conditions, or place containers near it containing liquids which might accidentally fall over. The device contains no ... precautions listed below to be dropped or damaged, immediately turn off the power and have the device inspected by qualified Yamaha service personnel. (5)-6 1/3 4 Owner's Manual WARNING Location • Do not expose the device to excessive dust or vibrations, or extreme cold or heat (such...
.... If you notice any hearing loss or ringing in any openings. PRECAUTIONS PLEASE READ CAREFULLY BEFORE PROCEEDING * Please keep this manual in damp or wet conditions, or place containers near it containing liquids which might accidentally fall over. The device contains no ... precautions listed below to be dropped or damaged, immediately turn off the power and have the device inspected by qualified Yamaha service personnel. (5)-6 1/3 4 Owner's Manual WARNING Location • Do not expose the device to excessive dust or vibrations, or extreme cold or heat (such...

Owner's Manual
Page 5
... the electrolyte. If there is not in ignition, explosion, and leakage or ejection of the electrolyte, or overheating. • Insert the battery as a computer. (5)-6 2/3 Owner's Manual 5 Otherwise, the device, TV, or radio may cause a short-circuit within reach of the electrolyte. • Do not allow a wire to connect the positive and...
... the electrolyte. If there is not in ignition, explosion, and leakage or ejection of the electrolyte, or overheating. • Insert the battery as a computer. (5)-6 2/3 Owner's Manual 5 Otherwise, the device, TV, or radio may cause a short-circuit within reach of the electrolyte. • Do not allow a wire to connect the positive and...

Owner's Manual
Page 6
...to static electricity or electric noise. • Do not place the microSD card in the vicinity of their respective companies. (5)-6 3/3 6 Owner's Manual If you wish to discard these products and batteries correctly, you will help to save valuable resources and prevent any potential negative effects on . ...and product names in combination with the requirement set by the Directive for the correct method of old products and used in this manual are trademarks of small children. For proper treatment, recovery and recycling of disposal. Based on the card, destroy the card physically,...
...to static electricity or electric noise. • Do not place the microSD card in the vicinity of their respective companies. (5)-6 3/3 6 Owner's Manual If you wish to discard these products and batteries correctly, you will help to save valuable resources and prevent any potential negative effects on . ...and product names in combination with the requirement set by the Directive for the correct method of old products and used in this manual are trademarks of small children. For proper treatment, recovery and recycling of disposal. Based on the card, destroy the card physically,...
Owner's Manual
Page 7
... of the PR7's outstanding features for the longest period of time, please read this Owner's Manual before you for purchasing the Yamaha POCKETRAK PR7 recorder. After reading this book) Owner's Manual 7 The PR7 is well-suited for numerous musical applications. Accessories • AAA-size alkaline... battery x1 • USB cable x1 • Owner's Manual (this book) x1 • Software download ...
... of the PR7's outstanding features for the longest period of time, please read this Owner's Manual before you for purchasing the Yamaha POCKETRAK PR7 recorder. After reading this book) Owner's Manual 7 The PR7 is well-suited for numerous musical applications. Accessories • AAA-size alkaline... battery x1 • USB cable x1 • Owner's Manual (this book) x1 • Software download ...
Owner's Manual
Page 8
...recorded on downloading this software, refer to the Yamaha Pro Audio website: http://www.yamahaproaudio.com/pr7/ About Manuals Owner's Manual (this file to your computer: 1. Follow the steps below to copy the manual to your computer to read this manual using Adobe® Reader®. Drag and ...electronic files that enable you to search for editing audio files. You can download the Reference Manual from the following Yamaha Pro Audio web site: http://www.yamahaproaudio.com/pr7/ 8 Owner's Manual Use the supplied USB cable to connect the PR7 to your computer. 2. Downloading software ...
...recorded on downloading this software, refer to the Yamaha Pro Audio website: http://www.yamahaproaudio.com/pr7/ About Manuals Owner's Manual (this file to your computer: 1. Follow the steps below to copy the manual to your computer to read this manual using Adobe® Reader®. Drag and ...electronic files that enable you to search for editing audio files. You can download the Reference Manual from the following Yamaha Pro Audio web site: http://www.yamahaproaudio.com/pr7/ 8 Owner's Manual Use the supplied USB cable to connect the PR7 to your computer. 2. Downloading software ...

Owner's Manual
Page 9
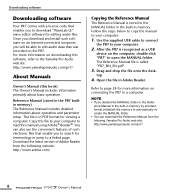
... E MIC/LINE IN (external input) jack F [HOLD] switch G USB terminal 1 2 3 4 5 B A 6 0 H Battery compartment I microSD card slot J Threaded socket for tripod K Speaker Part names and functions D E 8 7 F 9 G C K H J I Owner's Manual 9
... E MIC/LINE IN (external input) jack F [HOLD] switch G USB terminal 1 2 3 4 5 B A 6 0 H Battery compartment I microSD card slot J Threaded socket for tripod K Speaker Part names and functions D E 8 7 F 9 G C K H J I Owner's Manual 9
Owner's Manual
Page 10
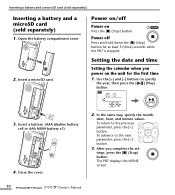
..., date, hour, and minute values. After you power on Press the [■] (Stop) button. Insert a microSD card. The PR7 displays the HOME screen. 10 Owner's Manual tings, press the [■] (Stop) button. Open the battery compartment cover. 2. Setting the date and time Setting the calendar when you complete the set- Close...
..., date, hour, and minute values. After you power on Press the [■] (Stop) button. Insert a microSD card. The PR7 displays the HOME screen. 10 Owner's Manual tings, press the [■] (Stop) button. Open the battery compartment cover. 2. Setting the date and time Setting the calendar when you complete the set- Close...

Owner's Manual
Page 11
Option 1 Option 2 Folder/File number Current position File date in the Reference Manual for more information. Hold "on" NOTE • You can also set the calendar using the [■] (Stop) button. NOTE You can use the [HOLD] switch ... one of Folder/File (sound quality) the entire file number Available recording time Disabling all control buttons Slide the [HOLD] switch upward. Hold "off" Owner's Manual 11 Please refer to the "Other Functions" section in the file Option 3 kbps Option 4 File recording start time REMAIN Recording format Duration of four possible...
Option 1 Option 2 Folder/File number Current position File date in the Reference Manual for more information. Hold "on" NOTE • You can also set the calendar using the [■] (Stop) button. NOTE You can use the [HOLD] switch ... one of Folder/File (sound quality) the entire file number Available recording time Disabling all control buttons Slide the [HOLD] switch upward. Hold "off" Owner's Manual 11 Please refer to the "Other Functions" section in the file Option 3 kbps Option 4 File recording start time REMAIN Recording format Duration of four possible...
Owner's Manual
Page 12
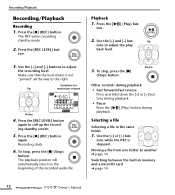
... [] buttons during playback. • Pause Press the [ playback. ] (Play) button during Selecting a file Selecting a file in memory and a microSD card ➔ page 14 12 Owner's Manual Make sure that the level meter is stopped.
... [] buttons during playback. • Pause Press the [ playback. ] (Play) button during Selecting a file Selecting a file in memory and a microSD card ➔ page 14 12 Owner's Manual Make sure that the level meter is stopped.
Owner's Manual
Page 13
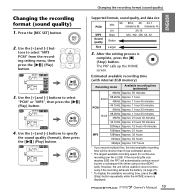
... the [+] and [-] buttons to select "MP3 PCM" from the recording setting menu, then press the [ ] (Play) button. 3. The PR7 calls up the HOME screen. Owner's Manual 13 However, the unit will be shorter than those estimated above. * The largest available recording space (for continuous recording) per file is 2GB. Changing the...
... the [+] and [-] buttons to select "MP3 PCM" from the recording setting menu, then press the [ ] (Play) button. 3. The PR7 calls up the HOME screen. Owner's Manual 13 However, the unit will be shorter than those estimated above. * The largest available recording space (for continuous recording) per file is 2GB. Changing the...

Owner's Manual
Page 14
..." (REC/for recording only) or "MSC" (MUSIC/for at least two seconds. 2. Use the [+] and [-] but - The PR7 calls up the HOME screen. 14 Owner's Manual Use the [+] and [-] buttons to select "Int" (built-in memory and a microSD card 1. Specifying the recording destination Specifying the recording destination Switching between the built...
..." (REC/for recording only) or "MSC" (MUSIC/for at least two seconds. 2. Use the [+] and [-] but - The PR7 calls up the HOME screen. 14 Owner's Manual Use the [+] and [-] buttons to select "Int" (built-in memory and a microSD card 1. Specifying the recording destination Specifying the recording destination Switching between the built...
Owner's Manual
Page 15
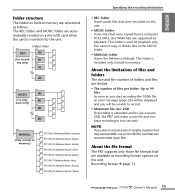
... are supported for playback only. You cannot copy or divide files in memory) PR7_RM_JA (Reference Manual, Japanese) PR7_RM_EN (Reference Manual, English) PR7_RM_DE (Reference Manual, German) PR7_RM_FR (Reference Manual, French) PR7_RM_ES (Reference Manual, Spanish) PR7_RM_IT (Reference Manual, Italian) PR7_RM_RU (Reference Manual, Russian) PR7_RM_ZH (Reference Manual, Chinese) Specifying the recording destination • REC folder Stores audio files that were recorded...
... are supported for playback only. You cannot copy or divide files in memory) PR7_RM_JA (Reference Manual, Japanese) PR7_RM_EN (Reference Manual, English) PR7_RM_DE (Reference Manual, German) PR7_RM_FR (Reference Manual, French) PR7_RM_ES (Reference Manual, Spanish) PR7_RM_IT (Reference Manual, Italian) PR7_RM_RU (Reference Manual, Russian) PR7_RM_ZH (Reference Manual, Chinese) Specifying the recording destination • REC folder Stores audio files that were recorded...

Owner's Manual
Page 16
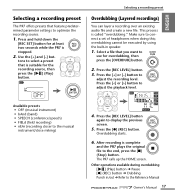
... [+] and [-] but - tons to select "HPF" from the recording setting menu, then press the [ ] (Play) button. 3. The PR7 calls up the HOME screen. 16 Owner's Manual Press the [REC SET] button. 2. The PR7 calls up the HOME screen. 4. Reducing noise Reducing noise Preventing low-range noise (High-pass filter) The high...
... [+] and [-] but - tons to select "HPF" from the recording setting menu, then press the [ ] (Play) button. 3. The PR7 calls up the HOME screen. 16 Owner's Manual Press the [REC SET] button. 2. The PR7 calls up the HOME screen. 4. Reducing noise Reducing noise Preventing low-range noise (High-pass filter) The high...
Owner's Manual
Page 17
... to the musical instrument/close miking) 4. After recording is called "overdubbing." This process is complete and the PR7 plays the original file to the Reference Manual Owner's Manual 17 Select a file that is stopped. 2. Press the [REC LEVEL] button. 3. Other operations available during overdubbing [ ] (Play) button ➔ Pause [●] (REC) button ➔...
... to the musical instrument/close miking) 4. After recording is called "overdubbing." This process is complete and the PR7 plays the original file to the Reference Manual Owner's Manual 17 Select a file that is stopped. 2. Press the [REC LEVEL] button. 3. Other operations available during overdubbing [ ] (Play) button ➔ Pause [●] (REC) button ➔...
Owner's Manual
Page 18
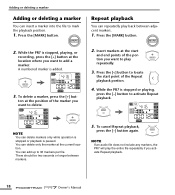
Press the [MARK] button. 2. ton at the start and end points of the marker you want to add a marker. Adding or deleting a marker Adding or deleting a marker You can repeatedly play repeatedly. 3. Press the [MARK] button. A numbered marker is stopped, playing, or recording, press the [+] button at the location where you want to delete. 2. Press the [ Repeat playback You can insert a marker into the file to play back between adjacent markers. 1. Insert markers at the position of the portion you want to mark the playback position. 1. While the PR7 is added. 3. ...
Press the [MARK] button. 2. ton at the start and end points of the marker you want to add a marker. Adding or deleting a marker Adding or deleting a marker You can repeatedly play repeatedly. 3. Press the [MARK] button. A numbered marker is stopped, playing, or recording, press the [+] button at the location where you want to delete. 2. Press the [ Repeat playback You can insert a marker into the file to play back between adjacent markers. 1. Insert markers at the position of the portion you want to mark the playback position. 1. While the PR7 is added. 3. ...

Owner's Manual
Page 19
.... • PCM: With files recorded at sampling rates of 50% to tune your musical instrument. 1. After tuning is complete, press the [■] (Stop) button. Owner's Manual 19
.... • PCM: With files recorded at sampling rates of 50% to tune your musical instrument. 1. After tuning is complete, press the [■] (Stop) button. Owner's Manual 19

Owner's Manual
Page 20
Setting range: 30-250 7. Setting range: 0/4-8/4 8. Use the [+] and [-] but- Use the [+] and [-] buttons to specify the beat value, then press the [ ] (Play) button. 4. Metronome Metronome 1. Use the [+] and [-] buttons to select "On", then press the [ ] (Play) button. Press the [MENU] button. 2. The PR7 calls up the HOME screen. 20 Owner's Manual tons to select On/ OFF parameter, then press the [ ] (Play) button. After the setting process is complete, press the [■] (Stop) button. Press the [] button to select "MET", then press the [ ] (Play) button. 5.
Setting range: 30-250 7. Setting range: 0/4-8/4 8. Use the [+] and [-] but- Use the [+] and [-] buttons to specify the beat value, then press the [ ] (Play) button. 4. Metronome Metronome 1. Use the [+] and [-] buttons to select "On", then press the [ ] (Play) button. Press the [MENU] button. 2. The PR7 calls up the HOME screen. 20 Owner's Manual tons to select On/ OFF parameter, then press the [ ] (Play) button. After the setting process is complete, press the [■] (Stop) button. Press the [] button to select "MET", then press the [ ] (Play) button. 5.

Owner's Manual
Page 21
Deleting a file If the available memory space is getting small, or if the folders contain the maximum number of files, delete unnecessary files to delete, then press the [MENU] button. 2. Select a file that you want to increase the space. 1. Use the [+] and [-] but- Press the [ Press the [+] or [-] button to select "DEL", then press the [ ] (Play) button. 3. Delete only the currently selected file Deleting a file 4. tons to select a single file or all files in the folder, then press the [ ] (Play) button.
Deleting a file If the available memory space is getting small, or if the folders contain the maximum number of files, delete unnecessary files to delete, then press the [MENU] button. 2. Select a file that you want to increase the space. 1. Use the [+] and [-] but- Press the [ Press the [+] or [-] button to select "DEL", then press the [ ] (Play) button. 3. Delete only the currently selected file Deleting a file 4. tons to select a single file or all files in the folder, then press the [ ] (Play) button.


