
Owner's Manual
Page 3
CONTENTS BEFORE OPERATION 2 PLEASE NOTE THE FOLLOWING PRECAUTIONS 2 THE DIFFERENCE BETWEEN TRACKS AND CHANNELS 3 WHAT IS A MULTITRACK CASSETTE RECORDER 3 THE CONTROLS AND THEIR FUNCTIONS 4 MIXER SECTlON 4 RECORDER SECTION 7 METER AND MONITOR SECTION 9 CONNECTOR ... operation, we urge you to thoroughly read this operating manual. To take full advantage of the outstanding array of the New Yamaha MT1X Multitrack Cassette Recorder. The MT1X is a compact multitrack recorder with a recording mixer, and is equipped with numerous versatile functions. Using conventional cassette tapes, the...
CONTENTS BEFORE OPERATION 2 PLEASE NOTE THE FOLLOWING PRECAUTIONS 2 THE DIFFERENCE BETWEEN TRACKS AND CHANNELS 3 WHAT IS A MULTITRACK CASSETTE RECORDER 3 THE CONTROLS AND THEIR FUNCTIONS 4 MIXER SECTlON 4 RECORDER SECTION 7 METER AND MONITOR SECTION 9 CONNECTOR ... operation, we urge you to thoroughly read this operating manual. To take full advantage of the outstanding array of the New Yamaha MT1X Multitrack Cassette Recorder. The MT1X is a compact multitrack recorder with a recording mixer, and is equipped with numerous versatile functions. Using conventional cassette tapes, the...
Owner's Manual
Page 5
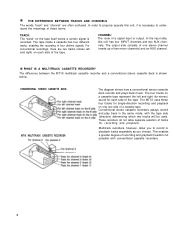
... of two mono channels) and an AUX channel. The MT1X uses these terms. TRACK: The "band" on each side of the tape. These recorders do not allow you choose. CONVENTIONAL STEREO CASSETTE DECK MT1X MULTITRACK CASSETTE RECORDER The diagram shows how a conventional stereo ...mode, with conventional cassette recorders. 3 THE DIFFERENCE BETWEEN TRACKS AND CHANNELS The words "track" and "channel" are two tracks (stereo left and right (for stereo) sound for each side of the tape. The difference between the MT1X multitrack cassette recorder and a conventional stereo cassette deck is...
... of two mono channels) and an AUX channel. The MT1X uses these terms. TRACK: The "band" on each side of the tape. These recorders do not allow you choose. CONVENTIONAL STEREO CASSETTE DECK MT1X MULTITRACK CASSETTE RECORDER The diagram shows how a conventional stereo ...mode, with conventional cassette recorders. 3 THE DIFFERENCE BETWEEN TRACKS AND CHANNELS The words "track" and "channel" are two tracks (stereo left and right (for stereo) sound for each side of the tape. The difference between the MT1X multitrack cassette recorder and a conventional stereo cassette deck is...
Owner's Manual
Page 6
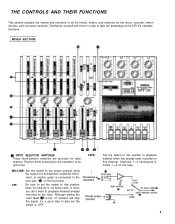
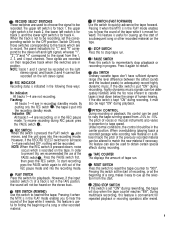
... a microphone, keyboard instru- ment, or electric guitar is not being used, or when you don't want to the proper position when the output of the MT1X's versatile functions. MIXER SECTION INPUT SELECTOR SWITCHES These three-position switches are provided for the mixer, recorder, meter/ monitor, and connector sections. Channels 1-4 correspond to...
... a microphone, keyboard instru- ment, or electric guitar is not being used, or when you don't want to the proper position when the output of the MT1X's versatile functions. MIXER SECTION INPUT SELECTOR SWITCHES These three-position switches are provided for the mixer, recorder, meter/ monitor, and connector sections. Channels 1-4 correspond to...
Owner's Manual
Page 7
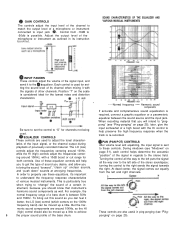
... and comprehensive sound equalization is particularly true when trying to bring out this sound so you will help preserve the high frequency response when the track is sent to understand the frequency response characteristics of various musical instruments. Turning the control all the way to the left and right channels. This...
... and comprehensive sound equalization is particularly true when trying to bring out this sound so you will help preserve the high frequency response when the track is sent to understand the frequency response characteristics of various musical instruments. Turning the control all the way to the left and right channels. This...
Owner's Manual
Page 10
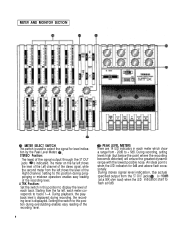
... the 1, 2, 3, and 4 input channels. By pushing only the REC switch the tape is for track 1, the upper right switch is put "ON" during recording, it again to restart. Pressing it when the MT1X is kept "ON" during recording, highly dynamic music signals can be recorded. If the dbx switch is... for "L" and "R" correspond to the stereo left switch is for track 3, and the lower right switch is useful for track 4. NOTE: When the REC switch is pressed down below the range of the tape while it when the MT1X is not to be used to obtain certain special effects during REC...
... the 1, 2, 3, and 4 input channels. By pushing only the REC switch the tape is for track 1, the upper right switch is put "ON" during recording, it again to restart. Pressing it when the MT1X is kept "ON" during recording, highly dynamic music signals can be recorded. If the dbx switch is... for "L" and "R" correspond to the stereo left switch is for track 3, and the lower right switch is useful for track 4. NOTE: When the REC switch is pressed down below the range of the tape while it when the MT1X is not to be used to obtain certain special effects during REC...
Owner's Manual
Page 11
... level of the Left channel of the signal output through the ST OUT jacks is (at a 50K ohm load) when the LED indicators start to tracks 1-4. An ideal point is when the LED indicators for level indication by the Peak Level Meters STEREO Position: The level of the stereo signal, while... the second meter from the far left shows the level of the recording level. 9 TherePEaAreK 1L4EVLEEDL iMndEicTEaRtoSrs in each track. METER AND MONITOR SECTION ThisMswEiTtEcRh iSsEuLsEeCdTtoSWseIlTeCcHt the signal for 0dB and above flash occasionally.
... level of the Left channel of the signal output through the ST OUT jacks is (at a 50K ohm load) when the LED indicators start to tracks 1-4. An ideal point is when the LED indicators for level indication by the Peak Level Meters STEREO Position: The level of the stereo signal, while... the second meter from the far left shows the level of the recording level. 9 TherePEaAreK 1L4EVLEEDL iMndEicTEaRtoSrs in each track. METER AND MONITOR SECTION ThisMswEiTtEcRh iSsEuLsEeCdTtoSWseIlTeCcHt the signal for 0dB and above flash occasionally.
Owner's Manual
Page 12
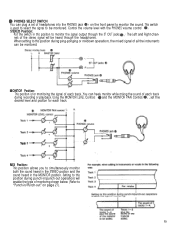
...: This position allows you to be heard through the ST OUT jacks The Left and Right chan- This switch is for each track. MONITOR Position: This position is used to select the signal to simultaneously monitor both the sound heard in the STEREO position and the... sound heard in this position during recording or playback. nels of each track. Setting to this position to monitor the sound. Control the volume level with the PHONES volume control STEPRuEtOthePosswititiochn:in the MONITOR position. Using...
...: This position allows you to be heard through the ST OUT jacks The Left and Right chan- This switch is for each track. MONITOR Position: This position is used to select the signal to simultaneously monitor both the sound heard in the STEREO position and the... sound heard in this position during recording or playback. nels of each track. Setting to this position to monitor the sound. Control the volume level with the PHONES volume control STEPRuEtOthePosswititiochn:in the MONITOR position. Using...
Owner's Manual
Page 13
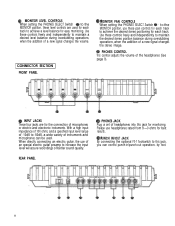
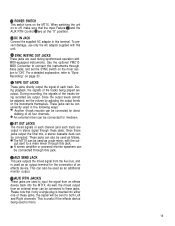
REAR PANEL PHONES JACK Plug a set of headphones into this jack, you can be used for each track to increase the input level will assure recordings of better sound quality. PUNCH IN/OUT JACK By connecting the optional FS-1 footswitch to this... PAN CONTROLS When setting the PHONES SELECT Switch to the MONITOR position, use these pan controls for each track. When directly connecting an electric guitar, the use headphones rated from 8--0 ohms for each track to maintain the desired stereo position balance during overdubbing operations, when the addition of a new signal changes...
REAR PANEL PHONES JACK Plug a set of headphones into this jack, you can be used for each track to increase the input level will assure recordings of better sound quality. PUNCH IN/OUT JACK By connecting the optional FS-1 footswitch to this... PAN CONTROLS When setting the PHONES SELECT Switch to the MONITOR position, use these pan controls for each track. When directly connecting an electric guitar, the use headphones rated from 8--0 ohms for each track to maintain the desired stereo position balance during overdubbing operations, when the addition of a new signal changes...
Owner's Manual
Page 14
... from an external mixer can be connected to "SyncRecording" on the MT1X. This is useful if the effects device being played are output in the following ways: Another 4-track recorder can also be connected for direct dubbing of each track) are output. ST OUT JACKS The mixed signals of the.... Please note that the Input Faders and the AUX RTN Control are used as follows. During playback, the signals of each channel (and each track. For a detailed explanation, refer to these jacks output the final mix, a stereo cassette deck can be connected. DC IN JACK Connect the ...
... from an external mixer can be connected to "SyncRecording" on the MT1X. This is useful if the effects device being played are output in the following ways: Another 4-track recorder can also be connected for direct dubbing of each track) are output. ST OUT JACKS The mixed signals of the.... Please note that the Input Faders and the AUX RTN Control are used as follows. During playback, the signals of each channel (and each track. For a detailed explanation, refer to these jacks output the final mix, a stereo cassette deck can be connected. DC IN JACK Connect the ...
Owner's Manual
Page 16
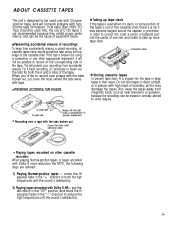
...is broken out using a screwdriver or any other cassette recorders When playing Normal-position tapes, or tapes encoded with Dolby B noise reduction the MT1X, the following steps are advised: 1) Playing Normal-position tapes - " direction to reduce the high frequencies until the sound is satisfactory. 14... have record protection tabs along the top edge of the cassette shell. PREVENTING ACCIDENTAL TAPE ERASURE: Taking up loose tape slack. For 4-track recording, it will protect your recordings from magnetic fields, such as this , insert a pencil or ballpoint pen into the tape or keep...
...is broken out using a screwdriver or any other cassette recorders When playing Normal-position tapes, or tapes encoded with Dolby B noise reduction the MT1X, the following steps are advised: 1) Playing Normal-position tapes - " direction to reduce the high frequencies until the sound is satisfactory. 14... have record protection tabs along the top edge of the cassette shell. PREVENTING ACCIDENTAL TAPE ERASURE: Taking up loose tape slack. For 4-track recording, it will protect your recordings from magnetic fields, such as this , insert a pencil or ballpoint pen into the tape or keep...
Owner's Manual
Page 18
.... Set the bass drum and the snare drum center, with overdubbing and ping-ponging operations assisting in mixing the parts of each track, as well as to result in any degree necessary. Solo instruments and voices should spend an adequate amount of headphones. EQUALIZATION AND...Controls, and Their Functions". However, if they're peaking out for signal recording, this makes it 's not a problem. However, the MT1X is too low, the recording will sound distorted and unclear. In addition, powered monitor speakers can probably think about the acoustic "position" of each...
.... Set the bass drum and the snare drum center, with overdubbing and ping-ponging operations assisting in mixing the parts of each track, as well as to result in any degree necessary. Solo instruments and voices should spend an adequate amount of headphones. EQUALIZATION AND...Controls, and Their Functions". However, if they're peaking out for signal recording, this makes it 's not a problem. However, the MT1X is too low, the recording will sound distorted and unclear. In addition, powered monitor speakers can probably think about the acoustic "position" of each...
Owner's Manual
Page 19
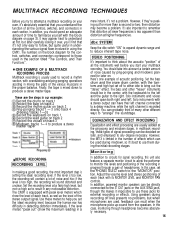
... operations than really necessary. MULTITRACK RECORDING PLAN YOUR RECORDING A clear plan is essential before you start, plan your recording carefully - YAMAHA's REV7 Digital Reverberator can perform ping-pong and mixdown operations without regard to achieve good sound quality. It also features echo and...all the steps involved, you may "record yourself into a corner" by these operations. Through the MT1X's mixing section, the sounds recorded by running out of available empty tracks, missing the chance to add effects at the proper points, losing control over the final stereo ...
... operations than really necessary. MULTITRACK RECORDING PLAN YOUR RECORDING A clear plan is essential before you start, plan your recording carefully - YAMAHA's REV7 Digital Reverberator can perform ping-pong and mixdown operations without regard to achieve good sound quality. It also features echo and...all the steps involved, you may "record yourself into a corner" by these operations. Through the MT1X's mixing section, the sounds recorded by running out of available empty tracks, missing the chance to add effects at the proper points, losing control over the final stereo ...
Owner's Manual
Page 20
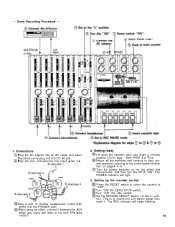
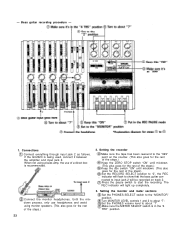
... is to the control panel illustration on for the effect and microphones, and then turn the MT1X "ON". - Return all the switches and controls to their normal positions, referring to record the Left stereo signal onto track 1. When using an effect, connect it between the AUX SEND jack (input) and either of...
... is to the control panel illustration on for the effect and microphones, and then turn the MT1X "ON". - Return all the switches and controls to their normal positions, referring to record the Left stereo signal onto track 1. When using an effect, connect it between the AUX SEND jack (input) and either of...
Owner's Manual
Page 22
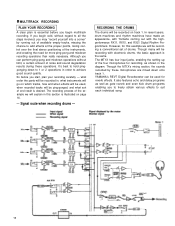
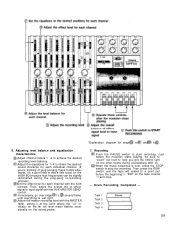
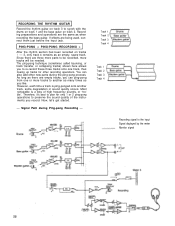
...the equalizers for 1~4 to obtain the desired sound character for each individual channel. (If you get the timing right on the other tracks during the ping-pong re-recording process). Recording Push the PAUSE switch to . 7. Adjust the master recording level with the AUX ...the recording. Just before the beginning "999" on the sound.peaks. *Explanation diagram for steps to and to start recording. Track 1 Track 2 Track 3 Track 4 20 Adjusting level balance and equalization characteristics Adjust channel faders 1 ~4 to input signal with the MASTER fader, setting it 's a good...
...the equalizers for 1~4 to obtain the desired sound character for each individual channel. (If you get the timing right on the other tracks during the ping-pong re-recording process). Recording Push the PAUSE switch to . 7. Adjust the master recording level with the AUX ...the recording. Just before the beginning "999" on the sound.peaks. *Explanation diagram for steps to and to start recording. Track 1 Track 2 Track 3 Track 4 20 Adjusting level balance and equalization characteristics Adjust channel faders 1 ~4 to input signal with the MASTER fader, setting it 's a good...
Owner's Manual
Page 23
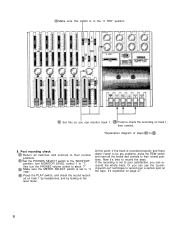
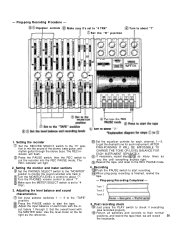
... and there doesn't seem to be any problems, press the REW switch and reset all switches and controls to their normal positions. It's explained on track 1 by headphones, and by looking at the level meter. Press to about "7". Set the PHONES SELECT switch to the "MONITOR" position, turn MONITOR LEVEL... control to check the recording on the tape. Set this so you can use the "punchin/punch-out" technique to record over a certain spot on track 1, then rewind. *Explanation diagram of steps t o 8. Now it's time to record the bass. Make sure this switch is set to "4 TRK". Or you ...
... and there doesn't seem to be any problems, press the REW switch and reset all switches and controls to their normal positions. It's explained on track 1 by headphones, and by looking at the level meter. Press to about "7". Set the PHONES SELECT switch to the "MONITOR" position, turn MONITOR LEVEL... control to check the recording on the tape. Set this so you can use the "punchin/punch-out" technique to record over a certain spot on track 1, then rewind. *Explanation diagram of steps t o 8. Now it's time to record the bass. Make sure this switch is set to "4 TRK". Or you ...
Owner's Manual
Page 24
... recorder. Another idea is the way to play many different instrumental parts on a different track. With this technique, it's possible for one musician to go. If you're multitalented, multitrack overdubbing can prove to use the Yamaha GC2020 comp/limiter. If you're using an effect of the effect. TRK2 22 If...
... recorder. Another idea is the way to play many different instrumental parts on a different track. With this technique, it's possible for one musician to go. If you're multitalented, multitrack overdubbing can prove to use the Yamaha GC2020 comp/limiter. If you're using an effect of the effect. TRK2 22 If...
Owner's Manual
Page 25
... the dbx switch "ON" until mixdown. (This also goes for the rest of the steps) Set the RECORD SELECT position to the "999" point on track 2. The REC indicator will flash to about "7". If the GC2020 is in the "4 TRK" position. 23 Connect the monitor headphones. Make sure the METER SELECT...
... the dbx switch "ON" until mixdown. (This also goes for the rest of the steps) Set the RECORD SELECT position to the "999" point on track 2. The REC indicator will flash to about "7". If the GC2020 is in the "4 TRK" position. 23 Connect the monitor headphones. Make sure the METER SELECT...

Owner's Manual
Page 26
...and 2, decide the left/ right stereo positioning of the bass guitar and drums. If necessary, control the combined volume level with the drum track. When the musical segment is over, stop and rewind the tape. - Set all switches and controls back to your satisfaction, rewind the.... Post recording check Just press the play along in synch with the PHONES volume control. Recording Press the PAUSE switch to 4. Track 1 Track 2 Track 3 Track 4 8. Bass Guitar Recording completed - Equalizer controls Press the PAUSE button and adjust the monitor levels Set to the MIC/LINE position...
...and 2, decide the left/ right stereo positioning of the bass guitar and drums. If necessary, control the combined volume level with the drum track. When the musical segment is over, stop and rewind the tape. - Set all switches and controls back to your satisfaction, rewind the.... Post recording check Just press the play along in synch with the PHONES volume control. Recording Press the PAUSE switch to 4. Track 1 Track 2 Track 3 Track 4 8. Bass Guitar Recording completed - Equalizer controls Press the PAUSE button and adjust the monitor levels Set to the MIC/LINE position...
Owner's Manual
Page 27
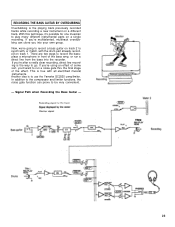
... onto another as many times as when recording the bass guitar. Since there are empty tracks, you can also add other recording operations. However, each time a track is a loss of the instruments you like. Track 1 Track 2 Track 3 Track 4 Track 1 Track 2 Track 3 Track 4 Recording signal to another track, some degradation in sound quality occurs. The ping-pong technique (sometimes called bouncing, or...
... onto another as many times as when recording the bass guitar. Since there are empty tracks, you can also add other recording operations. However, each time a track is a loss of the instruments you like. Track 1 Track 2 Track 3 Track 4 Track 1 Track 2 Track 3 Track 4 Recording signal to another track, some degradation in sound quality occurs. The ping-pong technique (sometimes called bouncing, or...
Owner's Manual
Page 28
...EACH INSTRUMENT SEPARATELY. Recording Push the PAUSE switch to start recording. Return all switches and controls to monitor the sound recorded onto track 4. Setting the monitor and meter sections Set the PHONES SELECT switch to the "MONITOR" position to their normal positions, and ...rewind the tape Next, we will record 26 the keyboards. put the recorder into the REC PAUSE mode. Track 1 Track 2 Track 3 5. Post recording check Just press the PLAY switch to about "7". Turn the MONITOR LEVEL 4 control to check if everything sounds right...
...EACH INSTRUMENT SEPARATELY. Recording Push the PAUSE switch to start recording. Return all switches and controls to monitor the sound recorded onto track 4. Setting the monitor and meter sections Set the PHONES SELECT switch to the "MONITOR" position to their normal positions, and ...rewind the tape Next, we will record 26 the keyboards. put the recorder into the REC PAUSE mode. Track 1 Track 2 Track 3 5. Post recording check Just press the PLAY switch to about "7". Turn the MONITOR LEVEL 4 control to check if everything sounds right...


