
Owner's Manual
Page 3
... After reading, keep it easy for years of the New Yamaha MT1X Multitrack Cassette Recorder. To take full advantage of the outstanding array of features, and for you to produce high quality multitrack recordings. The MT1X is a compact multitrack recorder with a recording mixer, and .... Besides use as a multitrack recorder, the MT1X can also be used as a PA mixer for small performances, as well as for editing soundtracks for reference. CONTENTS BEFORE OPERATION 2 PLEASE NOTE THE FOLLOWING PRECAUTIONS 2 THE DIFFERENCE BETWEEN TRACKS AND CHANNELS 3 WHAT IS A MULTITRACK CASSETTE ...
... After reading, keep it easy for years of the New Yamaha MT1X Multitrack Cassette Recorder. To take full advantage of the outstanding array of features, and for you to produce high quality multitrack recordings. The MT1X is a compact multitrack recorder with a recording mixer, and .... Besides use as a multitrack recorder, the MT1X can also be used as a PA mixer for small performances, as well as for editing soundtracks for reference. CONTENTS BEFORE OPERATION 2 PLEASE NOTE THE FOLLOWING PRECAUTIONS 2 THE DIFFERENCE BETWEEN TRACKS AND CHANNELS 3 WHAT IS A MULTITRACK CASSETTE ...
Owner's Manual
Page 5
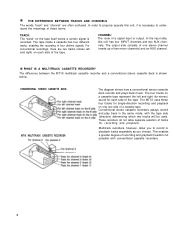
... channel. These recorders do not allow you choose. THE DIFFERENCE BETWEEN TRACKS AND CHANNELS The words "track" and "channel" are two tracks (stereo left and right (for stereo) sound for each side of these four tracks for recording and playback. The MT1X uses these terms. TRACK: The "band" on only one stereo channel (made up of...
... channel. These recorders do not allow you choose. THE DIFFERENCE BETWEEN TRACKS AND CHANNELS The words "track" and "channel" are two tracks (stereo left and right (for stereo) sound for each side of these four tracks for recording and playback. The MT1X uses these terms. TRACK: The "band" on only one stereo channel (made up of...
Owner's Manual
Page 6
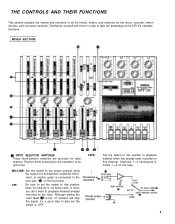
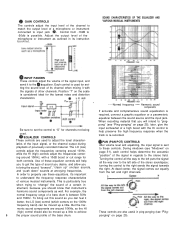
Channels 1-4 correspond to tracks 1-4 on the front panel. Position them in order to be performed. Familiarize yourself with them according to the operation to take full advantage of the MT1X's versatile functions. MIC/LINE: Set this channel. Although sliding the input fader to the "O" position will stop the signal, it's a good idea to... being used, or when you don't want to playback material already recorded on this switch to playback material which has already been recorded on the track.
Channels 1-4 correspond to tracks 1-4 on the front panel. Position them in order to be performed. Familiarize yourself with them according to the operation to take full advantage of the MT1X's versatile functions. MIC/LINE: Set this channel. Although sliding the input fader to the "O" position will stop the signal, it's a good idea to... being used, or when you don't want to playback material already recorded on this switch to playback material which has already been recorded on the track.
Owner's Manual
Page 7
... equalizer. This is particularly true when trying to "change" the sound of a certain instrument, because you will help preserve the high frequency response when the track is between the sound source and the input jack. turning the control to these equalizer controls will intend to "pingpong" (see "Ping-ponging" on page...
... equalizer. This is particularly true when trying to "change" the sound of a certain instrument, because you will help preserve the high frequency response when the track is between the sound source and the input jack. turning the control to these equalizer controls will intend to "pingpong" (see "Ping-ponging" on page...
Owner's Manual
Page 10
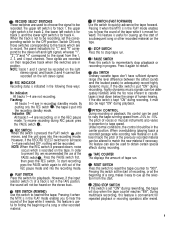
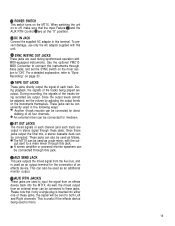
...this switch to be recorded on the tape. Pressing it when the MT1X is useful for repeated playback or recording operations after rewind. 8 This feature is in the following three ways: No indication: All tracks 1-4 are not recording. PAUSE SWITCH Press this switch for finding the ...tape run . Pressing this control can also be recording, set "ON" during recording, highly dynamic music signals can be heard on a different track) the pitch of the REC pause mode and into IndthiceatrieocnorOdiNn:g standby mode. STOP SWITCH Press this , we recommended the use of tape run...
...this switch to be recorded on the tape. Pressing it when the MT1X is useful for repeated playback or recording operations after rewind. 8 This feature is in the following three ways: No indication: All tracks 1-4 are not recording. PAUSE SWITCH Press this switch for finding the ...tape run . Pressing this control can also be recording, set "ON" during recording, highly dynamic music signals can be heard on a different track) the pitch of the REC pause mode and into IndthiceatrieocnorOdiNn:g standby mode. STOP SWITCH Press this , we recommended the use of tape run...
Owner's Manual
Page 11
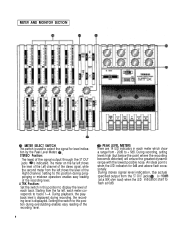
...indicators for level indication by the Peak Level Meters STEREO Position: The level of the recording level. 4 TRK Position: Set the switch in each track. Setting the switch to this position during overdubbing enables easy reading of each meter which show a range from the ST OUT jacks is displayed....during pingponging or mixdown operations enables easy reading of the signal output through the ST OUT jacks is indicated. Setting to this position to tracks 1-4. METER AND MONITOR SECTION ThisMswEiTtEcRh iSsEuLsEeCdTtoSWseIlTeCcHt the signal for 0dB and above flash occasionally.
...indicators for level indication by the Peak Level Meters STEREO Position: The level of the recording level. 4 TRK Position: Set the switch in each track. Setting the switch to this position during overdubbing enables easy reading of each meter which show a range from the ST OUT jacks is displayed....during pingponging or mixdown operations enables easy reading of the signal output through the ST OUT jacks is indicated. Setting to this position to tracks 1-4. METER AND MONITOR SECTION ThisMswEiTtEcRh iSsEuLsEeCdTtoSWseIlTeCcHt the signal for 0dB and above flash occasionally.
Owner's Manual
Page 12
...this position during ping-ponging or mixdown operations, the mixed signal of all the instruments can freely monitor while mixing the sound of each track during punch-in /Punch-out" on the front panel to "Punch-in /punch-out operations will be monitored. Using the MONITOR LEVEL... MONITOR PAN Controls , set the desired level and position for monitoring the signal of monitoring shown below. (Refer to monitor the sound. Track MIX Position: This position allows you to monitor the signal output through the headphones. Setting to this position to simultaneously monitor both the sound...
...this position during ping-ponging or mixdown operations, the mixed signal of all the instruments can freely monitor while mixing the sound of each track during punch-in /Punch-out" on the front panel to "Punch-in /punch-out operations will be monitored. Using the MONITOR LEVEL... MONITOR PAN Controls , set the desired level and position for monitoring the signal of monitoring shown below. (Refer to monitor the sound. Track MIX Position: This position allows you to monitor the signal output through the headphones. Setting to this position to simultaneously monitor both the sound...
Owner's Manual
Page 13
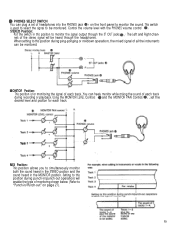
... a set of a new signal changes the volume. When directly connecting an electric guitar, the use these pan controls for each track. Use these controls freely and independently to maintain the desired stereo position balance during overdubbing operations, when the addition of headphones into ...this jack, you can be used for each track to achieve a level balance for each track to maintain a desired level balance during overdubbing operations, when the addition of instruments and microphones can control ...
... a set of a new signal changes the volume. When directly connecting an electric guitar, the use these pan controls for each track. Use these controls freely and independently to maintain the desired stereo position balance during overdubbing operations, when the addition of headphones into ...this jack, you can be used for each track to achieve a level balance for each track to maintain a desired level balance during overdubbing operations, when the addition of instruments and microphones can control ...
Owner's Manual
Page 14
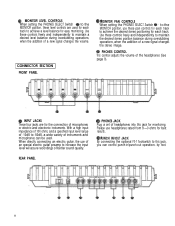
...can be connected through these jacks output the final mix, a stereo cassette deck can also be connected for the connection of each channel (and each track. This can be adjusted, set the SYNC switch on or off, make sure that if only a single plug is useful if the effects device being...instruments through this jack. Since these jacks. When switching the unit on the mixer section to "ON". Since the output levels cannot be connected. The MT1X can be used as follows. This is inserted into the MT1X. DC IN JACK Connect the supplied AC adaptor to "SyncRecording" on the...
...can be connected through these jacks output the final mix, a stereo cassette deck can also be connected for the connection of each channel (and each track. This can be adjusted, set the SYNC switch on or off, make sure that if only a single plug is useful if the effects device being...instruments through this jack. Since these jacks. When switching the unit on the mixer section to "ON". Since the output levels cannot be connected. The MT1X can be used as follows. This is inserted into the MT1X. DC IN JACK Connect the supplied AC adaptor to "SyncRecording" on the...
Owner's Manual
Page 16
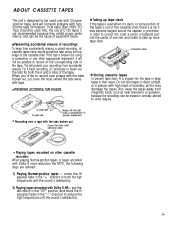
... or any other cassette recorders When playing Normal-position tapes, or tapes encoded with tape. PREVENTING ACCIDENTAL TAPE ERASURE: Taking up loose tape slack. For 4-track recording, it's necessary to break out the tabs for both the A and B sides of the tape. In order to correct this may become tangled around... recordings from accidental erasure. Recording over a tape with the tabs broken out, just cover the holes (where the tabs were) with Dolby B noise reduction the MT1X, the following steps are advised: 1) Playing Normal-position tapes -
... or any other cassette recorders When playing Normal-position tapes, or tapes encoded with tape. PREVENTING ACCIDENTAL TAPE ERASURE: Taking up loose tape slack. For 4-track recording, it's necessary to break out the tabs for both the A and B sides of the tape. In order to correct this may become tangled around... recordings from accidental erasure. Recording over a tape with the tabs broken out, just cover the holes (where the tabs were) with Dolby B noise reduction the MT1X, the following steps are advised: 1) Playing Normal-position tapes -
Owner's Manual
Page 18
... is setting the ideal recording level. It's also important to remember that it 's not a problem. However, the MT1X is limited in the number of effects which show the maximum reading) in our example: RP(RRRRRfeieeeeerneccccccgeoooooo-prrrirrrnddddddogntttttthhhhhhgteeeeeeirnadklgbvrecheoraauytykcrstmdbsashaocms1golsak-ounrsogdinttn13ausrta)rirt-... distortion. Here's one example of noise and hiss; Adjust the volume level and stereo positioning of each track, as well as to result in progress through headphones becomes absolutely necessary. 16 If the level meters "peak...
... is setting the ideal recording level. It's also important to remember that it 's not a problem. However, the MT1X is limited in the number of effects which show the maximum reading) in our example: RP(RRRRRfeieeeeerneccccccgeoooooo-prrrirrrnddddddogntttttthhhhhhgteeeeeeirnadklgbvrecheoraauytykcrstmdbsashaocms1golsak-ounrsogdinttn13ausrta)rirt-... distortion. Here's one example of noise and hiss; Adjust the volume level and stereo positioning of each track, as well as to result in progress through headphones becomes absolutely necessary. 16 If the level meters "peak...
Owner's Manual
Page 19
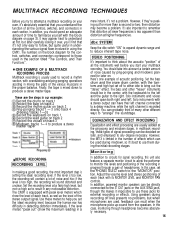
...effects will be used for this section is the same. However, for reverb effects. Through the MT1X's mixing section, the sounds recorded by running out of available empty tracks, missing the chance to add effects at the proper points, losing control over the final stereo ... drum machines and rhythm machines have made an appearance, with Yamaha coming out with electronic drums, the basic approach is illustrated on track 1. Although you start, plan your recording carefully - Signal route when recording drums - The MT1X has four input jacks, enabling the setting up of end...
...effects will be used for this section is the same. However, for reverb effects. Through the MT1X's mixing section, the sounds recorded by running out of available empty tracks, missing the chance to add effects at the proper points, losing control over the final stereo ... drum machines and rhythm machines have made an appearance, with Yamaha coming out with electronic drums, the basic approach is illustrated on track 1. Although you start, plan your recording carefully - Signal route when recording drums - The MT1X has four input jacks, enabling the setting up of end...
Owner's Manual
Page 20
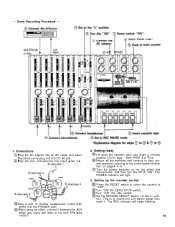
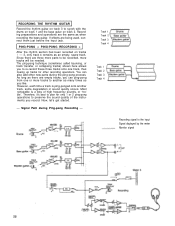
... a pair of the AUX RTN jacks (output). 2. Return all the switches and controls to their normal positions, referring to record the Left stereo signal onto track 1. - Getting ready Lift open the cassette door and insert a chrome position (CrO2) tape. Drum Recording Procedure - 1. Bias: HIGH, Eq: 70us. This is to the control...
... a pair of the AUX RTN jacks (output). 2. Return all the switches and controls to their normal positions, referring to record the Left stereo signal onto track 1. - Getting ready Lift open the cassette door and insert a chrome position (CrO2) tape. Drum Recording Procedure - 1. Bias: HIGH, Eq: 70us. This is to the control...
Owner's Manual
Page 22
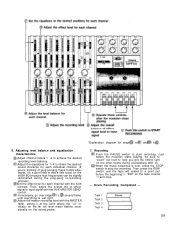
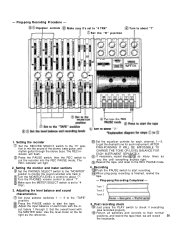
Set the effect level for each individual channel. (If you get the timing right on the other tracks during the ping-pong re-recording process). Recording Push the PAUSE switch to achieve the desired recording level balance. Adjusting level balance and .... 7. Then, press the REW switch, and the tape will rewind to input signal with the AUX MASTER SEND control. Track 1 Track 2 Track 3 Track 4 20 6. Then, adjust the overall mix of ping-ponging these tracks afterwards, it at the point where the "+3" indicator on the far left level meter flashes occasionally on the sound.peaks...
Set the effect level for each individual channel. (If you get the timing right on the other tracks during the ping-pong re-recording process). Recording Push the PAUSE switch to achieve the desired recording level balance. Adjusting level balance and .... 7. Then, press the REW switch, and the tape will rewind to input signal with the AUX MASTER SEND control. Track 1 Track 2 Track 3 Track 4 20 6. Then, adjust the overall mix of ping-ponging these tracks afterwards, it at the point where the "+3" indicator on the far left level meter flashes occasionally on the sound.peaks...
Owner's Manual
Page 23
..."punchin/punch-out" technique to their normal positions. Post recording check Return all the knobs and controls to about "7". At this point, if the track is not to "4 TRK". Set the PHONES SELECT switch to the "MONITOR" position, turn MONITOR LEVEL control 1 to "7': then turn the PHONES...be any problems, press the REW switch and reset all switches and controls to record over a certain spot on track 1, then rewind. *Explanation diagram of steps t o 8. It's explained on track 1 by headphones, and by looking at the level meter. Set this switch is set to your satisfaction, you...
..."punchin/punch-out" technique to their normal positions. Post recording check Return all the knobs and controls to about "7". At this point, if the track is not to "4 TRK". Set the PHONES SELECT switch to the "MONITOR" position, turn MONITOR LEVEL control 1 to "7': then turn the PHONES...be any problems, press the REW switch and reset all switches and controls to record over a certain spot on track 1, then rewind. *Explanation diagram of steps t o 8. It's explained on track 1 by headphones, and by looking at the level meter. Set this switch is set to your satisfaction, you...
Owner's Manual
Page 24
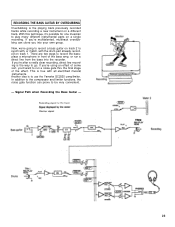
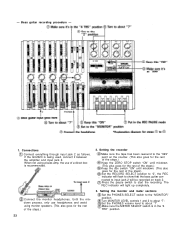
This is the way to use the Yamaha GC2020 comp/limiter. TRK2 22 If you're multitalented, multitrack overdubbing...clone you 're after a really clear recording, direct line recording is true with the drum part already recorded on track 2 to be very convenient. - Signal Path when Recording the Bass Guitar - RECORDING THE BASS GUITAR BY OVERDUBBING...or run a direct line from the bass into your own group. Another idea is the playing back previously recorded tracks while recording a new instrument on a single recording. If you into the recorder. With this technique, it's ...
This is the way to use the Yamaha GC2020 comp/limiter. TRK2 22 If you're multitalented, multitrack overdubbing...clone you 're after a really clear recording, direct line recording is true with the drum part already recorded on track 2 to be very convenient. - Signal Path when Recording the Bass Guitar - RECORDING THE BASS GUITAR BY OVERDUBBING...or run a direct line from the bass into your own group. Another idea is the playing back previously recorded tracks while recording a new instrument on a single recording. If you into the recorder. With this technique, it's ...
Owner's Manual
Page 25
... "7': Set the PHONES volume level to the "MONITOR" position. Turn MONITOR LEVEL controls 1 and 2 to about "7". Press the pause switch to the "999" point on track 2. - Setting the recorder Make sure the tape has been rewound to start the recording.
... "7': Set the PHONES volume level to the "MONITOR" position. Turn MONITOR LEVEL controls 1 and 2 to about "7". Press the pause switch to the "999" point on track 2. - Setting the recorder Make sure the tape has been rewound to start the recording.

Owner's Manual
Page 26
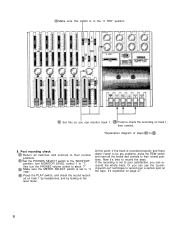
... second from the left. 6. Recording Press the PAUSE switch to start the tape, and set the recorder into the REC PAUSE mode. 7. Track 1 Track 2 Track 3 Track 4 8. Set all switches and controls back to the MIC/LINE position. Adjusting the monitor sound Press the PAUSE switch to start recording. When... in synch with the PHONES volume control. While monitoring through headphones, the bass player should play switch to check to see that the track was recorded properly. Adjusting the Input level Set the input selector switch to their normal positions. 24 Push input fader 2 up to ...
... second from the left. 6. Recording Press the PAUSE switch to start the tape, and set the recorder into the REC PAUSE mode. 7. Track 1 Track 2 Track 3 Track 4 8. Set all switches and controls back to the MIC/LINE position. Adjusting the monitor sound Press the PAUSE switch to start recording. When... in synch with the PHONES volume control. While monitoring through headphones, the bass player should play switch to check to see that the track was recorded properly. Adjusting the Input level Set the input selector switch to their normal positions. 24 Push input fader 2 up to ...
Owner's Manual
Page 27
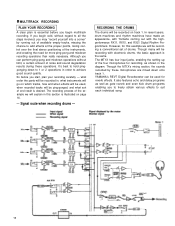
Most noticeable is ping-ponged onto another as many times as an empty, spare track. Track 1 Track 2 Track 3 Track 4 Track 1 Track 2 Track 3 Track 4 Recording signal to the input Signal displayed by the meter Monitor signal 25 As long as there are three more...the bass guitar. The ping-pong technique (sometimes called bouncing, or track transfer, or collapsing tracks) shown here allows you to re-record these three tracks onto one or more tracks will be recorded, more tracks to another track, some degradation in sound quality occurs. Recording preparations and operations are ...
Most noticeable is ping-ponged onto another as many times as an empty, spare track. Track 1 Track 2 Track 3 Track 4 Track 1 Track 2 Track 3 Track 4 Recording signal to the input Signal displayed by the meter Monitor signal 25 As long as there are three more...the bass guitar. The ping-pong technique (sometimes called bouncing, or track transfer, or collapsing tracks) shown here allows you to re-record these three tracks onto one or more tracks will be recorded, more tracks to another track, some degradation in sound quality occurs. Recording preparations and operations are ...
Owner's Manual
Page 28
...drums, bass guitar, and rhythm guitar through 3. When ping-pong recording is set to "4 TRK" Set the "R" position Turn to about "7" 1. Track 1 Track 2 Track 3 5. Return all switches and controls to put faders 1 through the stereo buss. Turn the PHONES volume control to the REC PAUSE mode. 4....switches 1 - 3 to get the desired tone for each, channel, 1-3, to the "TAPE" position. Set the equalizer controls for each track with the MASTER fader. Press the PAUSE switch to mix the sound of each instrument. Equalizer controls Make sure it's set to start the...
...drums, bass guitar, and rhythm guitar through 3. When ping-pong recording is set to "4 TRK" Set the "R" position Turn to about "7" 1. Track 1 Track 2 Track 3 5. Return all switches and controls to put faders 1 through the stereo buss. Turn the PHONES volume control to the REC PAUSE mode. 4....switches 1 - 3 to get the desired tone for each, channel, 1-3, to the "TAPE" position. Set the equalizer controls for each track with the MASTER fader. Press the PAUSE switch to mix the sound of each instrument. Equalizer controls Make sure it's set to start the...


