
Owner's Manual
Page 3
... with numerous versatile functions. To take full advantage of the outstanding array of features, and for reference. Congratulations on your choice of trouble-free operation, we urge you to thoroughly read this operating manual. Using conventional cassette tapes, the MT1X makes it in a handy place for years of the New Yamaha MT1X Multitrack Cassette Recorder. Besides use as a multitrack recorder, the MT1X can also be used as a PA mixer...
... with numerous versatile functions. To take full advantage of the outstanding array of features, and for reference. Congratulations on your choice of trouble-free operation, we urge you to thoroughly read this operating manual. Using conventional cassette tapes, the MT1X makes it in a handy place for years of the New Yamaha MT1X Multitrack Cassette Recorder. Besides use as a multitrack recorder, the MT1X can also be used as a PA mixer...
Owner's Manual
Page 4
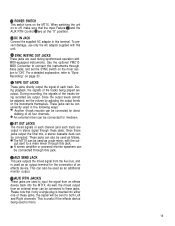
... wet hands -- Be sure to get proper sound reproduction, set the dbx switch ON when playing back tapes recorded with dbx on the cord. If necessary, the user should be used for additional suggestions. BEFORE OPERATION PLEASE NOTE THE FOLLOWING PRECAUTIONS: • ABOUT CASSETTE TAPE This unit is designed to be used only with Chromeposition tape, and will not work properly with a soft, dry cloth. EQ...
... wet hands -- Be sure to get proper sound reproduction, set the dbx switch ON when playing back tapes recorded with dbx on the cord. If necessary, the user should be used for additional suggestions. BEFORE OPERATION PLEASE NOTE THE FOLLOWING PRECAUTIONS: • ABOUT CASSETTE TAPE This unit is designed to be used only with Chromeposition tape, and will not work properly with a soft, dry cloth. EQ...
Owner's Manual
Page 5
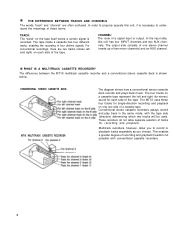
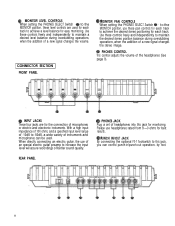
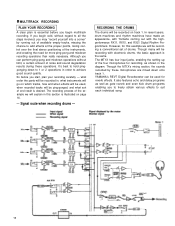
... the recording of a signal input or output. The output side consists of one side of a cassette tape. CONVENTIONAL STEREO CASSETTE DECK MT1X MULTITRACK CASSETTE RECORDER The diagram shows how a conventional stereo cassette deck records and plays back music. Conventional stereo cassette recorders always record and play back in the same mode, with conventional cassette recorders. 3 CHANNEL: The route of four distinct signals. The difference between the MT1X multitrack cassette recorder and a conventional stereo cassette deck is recorded. The MT1X uses these terms. TRACK: The...
... the recording of a signal input or output. The output side consists of one side of a cassette tape. CONVENTIONAL STEREO CASSETTE DECK MT1X MULTITRACK CASSETTE RECORDER The diagram shows how a conventional stereo cassette deck records and plays back music. Conventional stereo cassette recorders always record and play back in the same mode, with conventional cassette recorders. 3 CHANNEL: The route of four distinct signals. The difference between the MT1X multitrack cassette recorder and a conventional stereo cassette deck is recorded. The MT1X uses these terms. TRACK: The...
Owner's Manual
Page 7
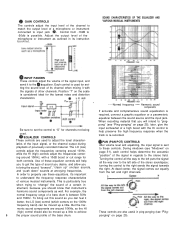
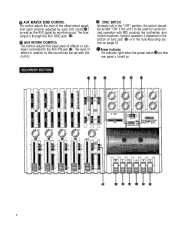
... "push down" sounds at annoying frequencies. turning the control to the left and right channels. GAIN CONTROLS The controls adjust the input level of the channel to match the output level of a microphone or instrument connected to input jack Control from the left side of the stereo soundspace; SOUND CHARACTERISTICS OF THE EQUALIZER AND VARIOUS MUSICAL INSTRUMENTS INPUT FADERS These controls adjust the volume of the signal input, and send it better, the LO (low) control (which centers...
... "push down" sounds at annoying frequencies. turning the control to the left and right channels. GAIN CONTROLS The controls adjust the input level of the channel to match the output level of a microphone or instrument connected to input jack Control from the left side of the stereo soundspace; SOUND CHARACTERISTICS OF THE EQUALIZER AND VARIOUS MUSICAL INSTRUMENTS INPUT FADERS These controls adjust the volume of the signal input, and send it better, the LO (low) control (which centers...
Owner's Manual
Page 9
... the Sync-Recording section on Sync jack or in relation to the sound can be used for monitoring use. Synchro operation is to the AUX RTN jack . The final output is turned on the rear panel is through the AUX SEND jack AUX RETURN CONTROL This control adjusts the input level of effects or submixers connected to be set with MIDI products like synthesizers and rhythm machines. Power Indicator This indicator lights when the power switch...
... the Sync-Recording section on Sync jack or in relation to the sound can be used for monitoring use. Synchro operation is to the AUX RTN jack . The final output is turned on the rear panel is through the AUX SEND jack AUX RETURN CONTROL This control adjusts the input level of effects or submixers connected to be set with MIDI products like synthesizers and rhythm machines. Power Indicator This indicator lights when the power switch...
Owner's Manual
Page 10
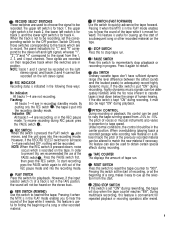
... this switch to rewind the tape. REW SWlTCH (REWIND) Use this , we recommended the use of a song or other recorded material on the tape. RESET SWITCH Press this switch for playback. When the track is indicated in position. By pushing only the REC switch the tape is useful for all tracks 1-4 are switched OFF, nothing will be recording, set "ON" during recording, highly dynamic music signals can be in the REC pause mode. However, if the RECORD SELECT switches...
... this switch to rewind the tape. REW SWlTCH (REWIND) Use this , we recommended the use of a song or other recorded material on the tape. RESET SWITCH Press this switch for playback. When the track is indicated in position. By pushing only the REC switch the tape is useful for all tracks 1-4 are switched OFF, nothing will be recording, set "ON" during recording, highly dynamic music signals can be in the REC pause mode. However, if the RECORD SELECT switches...
Owner's Manual
Page 12
... recording or playback. nels of each track. Control the volume level with the PHONES volume control STEPRuEtOthePosswititiochn:in /Punch-out" on the front panel to simultaneously monitor both the sound heard in the STEREO position and the sound heard in the MONITOR position. Using the MONITOR LEVEL Controls and the MONITOR PAN Controls , set the desired level and position for monitoring the signal of the stereo signal will enable the type...
... recording or playback. nels of each track. Control the volume level with the PHONES volume control STEPRuEtOthePosswititiochn:in /Punch-out" on the front panel to simultaneously monitor both the sound heard in the STEREO position and the sound heard in the MONITOR position. Using the MONITOR LEVEL Controls and the MONITOR PAN Controls , set the desired level and position for monitoring the signal of the stereo signal will enable the type...
Owner's Manual
Page 13
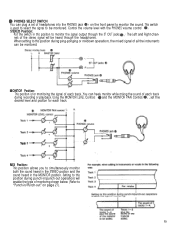
... the desired stereo positioning for each track to -50dB, a wide variety of instruments and microphones can control punch-in/punch-out operations. by foot. 11 CONNECTOR SECTION FRONT PANEL MONITOR PAN CONTROLS When setting the PHONES SELECT Switch to the MONITOR position, use of an special electric guitar preamp to increase the input level will assure recordings of better sound quality. Please use headphones...
... the desired stereo positioning for each track to -50dB, a wide variety of instruments and microphones can control punch-in/punch-out operations. by foot. 11 CONNECTOR SECTION FRONT PANEL MONITOR PAN CONTROLS When setting the PHONES SELECT Switch to the MONITOR position, use of an special electric guitar preamp to increase the input level will assure recordings of better sound quality. Please use headphones...
Owner's Manual
Page 14
... powered monitor speakers can also be connected through this jack. AUX SEND JACK This jack outputs the mixed signal from the Aux bus, and is mono. 12 During recording, the signals of the tracks being used is used in stereo signal through these jacks, the signal will be used as follows. Since these jacks. An external mixer can be adjusted, set the SYNC switch on the mixer section to this unit. The MT1X can be connected. POWER SWITCH This switch turns...
... powered monitor speakers can also be connected through this jack. AUX SEND JACK This jack outputs the mixed signal from the Aux bus, and is mono. 12 During recording, the signals of the tracks being used is used in stereo signal through these jacks, the signal will be used as follows. Since these jacks. An external mixer can be adjusted, set the SYNC switch on the mixer section to this unit. The MT1X can be connected. POWER SWITCH This switch turns...
Owner's Manual
Page 18
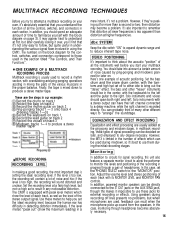
... switch to produce a stereo BEFORE RECORDING RECORDING LEVEL In making a good recording, the most important step is too low, the recording will sound distorted and unclear. The numbers on later, and employed to any noticeable distortion. STEREO POSITIONING It's important to bring out the "stereo" effect. In multitrack recording, these meters to reduce inherent tape noise. Adjust the volume level and stereo positioning of many other different ways to use...
... switch to produce a stereo BEFORE RECORDING RECORDING LEVEL In making a good recording, the most important step is too low, the recording will sound distorted and unclear. The numbers on later, and employed to any noticeable distortion. STEREO POSITIONING It's important to bring out the "stereo" effect. In multitrack recording, these meters to reduce inherent tape noise. Adjust the volume level and stereo positioning of many other different ways to use...
Owner's Manual
Page 19
... reverb effects. Through the MT1X's mixing section, the sounds recorded by running out of available empty tracks, missing the chance to all the steps involved, you start, plan your recording carefully - YAMAHA's REV7 Digital Reverberator can perform ping-pong and mixdown operations without regard to add effects at the proper points, losing control over the final stereo positioning of the four...
... reverb effects. Through the MT1X's mixing section, the sounds recorded by running out of available empty tracks, missing the chance to all the steps involved, you start, plan your recording carefully - YAMAHA's REV7 Digital Reverberator can perform ping-pong and mixdown operations without regard to add effects at the proper points, losing control over the final stereo positioning of the four...
Owner's Manual
Page 20
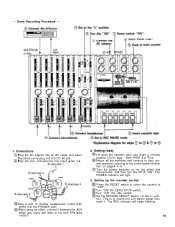
... round plug into input jacks 1-4. The POWER indicator will begin flashing. 18 Turn "ON" the ZERO STOP switch. The REC indicator will light. 3. Drum Recording Procedure - 1. Plug a pair of the AUX RTN jacks (output). 2. Bias: HIGH, Eq: 70us. When using an effect, connect it between the AUX SEND jack (input) and either of monitor headphones (rated 8-40 ohms) into the PHONES jack. Set the RECORD SELECT switch 1 to record the Left stereo signal onto track 1. Return all the switches and controls...
... round plug into input jacks 1-4. The POWER indicator will begin flashing. 18 Turn "ON" the ZERO STOP switch. The REC indicator will light. 3. Drum Recording Procedure - 1. Plug a pair of the AUX RTN jacks (output). 2. Bias: HIGH, Eq: 70us. When using an effect, connect it between the AUX SEND jack (input) and either of monitor headphones (rated 8-40 ohms) into the PHONES jack. Set the RECORD SELECT switch 1 to record the Left stereo signal onto track 1. Return all the switches and controls...
Owner's Manual
Page 23
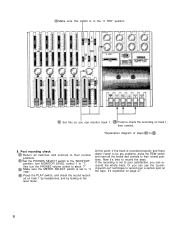
... level meter. Press the PLAY switch, and check the sound recorded on track 1, then rewind. *Explanation diagram of steps t o 8. Set the PHONES SELECT switch to the "MONITOR" position, turn MONITOR LEVEL control 1 to "7': then turn the PHONES volume control to "4 TRK". It's explained on the tape. Make sure this point, if the track is recorded properly and there doesn't seem to be any problems, press the REW switch and reset all switches and controls...
... level meter. Press the PLAY switch, and check the sound recorded on track 1, then rewind. *Explanation diagram of steps t o 8. Set the PHONES SELECT switch to the "MONITOR" position, turn MONITOR LEVEL control 1 to "7': then turn the PHONES volume control to "4 TRK". It's explained on the tape. Make sure this point, if the track is recorded properly and there doesn't seem to be any problems, press the REW switch and reset all switches and controls...
Owner's Manual
Page 25
... REC indicator will flash to the "MONITOR" position. Connect the monitor headphones. Turn MONITOR LEVEL controls 1 and 2 to about "7': Set the PHONES volume level to start the recording. Press the pause switch to about "7". nected to the "999" point on track 2. Make sure the METER SELECT switch is being used, connect it between the amplifier and input jack 2. Bass guitar recording procedure - 1. Setting the recorder Make sure the tape has been rewound to input jack 2 will be recorded...
... REC indicator will flash to the "MONITOR" position. Connect the monitor headphones. Turn MONITOR LEVEL controls 1 and 2 to about "7': Set the PHONES volume level to start the recording. Press the pause switch to about "7". nected to the "999" point on track 2. Make sure the METER SELECT switch is being used, connect it between the amplifier and input jack 2. Bass guitar recording procedure - 1. Setting the recorder Make sure the tape has been rewound to input jack 2 will be recorded...

Owner's Manual
Page 26
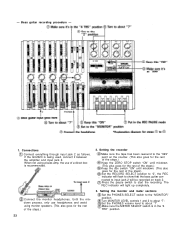
Start playing the bass guitar, and slide gain control 2 towards the "MIC" direction, stopping when the "+3" indicator on the level meter second from the left. 6. Adjusting the monitor sound Press the PAUSE switch to start recording. Push input fader 2 up to start the tape, and set the recorder into the REC PAUSE mode. 7. When the musical segment is over, stop and rewind the tape. - Track 1 Track 2 Track 3 Track 4 8. Adjusting the recording level and sound characteristics Operate the equalizer controls for steps to 4. Now, using MONITOR PAN...
Start playing the bass guitar, and slide gain control 2 towards the "MIC" direction, stopping when the "+3" indicator on the level meter second from the left. 6. Adjusting the monitor sound Press the PAUSE switch to start recording. Push input fader 2 up to start the tape, and set the recorder into the REC PAUSE mode. 7. When the musical segment is over, stop and rewind the tape. - Track 1 Track 2 Track 3 Track 4 8. Adjusting the recording level and sound characteristics Operate the equalizer controls for steps to 4. Now, using MONITOR PAN...
Owner's Manual
Page 28
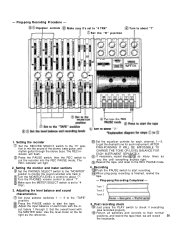
... reset to check if everything sounds right. Set the equalizer controls for each, channel, 1-3, to start the tape. Ping-pong Recording Completed - Turn the PHONES volume control to their normal positions, and rewind the tape Next, we will flash. Post recording check Just press the PLAY switch to the REC PAUSE mode. 4. Return all switches and controls to about "7". Turn the MONITOR LEVEL 4 control to start recording. Adjusting the level balance and sound characteristics Set input selector switches 1 - 3 to monitor the sound recorded onto track...
... reset to check if everything sounds right. Set the equalizer controls for each, channel, 1-3, to start the tape. Ping-pong Recording Completed - Turn the PHONES volume control to their normal positions, and rewind the tape Next, we will flash. Post recording check Just press the PLAY switch to the REC PAUSE mode. 4. Return all switches and controls to about "7". Turn the MONITOR LEVEL 4 control to start recording. Adjusting the level balance and sound characteristics Set input selector switches 1 - 3 to monitor the sound recorded onto track...
Owner's Manual
Page 31
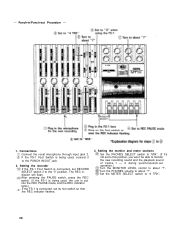
... monitor the new recording sound and the playback sound of tracks 1 - 4 during punch-in /Punch-out Procedure - 1. Set the METER SELECT switch to the PUNCH IN/OUT jack. 2. Punch-in /punch-out operation.) Turn the MONITOR LEVEL control to about "7". Setting the recorder If the FS-1 Foot Switch is being used , the unit is put into the REC PAUSE mode, and the REC indicator lights.) If the FS-1 is connected, set RECORD SELECT switch 3 to about...
... monitor the new recording sound and the playback sound of tracks 1 - 4 during punch-in /Punch-out Procedure - 1. Set the METER SELECT switch to the PUNCH IN/OUT jack. 2. Punch-in /punch-out operation.) Turn the MONITOR LEVEL control to about "7". Setting the recorder If the FS-1 Foot Switch is being used , the unit is put into the REC PAUSE mode, and the REC indicator lights.) If the FS-1 is connected, set RECORD SELECT switch 3 to about...

Owner's Manual
Page 34
... PLAY switch of the MT1X at the same time you start the tape, and adjust the level balance of the signal sent from the ST OUT jacks. After the recording is finished, play back the mixed down sound. You can keep repeating the mixdown process, varying the levels, equalizations, and effect level balance until everything sounds right. Watching the level meters of the stereo tape deck, set the output level of each track. Connections Connect a stereo tape...
... PLAY switch of the MT1X at the same time you start the tape, and adjust the level balance of the signal sent from the ST OUT jacks. After the recording is finished, play back the mixed down sound. You can keep repeating the mixdown process, varying the levels, equalizations, and effect level balance until everything sounds right. Watching the level meters of the stereo tape deck, set the output level of each track. Connections Connect a stereo tape...
Owner's Manual
Page 35
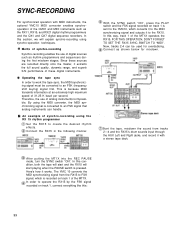
..., track 1 of the MT1X operates the RX15. This is pressed. Connect the RX15 in the following manner. FOR THIS OPERATION, DON'T FORGET TO SET THE RX15 SYNC SWITCH TO "MIDI". The YMC 10 converts the MIDI synchronizing signal from tracks 2-4 and the RX15's drum sounds input through the AUX Left and Right jacks, and record it to work the tape sync, the MIDI synchronizing signal must be used for...
..., track 1 of the MT1X operates the RX15. This is pressed. Connect the RX15 in the following manner. FOR THIS OPERATION, DON'T FORGET TO SET THE RX15 SYNC SWITCH TO "MIDI". The YMC 10 converts the MIDI synchronizing signal from tracks 2-4 and the RX15's drum sounds input through the AUX Left and Right jacks, and record it to work the tape sync, the MIDI synchronizing signal must be used for...

Owner's Manual
Page 36
... video camera's microphone, narration, background music, and sound effects. Using the MT1X to produce a promotional video for a period of a monaural video deck with a microphone. Overdub the background music on track 4. If it first. Mix down a good soundtrack for a good music video. If this capability useful to edit down the sound from tracks 1-4 and record them on the video soundtrack using the video decks overdubbing function. MAINTENANCE As a good general rule, the tape...
... video camera's microphone, narration, background music, and sound effects. Using the MT1X to produce a promotional video for a period of a monaural video deck with a microphone. Overdub the background music on track 4. If it first. Mix down a good soundtrack for a good music video. If this capability useful to edit down the sound from tracks 1-4 and record them on the video soundtrack using the video decks overdubbing function. MAINTENANCE As a good general rule, the tape...


