
Owner's Manual
Page 5
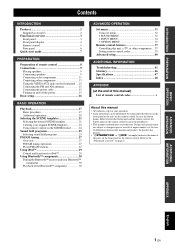
...30 Pairing the Bluetooth™ receiver and your Bluetooth™ component 30 Playback of the Bluetooth™ component 30 ADVANCED OPERATION Set menu 31 Using set menu 32 1 SOUND MENU 32 2 INPUT MENU 34 3 OPTION MENU 35 Remote control features 37 Controlling this unit, a TV, or... other components .... 37 Setting remote control codes 39 Advanced setup 40 ADDITIONAL INFORMATION Troubleshooting 41 Glossary 46 Specifications 47 Index 48 APPENDIX (at...
...30 Pairing the Bluetooth™ receiver and your Bluetooth™ component 30 Playback of the Bluetooth™ component 30 ADVANCED OPERATION Set menu 31 Using set menu 32 1 SOUND MENU 32 2 INPUT MENU 34 3 OPTION MENU 35 Remote control features 37 Controlling this unit, a TV, or... other components .... 37 Setting remote control codes 39 Advanced setup 40 ADDITIONAL INFORMATION Troubleshooting 41 Glossary 46 Specifications 47 Index 48 APPENDIX (at...
Owner's Manual
Page 6
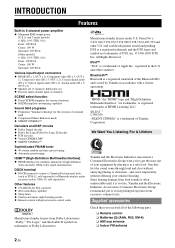
... are trademarks, or registered trademarks of Dolby Laboratories. DTS is a trademark of the following parts. ❏ Remote control ❏ Batteries (2) (AAA, R03, UM-4) ❏ AM loop antenna ❏ Indoor FM antenna 2 En One that you received all of Yamaha Corporation. and Canada models] (1 kHz, 0.9% THD, 8 Ω) Front: 100 W/ch Center: 100 W Surround: 100 W/ch...
... are trademarks, or registered trademarks of Dolby Laboratories. DTS is a trademark of the following parts. ❏ Remote control ❏ Batteries (2) (AAA, R03, UM-4) ❏ AM loop antenna ❏ Indoor FM antenna 2 En One that you received all of Yamaha Corporation. and Canada models] (1 kHz, 0.9% THD, 8 Ω) Front: 100 W/ch Center: 100 W Surround: 100 W/ch...
Owner's Manual
Page 9
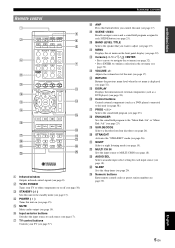
... of this unit (see page 25). v MULTI CH IN Sets the input source to each SCENE button (see page 32). y Numeric buttons Enter remote control codes or preset station number (see page 32). l Cursors (l / h / n / k) / ENTER • Press cursors to navigate the ... Sets the sound field program to confirm a selection in the set menu is displayed (see page 17). INTRODUCTION PREPARATION BASIC OPERATION ADVANCED OPERATION Remote control a c b POWER POWER STANDBY POWER TV AV d A B C MUTE e CD MD/CD-R TUNER f DVD DTV/CBL DVR TV CH V-AUX/DOCK D E g h AMP TV INPUT...
... of this unit (see page 25). v MULTI CH IN Sets the input source to each SCENE button (see page 32). y Numeric buttons Enter remote control codes or preset station number (see page 32). l Cursors (l / h / n / k) / ENTER • Press cursors to navigate the ... Sets the sound field program to confirm a selection in the set menu is displayed (see page 17). INTRODUCTION PREPARATION BASIC OPERATION ADVANCED OPERATION Remote control a c b POWER POWER STANDBY POWER TV AV d A B C MUTE e CD MD/CD-R TUNER f DVD DTV/CBL DVR TV CH V-AUX/DOCK D E g h AMP TV INPUT...

Owner's Manual
Page 12
... cover back into contact with your local regulations. • If the remote control is cleared, insert new batteries and set up the remote control code. dusty places • To set the remote control codes for other components, see page 39. 8 En places of high...Outputs infrared control signals. Notes • Change all of the batteries if you want to the polarity markings (+ and -) on the remote control. • Do not drop the remote control. • Do not leave or store the remote control in the remote control 13 Using the remote control The remote control transmits a ...
... cover back into contact with your local regulations. • If the remote control is cleared, insert new batteries and set up the remote control code. dusty places • To set the remote control codes for other components, see page 39. 8 En places of high...Outputs infrared control signals. Notes • Change all of the batteries if you want to the polarity markings (+ and -) on the remote control. • Do not drop the remote control. • Do not leave or store the remote control in the remote control 13 Using the remote control The remote control transmits a ...
Owner's Manual
Page 19
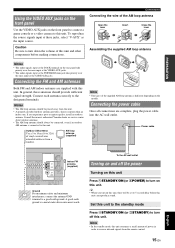
... this unit. Connections Connecting the wire of power in order to receive infrared signals from this unit. • A properly installed outdoor antenna provides clearer reception than an indoor one. Consult the nearest authorized Yamaha dealer or service center about outdoor antennas. • The AM ...The audio signals input at the PORTABLE mini jack take priority over the ones input at these antennas should be placed away from the remote control. 15 En English AM loop antenna (supplied) Note • The types of vinyl-covered wire extended outdoors from a window. Set ...
... this unit. Connections Connecting the wire of power in order to receive infrared signals from this unit. • A properly installed outdoor antenna provides clearer reception than an indoor one. Consult the nearest authorized Yamaha dealer or service center about outdoor antennas. • The AM ...The audio signals input at the PORTABLE mini jack take priority over the ones input at these antennas should be placed away from the remote control. 15 En English AM loop antenna (supplied) Note • The types of vinyl-covered wire extended outdoors from a window. Set ...
Owner's Manual
Page 20
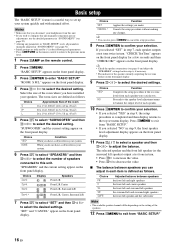
...h to select the desired setting. Choice Function SET Applies the settings you have a subwoofer in the following each parameters. • Press nRETURN on the remote control to return to the previous menu level. 1 Press hAMP on the front panel display. 11 Press lk / n to select a speaker and then ll... test tone levels from this unit. • If you selected "YES" in step 9, the front speaker level adjustment display appears on the remote control. 2 Press kMENU. Choice YES* NONE Condition When you made. appears on the front panel display for a few seconds and then "CHECK ...
...h to select the desired setting. Choice Function SET Applies the settings you have a subwoofer in the following each parameters. • Press nRETURN on the remote control to return to the previous menu level. 1 Press hAMP on the front panel display. 11 Press lk / n to select a speaker and then ll... test tone levels from this unit. • If you selected "YES" in step 9, the front speaker level adjustment display appears on the remote control. 2 Press kMENU. Choice YES* NONE Condition When you made. appears on the front panel display for a few seconds and then "CHECK ...

Owner's Manual
Page 23
...left speaker Front right speaker Center speaker Subwoofer Surround left speaker Surround right speaker Playback y • Once you press jBAND LEVEL TITLE on the remote control, you connect headphones, no signals are output at night. 1 Press ONIGHT (or press hAMP and then uNIGHT) repeatedly to adjust the speaker ...or speaker level. ■ Muting the audio output Press eMUTE on the front panel. Press eMUTE again to the PHONES jack on the remote control to adjust the balance of bass and treble for all sounds. Each choice is defined as follows. Note • This operation will ...
...left speaker Front right speaker Center speaker Subwoofer Surround left speaker Surround right speaker Playback y • Once you press jBAND LEVEL TITLE on the remote control, you connect headphones, no signals are output at night. 1 Press ONIGHT (or press hAMP and then uNIGHT) repeatedly to adjust the speaker ...or speaker level. ■ Muting the audio output Press eMUTE on the front panel. Press eMUTE again to the PHONES jack on the remote control to adjust the balance of bass and treble for all sounds. Each choice is defined as follows. Note • This operation will ...
Owner's Manual
Page 24
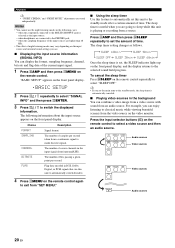
... the MULTI CH INPUT jacks is automatically canceled. ■ Playing video sources in the following information about the input source appears on the remote control to switch the displayed information. Press the input selector buttons (f) on the front panel display. y • If you are higher than... Once the sleep timer is playing or recording from the video source on the remote control again to exit from a continuous signal to select "SLEEP OFF." "BASIC SETUP" appears on the remote control. Press hAMP and then press xSLEEP repeatedly to set this unit to the standby...
... the MULTI CH INPUT jacks is automatically canceled. ■ Playing video sources in the following information about the input source appears on the remote control to switch the displayed information. Press the input selector buttons (f) on the front panel display. y • If you are higher than... Once the sleep timer is playing or recording from the video source on the remote control again to exit from a continuous signal to select "SLEEP OFF." "BASIC SETUP" appears on the remote control. Press hAMP and then press xSLEEP repeatedly to set this unit to the standby...

Owner's Manual
Page 25
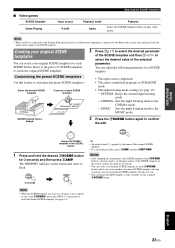
...for this unit in advance. ADVANCED OPERATION ADDITIONAL INFORMATION APPENDIX English 21 En The SCENE templates are built combinations of the SCENE template on the remote control. Radio Listening *2, *3, *4 - sound field program: Music Enh. 5ch For when you want to listen to confirm the selection. DVD ... desired SCENE templates from the SCENE template library and assign the templates to the selected SCENE buttons on the front panel and the remote control. y • To cancel the procedure, press hAMP and then nRETURN. sound field program: STRAIGHT For when you want to use...
...for this unit in advance. ADVANCED OPERATION ADDITIONAL INFORMATION APPENDIX English 21 En The SCENE templates are built combinations of the SCENE template on the remote control. Radio Listening *2, *3, *4 - sound field program: Music Enh. 5ch For when you want to listen to confirm the selection. DVD ... desired SCENE templates from the SCENE template library and assign the templates to the selected SCENE buttons on the front panel and the remote control. y • To cancel the procedure, press hAMP and then nRETURN. sound field program: STRAIGHT For when you want to use...
Owner's Manual
Page 27
... button for each iSCENE button, and if you create another customized SCENE template, this feature to the Bluetooth receiver, this SCENE template when you want to customize is connected to customize the preset SCENE templates. INTRODUCTION PREPARATION... SCENE templates for 3 seconds and then press hAMP. Note • When an iPod is connected to the Yamaha iPod universal dock or a Bluetooth component is not assigned to select the desired value of the original SCENE template... asterisk mark (*) appears by the name of the selected parameter. The MEMORY indicator on the remote control.
... button for each iSCENE button, and if you create another customized SCENE template, this feature to the Bluetooth receiver, this SCENE template when you want to customize is connected to customize the preset SCENE templates. INTRODUCTION PREPARATION... SCENE templates for 3 seconds and then press hAMP. Note • When an iPod is connected to the Yamaha iPod universal dock or a Bluetooth component is not assigned to select the desired value of the original SCENE template... asterisk mark (*) appears by the name of the selected parameter. The MEMORY indicator on the remote control.
Owner's Manual
Page 28
...to operate the input source component correctly. See page 37 for 3 seconds. Setting input source of the customized SCENE template on the remote control If you customize the input source of the selected SCENE template, you must set the input source of the selected SCENE template. *... STANDBY POWER TV AV A B C MUTE CD MD/CD-R TUNER DVD DTV/CBL DVR TV CH V-AUX/DOCK D E AMP TV INPUT TV MUTE TV VOL SCENE 1 2 3 4 BAND LEVEL TITLE MENU VOLUME SCENE buttons ENTER RETURN REC DISPLAY l PROG h 1 2 ENHANCER SUR. You must set the appropriate remote control code for each ...
...to operate the input source component correctly. See page 37 for 3 seconds. Setting input source of the customized SCENE template on the remote control If you customize the input source of the selected SCENE template, you must set the input source of the selected SCENE template. *... STANDBY POWER TV AV A B C MUTE CD MD/CD-R TUNER DVD DTV/CBL DVR TV CH V-AUX/DOCK D E AMP TV INPUT TV MUTE TV VOL SCENE 1 2 3 4 BAND LEVEL TITLE MENU VOLUME SCENE buttons ENTER RETURN REC DISPLAY l PROG h 1 2 ENHANCER SUR. You must set the appropriate remote control code for each ...
Owner's Manual
Page 32
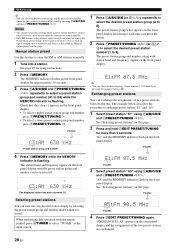
... than 3 seconds. When performing this page. If the station you store a new station under the same preset station number. • Only FM stations with the remote control, press fTUNER to select "TUNER" as C3. Manual station preset Use this feature to store is cleared when you want to store the FM or... stations" on the front panel display. FM/AM tuning y • You can select the preset station group and the preset station number where the first received station will be stored by pressing the numeric buttons (y).
... than 3 seconds. When performing this page. If the station you store a new station under the same preset station number. • Only FM stations with the remote control, press fTUNER to select "TUNER" as C3. Manual station preset Use this feature to store is cleared when you want to store the FM or... stations" on the front panel display. FM/AM tuning y • You can select the preset station group and the preset station number where the first received station will be stored by pressing the numeric buttons (y).
Owner's Manual
Page 33
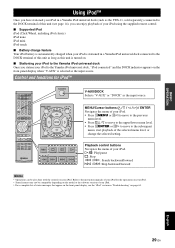
... unit is turned on. ■ Stationing your iPod to the subsequent menu, start playback of your iPod for iPod™ POWER POWER STANDBY POWER TV AV A B C MUTE CD MD/CD-R TUNER DVD DTV/CBL DVR TV CH V-AUX/DOCK D E AMP TV INPUT TV MUTE TV VOL SCENE 1 2...• Press lENTER or lh to move to the Yamaha iPod universal dock Once you station your iPod. p/e: Play/pause s: Stop w / f: Search backward/forward b / a: Skip backward/forward Notes • Operations can enjoy playback of your iPod using the supplied remote control. ■ Supported iPod iPod (Click Wheel, including ...
... unit is turned on. ■ Stationing your iPod to the subsequent menu, start playback of your iPod for iPod™ POWER POWER STANDBY POWER TV AV A B C MUTE CD MD/CD-R TUNER DVD DTV/CBL DVR TV CH V-AUX/DOCK D E AMP TV INPUT TV MUTE TV VOL SCENE 1 2...• Press lENTER or lh to move to the Yamaha iPod universal dock Once you station your iPod. p/e: Play/pause s: Stop w / f: Search backward/forward b / a: Skip backward/forward Notes • Operations can enjoy playback of your iPod using the supplied remote control. ■ Supported iPod iPod (Click Wheel, including ...
Owner's Manual
Page 34
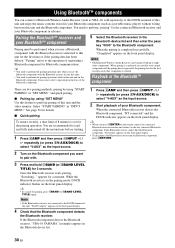
... for details. ■ Quick pairing To ensure security, a time limit of 8 minutes is cleared. If the Bluetooth component detects the Bluetooth receiver, "YBA-10 YAMAHA" (example) appears in the Bluetooth device list. 1 Press hAMP and then press NINPUT l / h repeatedly (or press fV-AUX/DOCK)... in the pairing mode, DOCK indicator flashes on the front panel display. y • When you press lENTER on the remote control, the connected Bluetooth receiver searches and connect to eight other component is set for the pairing operation. If necessary, refer to operating instructions of the ...
... for details. ■ Quick pairing To ensure security, a time limit of 8 minutes is cleared. If the Bluetooth component detects the Bluetooth receiver, "YBA-10 YAMAHA" (example) appears in the Bluetooth device list. 1 Press hAMP and then press NINPUT l / h repeatedly (or press fV-AUX/DOCK)... in the pairing mode, DOCK indicator flashes on the front panel display. y • When you press lENTER on the remote control, the connected Bluetooth receiver searches and connect to eight other component is set for the pairing operation. If necessary, refer to operating instructions of the ...
Owner's Manual
Page 36
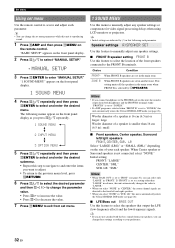
... and enter the desired submenu. • Repeat this step to navigate to and enter the items you connect headphones to the PHONES jack on the remote control. Initial setting: FRONT: "LARGE" CENTER: "SML" SUR. Choice Condition FRONT* When FRONT B speakers are indicated by CSPEAKERS. LR: "SML" Notes &#.... 1 SOUND MENU 4 Press lk / n repeatedly and then press lENTER to enter "MANUAL SETUP." Set menu Using set menu Use the remote control to access and adjust each speaker. If "FRONT" is set menu parameters while this feature to select the location of the front speakers connected...
... and enter the desired submenu. • Repeat this step to navigate to and enter the items you connect headphones to the PHONES jack on the remote control. Initial setting: FRONT: "LARGE" CENTER: "SML" SUR. Choice Condition FRONT* When FRONT B speakers are indicated by CSPEAKERS. LR: "SML" Notes &#.... 1 SOUND MENU 4 Press lk / n repeatedly and then press lENTER to enter "MANUAL SETUP." Set menu Using set menu Use the remote control to access and adjust each speaker. If "FRONT" is set menu parameters while this feature to select the location of the front speakers connected...
Owner's Manual
Page 38
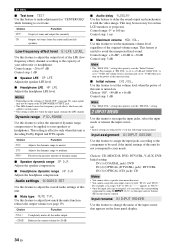
...time. ■ Initial volume INI.VOL. is set to -30 dB when you turn on the power of the input source that appears on the remote control). is set to -30 dB, the volume level is effective when the input signal contains the LFE channel. Choices: Off*, -80 dB to -20...more than once. • You cannot assign the same input source to narrow. Choice Function MIN Adjusts the dynamic range to both "IN (2)" and "IN (3)." Control range: 0* to avoid the unexpected loud sound. This feature is decoding Dolby Digital and DTS signals. For example, if "INI.VOL." y • Initial ...
...time. ■ Initial volume INI.VOL. is set to -30 dB when you turn on the power of the input source that appears on the remote control). is set to -30 dB, the volume level is effective when the input signal contains the LFE channel. Choices: Off*, -80 dB to -20...more than once. • You cannot assign the same input source to narrow. Choice Function MIN Adjusts the dynamic range to both "IN (2)" and "IN (3)." Control range: 0* to avoid the unexpected loud sound. This feature is decoding Dolby Digital and DTS signals. For example, if "INI.VOL." y • Initial ...
Owner's Manual
Page 39
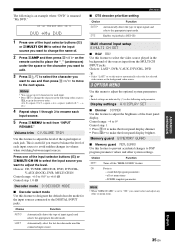
... ■ DTS decoder prioritize setting Choice Function AUTO* Automatically detect the type of . 2 Press hAMP and then press ll / h on the remote control to place the "_" (underscore) under the space or the character you want to edit. 3 Press lk / n to select the character you want... parameter. LAST Automatically select the last decoder mode used the connected input source. DTS Enables to make the front panel display brighter. Control range: -4 to 0* Control step: 1 • Press ll to make the front panel display dimmer. • Press lh to playback a DTS-CD. ...
... ■ DTS decoder prioritize setting Choice Function AUTO* Automatically detect the type of . 2 Press hAMP and then press ll / h on the remote control to place the "_" (underscore) under the space or the character you want to edit. 3 Press lk / n to select the character you want... parameter. LAST Automatically select the last decoder mode used the connected input source. DTS Enables to make the front panel display brighter. Control range: -4 to 0* Control step: 1 • Press ll to make the front panel display dimmer. • Press lh to playback a DTS-CD. ...
Owner's Manual
Page 41
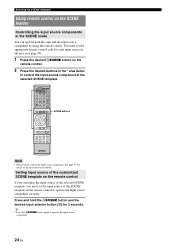
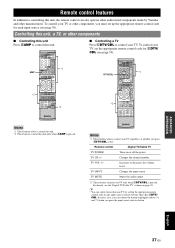
...the channel number. INTRODUCTION PREPARATION BASIC OPERATION Remote control features In addition to controlling this unit, the remote control can also operate other audiovisual components made by Yamaha and other than one TV by setting the appropriate remote control code for any input source selector buttons ...other manufacturers. DTV/CBL *2 POWER POWER STANDBY POWER TV AV...
...the channel number. INTRODUCTION PREPARATION BASIC OPERATION Remote control features In addition to controlling this unit, the remote control can also operate other audiovisual components made by Yamaha and other than one TV by setting the appropriate remote control code for any input source selector buttons ...other manufacturers. DTV/CBL *2 POWER POWER STANDBY POWER TV AV...
Owner's Manual
Page 42
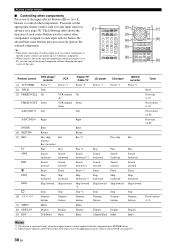
... correctly operate the selected component. y • The remote control has 13 modes (input areas) to control other components assigned to 13 different components. • When you set the appropriate remote control code for DVR (see page 39). DECODE 3 4 STRAIGHT NIGHT 5 6 7 8 MULTI CH IN AUDIO SEL 9 0 SLEEP 10 ENT [9] Remote control [1] AV POWER [2] TITLE [3] PRESET/CH k PRESET/CH n A/B/C/D/E l DVD...
... correctly operate the selected component. y • The remote control has 13 modes (input areas) to control other components assigned to 13 different components. • When you set the appropriate remote control code for DVR (see page 39). DECODE 3 4 STRAIGHT NIGHT 5 6 7 8 MULTI CH IN AUDIO SEL 9 0 SLEEP 10 ENT [9] Remote control [1] AV POWER [2] TITLE [3] PRESET/CH k PRESET/CH n A/B/C/D/E l DVD...
Owner's Manual
Page 43
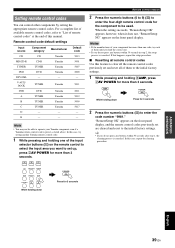
...Yamaha 5011 DVR DVR Yamaha 2011 A TUNER Yamaha 5012 B TUNER Yamaha 5009 C TUNER Yamaha 5017 D - - - Notes • If the manufacturer of your Yamaha component even if a Yamaha remote control code is canceled. INTRODUCTION PREPARATION BASIC OPERATION Remote control features Setting remote control codes You can control other components by setting the appropriate remote control...9981." CD MD/CD-R TUNER DVD DTV/CBL DVR V-AUX/DOCK D E POWER AV Press for 3 seconds 2 Press the numeric buttons (y) to the initial factory settings. Note • You may not ...
...Yamaha 5011 DVR DVR Yamaha 2011 A TUNER Yamaha 5012 B TUNER Yamaha 5009 C TUNER Yamaha 5017 D - - - Notes • If the manufacturer of your Yamaha component even if a Yamaha remote control code is canceled. INTRODUCTION PREPARATION BASIC OPERATION Remote control features Setting remote control codes You can control other components by setting the appropriate remote control...9981." CD MD/CD-R TUNER DVD DTV/CBL DVR V-AUX/DOCK D E POWER AV Press for 3 seconds 2 Press the numeric buttons (y) to the initial factory settings. Note • You may not ...


