
Owner's Manual
Page 4
... 10 When disconnecting the power cable from earphones and headphones can be exposed to this unit, and/or personal injury. - do not place: - Yamaha will not be exposed to excessive heat such as they may overheat, possibly causing damage. 9 Do not use batteries of time (i.e. Voltages are complete...5 Avoid installing this unit where foreign objects may fall and liquid may happen if batteries are incorrectly replaced. The cabinet should never be set this unit in order not to wide slot and fully insert. FOR CANADIAN CUSTOMERS To prevent electric shock, match wide blade of this...
... 10 When disconnecting the power cable from earphones and headphones can be exposed to this unit, and/or personal injury. - do not place: - Yamaha will not be exposed to excessive heat such as they may overheat, possibly causing damage. 9 Do not use batteries of time (i.e. Voltages are complete...5 Avoid installing this unit where foreign objects may fall and liquid may happen if batteries are incorrectly replaced. The cabinet should never be set this unit in order not to wide slot and fully insert. FOR CANADIAN CUSTOMERS To prevent electric shock, match wide blade of this...
Owner's Manual
Page 5
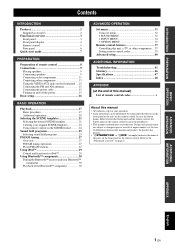
... and functions for iPod 29 Using Bluetooth™ components 30 Pairing the Bluetooth™ receiver and your Bluetooth™ component 30 Playback of the Bluetooth™ component 30 ADVANCED OPERATION Set menu 31 Using set menu 32 1 SOUND MENU 32 2 INPUT MENU 34 3 OPTION MENU 35 Remote ...control features 37 Controlling this unit, a TV, or other components .... 37 Setting remote control codes 39 Advanced setup 40 ADDITIONAL INFORMATION Troubleshooting 41 Glossary 46 Specifications 47 Index 48 APPENDIX (at the end of this manual...
... and functions for iPod 29 Using Bluetooth™ components 30 Pairing the Bluetooth™ receiver and your Bluetooth™ component 30 Playback of the Bluetooth™ component 30 ADVANCED OPERATION Set menu 31 Using set menu 32 1 SOUND MENU 32 2 INPUT MENU 34 3 OPTION MENU 35 Remote ...control features 37 Controlling this unit, a TV, or other components .... 37 Setting remote control codes 39 Advanced setup 40 ADDITIONAL INFORMATION Troubleshooting 41 Glossary 46 Specifications 47 Index 48 APPENDIX (at the end of this manual...
Owner's Manual
Page 7
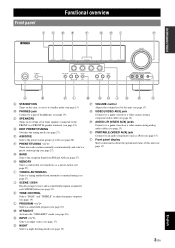
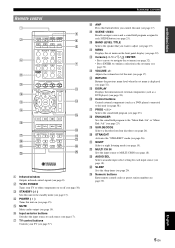
...AUDIO L/R (VIDEO AUX) jacks Connects to an audio component (such as a preset station (see page 27). C SPEAKERS Turns on this unit, or sets it to each SCENE button (see page 21). H MEMORY Stores a station that you tuned into radio stations manually or automatically and selects a preset ... h NIGHT VIDEO AUX VIDEO AUDIO PORTABLE BASIC OPERATION ADVANCED OPERATION ADDITIONAL INFORMATION A B KL M NOJ Q R S A STANDBY/ON Turns on or off the set of front speakers connected to adjust frequency response (see page 19). O NIGHT Selects a night listening mode (see page 19).
...AUDIO L/R (VIDEO AUX) jacks Connects to an audio component (such as a preset station (see page 27). C SPEAKERS Turns on this unit, or sets it to each SCENE button (see page 21). H MEMORY Stores a station that you tuned into radio stations manually or automatically and selects a preset ... h NIGHT VIDEO AUX VIDEO AUDIO PORTABLE BASIC OPERATION ADVANCED OPERATION ADDITIONAL INFORMATION A B KL M NOJ Q R S A STANDBY/ON Turns on or off the set of front speakers connected to adjust frequency response (see page 19). O NIGHT Selects a night listening mode (see page 19).
Owner's Manual
Page 8
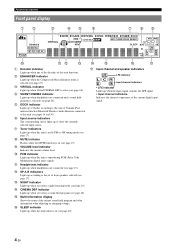
...VOLUME dB ft LFE L CR mS dB SL SR j kl m a Decoder indicator Lights up when any of the decoders of Yamaha iPod universal dock or Bluetooth Wireless Audio Receiver connected to this unit (see pages 14 and 30). e DOCK indicator Lights up or flashes according to the state of this ... indicators LFE LFE indicator L CR SL SR Input channel indicators • LFE indicator Lights up to the set of the current sound field program and other information when adjusting or changing settings. h MUTE indicator Flashes while the MUTE function is in the FM or AM tuning mode (see page ...
...VOLUME dB ft LFE L CR mS dB SL SR j kl m a Decoder indicator Lights up when any of the decoders of Yamaha iPod universal dock or Bluetooth Wireless Audio Receiver connected to this unit (see pages 14 and 30). e DOCK indicator Lights up or flashes according to the state of this ... indicators LFE LFE indicator L CR SL SR Input channel indicators • LFE indicator Lights up to the set of the current sound field program and other information when adjusting or changing settings. h MUTE indicator Flashes while the MUTE function is in the FM or AM tuning mode (see page ...
Owner's Manual
Page 9
... decoders (see page 25). u NIGHT Selects a night listening mode (see page 17). w AUDIO SEL Selects an audio input select setting for each SCENE button (see page 37). b TV/AV POWER Turns your TV (see page 21). f Input selector buttons Switches the input source to the standby mode (see page 18...). m VOLUME +/- v MULTI CH IN Sets the input source to confirm a selection in the set menu on (see page 32). j BAND LEVEL ...
... decoders (see page 25). u NIGHT Selects a night listening mode (see page 17). w AUDIO SEL Selects an audio input select setting for each SCENE button (see page 37). b TV/AV POWER Turns your TV (see page 21). f Input selector buttons Switches the input source to the standby mode (see page 18...). m VOLUME +/- v MULTI CH IN Sets the input source to confirm a selection in the set menu on (see page 32). j BAND LEVEL ...
Owner's Manual
Page 11
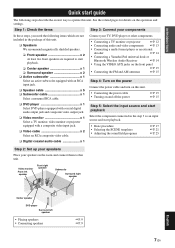
...templates • Adjusting the sound field programs ☞P. 17 ☞P. 21 ☞P. 25 ❏ Digital coaxial audio cable x 1 Step 2: Set up your speakers Place your TV, DVD player or other components. • Connecting a TV monitor or projector ☞P. 12 • Connecting audio ...components ☞P. 13 • Connecting a multi-format player or an external decoder ☞P. 14 • Connecting a Yamaha iPod universal dock or Bluetooth Wireless Audio Receiver ☞P. 14 • Using the VIDEO AUX jacks on the front panel ☞P. 15 • Connecting the FM ...
...templates • Adjusting the sound field programs ☞P. 17 ☞P. 21 ☞P. 25 ❏ Digital coaxial audio cable x 1 Step 2: Set up your speakers Place your TV, DVD player or other components. • Connecting a TV monitor or projector ☞P. 12 • Connecting audio ...components ☞P. 13 • Connecting a multi-format player or an external decoder ☞P. 14 • Connecting a Yamaha iPod universal dock or Bluetooth Wireless Audio Receiver ☞P. 14 • Using the VIDEO AUX jacks on the front panel ☞P. 15 • Connecting the FM ...

Owner's Manual
Page 12
.... • Do not throw away batteries with your local regulations. • If the remote control is cleared, insert new batteries and set the remote control codes for more than 2 minutes, or if exhausted batteries remain in the remote control 13 Using the remote control The ...the remote control in accordance with general house waste; a Infrared window Outputs infrared control signals. Be sure to operate. y • To set up the remote control code. PREPARATION Preparation of remote control Installing batteries in the remote control, the contents of the memory may have the ...
.... • Do not throw away batteries with your local regulations. • If the remote control is cleared, insert new batteries and set the remote control codes for more than 2 minutes, or if exhausted batteries remain in the remote control 13 Using the remote control The ...the remote control in accordance with general house waste; a Infrared window Outputs infrared control signals. Be sure to operate. y • To set up the remote control code. PREPARATION Preparation of remote control Installing batteries in the remote control, the contents of the memory may have the ...
Owner's Manual
Page 13
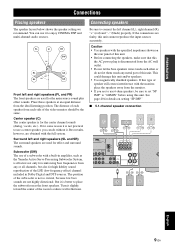
...wall reflections. Turn it slightly toward the center of the LFE (low-frequency effect) channel included in amplifier, such as the Yamaha Active Servo Processing Subwoofer System, is not so critical, because low bass sounds are not highly directional. If the connections are used...creates interference with the full system. But it . INTRODUCTION PREPARATION BASIC OPERATION Connections Placing speakers The speaker layout below shows the speaker setting we recommend. Center speaker (C) The center speaker is better to enjoy CINEMA DSP and multi-channel audio sources. Connecting speakers Be...
...wall reflections. Turn it slightly toward the center of the LFE (low-frequency effect) channel included in amplifier, such as the Yamaha Active Servo Processing Subwoofer System, is not so critical, because low bass sounds are not highly directional. If the connections are used...creates interference with the full system. But it . INTRODUCTION PREPARATION BASIC OPERATION Connections Placing speakers The speaker layout below shows the speaker setting we recommend. Center speaker (C) The center speaker is better to enjoy CINEMA DSP and multi-channel audio sources. Connecting speakers Be...
Owner's Manual
Page 14
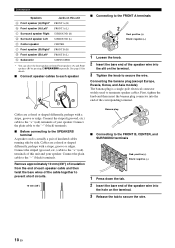
... striped (grooved, etc.) cable to the "+" (red) terminals of this unit FRONT A (R) FRONT A (L) SURROUND (R) SURROUND (L) CENTER FRONT B (R) FRONT B (L) SUBWOOFER * You can select the front speaker set from the end of each speaker ■ Connecting to the FRONT A terminals 2 1 Red: positive (+) Black: negative (-) 3 1 Loosen the knob. 2 Insert the bare end of the...
... striped (grooved, etc.) cable to the "+" (red) terminals of this unit FRONT A (R) FRONT A (L) SURROUND (R) SURROUND (L) CENTER FRONT B (R) FRONT B (L) SUBWOOFER * You can select the front speaker set from the end of each speaker ■ Connecting to the FRONT A terminals 2 1 Red: positive (+) Black: negative (-) 3 1 Loosen the knob. 2 Insert the bare end of the...
Owner's Manual
Page 15
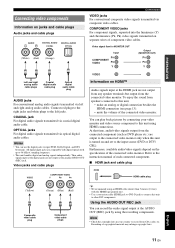
... REC jack You can record the audio signal output at the HDMI jack are compatible with digital signals with the HDMI logo printed on and set to the instruction manual of sampling frequency. • This unit handles digital and analog signals independently. Recording of the connected video monitor. To enjoy the...
... REC jack You can record the audio signal output at the HDMI jack are compatible with digital signals with the HDMI logo printed on and set to the instruction manual of sampling frequency. • This unit handles digital and analog signals independently. Recording of the connected video monitor. To enjoy the...
Owner's Manual
Page 17
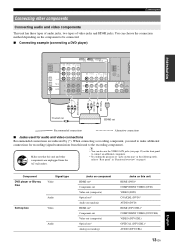
... page 6. Connections Connecting other • To confirm the positions of video jacks and HDMI jacks. Component DVD player or Blu-ray Disc Signal type Video Set-top box Audio Video Audio Jacks on component HDMI out* Component out Video out (composite) Optical out* Audio out (analog) HDMI out* Component out Video...
... page 6. Connections Connecting other • To confirm the positions of video jacks and HDMI jacks. Component DVD player or Blu-ray Disc Signal type Video Set-top box Audio Video Audio Jacks on component HDMI out* Component out Video out (composite) Optical out* Audio out (analog) HDMI out* Component out Video...
Owner's Manual
Page 18
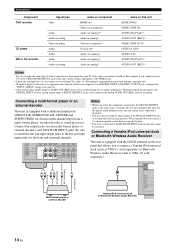
...type of this unit, connect other than the default one assigned to each DIGITAL INPUT or DIGITAL OUTPUT jack, configure the "INPUT ASSIGN" setting (see page 34), this unit automatically turns off the digital sound field processor, and you cannot select sound field programs. • ... decoder or sound processor. DOCK Center out Subwoofer out Surround out Front out LR LR Multi-format player or external decoder Yamaha iPod universal dock or Bluetooth Wireless Audio Receiver DIGITAL INPUT OPTICAL COAXIAL CD 3 DTV/ CBL 2 DVD 1 14 En For example, if you connect a 5.1-channel speaker...
...type of this unit, connect other than the default one assigned to each DIGITAL INPUT or DIGITAL OUTPUT jack, configure the "INPUT ASSIGN" setting (see page 34), this unit automatically turns off the digital sound field processor, and you cannot select sound field programs. • ... decoder or sound processor. DOCK Center out Subwoofer out Surround out Front out LR LR Multi-format player or external decoder Yamaha iPod universal dock or Bluetooth Wireless Audio Receiver DIGITAL INPUT OPTICAL COAXIAL CD 3 DTV/ CBL 2 DVD 1 14 En For example, if you connect a 5.1-channel speaker...
Owner's Manual
Page 19
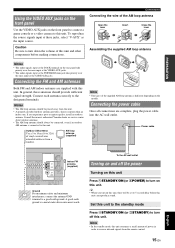
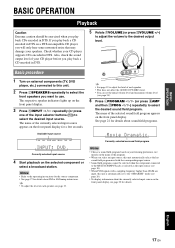
...a small amount of this unit and other components before this unit can reproduce sound. Connect each antenna correctly to receive infrared signals from a window. Consult the nearest authorized Yamaha dealer or service center about outdoor antennas. • The AM loop antenna should provide sufficient signal strength. To ...; The types of the supplied AM loop antenna is connected to turn down the volume of power in order to the designated terminals. Set this unit to the standby mode Press ASTANDBY/ON (or cSTANDBY) to turn off the power Turning on this unit Press ASTANDBY/ON ...
...a small amount of this unit and other components before this unit can reproduce sound. Connect each antenna correctly to receive infrared signals from a window. Consult the nearest authorized Yamaha dealer or service center about outdoor antennas. • The AM loop antenna should provide sufficient signal strength. To ...; The types of the supplied AM loop antenna is connected to turn down the volume of power in order to the designated terminals. Set this unit to the standby mode Press ASTANDBY/ON (or cSTANDBY) to turn off the power Turning on this unit Press ASTANDBY/ON ...
Owner's Manual
Page 20
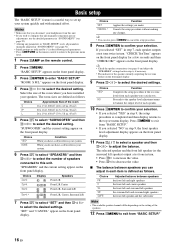
... CR L R SL SR L CR SL SR Speakers Front L/R Front L/R Center Front L/R, Surround L/R Front L/R, Center, Surround L/R 7 Press ln to select "SET" and then ll / h to this unit manually using more precise adjustments, use the detailed parameters in "SOUND MENU" (see page 32). • Altering any ...changes. Choice Function SET Applies the settings you have installed your headphones from this unit. • If you wish to configure this unit. "CHECK:TestTone" appears on ...
... CR L R SL SR L CR SL SR Speakers Front L/R Front L/R Center Front L/R, Surround L/R Front L/R, Center, Surround L/R 7 Press ln to select "SET" and then ll / h to this unit manually using more precise adjustments, use the detailed parameters in "SOUND MENU" (see page 32). • Altering any ...changes. Choice Function SET Applies the settings you have installed your headphones from this unit. • If you wish to configure this unit. "CHECK:TestTone" appears on ...
Owner's Manual
Page 21
... input source, this unit automatically selects the last sound field program used with a sampling frequency higher than 48 kHz are input, this unit is automatically set the initial volume level and maximum volume level (see page 34). 6 Press LPROGRAM l / h (or press hAMP and then qPROG l / h) repeatedly ...FM or AM tuning instructions. The name of each speaker. • This does not affect the AUDIO OUT (REC) level. • You can set to the "STRAIGHT" mode (see page 26). • To display information about the currently selected input source on the front panel display. Basic ...
... input source, this unit automatically selects the last sound field program used with a sampling frequency higher than 48 kHz are input, this unit is automatically set the initial volume level and maximum volume level (see page 34). 6 Press LPROGRAM l / h (or press hAMP and then qPROG l / h) repeatedly ...FM or AM tuning instructions. The name of each speaker. • This does not affect the AUDIO OUT (REC) level. • You can set to the "STRAIGHT" mode (see page 26). • To display information about the currently selected input source on the front panel display. Basic ...
Owner's Manual
Page 22
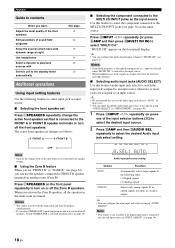
... • You can use the speakers connected to the standby mode automatically See page 19 26 19 19 26 20 Additional operations Using input setting features Use the following order: (1) Digital signals (2) Analog signals ANALOG Selects only analog signals. cannot be selected when "MULTI CH" is... activated automatically (see page 32), you want... Playback Guide to select the desired Audio input jack select setting. The active front speaker set changes as the input source Use this unit to FRONT B speaker terminals in the following features to select input jack ...
... • You can use the speakers connected to the standby mode automatically See page 19 26 19 19 26 20 Additional operations Using input setting features Use the following order: (1) Digital signals (2) Analog signals ANALOG Selects only analog signals. cannot be selected when "MULTI CH" is... activated automatically (see page 32), you want... Playback Guide to select the desired Audio input jack select setting. The active front speaker set changes as the input source Use this unit to FRONT B speaker terminals in the following features to select input jack ...

Owner's Manual
Page 23
.... Considerably lowers the effect level. y • You can configure the muting level by pressing lk / n. • The available speaker channels differ depending on the speaker settings. 2 Press ll / h on the front panel display. Choice BASS TREBLE Function Adjusts the low-frequency response. Adjusts the high-frequency response. Choice FRONT L FRONT R CENTER...
.... Considerably lowers the effect level. y • You can configure the muting level by pressing lk / n. • The available speaker channels differ depending on the speaker settings. 2 Press ll / h on the front panel display. Choice BASS TREBLE Function Adjusts the low-frequency response. Adjusts the high-frequency response. Choice FRONT L FRONT R CENTER...
Owner's Manual
Page 24
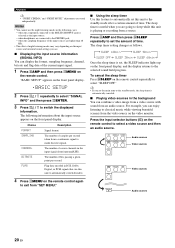
... given point per second taken from the video source on the video monitor. The sleep timer is playing or recording from a source. y • If you set this unit to the standby mode, the sleep timer is selected as follows. CD MD/CD-R TUNER DVD DTV/CBL DVR V-AUX/DOCK Audio sources...the input sources are stored independently. The number of source channels in the background You can combine a video image from a video source with sound from "SET MENU." ■ Using the sleep timer Use this unit to automatically switch decoders. 4 Press kMENU on the remote control again to exit from an ...
... given point per second taken from the video source on the video monitor. The sleep timer is playing or recording from a source. y • If you set this unit to the standby mode, the sleep timer is selected as follows. CD MD/CD-R TUNER DVD DTV/CBL DVR V-AUX/DOCK Audio sources...the input sources are stored independently. The number of source channels in the background You can combine a video image from a video source with sound from "SET MENU." ■ Using the sleep timer Use this unit to automatically switch decoders. 4 Press kMENU on the remote control again to exit from an ...

Owner's Manual
Page 25
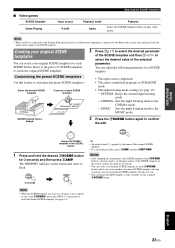
... and assign the templates to confirm the selection. sound field program: STRAIGHT For when you want to listen to respective SCENE buttons in the default settings. input source: DTV/CBL - See page 24 for 3 seconds. The following SCENE templates are assigned to a music program from the connected DVD ...program: Music Enh. 5ch For when you want to use other SCENE templates, you may need to connect the supplied FM and AM antennas to set the input source of the indoor FM antenna. Notes *1 You must connect a cable TV or a satellite tuner to this unit in advance. Selecting...
... and assign the templates to confirm the selection. sound field program: STRAIGHT For when you want to listen to respective SCENE buttons in the default settings. input source: DTV/CBL - See page 24 for 3 seconds. The following SCENE templates are assigned to a music program from the connected DVD ...program: Music Enh. 5ch For when you want to use other SCENE templates, you may need to connect the supplied FM and AM antennas to set the input source of the indoor FM antenna. Notes *1 You must connect a cable TV or a satellite tuner to this unit in advance. Selecting...
Owner's Manual
Page 27
Note • When an iPod is connected to the Yamaha iPod universal dock or a Bluetooth component is not assigned to any of the iSCENE button, press ll / h repeatedly to recall the desired SCENE template (see page 19) - CINEMA: Sets the night listening mode to the MUSIC mode. Notes • ...templates Input source V-AUX Playback mode Game Features Select this SCENE template when you may need to set the input source of the SCENE template on the front panel starts to the Bluetooth receiver, this unit plays back the audio sources input at the DOCK terminal. Note • When ...
Note • When an iPod is connected to the Yamaha iPod universal dock or a Bluetooth component is not assigned to any of the iSCENE button, press ll / h repeatedly to recall the desired SCENE template (see page 19) - CINEMA: Sets the night listening mode to the MUSIC mode. Notes • ...templates Input source V-AUX Playback mode Game Features Select this SCENE template when you may need to set the input source of the SCENE template on the front panel starts to the Bluetooth receiver, this unit plays back the audio sources input at the DOCK terminal. Note • When ...


