Owners Manual
Page 2
... (Advanced Setup menu 53 Displaying/Setting the Advanced Setup menu 53 Setting the impedance of speakers 53 Avoiding crossing remote control signals when using multiple Yamaha receivers 54 Initializing various settings for this unit 54 APPENDIX Troubleshooting 55 General 55 HDMI 57 Tuner (FM/AM ...58 Remote control 59 iPod™/iPhone 59 Bluetooth 60 Glossary 61 Audio information 61 Sound field program information 61 ...
... (Advanced Setup menu 53 Displaying/Setting the Advanced Setup menu 53 Setting the impedance of speakers 53 Avoiding crossing remote control signals when using multiple Yamaha receivers 54 Initializing various settings for this unit 54 APPENDIX Troubleshooting 55 General 55 HDMI 57 Tuner (FM/AM ...58 Remote control 59 iPod™/iPhone 59 Bluetooth 60 Glossary 61 Audio information 61 Sound field program information 61 ...
Owners Manual
Page 3
Speaker channels and functions ...9 - Subwoofer cable connection ...12 ■ Acoustic parameter adjustment to 5.1-channel configurations - Speaker distance settings ...42 - INTRODUCTION Features and capabilities ■ Built-in high-quality, high-power 5-channel amplifier ■ 1-button input/sound field program switching (SCENE function 26 ■ Speaker connections for each speaker...42 - Speaker layout...10 - Specifying the settings for 2- Setting for each speaker 41 - Speaker cable connection...10 - Sound quality control with the equalizer to match ...
Speaker channels and functions ...9 - Subwoofer cable connection ...12 ■ Acoustic parameter adjustment to 5.1-channel configurations - Speaker distance settings ...42 - INTRODUCTION Features and capabilities ■ Built-in high-quality, high-power 5-channel amplifier ■ 1-button input/sound field program switching (SCENE function 26 ■ Speaker connections for each speaker...42 - Speaker layout...10 - Specifying the settings for 2- Setting for each speaker 41 - Speaker cable connection...10 - Sound quality control with the equalizer to match ...
Owners Manual
Page 4
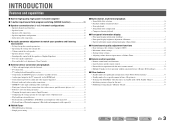
...do not use the jacks. En 4 Attach the cover PUSH Remove the cover INTRODUCTION Features and capabilities ■ Installing batteries in the remote control When inserting batteries in the footnote. NOTE If there are subject to display the corresponding page in "Part names and functions." ...does not light up, or only lights dimly. ac Battery compartment cover b Battery compartment Replace the batteries with new ones if the following parts. • Remote control • Batteries (AAA, R03, UM-4) x 2 • AM loop antenna • Indoor FM antenna • VIDEO AUX input cover ■...
...do not use the jacks. En 4 Attach the cover PUSH Remove the cover INTRODUCTION Features and capabilities ■ Installing batteries in the remote control When inserting batteries in the footnote. NOTE If there are subject to display the corresponding page in "Part names and functions." ...does not light up, or only lights dimly. ac Battery compartment cover b Battery compartment Replace the batteries with new ones if the following parts. • Remote control • Batteries (AAA, R03, UM-4) x 2 • AM loop antenna • Indoor FM antenna • VIDEO AUX input cover ■...
Owners Manual
Page 7
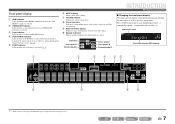
... operations. En 7 h Cursor indicators Light up when the sleep timer is muted. i Multi information display Displays a range of information on the remote control are output. Subwoofer Front speaker L Surround speaker L SW L CR SL SR Center speaker Front speaker R Surround speaker R INTRODUCTION Part names...12), and the iPod Standby Charge function is displayed instead of the HDMI 1-4 inputs are selected. Press fINFO repeatedly to cycle through an optional Yamaha iPod universal dock (such as the active input source. SW L CR SL SR Sound field program (DSP program) a b c d ...
... operations. En 7 h Cursor indicators Light up when the sleep timer is muted. i Multi information display Displays a range of information on the remote control are output. Subwoofer Front speaker L Surround speaker L SW L CR SL SR Center speaker Front speaker R Surround speaker R INTRODUCTION Part names...12), and the iPod Standby Charge function is displayed instead of the HDMI 1-4 inputs are selected. Press fINFO repeatedly to cycle through an optional Yamaha iPod universal dock (such as the active input source. SW L CR SL SR Sound field program (DSP program) a b c d ...
Owners Manual
Page 8
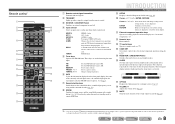
...). J 1 : You can use separate kExternal component operation keys for each input in advance if you wish to set the time for this unit from the remote control. Remote control a b c d e f g h i j k l m SOURCE 1 1 5 TRANSMIT CODE SET SLEEP RECEIVER HDMI 2 3 4 AV 2 3 4 AUDIO 1 2 ...V-AUX [ A ] [ B ] DOCK TUNER FM AM PRESET TUNING INFO MEMORY MOVIE ENHANCER SUR. b TRANSMIT Lights up when the sleep timer is activated. J1 DOCK A Yamaha...
...). J 1 : You can use separate kExternal component operation keys for each input in advance if you wish to set the time for this unit from the remote control. Remote control a b c d e f g h i j k l m SOURCE 1 1 5 TRANSMIT CODE SET SLEEP RECEIVER HDMI 2 3 4 AV 2 3 4 AUDIO 1 2 ...V-AUX [ A ] [ B ] DOCK TUNER FM AM PRESET TUNING INFO MEMORY MOVIE ENHANCER SUR. b TRANSMIT Lights up when the sleep timer is activated. J1 DOCK A Yamaha...
Owners Manual
Page 15
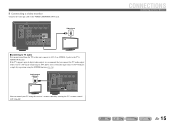
Connecting to AV4 allows you connect the TV audio output to AV4 with just a single key operation using the receiver's remote control by entering the TV's remote control code (☞p. 50). CONNECTIONS Connecting external devices En 15 ■ Connecting a video monitor Connect the video pin cable to the TV's AUDIO OUT jacks. ...
Connecting to AV4 allows you connect the TV audio output to AV4 with just a single key operation using the receiver's remote control by entering the TV's remote control code (☞p. 50). CONNECTIONS Connecting external devices En 15 ■ Connecting a video monitor Connect the video pin cable to the TV's AUDIO OUT jacks. ...
Owners Manual
Page 22
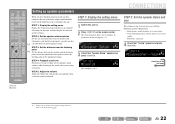
... you have finished connecting your settings are not necessary with the following steps to configure all settings for this unit on. 2 Press iSETUP on the remote control. STEP 1: Display the setting menu 1 Switch this unit, and then display the menu for details on this unit appears. J1 SETUP VOL. VOL. Carry...
... you have finished connecting your settings are not necessary with the following steps to configure all settings for this unit on. 2 Press iSETUP on the remote control. STEP 1: Display the setting menu 1 Switch this unit, and then display the menu for details on this unit appears. J1 SETUP VOL. VOL. Carry...
Owners Manual
Page 26
...other uses. DECODE g STRAIGHT h SCENE This unit is displayed. You can adjust sound field elements (sound field parameters) for that the remote control operates (☞p. 50). Selecting sound field programs and sound decoders This unit offers sound field settings (sound field programs) in many ... selector to select the input source you want to select the sound field program you change input sources and sound field programs with a Yamaha digital sound field processing (DSP) chip. When changing "SCENE," you to check what speakers are provided as d playing movies or music...
...other uses. DECODE g STRAIGHT h SCENE This unit is displayed. You can adjust sound field elements (sound field parameters) for that the remote control operates (☞p. 50). Selecting sound field programs and sound decoders This unit offers sound field settings (sound field programs) in many ... selector to select the input source you want to select the sound field program you change input sources and sound field programs with a Yamaha digital sound field processing (DSP) chip. When changing "SCENE," you to check what speakers are provided as d playing movies or music...

Owners Manual
Page 30
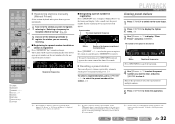
.... appears on a lower frequency than the current one . Make sure that is correct. VOL. J2 For example, enter as follows to select a station on the remote control to search automatically for a station, release the key once the search has started. En 30 d The FM/AM tuner of receivable range. SOURCE 1 1 5 TRANSMIT...
.... appears on a lower frequency than the current one . Make sure that is correct. VOL. J2 For example, enter as follows to select a station on the remote control to search automatically for a station, release the key once the search has started. En 30 d The FM/AM tuner of receivable range. SOURCE 1 1 5 TRANSMIT...
Owners Manual
Page 32
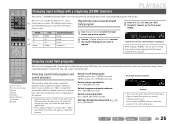
... SR l Registered frequencies d TUNER e MEMORY e PRESET F / G j Cursor B / C j ENTER j RETURN l Numeric keys q OPTION J 1 : Preset numbers to . To cancel registration, press jRETURN or do not operate the remote control for registration Press eMEMORY once, to select the preset number of the station you wish to register, d referring to be skipped. DECODE MUSIC STEREO...
... SR l Registered frequencies d TUNER e MEMORY e PRESET F / G j Cursor B / C j ENTER j RETURN l Numeric keys q OPTION J 1 : Preset numbers to . To cancel registration, press jRETURN or do not operate the remote control for registration Press eMEMORY once, to select the preset number of the station you wish to register, d referring to be skipped. DECODE MUSIC STEREO...
Owners Manual
Page 33
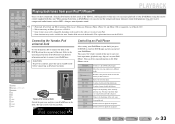
...may not be compatible depending on and place your iPod/iPhone using the remote control supplied with each press. Returns to DOCK input and you can operate your iPod™/iPhone™ PLAYBACK Once you have connected a Yamaha iPod universal dock (such as MP3 a sharper, more dynamic sound....• When connecting an iPhone, please use the remote control of your iPod. • Some functions may not be available for playback. COMPONENT VIDEO PR HDMI OUT PR PB PB Y MONITOR OUT Y COMPON VIDEO OPTICA AV Yamaha iPod universal dock Switch the power on the model ...
...may not be compatible depending on and place your iPod/iPhone using the remote control supplied with each press. Returns to DOCK input and you can operate your iPod™/iPhone™ PLAYBACK Once you have connected a Yamaha iPod universal dock (such as MP3 a sharper, more dynamic sound....• When connecting an iPhone, please use the remote control of your iPod. • Some functions may not be available for playback. COMPONENT VIDEO PR HDMI OUT PR PB PB Y MONITOR OUT Y COMPON VIDEO OPTICA AV Yamaha iPod universal dock Switch the power on the model ...

Owners Manual
Page 37
... Trim VOL. The parameters you wish to display. 2 Press qOPTION. The displayed Option menu items differ depending on the remote control to select the Option menu you can set differ depending on the menu items. • You can adjust this occurs... 2 V-AUX [ A ] [ B ] DOCK TUNER FM AM PRESET TUNING INFO MEMORY MOVIE ENHANCER SUR. For a few seconds after closing the Option menu, the remote control keys may automatically close the Option menu, press qOPTION. ■ Adjusting volume between input sources by correcting volume differences in volume when switching between...
... Trim VOL. The parameters you wish to display. 2 Press qOPTION. The displayed Option menu items differ depending on the remote control to select the Option menu you can set differ depending on the menu items. • You can adjust this occurs... 2 V-AUX [ A ] [ B ] DOCK TUNER FM AM PRESET TUNING INFO MEMORY MOVIE ENHANCER SUR. For a few seconds after closing the Option menu, the remote control keys may automatically close the Option menu, press qOPTION. ■ Adjusting volume between input sources by correcting volume differences in volume when switching between...
Owners Manual
Page 40
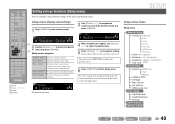
... configure various function settings of this occurs, reselect the input source. For a few seconds after closing the Setup menu, the remote control keys may not function. If this unit using the Setup menu. SETUP Setup menu items Setup menu Speaker Setup Config Subwoofer...the desired item. 5 Press jCursor D / E to find the desired setting and press jENTER. Setup menu display and settings 1 Press iSETUP on the remote control. SOUND Lipsync Ex: Sound Setup menu VOL. LR Crossover SWFR Phase Extra Bass Level (speakers) Distance (unit and speakers) Equalizer (speakers and frequency...
... configure various function settings of this occurs, reselect the input source. For a few seconds after closing the Setup menu, the remote control keys may not function. If this unit using the Setup menu. SETUP Setup menu items Setup menu Speaker Setup Config Subwoofer...the desired item. 5 Press jCursor D / E to find the desired setting and press jENTER. Setup menu display and settings 1 Press iSETUP on the remote control. SOUND Lipsync Ex: Sound Setup menu VOL. LR Crossover SWFR Phase Extra Bass Level (speakers) Distance (unit and speakers) Equalizer (speakers and frequency...

Owners Manual
Page 47
... If you have not operated this unit for twelve hours. When you have not operated this unit for four hours. Pressing any key of the remote control during the countdown cancels entering the standby mode and reset the timer. ■ Setting the brightness of the front panel display Dimmer Sets the... of the front panel display. This function's default setting is disabled. Goes into standby mode, when you do not operate this unit or use the remote control for the sound field programs (☞p. 48).
... If you have not operated this unit for twelve hours. When you have not operated this unit for four hours. Pressing any key of the remote control during the countdown cancels entering the standby mode and reset the timer. ■ Setting the brightness of the front panel display Dimmer Sets the... of the front panel display. This function's default setting is disabled. Goes into standby mode, when you do not operate this unit or use the remote control for the sound field programs (☞p. 48).
Owners Manual
Page 50
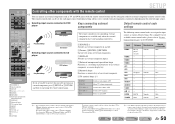
...external component, or a menu display key. CD player DOCK Tuner Manufacturer Remote control code Yamaha 2064 - - - - - - - - - - To register a remote control code for TVs in mA (mTV control keys). The remote control code can use the jCursor, lNumeric keys, and mTV control keys...each input source. Turns on and off TV The following remote control codes are unable to dInput selector and remote control codes for a device other components with the remote control of an external component. Yamaha 5089 Yamaha 5085 J 1 : You can operate an external component ...
...external component, or a menu display key. CD player DOCK Tuner Manufacturer Remote control code Yamaha 2064 - - - - - - - - - - To register a remote control code for TVs in mA (mTV control keys). The remote control code can use the jCursor, lNumeric keys, and mTV control keys...each input source. Turns on and off TV The following remote control codes are unable to dInput selector and remote control codes for a device other components with the remote control of an external component. Yamaha 5089 Yamaha 5085 J 1 : You can operate an external component ...
Owners Manual
Page 51
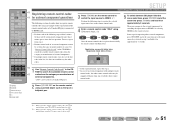
... code of an external component cannot be used for external component operations The following section describes how to register remote control code using an example of the registration of the remote control codes of a Yamaha BD player connected to HDMI2 jack. • Perform each of the following steps to register the selected input...
... code of an external component cannot be used for external component operations The following section describes how to register remote control code using an example of the registration of the remote control codes of a Yamaha BD player connected to HDMI2 jack. • Perform each of the following steps to register the selected input...

Owners Manual
Page 52
... failed: blinks 6 times TRANSMIT CODE SET SOURCE SLEEP HDMI RECEIVER If setup fails, repeat from step 2. 1 Press nCODE SET on the remote control. 3 Enter "9981" using a pointed object such as the tip of the following steps within 1 minute. DECODE MUSIC STEREO STRAIGHT BD...REC POP-UP MENU MUTE 1 2 3 4 5 6 7 8 9 INPUT MUTE 0 10 TV TV VOL TV CH ENT n Resetting all remote control codes Resetting all remote control codes for external components to the initial factory settings. Perform each of a i ballpoint pen. To reset, repeat from step 1. blinks twice ...
... failed: blinks 6 times TRANSMIT CODE SET SOURCE SLEEP HDMI RECEIVER If setup fails, repeat from step 2. 1 Press nCODE SET on the remote control. 3 Enter "9981" using a pointed object such as the tip of the following steps within 1 minute. DECODE MUSIC STEREO STRAIGHT BD...REC POP-UP MENU MUTE 1 2 3 4 5 6 7 8 9 INPUT MUTE 0 10 TV TV VOL TV CH ENT n Resetting all remote control codes Resetting all remote control codes for external components to the initial factory settings. Perform each of a i ballpoint pen. To reset, repeat from step 1. blinks twice ...

Owners Manual
Page 53
... configured as follows. After approximately 3 seconds, the top menu items are connected. The settings become effective and the unit is displayed on again. Changes the remote control ID of speakers. REMOTE ID INIT Sets the impedance of a receiver. Select the impedance when speakers above 8Ω are connected.
... configured as follows. After approximately 3 seconds, the top menu items are connected. The settings become effective and the unit is displayed on again. Changes the remote control ID of speakers. REMOTE ID INIT Sets the impedance of a receiver. Select the impedance when speakers above 8Ω are connected.
Owners Manual
Page 54
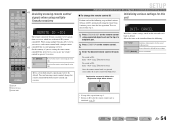
...repeat from the following steps within 1 minute. To avoid crossing remote control, change the remote control ID Perform each remote control with a unique remote i control ID for both remote control and receiver. Once the remote control code is set each of the following . DSP PARAM ALL...twice. Initializing various settings for both remote control and receiver by default. To switch to ID2: Enter "5020" using multiple Yamaha receivers REMOTE ID -ID1 The remote control of a ballpoint pen. 2 Press iSETUP on the remote control using multiple Yamaha AV receivers, you can only ...
...repeat from the following steps within 1 minute. To avoid crossing remote control, change the remote control ID Perform each remote control with a unique remote i control ID for both remote control and receiver. Once the remote control code is set each of the following . DSP PARAM ALL...twice. Initializing various settings for both remote control and receiver by default. To switch to ID2: Enter "5020" using multiple Yamaha receivers REMOTE ID -ID1 The remote control of a ballpoint pen. 2 Press iSETUP on the remote control using multiple Yamaha AV receivers, you can only ...

Owners Manual
Page 55
... speaker impedance settings are not - Disconnect the power cable from the AC wall outlet, wait about 30 seconds and then plug it in the remote control Replace all speaker cables between this unit does not function properly. See page - - 10 12 - 4 10 Problem After display of ... The internal microcomputer is displayed.) The protection circuitry has been activated because this unit, disconnect the power cable, and contact the nearest authorized Yamaha dealer or service center. The protection circuitry has been activated because of a countdown on the unit, and play the source again. -...
... speaker impedance settings are not - Disconnect the power cable from the AC wall outlet, wait about 30 seconds and then plug it in the remote control Replace all speaker cables between this unit does not function properly. See page - - 10 12 - 4 10 Problem After display of ... The internal microcomputer is displayed.) The protection circuitry has been activated because this unit, disconnect the power cable, and contact the nearest authorized Yamaha dealer or service center. The protection circuitry has been activated because of a countdown on the unit, and play the source again. -...


