Owners Manual
Page 2
... remote control 50 Keys connecting external components 50 Default remote control code settings 50 Registering remote control codes for external component operations 51 Resetting all remote control codes 52 Extended functionality that can be configured as needed (Advanced Setup menu 53 Displaying/Setting the Advanced Setup menu 53 Setting the impedance of speakers 53 Avoiding crossing remote control signals when using multiple Yamaha receivers 54 Initializing various settings for this unit 54 APPENDIX Troubleshooting 55 General 55 HDMI 57 Tuner (FM/AM 58 Remote control 59 iPod...
... remote control 50 Keys connecting external components 50 Default remote control code settings 50 Registering remote control codes for external component operations 51 Resetting all remote control codes 52 Extended functionality that can be configured as needed (Advanced Setup menu 53 Displaying/Setting the Advanced Setup menu 53 Setting the impedance of speakers 53 Avoiding crossing remote control signals when using multiple Yamaha receivers 54 Initializing various settings for this unit 54 APPENDIX Troubleshooting 55 General 55 HDMI 57 Tuner (FM/AM 58 Remote control 59 iPod...
Owners Manual
Page 6
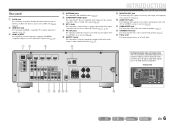
... optional Yamaha iPod universal dock (such as the AV5 or AUDIO1-2 jacks are selected (☞p. 20). c HDMI1-4 jacks For connecting external components equipped with analog audio outputs to input sound into this unit (☞p. 19). ab c d ANTENNA jacks For connecting AM and FM antennas (☞p. 21). l SPEAKER terminals For connecting the front, center, and surround speakers (☞p. 12). b HDMI OUT jack For connecting an HDMI - INTRODUCTION Part names and functions i MONITOR OUT jack For connecting a TV capable of receiving video input, and outputting video signals...
... optional Yamaha iPod universal dock (such as the AV5 or AUDIO1-2 jacks are selected (☞p. 20). c HDMI1-4 jacks For connecting external components equipped with analog audio outputs to input sound into this unit (☞p. 19). ab c d ANTENNA jacks For connecting AM and FM antennas (☞p. 21). l SPEAKER terminals For connecting the front, center, and surround speakers (☞p. 12). b HDMI OUT jack For connecting an HDMI - INTRODUCTION Part names and functions i MONITOR OUT jack For connecting a TV capable of receiving video input, and outputting video signals...
Owners Manual
Page 8
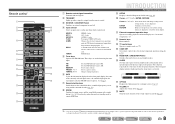
...-5 AV1-5 jacks AUDIO1-2 AUDIO1-2 jacks V-AUX Front panel VIDEO AUX jacks [A]/[B] Changes the external component you are used when using and the surround decoder (☞p. 26). Confirms a selected item. Press this unit is in standby mode to the previous screen when setting menus are displayed. J 1 : You can use separate kExternal component operation keys for external components. DECODE MUSIC STEREO STRAIGHT BD DVD SETUP SCENE TV CD RADIO OPTION ENTER VOLUME RETURN DISPLAY TOP MENU REC POP-UP MENU MUTE n o p q r s 1 2 3 4 5 6 7 8 9 INPUT MUTE...
...-5 AV1-5 jacks AUDIO1-2 AUDIO1-2 jacks V-AUX Front panel VIDEO AUX jacks [A]/[B] Changes the external component you are used when using and the surround decoder (☞p. 26). Confirms a selected item. Press this unit is in standby mode to the previous screen when setting menus are displayed. J 1 : You can use separate kExternal component operation keys for external components. DECODE MUSIC STEREO STRAIGHT BD DVD SETUP SCENE TV CD RADIO OPTION ENTER VOLUME RETURN DISPLAY TOP MENU REC POP-UP MENU MUTE n o p q r s 1 2 3 4 5 6 7 8 9 INPUT MUTE...
Owners Manual
Page 22
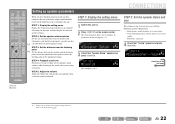
.... SOURCE 1 1 5 TRANSMIT CODE SET SLEEP RECEIVER HDMI 2 3 4 AV 2 3 4 AUDIO 1 2 V-AUX [ A ] [ B ] DOCK TUNER FM AM PRESET TUNING INFO MEMORY MOVIE ENHANCER SUR. Carry out the following speaker configuration: - SW Speaker Setup L CR SL SR 3 Check that "Config" appears and press jENTER. Front speaker: woofer diameter is 16 cm or smaller - CONFIG VOL. STEP 1: Display the setting menu Display the Setup menu from each speaker and configure them so that the sound is balanced. STEP 5: Adjust the volume Adjust...
.... SOURCE 1 1 5 TRANSMIT CODE SET SLEEP RECEIVER HDMI 2 3 4 AV 2 3 4 AUDIO 1 2 V-AUX [ A ] [ B ] DOCK TUNER FM AM PRESET TUNING INFO MEMORY MOVIE ENHANCER SUR. Carry out the following speaker configuration: - SW Speaker Setup L CR SL SR 3 Check that "Config" appears and press jENTER. Front speaker: woofer diameter is 16 cm or smaller - CONFIG VOL. STEP 1: Display the setting menu Display the Setup menu from each speaker and configure them so that the sound is balanced. STEP 5: Adjust the volume Adjust...
Owners Manual
Page 23
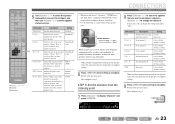
... page En 23 DECODE MUSIC STEREO STRAIGHT BD DVD SETUP SCENE TV CD RADIO OPTION ENTER VOLUME RETURN DISPLAY TOP MENU REC POP-UP MENU MUTE 1 2 3 4 5 6 7 8 9 INPUT MUTE 0 10 TV TV VOL TV CH ENT j Cursor B / C / D / E j ENTER j RETURN 5 Use jCursor B / C to select the speaker (subwoofer) you want to configure, and press jCursor D / E to play front channel low-frequency components through either of the speakers you can change the distance. If necessary...
... page En 23 DECODE MUSIC STEREO STRAIGHT BD DVD SETUP SCENE TV CD RADIO OPTION ENTER VOLUME RETURN DISPLAY TOP MENU REC POP-UP MENU MUTE 1 2 3 4 5 6 7 8 9 INPUT MUTE 0 10 TV TV VOL TV CH ENT j Cursor B / C / D / E j ENTER j RETURN 5 Use jCursor B / C to select the speaker (subwoofer) you want to configure, and press jCursor D / E to play front channel low-frequency components through either of the speakers you can change the distance. If necessary...
Owners Manual
Page 25
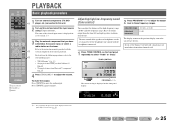
... high/low-frequency sound (Tone control) You can adjust the balance of the high-frequency range (Treble) and low-frequency range (Bass) of sounds output from Bluetooth™ components" (☞p. 35) 4 Press rVOLUME +/- PLAYBACK SOURCE 1 1 5 TRANSMIT CODE SET SLEEP RECEIVER HDMI 2 3 4 AV 2 3 4 AUDIO 1 2 V-AUX [ A ] [ B ] DOCK TUNER FM AM PRESET TUNING INFO MEMORY MOVIE ENHANCER SUR. For details on playback. To mute the output. TONE CONTROL PHONES SILENT CINEMA INFO MEMORY PRESET FM AM INPUT BD DVD SCENE TV CD TONE CONTROL PROGRAM RADIO...
... high/low-frequency sound (Tone control) You can adjust the balance of the high-frequency range (Treble) and low-frequency range (Bass) of sounds output from Bluetooth™ components" (☞p. 35) 4 Press rVOLUME +/- PLAYBACK SOURCE 1 1 5 TRANSMIT CODE SET SLEEP RECEIVER HDMI 2 3 4 AV 2 3 4 AUDIO 1 2 V-AUX [ A ] [ B ] DOCK TUNER FM AM PRESET TUNING INFO MEMORY MOVIE ENHANCER SUR. For details on playback. To mute the output. TONE CONTROL PHONES SILENT CINEMA INFO MEMORY PRESET FM AM INPUT BD DVD SCENE TV CD TONE CONTROL PROGRAM RADIO...
Owners Manual
Page 26
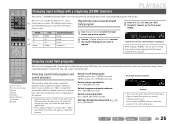
... g Sound selection keys g MOVIE g MUSIC g STEREO g SUR. Choose a sound field program that input source is applied again. • If the sampling frequency of an input source is displayed. PLAYBACK SOURCE 1 1 5 TRANSMIT CODE SET SLEEP RECEIVER HDMI 2 3 4 AV 2 3 4 AUDIO 1 2 V-AUX [ A ] [ B ] DOCK TUNER FM AM PRESET TUNING INFO MEMORY MOVIE ENHANCER SUR. SCENE BD/DVD g TV CD h RADIO Input HDMI1 AV4 AV3 TUNER Sound field program Straight Straight Straight 5ch Enhancer Registering input sources/sound field program 1 Use dInput selector to select the input source...
... g Sound selection keys g MOVIE g MUSIC g STEREO g SUR. Choose a sound field program that input source is applied again. • If the sampling frequency of an input source is displayed. PLAYBACK SOURCE 1 1 5 TRANSMIT CODE SET SLEEP RECEIVER HDMI 2 3 4 AV 2 3 4 AUDIO 1 2 V-AUX [ A ] [ B ] DOCK TUNER FM AM PRESET TUNING INFO MEMORY MOVIE ENHANCER SUR. SCENE BD/DVD g TV CD h RADIO Input HDMI1 AV4 AV3 TUNER Sound field program Straight Straight Straight 5ch Enhancer Registering input sources/sound field program 1 Use dInput selector to select the input source...
Owners Manual
Page 40
...HDMI VOL. If this unit using the Setup menu. Manages settings for sound field programs. Protects settings against accidental alteration. j Setup menu categories Speaker Setup Sound Setup Func. Setup DSP Parameter Memory Guard Manages settings for speakers. DECODE MUSIC STEREO STRAIGHT BD DVD SETUP SCENE TV CD RADIO OPTION ENTER VOLUME RETURN DISPLAY TOP MENU REC POP-UP MENU MUTE 1 2 3 4 5 6 7 8 9 INPUT MUTE 0 10 TV TV VOL TV CH ENT i SETUP j Cursor B / C / D / E j ENTER j RETURN Setting various functions (Setup menu) You can change the setting. SETUP...
...HDMI VOL. If this unit using the Setup menu. Manages settings for sound field programs. Protects settings against accidental alteration. j Setup menu categories Speaker Setup Sound Setup Func. Setup DSP Parameter Memory Guard Manages settings for speakers. DECODE MUSIC STEREO STRAIGHT BD DVD SETUP SCENE TV CD RADIO OPTION ENTER VOLUME RETURN DISPLAY TOP MENU REC POP-UP MENU MUTE 1 2 3 4 5 6 7 8 9 INPUT MUTE 0 10 TV TV VOL TV CH ENT i SETUP j Cursor B / C / D / E j ENTER j RETURN Setting various functions (Setup menu) You can change the setting. SETUP...
Owners Manual
Page 44
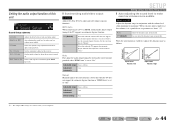
... to make even low volumes more audible. Adaptive DRC Auto-adjusting the sound level to 240 ms Adjustment 1 ms increments Manual Manually adjusts the correction time. D.Range Selects the dynamic range adjustment method for digital audio playback. HDMI Audio Out Selects audio signals received through the HDMI input jack. ■ Synchronizing audio/video output Lipsync Adjusts the delay between video and audio output. SW L CR SL SR Sound Setup submenu Lipsync Adjusts the delay between audio and video output (Lipsync function). Fine-adjust the correction time in "Manual."
... to make even low volumes more audible. Adaptive DRC Auto-adjusting the sound level to 240 ms Adjustment 1 ms increments Manual Manually adjusts the correction time. D.Range Selects the dynamic range adjustment method for digital audio playback. HDMI Audio Out Selects audio signals received through the HDMI input jack. ■ Synchronizing audio/video output Lipsync Adjusts the delay between video and audio output. SW L CR SL SR Sound Setup submenu Lipsync Adjusts the delay between audio and video output (Lipsync function). Fine-adjust the correction time in "Manual."

Owners Manual
Page 47
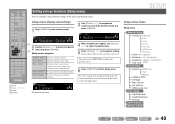
... the standby mode and reset the timer. ■ Setting the brightness of the front panel display Dimmer Sets the brightness of the front panel display. Lowering the setting dims the display. Off (Default) On Settings are not protected. When you wish to activate this function, set the amount of time to 0 Default setting 0 Setting sound field program parameters You can set to the settings on Setup menu until it will enter standby. Off (Default) 4hours 8hours 12hours Auto Power Down function...
... the standby mode and reset the timer. ■ Setting the brightness of the front panel display Dimmer Sets the brightness of the front panel display. Lowering the setting dims the display. Off (Default) On Settings are not protected. When you wish to activate this function, set the amount of time to 0 Default setting 0 Setting sound field program parameters You can set to the settings on Setup menu until it will enter standby. Off (Default) 4hours 8hours 12hours Auto Power Down function...
Owners Manual
Page 50
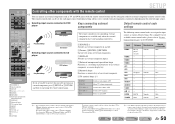
... use the jCursor, lNumeric keys, and mTV control keys to control a TV you to dInput selector: You can operate an external component such as a recording or playback key of external components. SOURCE 1 1 5 TRANSMIT CODE SET SLEEP RECEIVER HDMI 2 3 4 AV 2 3 4 AUDIO 1 2 V-AUX [ A ] [ B ] DOCK TUNER FM AM PRESET TUNING INFO MEMORY MOVIE ENHANCER SUR. DECODE MUSIC STEREO STRAIGHT BD DVD SETUP SCENE TV CD RADIO OPTION ENTER VOLUME RETURN DISPLAY TOP MENU REC POP-UP MENU MUTE 1 2 3 4 5 6 7 8 9 INPUT...
... use the jCursor, lNumeric keys, and mTV control keys to control a TV you to dInput selector: You can operate an external component such as a recording or playback key of external components. SOURCE 1 1 5 TRANSMIT CODE SET SLEEP RECEIVER HDMI 2 3 4 AV 2 3 4 AUDIO 1 2 V-AUX [ A ] [ B ] DOCK TUNER FM AM PRESET TUNING INFO MEMORY MOVIE ENHANCER SUR. DECODE MUSIC STEREO STRAIGHT BD DVD SETUP SCENE TV CD RADIO OPTION ENTER VOLUME RETURN DISPLAY TOP MENU REC POP-UP MENU MUTE 1 2 3 4 5 6 7 8 9 INPUT...
Owners Manual
Page 51
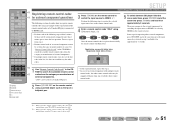
... player. Repeat from the category or manufacturer of the following steps within 1 minute. DECODE MUSIC STEREO STRAIGHT BD DVD SETUP SCENE TV CD RADIO OPTION ENTER VOLUME RETURN DISPLAY TOP MENU REC POP-UP MENU MUTE 1 2 3 4 5 6 7 8 9 INPUT MUTE 0 10 TV TV VOL TV CH ENT n Registering remote control codes d for approximately 3 seconds. Use "Remote Control Code Search" in the registered scene. Registration successful: blinks twice Registration failed: blinks 6 times SOURCE TRANSMIT SLEEP HDMI CODE SET RECEIVER...
... player. Repeat from the category or manufacturer of the following steps within 1 minute. DECODE MUSIC STEREO STRAIGHT BD DVD SETUP SCENE TV CD RADIO OPTION ENTER VOLUME RETURN DISPLAY TOP MENU REC POP-UP MENU MUTE 1 2 3 4 5 6 7 8 9 INPUT MUTE 0 10 TV TV VOL TV CH ENT n Registering remote control codes d for approximately 3 seconds. Use "Remote Control Code Search" in the registered scene. Registration successful: blinks twice Registration failed: blinks 6 times SOURCE TRANSMIT SLEEP HDMI CODE SET RECEIVER...

Owners Manual
Page 53
... times to select the value you can be set the following items. In the Advanced Setup menu, you wish to change. 5 Switch this unit to the standby mode, and then switch it will be performed when the unit is powered on. Changes the remote control ID of the speakers connected. Setting the impedance of speakers SP IMP. -8 MIN Changes the unit settings depending on the front panel display. J1 6 MIN 8 MIN (Default) Select the impedance when...
... times to select the value you can be set the following items. In the Advanced Setup menu, you wish to change. 5 Switch this unit to the standby mode, and then switch it will be performed when the unit is powered on. Changes the remote control ID of the speakers connected. Setting the impedance of speakers SP IMP. -8 MIN Changes the unit settings depending on the front panel display. J1 6 MIN 8 MIN (Default) Select the impedance when...
Owners Manual
Page 54
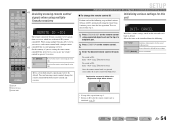
... MUSIC STEREO STRAIGHT BD DVD SETUP SCENE TV CD RADIO OPTION ENTER VOLUME RETURN DISPLAY TOP MENU REC POP-UP MENU MUTE 1 2 3 4 5 6 7 8 9 INPUT MUTE 0 10 TV TV VOL TV CH ENT n Avoiding crossing remote control signals when using multiple Yamaha receivers REMOTE ID -ID1 The remote control of the unit can be automatically stopped if more than 1 minute passes since the last operation. Receives the remote control signals set for the sound field programs. Resets this unit to default factory settings...
... MUSIC STEREO STRAIGHT BD DVD SETUP SCENE TV CD RADIO OPTION ENTER VOLUME RETURN DISPLAY TOP MENU REC POP-UP MENU MUTE 1 2 3 4 5 6 7 8 9 INPUT MUTE 0 10 TV TV VOL TV CH ENT n Avoiding crossing remote control signals when using multiple Yamaha receivers REMOTE ID -ID1 The remote control of the unit can be automatically stopped if more than 1 minute passes since the last operation. Receives the remote control signals set for the sound field programs. Resets this unit to default factory settings...

Owners Manual
Page 55
... back on the power is not completely Connect the power cable properly to standby mode, or turn off the Auto Power Down function. In the Setup menu "AutoPowerDown" ("Func. An internal error has occurred. Please contact authorized Yamaha dealer or service center to request repair. The speaker impedance settings are experiencing is hung-up due to turn on . APPENDIX Troubleshooting Refer to the table below do not use take any action, the Auto Power Down function operates.
... back on the power is not completely Connect the power cable properly to standby mode, or turn off the Auto Power Down function. In the Setup menu "AutoPowerDown" ("Func. An internal error has occurred. Please contact authorized Yamaha dealer or service center to request repair. The speaker impedance settings are experiencing is hung-up due to turn on . APPENDIX Troubleshooting Refer to the table below do not use take any action, the Auto Power Down function operates.

Owners Manual
Page 56
...-HDMI cable is used to try the following. 1) Change to enable output from that support the 38 to the minimum in "Speaker Setup" in the Setup menu, and set correctly. HDCP copy protection standards. reproduce are being used to Display the HDMI Input Option menu for 38 connect the unit with 25 been selected. A video jack (ex. APPENDIX Troubleshooting Problem No sound is disabled. Check the Speaker indicators on the remote control). Output from all channels is turned down or Turn...
...-HDMI cable is used to try the following. 1) Change to enable output from that support the 38 to the minimum in "Speaker Setup" in the Setup menu, and set correctly. HDCP copy protection standards. reproduce are being used to Display the HDMI Input Option menu for 38 connect the unit with 25 been selected. A video jack (ex. APPENDIX Troubleshooting Problem No sound is disabled. Check the Speaker indicators on the remote control). Output from all channels is turned down or Turn...
Owners Manual
Page 57
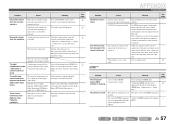
... digital or radio frequency equipment. See page - - - 45 HDMI™ Problem The front panel display HDMI indicator is not turned on . The number of AV receivers. Remedy Try re-inserting the HDMI cable. Press gSTRAIGHT (on all components connected to this unit is flashing. Sound may not be distorted, or the volume may be output from such equipment. This unit does not support playback of audio / video jacks to its instruction manual. No picture or sound...
... digital or radio frequency equipment. See page - - - 45 HDMI™ Problem The front panel display HDMI indicator is not turned on . The number of AV receivers. Remedy Try re-inserting the HDMI cable. Press gSTRAIGHT (on all components connected to this unit is flashing. Sound may not be distorted, or the volume may be output from such equipment. This unit does not support playback of audio / video jacks to its instruction manual. No picture or sound...

Owners Manual
Page 59
... used is in the Yamaha iPod universal dock. Adjust the lighting angle, or reposition this unit. Set the remote control code correctly using the remote control. See page - - 33 33 - - - - Remote control iPod™/iPhone™ APPENDIX Troubleshooting Problem The remote control does not work during Option menu/Setup menu operation: press the key corresponding to the unit. When the key does not work or function properly. External components cannot be controlled using "Remote control code search" on the CD-ROM. The remote control code...
... used is in the Yamaha iPod universal dock. Adjust the lighting angle, or reposition this unit. Set the remote control code correctly using the remote control. See page - - 33 33 - - - - Remote control iPod™/iPhone™ APPENDIX Troubleshooting Problem The remote control does not work during Option menu/Setup menu operation: press the key corresponding to the unit. When the key does not work or function properly. External components cannot be controlled using "Remote control code search" on the CD-ROM. The remote control code...

Owners Manual
Page 61
... music enhancer feature of 5.1channels (LFE is determined by the PCM format used for your home. Dolby Pro Logic II Dolby Pro Logic II is used to minimum volumes that offered by the number of audio signals. This system produces practically distortion-free 5.1-channel sound (technically, left and right channels, instead of DTS Digital Surround in many speakers designed for conventional Pro Logic technology. LFE 0.1 channel This channel reproduces low-frequency bass signals, and has a frequency range from monaural up to as LFE (Low-Frequency...
... music enhancer feature of 5.1channels (LFE is determined by the PCM format used for your home. Dolby Pro Logic II Dolby Pro Logic II is used to minimum volumes that offered by the number of audio signals. This system produces practically distortion-free 5.1-channel sound (technically, left and right channels, instead of DTS Digital Surround in many speakers designed for conventional Pro Logic technology. LFE 0.1 channel This channel reproduces low-frequency bass signals, and has a frequency range from monaural up to as LFE (Low-Frequency...
Quick Reference Guide
Page 3
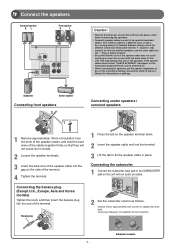
...). Crossover frequency (if available): Set to maximum. 1 Connect the speakers Surround speaker R L Front speaker R L ANTENNA FM GND AM SPEAKERS SURROUND CENTER FRONT SUBWOOFER Caution: • Remove the AC power cord of this unit from the ends of the speaker cables, and twist the bare wires of the cables together firmly so that the core of the speaker cable does not touch anything or come into contact with an audio pin cable. 2 Set the subwoofer volume as...
...). Crossover frequency (if available): Set to maximum. 1 Connect the speakers Surround speaker R L Front speaker R L ANTENNA FM GND AM SPEAKERS SURROUND CENTER FRONT SUBWOOFER Caution: • Remove the AC power cord of this unit from the ends of the speaker cables, and twist the bare wires of the cables together firmly so that the core of the speaker cable does not touch anything or come into contact with an audio pin cable. 2 Set the subwoofer volume as...


