Owners Manual
Page 1
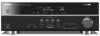
AV Receiver Owner's Manual English for North America
AV Receiver Owner's Manual English for North America
Owners Manual
Page 2
CONTENTS INTRODUCTION Features and capabilities 3 About this manual 4 Supplied accessories 4 Part names and functions 5 Front panel 5 Rear panel 6 Front panel display 7 Remote control 8 CONNECTIONS Connecting speakers 9 Speaker channels and functions 9 Speaker...Advanced Setup menu 53 Displaying/Setting the Advanced Setup menu 53 Setting the impedance of speakers 53 Avoiding crossing remote control signals when using multiple Yamaha receivers 54 Initializing various settings for this unit 54 APPENDIX Troubleshooting 55 General 55 HDMI 57 Tuner (FM/AM 58 Remote control 59 iPod...
CONTENTS INTRODUCTION Features and capabilities 3 About this manual 4 Supplied accessories 4 Part names and functions 5 Front panel 5 Rear panel 6 Front panel display 7 Remote control 8 CONNECTIONS Connecting speakers 9 Speaker channels and functions 9 Speaker...Advanced Setup menu 53 Displaying/Setting the Advanced Setup menu 53 Setting the impedance of speakers 53 Avoiding crossing remote control signals when using multiple Yamaha receivers 54 Initializing various settings for this unit 54 APPENDIX Troubleshooting 55 General 55 HDMI 57 Tuner (FM/AM 58 Remote control 59 iPod...
Owners Manual
Page 4
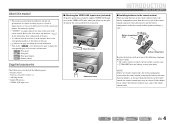
... left section of the page. • ☞ indicates the page describing the related information. • Click on the remote control. If this manual • This manual is in part as a result of the page to the "Part names and functions" (☞p. 5) for more than two minutes, or leaving ... is printed prior to production. NOTE If there are subject to the corresponding numbers on the bottom of it. In case of differences between the manual and product, the product has priority. • "dHDMI1" (example) indicates the name of the parts on the " " at the bottom of ...
... left section of the page. • ☞ indicates the page describing the related information. • Click on the remote control. If this manual • This manual is in part as a result of the page to the "Part names and functions" (☞p. 5) for more than two minutes, or leaving ... is printed prior to production. NOTE If there are subject to the corresponding numbers on the bottom of it. In case of differences between the manual and product, the product has priority. • "dHDMI1" (example) indicates the name of the parts on the " " at the bottom of ...
Owners Manual
Page 25
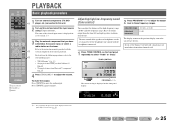
... selector. For details on the tuner. Press sMUTE to unmute. En 25 J1 3 Play the external component that you set separately. Refer to the instruction manuals provided with the headphones connected. 1 Press TONE CONTROL on playback. Set the headphone tone control with the r external component for a few seconds. Press sMUTE again...
... selector. For details on the tuner. Press sMUTE to unmute. En 25 J1 3 Play the external component that you set separately. Refer to the instruction manuals provided with the headphones connected. 1 Press TONE CONTROL on playback. Set the headphone tone control with the r external component for a few seconds. Press sMUTE again...
Owners Manual
Page 31
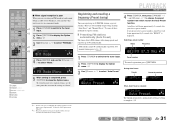
...and cannot obtain a stable stereo broadcast, you can register up to 40 automatically. Use one of presetting stations, "Auto Preset" and "Manual Preset." SW L CR SL SR Preset number To cancel registration, press jRETURN. During Auto Preset Search SEARCH Preset for details on the ...Option menu (☞p. 37). V-AUX [ A ] [ B ] DOCK TUNER 1 d Press dTUNER to switch to start the Auto Preset function. Use manual station preset (☞p. 32). Selecting a preset number Status Frequency READY VOL. 01:FM 87.5 MHz SW L CR SL SR 1 Press dTUNER to switch to...
...and cannot obtain a stable stereo broadcast, you can register up to 40 automatically. Use one of presetting stations, "Auto Preset" and "Manual Preset." SW L CR SL SR Preset number To cancel registration, press jRETURN. During Auto Preset Search SEARCH Preset for details on the ...Option menu (☞p. 37). V-AUX [ A ] [ B ] DOCK TUNER 1 d Press dTUNER to switch to start the Auto Preset function. Use manual station preset (☞p. 32). Selecting a preset number Status Frequency READY VOL. 01:FM 87.5 MHz SW L CR SL SR 1 Press dTUNER to switch to...
Owners Manual
Page 32
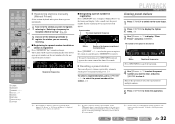
...Press jRETURN to cancel the operation. 4 Use jCursor B / C to select the preset number you want to clear, and press jENTER to display "Manual Preset" on the front panel display. SW L CR SL SR Blinks Empty, or the frequency registered most recently). J2 J 2 : To select... MENU MUTE 1 2 3 4 5 6 7 8 9 INPUT MUTE 0 10 TV TV VOL TV CH ENT ■ Registering stations manually (Manual Preset) Select stations by automatic station preset or manual station preset. After a small wait, the preset number that you wish to register, d referring to register. En 32
...Press jRETURN to cancel the operation. 4 Use jCursor B / C to select the preset number you want to clear, and press jENTER to display "Manual Preset" on the front panel display. SW L CR SL SR Blinks Empty, or the frequency registered most recently). J2 J 2 : To select... MENU MUTE 1 2 3 4 5 6 7 8 9 INPUT MUTE 0 10 TV TV VOL TV CH ENT ■ Registering stations manually (Manual Preset) Select stations by automatic station preset or manual station preset. After a small wait, the preset number that you wish to register, d referring to register. En 32
Owners Manual
Page 40
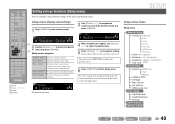
.... LR Crossover SWFR Phase Extra Bass Level (speakers) Distance (unit and speakers) Equalizer (speakers and frequency Test Tone bands) Sound Setup Lipsync HDMI Auto Auto Manual Adaptive DRC D.Range Max Volume Init.Volume HDMI Audio Out Func. DECODE MUSIC STEREO STRAIGHT BD DVD SETUP SCENE TV CD RADIO OPTION ENTER VOLUME...
.... LR Crossover SWFR Phase Extra Bass Level (speakers) Distance (unit and speakers) Equalizer (speakers and frequency Test Tone bands) Sound Setup Lipsync HDMI Auto Auto Manual Adaptive DRC D.Range Max Volume Init.Volume HDMI Audio Out Func. DECODE MUSIC STEREO STRAIGHT BD DVD SETUP SCENE TV CD RADIO OPTION ENTER VOLUME...
Owners Manual
Page 41
...this when you change to "Large." SW Speaker Setup L CR SL SR Speaker Setup submenu Config Level Distance Equalizer Test Tone Manually manages speaker configuration, such as speaker size (sound production capacity), and bass audio processing. J 3 : Enabling the "Crossover"... setting allows you can select the speaker size characteristic (Large or Small). Generates test tones. ■ Manual speaker setup Config Adjusts the output characteristics of the speakers that matches your speakers. Selects an equalizer to "None," you to "None...
...this when you change to "Large." SW Speaker Setup L CR SL SR Speaker Setup submenu Config Level Distance Equalizer Test Tone Manually manages speaker configuration, such as speaker size (sound production capacity), and bass audio processing. J 3 : Enabling the "Crossover"... setting allows you can select the speaker size characteristic (Large or Small). Generates test tones. ■ Manual speaker setup Config Adjusts the output characteristics of the speakers that matches your speakers. Selects an equalizer to "None," you to "None...
Owners Manual
Page 42
... range -10.0 dB to +10.0 dB Default setting 0 dB (FL / FR / SWFR) -1.0 dB (C / SL / SR) Adjustment increments 0.5 dB SETUP Setting various functions (Setup menu) ■ Manually setting speaker distance Distance Adjusts the timing at which the speakers produce audio so that limit will be produced exclusively by the subwoofer, or by...
... range -10.0 dB to +10.0 dB Default setting 0 dB (FL / FR / SWFR) -1.0 dB (C / SL / SR) Adjustment increments 0.5 dB SETUP Setting various functions (Setup menu) ■ Manually setting speaker distance Distance Adjusts the timing at which the speakers produce audio so that limit will be produced exclusively by the subwoofer, or by...
Owners Manual
Page 44
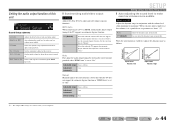
...Range Selects the dynamic range adjustment method for digital audio playback. En 44 Set the correction time in "Auto." Fine-adjust the correction time in "Manual." When the auto function is set to maximum). Auto Fine-adjust the audio output timing by entering the correction time provided when "HDMI Auto" is...Select this when the connected TV does not support the automatic lipsync function or you do not wish to 240 ms Adjustment 1 ms increments Manual Manually adjusts the correction time. J1 Auto Off (Default) Adjusts the dynamic range automatically.
...Range Selects the dynamic range adjustment method for digital audio playback. En 44 Set the correction time in "Auto." Fine-adjust the correction time in "Manual." When the auto function is set to maximum). Auto Fine-adjust the audio output timing by entering the correction time provided when "HDMI Auto" is...Select this when the connected TV does not support the automatic lipsync function or you do not wish to 240 ms Adjustment 1 ms increments Manual Manually adjusts the correction time. J1 Auto Off (Default) Adjusts the dynamic range automatically.
Owners Manual
Page 57
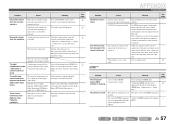
... mode and a monaural source is not resolved, the problem may be Connect the audio cables properly. A subwoofer is not connected, or it to its instruction manual. If the subwoofer includes an Auto Power Off function, then lower the Auto Power Off sensitivity settings. See page 27 26 41 - - 38 - - - Cause Remedy...
... mode and a monaural source is not resolved, the problem may be Connect the audio cables properly. A subwoofer is not connected, or it to its instruction manual. If the subwoofer includes an Auto Power Off function, then lower the Auto Power Off sensitivity settings. See page 27 26 41 - - 38 - - - Cause Remedy...

Owners Manual
Page 58
... the station. Replace the outdoor antenna with the automatic tuning method. Use the manual tuning method. 30 with a more sensitive multi element antenna. Move this unit away from the antenna is being used nearby. "No Presets" is displayed....into connections are in a different location. En 58 The desired station cannot be tuned into with the automatic tuning method. There is not Use manual station preset. 32 preset does not available for AM stations. Check the antenna connections. APPENDIX Troubleshooting AM Problem Cause Remedy See page The desired ...
... the station. Replace the outdoor antenna with the automatic tuning method. Use the manual tuning method. 30 with a more sensitive multi element antenna. Move this unit away from the antenna is being used nearby. "No Presets" is displayed....into connections are in a different location. En 58 The desired station cannot be tuned into with the automatic tuning method. There is not Use manual station preset. 32 preset does not available for AM stations. Check the antenna connections. APPENDIX Troubleshooting AM Problem Cause Remedy See page The desired ...
Owners Manual
Page 63
...registered trademarks and the DTS logos and Symbol are trademarks of Apple Inc. iPod™, iPhone™ "iPod" is a trademark of Yamaha Corporation. To decode audio bitstream signals on the component). • This unit is not compatible with a license agreement. Patent #'s: ...trademark of Apple Inc., registered in accordance with HDCP-incompatible HDMI or DVI components. • Refer to the supplied instruction manuals of the input source component, and set the input source component appropriately so that the component outputs the bitstream audio signals ...
...registered trademarks and the DTS logos and Symbol are trademarks of Apple Inc. iPod™, iPhone™ "iPod" is a trademark of Yamaha Corporation. To decode audio bitstream signals on the component). • This unit is not compatible with a license agreement. Patent #'s: ...trademark of Apple Inc., registered in accordance with HDCP-incompatible HDMI or DVI components. • Refer to the supplied instruction manuals of the input source component, and set the input source component appropriately so that the component outputs the bitstream audio signals ...

Owners Manual
Page 76
...into the apparatus, the apparatus has been exposed to the operation of interference, which can not locate the appropriate retailer, please contact Yamaha Electronics Corp., U.S.A. 6660 Orangethorpe Ave, Buena Park, CA 90620. Servicing is used, use this product in FCC Regulations, Part... "dangerous voltage" within an equilateral triangle is intended to alert you can be of sufficient magnitude to constitute a risk of this manual, meets FCC requirements. The exclamation point within the product's enclosure that are provided for your outlet, consult an electrician for Class ...
...into the apparatus, the apparatus has been exposed to the operation of interference, which can not locate the appropriate retailer, please contact Yamaha Electronics Corp., U.S.A. 6660 Orangethorpe Ave, Buena Park, CA 90620. Servicing is used, use this product in FCC Regulations, Part... "dangerous voltage" within an equilateral triangle is intended to alert you can be of sufficient magnitude to constitute a risk of this manual, meets FCC requirements. The exclamation point within the product's enclosure that are provided for your outlet, consult an electrician for Class ...
Owners Manual
Page 77
..., keep the power cable and outdoor antennas disconnected from a wall outlet or this unit. Using this unit, and/or personal injury. Contact qualified Yamaha service personnel when any reasons. 15 When not planning to standby mode and disconnect the AC power plug from the wall outlet. 18 VOLTAGE SELECTOR...rear panel of this might damage the finish. On the top of this sound system in order not to this unit for a long time, this manual carefully. this unit, do not pull the cable. 11 Do not clean this unit. - Disconnect the power cable from the outlet, then leave ...
..., keep the power cable and outdoor antennas disconnected from a wall outlet or this unit. Using this unit, and/or personal injury. Contact qualified Yamaha service personnel when any reasons. 15 When not planning to standby mode and disconnect the AC power plug from the wall outlet. 18 VOLTAGE SELECTOR...rear panel of this might damage the finish. On the top of this sound system in order not to this unit for a long time, this manual carefully. this unit, do not pull the cable. 11 Do not clean this unit. - Disconnect the power cable from the outlet, then leave ...
Owners Manual
Page 78
...Please record the serial number of your equipment by playing it away immediately and consult a doctor. We Want You Listening For A Lifetime Yamaha and the Electronic Industries Association's Consumer Electronics Group want you to get the most importantly, without annoying blaring or distortion - the transmit indicator...Class B digital apparatus complies with your skin or gets into your eyes or mouth, rinse it at a safe level. Retain this Owner's Manual in a safe place for more than 2 minutes, or if exhausted batteries remain in the remote control, the contents of batteries may not...
...Please record the serial number of your equipment by playing it away immediately and consult a doctor. We Want You Listening For A Lifetime Yamaha and the Electronic Industries Association's Consumer Electronics Group want you to get the most importantly, without annoying blaring or distortion - the transmit indicator...Class B digital apparatus complies with your skin or gets into your eyes or mouth, rinse it at a safe level. Retain this Owner's Manual in a safe place for more than 2 minutes, or if exhausted batteries remain in the remote control, the contents of batteries may not...
Quick Reference Guide
Page 3
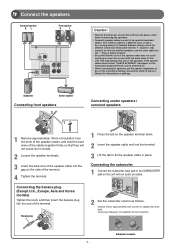
... banana plug (Except U.K., Europe, Asia and Korea models) Tighten the knob, and then insert the banana plug into the terminal. 3 Lift the tab to Owner's Manual for information on the speaker terminal down. 2 Insert the speaker cable end into the end of the terminal. Crossover frequency (if available): Set to approximately...
... banana plug (Except U.K., Europe, Asia and Korea models) Tighten the knob, and then insert the banana plug into the terminal. 3 Lift the tab to Owner's Manual for information on the speaker terminal down. 2 Insert the speaker cable end into the end of the terminal. Crossover frequency (if available): Set to approximately...
Quick Reference Guide
Page 5
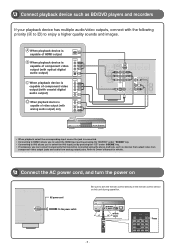
... a higher quality sounds and images. within 30 30 20 ft SOURCE 1 1 5 TRANSMIT CODE SET SLEEP RECEIVER HDMI 2 3 4 AV 2 3 4 AUDIO 1 2 V-AUX [ A ] [ B ] DOCK Press - 5 - Refer to Owner's Manual for details. 4 Connect the AC power cord, and turn the power on this unit during operation. A When playback device is capable of HDMI output HDMI...
... a higher quality sounds and images. within 30 30 20 ft SOURCE 1 1 5 TRANSMIT CODE SET SLEEP RECEIVER HDMI 2 3 4 AV 2 3 4 AUDIO 1 2 V-AUX [ A ] [ B ] DOCK Press - 5 - Refer to Owner's Manual for details. 4 Connect the AC power cord, and turn the power on this unit during operation. A When playback device is capable of HDMI output HDMI...


