
Owners Manual
Page 4
...17 Before moving this unit, press STANDBY/ON to set the unit in this unit to hot, nor locate this unit, and/or personal injury. YAMAHA will form when the surrounding temperature changes suddenly. This Class B digital apparatus complies with the same or ...power plug from the outlet, then leave the unit alone. 19 When using the unit for adequate ventilation. - Turn the power off . If you do not place this unit on common operating errors before concluding that this unit itself . Contact qualified YAMAHA service personnel when any reason. 15 When not planning to the wall...
...17 Before moving this unit, press STANDBY/ON to set the unit in this unit to hot, nor locate this unit, and/or personal injury. YAMAHA will form when the surrounding temperature changes suddenly. This Class B digital apparatus complies with the same or ...power plug from the outlet, then leave the unit alone. 19 When using the unit for adequate ventilation. - Turn the power off . If you do not place this unit on common operating errors before concluding that this unit itself . Contact qualified YAMAHA service personnel when any reason. 15 When not planning to the wall...
Owners Manual
Page 5
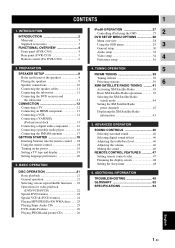
...Selecting digital sound effects 46 Adjusting the treble/bass level 46 Adjusting the volume 46 Muting the sound 46 REMOTE CONTROL FEATURES 47 Setting remote control codes 47 Dimming the display screen 48 Setting the sleep timer 48 6. PREPARATION SPEAKER SETUP 8 Roles and layout of the speakers 8 Placing the speakers 9 Speaker connections 10 Connecting the speaker cables 11 Connecting the subwoofer 11 Connecting the DVD receiver and the subwoofer 11 CONNECTION 12 Connecting a TV 12 Connecting an HDMI component 13 Connecting a VCR 14 Connecting a YAMAHA iPod universal dock...
...Selecting digital sound effects 46 Adjusting the treble/bass level 46 Adjusting the volume 46 Muting the sound 46 REMOTE CONTROL FEATURES 47 Setting remote control codes 47 Dimming the display screen 48 Setting the sleep timer 48 6. PREPARATION SPEAKER SETUP 8 Roles and layout of the speakers 8 Placing the speakers 9 Speaker connections 10 Connecting the speaker cables 11 Connecting the subwoofer 11 Connecting the DVD receiver and the subwoofer 11 CONNECTION 12 Connecting a TV 12 Connecting an HDMI component 13 Connecting a VCR 14 Connecting a YAMAHA iPod universal dock...

Owners Manual
Page 6
...-bass sound. Be sure to production. This Owner's Manual explains the basic operation of certain U.S. This manual is prohibited. 2 En JPEG/ISO 9660 format (except Progressive JPEG) • Up to your stereo system. Maximum 30 character display - Only the single session of 3072 x 2048 • File name extensions (.jpg) must be used under license from the center out. Some discs cannot be played...
...-bass sound. Be sure to production. This Owner's Manual explains the basic operation of certain U.S. This manual is prohibited. 2 En JPEG/ISO 9660 format (except Progressive JPEG) • Up to your stereo system. Maximum 30 character display - Only the single session of 3072 x 2048 • File name extensions (.jpg) must be used under license from the center out. Some discs cannot be played...
Owners Manual
Page 7
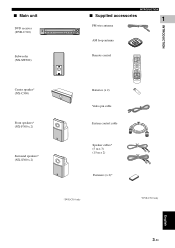
... TRE BASS EFFECT SURR TV INPUT VOL MUTE XM DOCK TV AUX TUNER DVD/CD Front speakers* (NX-F300 x 2) System control cable Surround speakers* (NX-S300 x 2) Speaker cables* (5 m x 3) (15 m x 2) Fasteners (x 2)* *DVX-C310 only *DVX-C310 only English 3 En INTRODUCTION ■ Main unit DVD receiver (DVR-C310) NATURAL SOUND HOME THEATER SYSTEM DVR-C310 1 2 3 4 5 DISC PORTABLE AUDIO/VIDEO INPUT VOLUME PLAYXCHANGE INTRODUCTION ■ Supplied accessories 1 FM wire antenna AM loop antenna Subwoofer (NX-SW300) Center speaker* (NX-C300) Remote control Batteries (x 2) Video...
... TRE BASS EFFECT SURR TV INPUT VOL MUTE XM DOCK TV AUX TUNER DVD/CD Front speakers* (NX-F300 x 2) System control cable Surround speakers* (NX-S300 x 2) Speaker cables* (5 m x 3) (15 m x 2) Fasteners (x 2)* *DVX-C310 only *DVX-C310 only English 3 En INTRODUCTION ■ Main unit DVD receiver (DVR-C310) NATURAL SOUND HOME THEATER SYSTEM DVR-C310 1 2 3 4 5 DISC PORTABLE AUDIO/VIDEO INPUT VOLUME PLAYXCHANGE INTRODUCTION ■ Supplied accessories 1 FM wire antenna AM loop antenna Subwoofer (NX-SW300) Center speaker* (NX-C300) Remote control Batteries (x 2) Video...

Owners Manual
Page 8
...Front panel (DVR-C310) 1 2 NATURAL SOUND HOME THEATER SYSTEM DVR-C310 1 2 3 4 5 DISC PORTABLE 34 AUDIO/VIDEO INPUT VOLUME PLAYXCHANGE C B A 0 9 87 6 5 1 STANDBY/ON ( ) Turns on this DVD receiver, or sets it consumes a small amount of power. 2 Disc tray Loads up when you play discs that allow down mixing, even if you play a multi-channel audio source. TUNER mode: selects the preset number. 0 PORTABLE jack Connects a portable audio player. It does not light up when you play a multi-channel audio source. Each LED lights up in the disc tray. 3 VOLUME Adjusts the volume level...
...Front panel (DVR-C310) 1 2 NATURAL SOUND HOME THEATER SYSTEM DVR-C310 1 2 3 4 5 DISC PORTABLE 34 AUDIO/VIDEO INPUT VOLUME PLAYXCHANGE C B A 0 9 87 6 5 1 STANDBY/ON ( ) Turns on this DVD receiver, or sets it consumes a small amount of power. 2 Disc tray Loads up when you play discs that allow down mixing, even if you play a multi-channel audio source. TUNER mode: selects the preset number. 0 PORTABLE jack Connects a portable audio player. It does not light up when you play a multi-channel audio source. Each LED lights up in the disc tray. 3 VOLUME Adjusts the volume level...

Owners Manual
Page 10
... use the remote control, see page 42. When this DVD receiver is in Plug and Play (see page 39). 0 u PRESET d (b/a) DVD/CD mode: selects the previous/next track or chapter. A SUBTITLE Selects a subtitle language. 6 En B SHUFFLE TOP MENU/RETURN CH + ENTER CAT OK ON SCREEN DISPLAY CA+T MENU CH SRCH SET UP PRESET SUBTITLE AUDIO ANGLE DISC SKIP ZOOM TVVOL TV CH TRE BASS EFFECT SURR TV INPUT VOL MUTE XM DOCK TV AUX TUNER DVD...
... use the remote control, see page 42. When this DVD receiver is in Plug and Play (see page 39). 0 u PRESET d (b/a) DVD/CD mode: selects the previous/next track or chapter. A SUBTITLE Selects a subtitle language. 6 En B SHUFFLE TOP MENU/RETURN CH + ENTER CAT OK ON SCREEN DISPLAY CA+T MENU CH SRCH SET UP PRESET SUBTITLE AUDIO ANGLE DISC SKIP ZOOM TVVOL TV CH TRE BASS EFFECT SURR TV INPUT VOL MUTE XM DOCK TV AUX TUNER DVD...

Owners Manual
Page 11
... from the setup menu of this DVD receiver is in the standby mode, it to TUNER/FM, TUNER/AM or XM RADIO input source. Ph DVD/CD mode: starts playback. TUNER mode: starts preset installation in random order. English 7 En B AUDIO Selects an audio language (DVD) or an audio channel (VCD). DVD/CD: switches to AUX ANALOG, AUX DIGITAL or AUX FRONT input source. I SLEEP Sets the sleep timer. L REPEAT A-B Repeats a specific section on the disc. V VOL (+ / -) Adjusts the volume level. H POWER ( ) Turns on screen display) menu of this DVD receiver, or sets it consumes...
... from the setup menu of this DVD receiver is in the standby mode, it to TUNER/FM, TUNER/AM or XM RADIO input source. Ph DVD/CD mode: starts playback. TUNER mode: starts preset installation in random order. English 7 En B AUDIO Selects an audio language (DVD) or an audio channel (VCD). DVD/CD: switches to AUX ANALOG, AUX DIGITAL or AUX FRONT input source. I SLEEP Sets the sleep timer. L REPEAT A-B Repeats a specific section on the disc. V VOL (+ / -) Adjusts the volume level. H POWER ( ) Turns on screen display) menu of this DVD receiver, or sets it consumes...

Owners Manual
Page 12
... quality sounds you need to place the speakers in Dolby Digital or DTS. To enjoy desired sounds, try to the listening position. 8 En Allow adequate ventilation around the DVD receiver and subwoofer. - DVD receiver 1 Front speaker (L) 2 Center speaker 1 Front speaker (R) 3 Surround speaker (L) 4 Subwoofer 3 Surround speaker (R) 1 Front Speakers (L, R) Place the front left /right speakers behind the listening position. For the best possible surround sound, all of the subwoofer according to change the location of the speakers (except the subwoofer) should...
... quality sounds you need to place the speakers in Dolby Digital or DTS. To enjoy desired sounds, try to the listening position. 8 En Allow adequate ventilation around the DVD receiver and subwoofer. - DVD receiver 1 Front speaker (L) 2 Center speaker 1 Front speaker (R) 3 Surround speaker (L) 4 Subwoofer 3 Surround speaker (R) 1 Front Speakers (L, R) Place the front left /right speakers behind the listening position. For the best possible surround sound, all of the subwoofer according to change the location of the speakers (except the subwoofer) should...

Owners Manual
Page 15
L GND AM R ANTENNA TV IN AUX IN LINE OUT DOCK SYSTEM CONNECTOR TO NX-SW300 PR Y VIDEO PCM/DTS q DIGITAL PB COAXIAL COMPONENT S VIDEO DIGITAL IN VIDEO OUT (DVD ONLY) NX-SW300 Notes - Improper connections may damage the system due to twist the cable core firmly in a clockwise direction. To prevent unwanted noise, do not loosen. SPEAKER SETUP Notes - Do not use excessive force when inserting the cable plug. Doing so...
L GND AM R ANTENNA TV IN AUX IN LINE OUT DOCK SYSTEM CONNECTOR TO NX-SW300 PR Y VIDEO PCM/DTS q DIGITAL PB COAXIAL COMPONENT S VIDEO DIGITAL IN VIDEO OUT (DVD ONLY) NX-SW300 Notes - Improper connections may damage the system due to twist the cable core firmly in a clockwise direction. To prevent unwanted noise, do not loosen. SPEAKER SETUP Notes - Do not use excessive force when inserting the cable plug. Doing so...

Owners Manual
Page 16
... your TV. Audio connections Video connections 1 AUDIO OUT 2 COAXIAL OUT 3 Pr/Cr Pb/Cb Y 1 VIDEO IN 2 S-VIDEO IN R L TV HDMI XM DOCK L GND AM R ANTENNA TV IN AUX IN LINE OUT SYSTEM CONNECTOR TO NX-SW300 PR Y VIDEO PCM/DTS q DIGITAL PB COAXIAL COMPONENT S VIDEO DIGITAL IN VIDEO OUT (DVD ONLY) 1 VIDEO output jack Use the supplied video pin cable (yellow) to connect the VIDEO jack of this DVD receiver to the analog audio and digital audio at the same time, the digital audio signals input at the...
... your TV. Audio connections Video connections 1 AUDIO OUT 2 COAXIAL OUT 3 Pr/Cr Pb/Cb Y 1 VIDEO IN 2 S-VIDEO IN R L TV HDMI XM DOCK L GND AM R ANTENNA TV IN AUX IN LINE OUT SYSTEM CONNECTOR TO NX-SW300 PR Y VIDEO PCM/DTS q DIGITAL PB COAXIAL COMPONENT S VIDEO DIGITAL IN VIDEO OUT (DVD ONLY) 1 VIDEO output jack Use the supplied video pin cable (yellow) to connect the VIDEO jack of this DVD receiver to the analog audio and digital audio at the same time, the digital audio signals input at the...

Owners Manual
Page 19
... a YAMAHA iPod universal dock connected to operate your iPod when it is stationed in the front panel display. - Once the connection between your iPod in the front panel display. L GND AM R ANTENNA TV IN AUX IN LINE OUT DOCK SYSTEM CONNECTOR TO NX-SW300 DVD receiver 1 Connect a YAMAHA iPod universal dock to the DOCK terminal on how to the DOCK terminal of this DVD receiver. - Only analog audio signals of your iPod are supported. - Once your iPod using its 2 dedicated cable compatible with the DOCK terminal of the iPod adapters...
... a YAMAHA iPod universal dock connected to operate your iPod when it is stationed in the front panel display. - Once the connection between your iPod in the front panel display. L GND AM R ANTENNA TV IN AUX IN LINE OUT DOCK SYSTEM CONNECTOR TO NX-SW300 DVD receiver 1 Connect a YAMAHA iPod universal dock to the DOCK terminal on how to the DOCK terminal of this DVD receiver. - Only analog audio signals of your iPod are supported. - Once your iPod using its 2 dedicated cable compatible with the DOCK terminal of the iPod adapters...
Owners Manual
Page 23
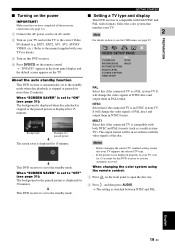
... connections (see page 29. When "SCREEN SAVER" is not displayed properly on how to use the OSD menu, see page 12). 1 Connect the AC power cord to the standby mode. EXT1, EXT2, AV1, AV2, AUDIO/ VIDEO, etc.). PREPARATION VIDEO SETUP PAGE TV TYPE TV DISPLAY PROGRESSIVE PICTURE SETTING BLACK LEVEL CLOSED CAPTION HDMI SETUP PAL NTSC MULTI PAL Select this if the connected TV is displayed for 15 minutes. This DVD receiver is set to the standby mode when disc...
... connections (see page 29. When "SCREEN SAVER" is not displayed properly on how to use the OSD menu, see page 12). 1 Connect the AC power cord to the standby mode. EXT1, EXT2, AV1, AV2, AUDIO/ VIDEO, etc.). PREPARATION VIDEO SETUP PAGE TV TYPE TV DISPLAY PROGRESSIVE PICTURE SETTING BLACK LEVEL CLOSED CAPTION HDMI SETUP PAL NTSC MULTI PAL Select this if the connected TV is displayed for 15 minutes. This DVD receiver is set to the standby mode when disc...
Owners Manual
Page 33
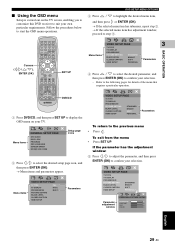
... confirm your selection. Menu items GENERAL SETUP PAGE DVD AUDIO DISC LOCK PROGRAM OSD LANGUAGE SCREEN SAVER DIVX(R) VOD CODE Setup page icons 2 Press / to the following pages for details of the menu that requires a particular operation. VIDEO SETUP PAGE TV TYPE TV DISPLAY PROGRESSIVE PICTURE SETTING BLACK LEVEL CLOSED CAPTION HDMI SETUP STANDARD BRIGHT SOFT PERSONAL Parameter adjustment window PERSONAL PICTURE SETUP BRIGHTNESS 0 CONTRAST 0 TINT 0 COLOR 0 English 29 En POWER DIMMER SLEEP POWER TV Cursors...
... confirm your selection. Menu items GENERAL SETUP PAGE DVD AUDIO DISC LOCK PROGRAM OSD LANGUAGE SCREEN SAVER DIVX(R) VOD CODE Setup page icons 2 Press / to the following pages for details of the menu that requires a particular operation. VIDEO SETUP PAGE TV TYPE TV DISPLAY PROGRESSIVE PICTURE SETTING BLACK LEVEL CLOSED CAPTION HDMI SETUP STANDARD BRIGHT SOFT PERSONAL Parameter adjustment window PERSONAL PICTURE SETUP BRIGHTNESS 0 CONTRAST 0 TINT 0 COLOR 0 English 29 En POWER DIMMER SLEEP POWER TV Cursors...

Owners Manual
Page 37
... the following menu items to match the audio output capability of this DVD receiver. [AUDIO SETUP PAGE] - [HDMI SETUP] AUDIO SETUP PAGE SPEAKER SETUP HDMI SETUP CD UPSAMPLING NIGHT MODE LIP SYNC HDMI SETUP PAGE HDMI AUDIO LPCM OUTPUT OFF ALL PCM ONLY [HDMI AUDIO] Adjust the audio output depending on [LPCM OUTPUT] setting. [LPCM OUTPUT] Set this if you have connected this DVD receiver to a PCM-compatible component via HDMI jack. If you activate the upsampling function, this DVD receiver automatically switches to the stereo mode. [AUDIO SETUP PAGE] - [CD UPSAMPLING] 3 OFF Select this...
... the following menu items to match the audio output capability of this DVD receiver. [AUDIO SETUP PAGE] - [HDMI SETUP] AUDIO SETUP PAGE SPEAKER SETUP HDMI SETUP CD UPSAMPLING NIGHT MODE LIP SYNC HDMI SETUP PAGE HDMI AUDIO LPCM OUTPUT OFF ALL PCM ONLY [HDMI AUDIO] Adjust the audio output depending on [LPCM OUTPUT] setting. [LPCM OUTPUT] Set this if you have connected this DVD receiver to a PCM-compatible component via HDMI jack. If you activate the upsampling function, this DVD receiver automatically switches to the stereo mode. [AUDIO SETUP PAGE] - [CD UPSAMPLING] 3 OFF Select this...

Owners Manual
Page 39
... value to match the video output capability of this DVD receiver. [VIDEO SETUP PAGE] - [HDMI SETUP] VIDEO SETUP PAGE TV TYPE TV DISPLAY PROGRESSIVE PICTURE SETTING BLACK LEVEL CLOSED CAPTION HDMI SETUP HDMI SETUP WIDE SCREEN FORMAT SUPERWIDE HDMI VIDEO 4:3 PILLARBOX OFF English 35 En Zero (0) is the average brightness setting value. OFF Select this for the standard picture setting. HDMI setup When you have connected this DVD receiver to an HDMI-compatible component via HDMI jack, adjust the following menu items to darken the picture or vice versa...
... value to match the video output capability of this DVD receiver. [VIDEO SETUP PAGE] - [HDMI SETUP] VIDEO SETUP PAGE TV TYPE TV DISPLAY PROGRESSIVE PICTURE SETTING BLACK LEVEL CLOSED CAPTION HDMI SETUP HDMI SETUP WIDE SCREEN FORMAT SUPERWIDE HDMI VIDEO 4:3 PILLARBOX OFF English 35 En Zero (0) is the average brightness setting value. OFF Select this for the standard picture setting. HDMI setup When you have connected this DVD receiver to an HDMI-compatible component via HDMI jack, adjust the following menu items to darken the picture or vice versa...

Owners Manual
Page 43
... ON SCREEN DISPLAY CA+T MENU CH SRCH SET UP PRESET SUBTITLE AUDIO ANGLE DISC SKIP ZOOM TVVOL TV CH TRE BASS EFFECT SURR TV INPUT VOL MUTE XM DOCK TV AUX TUNER DVD/CD Numeric keypad (0-9) TUNER Notes - Automatic tuning 1 Press TUNER repeatedly to select "TUNER/FM" or "TUNER/AM". 2 Press / briefly. → "SEARCH" appears, and this DVD receiver to start installation. → "AUTO PRESET" appears. Notes - When tuning is detected during Plug and Play, "CHECK ANTENNA" appears...
... ON SCREEN DISPLAY CA+T MENU CH SRCH SET UP PRESET SUBTITLE AUDIO ANGLE DISC SKIP ZOOM TVVOL TV CH TRE BASS EFFECT SURR TV INPUT VOL MUTE XM DOCK TV AUX TUNER DVD/CD Numeric keypad (0-9) TUNER Notes - Automatic tuning 1 Press TUNER repeatedly to select "TUNER/FM" or "TUNER/AM". 2 Press / briefly. → "SEARCH" appears, and this DVD receiver to start installation. → "AUTO PRESET" appears. Notes - When tuning is detected during Plug and Play, "CHECK ANTENNA" appears...

Owners Manual
Page 46
... ON SCREEN DISPLAY CA+T MENU CH SRCH SET UP PRESET SUBTITLE AUDIO ANGLE DISC SKIP ZOOM TVVOL TV CH TRE BASS EFFECT SURR TV INPUT VOL MUTE XM DOCK TV AUX TUNER DVD/CD Numeric keypad (0-9) DISPLAY XM 1 Numeric key pads (All Channel Search or Category Search mode) Use 1 to 9 and 0 to enter a channel number directly. (Preset Search mode) Use 1 to 9 and 0 to enter a preset channel directly. 2 PROG Stores a preset channel in the memory. 3 Cursors ( / / / ) (All Channel Search mode) Press...
... ON SCREEN DISPLAY CA+T MENU CH SRCH SET UP PRESET SUBTITLE AUDIO ANGLE DISC SKIP ZOOM TVVOL TV CH TRE BASS EFFECT SURR TV INPUT VOL MUTE XM DOCK TV AUX TUNER DVD/CD Numeric keypad (0-9) DISPLAY XM 1 Numeric key pads (All Channel Search or Category Search mode) Use 1 to 9 and 0 to enter a channel number directly. (Preset Search mode) Use 1 to 9 and 0 to enter a preset channel directly. 2 PROG Stores a preset channel in the memory. 3 Cursors ( / / / ) (All Channel Search mode) Press...

Owners Manual
Page 51
...TV INPUT* Switches the input source for the TV. 5 Numeric keypad (0-9) Selects a TV channels for your TV operations. REMOTE CONTROL FEATURES REMOTE CONTROL FEATURES In addition to controlling this DVD receiver, the remote control can also operate these functions in DVD/CD or TUNER mode. ADVANCED OPERATION Operating your cable and satellite tuner • Press AUX for playback. TV VOL (+/-)* Adjusts the audio output level of this case, operate the component using , you are using the supplied remote control. ■ Setting remote control codes Set a TV remote control code...
...TV INPUT* Switches the input source for the TV. 5 Numeric keypad (0-9) Selects a TV channels for your TV operations. REMOTE CONTROL FEATURES REMOTE CONTROL FEATURES In addition to controlling this DVD receiver, the remote control can also operate these functions in DVD/CD or TUNER mode. ADVANCED OPERATION Operating your cable and satellite tuner • Press AUX for playback. TV VOL (+/-)* Adjusts the audio output level of this case, operate the component using , you are using the supplied remote control. ■ Setting remote control codes Set a TV remote control code...

Owners Manual
Page 53
... help, turn off the setup menu screen. Press STANDBY/ON on the remote control in the setup menu The DVD receiver does not start playback Solution Check if the AC power cord is ejected without an operation Not able to select some menu items are copy protected. Press DVD/CD on the front panel of picture distortion may need to enter the password in order to choose the equipment that the audio cables are properly connected...
... help, turn off the setup menu screen. Press STANDBY/ON on the remote control in the setup menu The DVD receiver does not start playback Solution Check if the AC power cord is ejected without an operation Not able to select some menu items are copy protected. Press DVD/CD on the front panel of picture distortion may need to enter the password in order to choose the equipment that the audio cables are properly connected...

Owners Manual
Page 54
...work for operating other equipment The remote control does not function properly Solution Set the correct remote control code. In this DVD receiver. Adjust the volume level in surround sound (DTS, Dolby Digital, etc.). Make sure the source you are connected correctly. Select the source (DVD/CD or TUNER, etc.) before pressing the function button (h, b / a). "SPEAKER ERR" appears in 'Home Theater' mode with new ones. 50 En Depending on the DVD receiver. TROUBLESHOOTING Problem Solution A source cannot be able to operate it partly or wholly. Sounds played on the power...
...work for operating other equipment The remote control does not function properly Solution Set the correct remote control code. In this DVD receiver. Adjust the volume level in surround sound (DTS, Dolby Digital, etc.). Make sure the source you are connected correctly. Select the source (DVD/CD or TUNER, etc.) before pressing the function button (h, b / a). "SPEAKER ERR" appears in 'Home Theater' mode with new ones. 50 En Depending on the DVD receiver. TROUBLESHOOTING Problem Solution A source cannot be able to operate it partly or wholly. Sounds played on the power...


