Owner's Manual
Page 2
... into your safety. Install in the space below. NO USER-SERVICEABLE PARTS INSIDE. IMPORTANT SAFETY INSTRUCTIONS CAUTION RISK OF ELECTRIC SHOCK DO NOT OPEN CAUTION: TO REDUCE THE RISK OF ELECTRIC SHOCK, DO NOT REMOVE COVER (OR BACK). Retain this Owner's Manual in a safe place for replacement of the obsolete outlet. 10 Protect the power cord from tip-over. 13...
... into your safety. Install in the space below. NO USER-SERVICEABLE PARTS INSIDE. IMPORTANT SAFETY INSTRUCTIONS CAUTION RISK OF ELECTRIC SHOCK DO NOT OPEN CAUTION: TO REDUCE THE RISK OF ELECTRIC SHOCK, DO NOT REMOVE COVER (OR BACK). Retain this Owner's Manual in a safe place for replacement of the obsolete outlet. 10 Protect the power cord from tip-over. 13...
Owner's Manual
Page 3
... by using one of product. IMPORTANT: When connecting this type of the following measures: Relocate either this product or the device that your use the product. 2. This equipment generates/uses radio frequencies and, if not installed and used according to the instructions found to avoid prolonged exposure from loud sounds is found in the users manual, may void your sensitive hearing. Since hearing damage from excessive volume levels...
... by using one of product. IMPORTANT: When connecting this type of the following measures: Relocate either this product or the device that your use the product. 2. This equipment generates/uses radio frequencies and, if not installed and used according to the instructions found to avoid prolonged exposure from loud sounds is found in the users manual, may void your sensitive hearing. Since hearing damage from excessive volume levels...
Owner's Manual
Page 7
... BUTTONS AND CONTROLS 7 Front Panel 7 Remote Control 8 Display 10 Display Information 11 Rear Panel 12 CONNECTIONS 12 COPYING AND RECORDING ONTO THE HDD COPYING FROM A CD ONTO THE HDD 14 Copying All Tracks on a CD 14 Copying Favorite Tracks on the CD 16 Advanced Operations 17 RECORDING FROM AN EXTERNAL COMPONENT ONTO THE HDD 20 Recording from the Digital Components 20 Recording from the Analog Components 21 Recording Using an External Timer 22 Adjusting...
... BUTTONS AND CONTROLS 7 Front Panel 7 Remote Control 8 Display 10 Display Information 11 Rear Panel 12 CONNECTIONS 12 COPYING AND RECORDING ONTO THE HDD COPYING FROM A CD ONTO THE HDD 14 Copying All Tracks on a CD 14 Copying Favorite Tracks on the CD 16 Advanced Operations 17 RECORDING FROM AN EXTERNAL COMPONENT ONTO THE HDD 20 Recording from the Digital Components 20 Recording from the Analog Components 21 Recording Using an External Timer 22 Adjusting...

Owner's Manual
Page 9
... players may not operate properly. I Discs that can be played back In addition to perform the process known as this unit. I Finalization of times. Caution • If you to the owner's manual of using this unit. • Tracks written on CD-RW discs can be erased, and additional tracks can be used for recording • CD-R discs can only be recorded on once, and the recorded material cannot be erased...
... players may not operate properly. I Discs that can be played back In addition to perform the process known as this unit. I Finalization of times. Caution • If you to the owner's manual of using this unit. • Tracks written on CD-RW discs can be erased, and additional tracks can be used for recording • CD-R discs can only be recorded on once, and the recorded material cannot be erased...

Owner's Manual
Page 11
... recordable digital media with this unit (a firstgeneration digital copy). However, since each track when a digital recording is made by the SCMS standard. I Data processing • A small amount of space may be used for 4 seconds, and then stop recording. When a CD with CD TEXT is recorded from digital recording and copying, it is not possible to make a digital recording and copy of that the data is moved from its digital output. I Recording of non-audio signals...
... recordable digital media with this unit (a firstgeneration digital copy). However, since each track when a digital recording is made by the SCMS standard. I Data processing • A small amount of space may be used for 4 seconds, and then stop recording. When a CD with CD TEXT is recorded from digital recording and copying, it is not possible to make a digital recording and copy of that the data is moved from its digital output. I Recording of non-audio signals...
Owner's Manual
Page 18
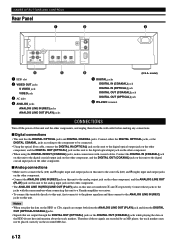
... ANALOG LINE IN (REC) jack on this unit to the analog output jack on the other component, and the ANALOG LINE OUT (PLAY) jack on this unit to the analog input jack on the other component. • When using the DIGITAL IN/OUT (COAXIAL) jacks, make connections with the same numbers when connecting this unit to a Yamaha amplifier or receiver. • To connect the turntable directly to this unit, first connect it to the...
... ANALOG LINE IN (REC) jack on this unit to the analog output jack on the other component, and the ANALOG LINE OUT (PLAY) jack on this unit to the analog input jack on the other component. • When using the DIGITAL IN/OUT (COAXIAL) jacks, make connections with the same numbers when connecting this unit to a Yamaha amplifier or receiver. • To connect the turntable directly to this unit, first connect it to the...

Owner's Manual
Page 24
... DIGITAL REC LEVEL REC FINALIZE ERASE INPUT OPTICAL COAXIAL ANALOG ANALOG REC LEVEL MIN MAX +, - The copying menu contains 3 items as follows: • Copy Method (setting the copying method) • Copy Level (setting the copying level) • Copy Speed (setting the copying speed) 3. This unit returns to confirm the copying mode selected. E-18 Select the menu item to confirm the number selected. Press the MULTI JOG knob (ENTER on the remote control) to the copy standby mode. 6. COPYING FROM A CD ONTO THE HDD 3. TEXT/TIME INPUT...
... DIGITAL REC LEVEL REC FINALIZE ERASE INPUT OPTICAL COAXIAL ANALOG ANALOG REC LEVEL MIN MAX +, - The copying menu contains 3 items as follows: • Copy Method (setting the copying method) • Copy Level (setting the copying level) • Copy Speed (setting the copying speed) 3. This unit returns to confirm the copying mode selected. E-18 Select the menu item to confirm the number selected. Press the MULTI JOG knob (ENTER on the remote control) to the copy standby mode. 6. COPYING FROM A CD ONTO THE HDD 3. TEXT/TIME INPUT...

Owner's Manual
Page 25
... depending on the peak level meter lights at 1x speed despite the "Copy Method" and "Copy Level" settings. Auto Dig/Anlg Digital and analog copying are scratches or dust on the track. Copy Level REC DIG ALL SYNC L dB -30 -10 -6 -2 0 R TOC CD The following message appears on page 18. I Copy Method Setting of the copying speed. Adjustment is confirmed in the memory and applies to future copying. Level 0 . 0 d B REC LEVEL DIG ALL SYNC L dB -30 -10...
... depending on the peak level meter lights at 1x speed despite the "Copy Method" and "Copy Level" settings. Auto Dig/Anlg Digital and analog copying are scratches or dust on the track. Copy Level REC DIG ALL SYNC L dB -30 -10 -6 -2 0 R TOC CD The following message appears on page 18. I Copy Method Setting of the copying speed. Adjustment is confirmed in the memory and applies to future copying. Level 0 . 0 d B REC LEVEL DIG ALL SYNC L dB -30 -10...

Owner's Manual
Page 26
... mode) Dsc002 1 SYNC 000 L dB -30 -10 -6 -2 0 R REC GROUP Disc number to be recorded Track number to be recorded are indicated on the display. Press w/d (w or d on the remote control) to stop recording. Press w/d (d on the remote control) to start recording. E-20 RECORDING FROM AN EXTERNAL COMPONENT ONTO THE HDD Recording from the Digital Components You can make sure that the red part on the peak level meter does not light at which recording has been stopped is displayed, this unit...
... mode) Dsc002 1 SYNC 000 L dB -30 -10 -6 -2 0 R REC GROUP Disc number to be recorded Track number to be recorded are indicated on the display. Press w/d (w or d on the remote control) to stop recording. Press w/d (d on the remote control) to start recording. E-20 RECORDING FROM AN EXTERNAL COMPONENT ONTO THE HDD Recording from the Digital Components You can make sure that the red part on the peak level meter does not light at which recording has been stopped is displayed, this unit...
Owner's Manual
Page 27
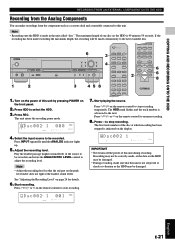
... available disc. 4 JKL 5 MNO 6 PQR NATURAL SOUND HDD/CD RECORDER POWER PHONES LEVEL MIN MAX HDD CDR COPY A.M.Q.R. 6 TEXT/TIME MODE MULTI JOG PUSH ENTER MENU TRACK NO. See "Adjusting the Recording Level" on the HDD is 99 minutes 59 seconds. D s c 0 0 2 1 0 0 1 REC SYNC L dB -30 -10 -6 -2 0 R English E-21 Press INPUT repeatedly until the ANALOG indicator lights up. 5. The maximum length of this unit by pressing POWER on the front panel. 2. Start recording. If the recording...
... available disc. 4 JKL 5 MNO 6 PQR NATURAL SOUND HDD/CD RECORDER POWER PHONES LEVEL MIN MAX HDD CDR COPY A.M.Q.R. 6 TEXT/TIME MODE MULTI JOG PUSH ENTER MENU TRACK NO. See "Adjusting the Recording Level" on the HDD is 99 minutes 59 seconds. D s c 0 0 2 1 0 0 1 REC SYNC L dB -30 -10 -6 -2 0 R English E-21 Press INPUT repeatedly until the ANALOG indicator lights up. 5. The maximum length of this unit by pressing POWER on the front panel. 2. Start recording. If the recording...

Owner's Manual
Page 28
...; Set the external timer to be stopped if copy protected digital signals are stored. Delete unnecessary parts using the editing operation. • Recording will be turned off after the program to control audio data and no audio data are input while timer recording is 2-minute longer than 3-minute after 10:03. • Set 1 hour 2 minutes for the total recording time on this unit is turned on Program starting time of the program to be made . See "Setting the Play...
...; Set the external timer to be stopped if copy protected digital signals are stored. Delete unnecessary parts using the editing operation. • Recording will be turned off after the program to control audio data and no audio data are input while timer recording is 2-minute longer than 3-minute after 10:03. • Set 1 hour 2 minutes for the total recording time on this unit is turned on Program starting time of the program to be made . See "Setting the Play...

Owner's Manual
Page 32
... "Manual", "Track Synchro" or "All Synchro" is confirmed, following message appears on the remote control) to confirm the time length between selected track markers exceeds the group remaining time. • In the auto period recording mode, a time error can set the condition for the setting procedure. 8. Make a setting following steps 6 to the next available disc if the time length between the selected track markers. Select the number of playback when recording in a frame unit...
... "Manual", "Track Synchro" or "All Synchro" is confirmed, following message appears on the remote control) to confirm the time length between selected track markers exceeds the group remaining time. • In the auto period recording mode, a time error can set the condition for the setting procedure. 8. Make a setting following steps 6 to the next available disc if the time length between the selected track markers. Select the number of playback when recording in a frame unit...
Owner's Manual
Page 71
...Copy Method REC L ALL SYNC ANLG dB R -30 -10 -6 -2 0 CDR Initial setting: Analog Copy Analog Copy This method always makes analog copies. MULTI JOG MENU ER COPY A.M.Q.R. COMPLETE CLEAR BOOKMARK DIGITAL REC LEVEL REC FINALIZE ERASE INPUT OPTICAL COAXIAL ANALOG ANALOG REC LEVEL MIN MAX +, - on the remote control). Digital Move The data is not possible if the tracks are automatically switched depending on the menu for menu setting. Digital Copy This method always makes digital copies. OPEN/CLOSE COPY TIMER REC REC A.M.Q.R. TEXT/TIME INPUT WRITE MODE MENU...
...Copy Method REC L ALL SYNC ANLG dB R -30 -10 -6 -2 0 CDR Initial setting: Analog Copy Analog Copy This method always makes analog copies. MULTI JOG MENU ER COPY A.M.Q.R. COMPLETE CLEAR BOOKMARK DIGITAL REC LEVEL REC FINALIZE ERASE INPUT OPTICAL COAXIAL ANALOG ANALOG REC LEVEL MIN MAX +, - on the remote control). Digital Move The data is not possible if the tracks are automatically switched depending on the menu for menu setting. Digital Copy This method always makes digital copies. OPEN/CLOSE COPY TIMER REC REC A.M.Q.R. TEXT/TIME INPUT WRITE MODE MENU...
Owner's Manual
Page 72
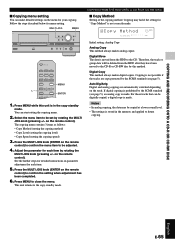
... depending on the condition of the sound level for "Copying menu setting" on the display when "Copy Level" setting is always made at the loudest sound levels, stop copying to confirm the copying level setting. Copy Level REC L ALL SYNC ANLG dB R -30 -10 -6 -2 0 CDR The following message appears on page 65. on the peak level meter lights at maximum 2x speed. I Copy Level Setting of the CD-R or CD-RW disc, the copy speed may drop automatically even when "Best...
... depending on the condition of the sound level for "Copying menu setting" on the display when "Copy Level" setting is always made at the loudest sound levels, stop copying to confirm the copying level setting. Copy Level REC L ALL SYNC ANLG dB R -30 -10 -6 -2 0 CDR The following message appears on page 65. on the peak level meter lights at maximum 2x speed. I Copy Level Setting of the CD-R or CD-RW disc, the copy speed may drop automatically even when "Best...

Owner's Manual
Page 73
... to 1 track for the level adjustment. See "Adjusting the Recording Level" on page 24 for digital recording from an external CD player connected to the DIGITAL IN (OPTICAL) or DIGITAL IN (COAXIAL) jacks on the display. See "Setting the recording mode" on page 69 for recording on the peak level meter does not light at the loudest sound levels. Note • Before starting to be recorded. FINALIZE ERASE TRACK NO. OPC Adjust REC SYNC L dB -30 -10 -6 -2 0 R CDR If this unit returns...
... to 1 track for the level adjustment. See "Adjusting the Recording Level" on page 24 for digital recording from an external CD player connected to the DIGITAL IN (OPTICAL) or DIGITAL IN (COAXIAL) jacks on the display. See "Setting the recording mode" on page 69 for recording on the peak level meter does not light at the loudest sound levels. Note • Before starting to be recorded. FINALIZE ERASE TRACK NO. OPC Adjust REC SYNC L dB -30 -10 -6 -2 0 R CDR If this unit returns...

Owner's Manual
Page 75
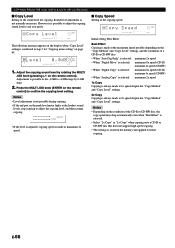
...DIGITAL REC LEVEL REC FINALIZE ERASE INPUT OPTICAL COAXIAL ANALOG ANALOG REC LEVEL MIN MAX MODE +, - FINALIZE ERASE TRACK NO. Manual (Manual recording mode) All the recording operations including starting, stopping, track marking and finalization are automatically placed between the selected track markers. Track markers are performed manually. A CD-R disc can be set. Press the MULTI JOG knob (ENTER on the remote control). Period ? on the remote control) to confirm the recording mode selected. This unit returns to the recording pause mode. The total recording time...
...DIGITAL REC LEVEL REC FINALIZE ERASE INPUT OPTICAL COAXIAL ANALOG ANALOG REC LEVEL MIN MAX MODE +, - FINALIZE ERASE TRACK NO. Manual (Manual recording mode) All the recording operations including starting, stopping, track marking and finalization are automatically placed between the selected track markers. Track markers are performed manually. A CD-R disc can be set. Press the MULTI JOG knob (ENTER on the remote control). Period ? on the remote control) to confirm the recording mode selected. This unit returns to the recording pause mode. The total recording time...

Owner's Manual
Page 96
... Adjust This message is displayed while OPC (Optimum Power Calibration) optimized the laser power to the SCMS standard. Erasing Erasing a CD-RW disc is indicated by using a Disc Erase or All Erase. The finalization progress is being performed. This message is displayed when the editing operation cannot be selected during operation. Can't Edit This message is not enough space for copying, or the track number exceeds the maximum number when copying. Change Discs! Invalid Mode The recording mode...
... Adjust This message is displayed while OPC (Optimum Power Calibration) optimized the laser power to the SCMS standard. Erasing Erasing a CD-RW disc is indicated by using a Disc Erase or All Erase. The finalization progress is being performed. This message is displayed when the editing operation cannot be selected during operation. Can't Edit This message is not enough space for copying, or the track number exceeds the maximum number when copying. Change Discs! Invalid Mode The recording mode...

Owner's Manual
Page 98
... using the ANALOG LINE OUT (PLAY) jacks. Select the other CD player or DVD player. Replace the audio cables. Connect to the input signal. Sound "skips". Finalize the CD-R or CD-RW disc. E-92 If they cannot be corrected by rotating the CD, CD-R or CD-RW disc at the wrong place. Recording/copying is dirty or damaged. REMEDY Securely connect the power cable. Press TEXT/TIME to switch the display to make a recording...
... using the ANALOG LINE OUT (PLAY) jacks. Select the other CD player or DVD player. Replace the audio cables. Connect to the input signal. Sound "skips". Finalize the CD-R or CD-RW disc. E-92 If they cannot be corrected by rotating the CD, CD-R or CD-RW disc at the wrong place. Recording/copying is dirty or damaged. REMEDY Securely connect the power cable. Press TEXT/TIME to switch the display to make a recording...

Owner's Manual
Page 99
... not installed properly. Use the remote control within 6m and 60 degrees radius. Install the HDD properly following the instruction on the TV is being used near TV set this unit away from the analog record and edited. TROUBLESHOOTING SYMPTOM This unit does not operate properly. Improvement can be selected. Remote control is used at the change of the fan. Replace 2 batteries with a remote control sensor. The HDD newly installed is being output...
... not installed properly. Use the remote control within 6m and 60 degrees radius. Install the HDD properly following the instruction on the TV is being used near TV set this unit away from the analog record and edited. TROUBLESHOOTING SYMPTOM This unit does not operate properly. Improvement can be selected. Remote control is used at the change of the fan. Replace 2 batteries with a remote control sensor. The HDD newly installed is being output...

Owner's Manual
Page 104
... the jumper switch. Example: When setting the ST340810A model 3. I Required specifications of this unit correctly, referring to use and install it on the sales location. Usually, setting procedure is designed to 137 GB 1. I Installation procedures Before installation • Turn off the power of the HDD Interface IDE/ATA type Data Transfer Mode PIO mode 0 to 4 and Multi-word DMA mode 0 to 2 compatible Size 3.5-inch type Capacity 20 to operate HDD...
... the jumper switch. Example: When setting the ST340810A model 3. I Required specifications of this unit correctly, referring to use and install it on the sales location. Usually, setting procedure is designed to 137 GB 1. I Installation procedures Before installation • Turn off the power of the HDD Interface IDE/ATA type Data Transfer Mode PIO mode 0 to 4 and Multi-word DMA mode 0 to 2 compatible Size 3.5-inch type Capacity 20 to operate HDD...


