
Owner's Manual
Page 4
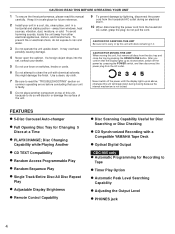
... Compatibility q Random Access Programmable Play q Random-Sequence Play q Single Track/Entire Disc/All Disc Repeat Play q Adjustable Display Brightness q Remote Control Capability q Disc Scanning Capability Useful for Disc Searching or Disc Checking q CD Synchronized Recording with chemical solvents; Keep it . After...Do not place another component on switches, knobs or cords. 6 Do not attempt to clean the unit with a Compatible YAMAHA Tape Deck q Optical Digital Output CDC-905 only q Automatic Programming for Recording to do so will break down . If a foreign object drops into the set, ...
... Compatibility q Random Access Programmable Play q Random-Sequence Play q Single Track/Entire Disc/All Disc Repeat Play q Adjustable Display Brightness q Remote Control Capability q Disc Scanning Capability Useful for Disc Searching or Disc Checking q CD Synchronized Recording with chemical solvents; Keep it . After...Do not place another component on switches, knobs or cords. 6 Do not attempt to clean the unit with a Compatible YAMAHA Tape Deck q Optical Digital Output CDC-905 only q Automatic Programming for Recording to do so will break down . If a foreign object drops into the set, ...
Owner's Manual
Page 5
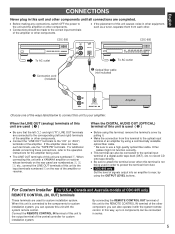
...; Optical fiber cable (not included) CD OPTICAL DIGITAL IN Amplifier Choose one of the amplifier. q CDC-905 only Set the level of an amplifier by pulling it with a YAMAHA amplifier or receiver whose terminals on the rear panel are numbered 1. q Make the connection from this ... for the amplifier being used in order to the corresponding (left and right) terminals of CDC-905 only REMOTE CONTROL (IN, OUT) terminals These terminals are completed. By connecting the REMOTE CONTROL OUT terminal of this unit to the optical input terminal of the amplifier or receiver...
...; Optical fiber cable (not included) CD OPTICAL DIGITAL IN Amplifier Choose one of the amplifier. q CDC-905 only Set the level of an amplifier by pulling it with a YAMAHA amplifier or receiver whose terminals on the rear panel are numbered 1. q Make the connection from this ... for the amplifier being used in order to the corresponding (left and right) terminals of CDC-905 only REMOTE CONTROL (IN, OUT) terminals These terminals are completed. By connecting the REMOTE CONTROL OUT terminal of this unit to the optical input terminal of the amplifier or receiver...
Owner's Manual
Page 6
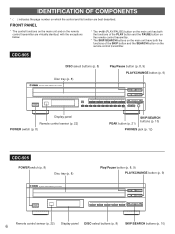
CDC-905 DISC-select buttons (p. 8) Disc tray (p. 8) Play/Pause button (p. 8, 9) PLAYXCHANGE button (p. 9) NATURAL SOUND COMPACT DISC PLAYER POWER / OPEN/CLOSE PLAYXCHANGE PROG 1 +10 1 2 3 DISC 2 3 4 4 5 6 7 8 5 9 0 PEAK SKIP/SEARCH OUTPUT LEVEL PHONES - + Display panel Remote control sensor (p. 22) POWER switch (p. 8) SKIP/SEARCH buttons (p. 10) PEAK button (p. 21) PHONES jack (p. 12) CDC-505 POWER switch (p. 8) Disc tray (p. 8) NATURAL...
CDC-905 DISC-select buttons (p. 8) Disc tray (p. 8) Play/Pause button (p. 8, 9) PLAYXCHANGE button (p. 9) NATURAL SOUND COMPACT DISC PLAYER POWER / OPEN/CLOSE PLAYXCHANGE PROG 1 +10 1 2 3 DISC 2 3 4 4 5 6 7 8 5 9 0 PEAK SKIP/SEARCH OUTPUT LEVEL PHONES - + Display panel Remote control sensor (p. 22) POWER switch (p. 8) SKIP/SEARCH buttons (p. 10) PEAK button (p. 21) PHONES jack (p. 12) CDC-505 POWER switch (p. 8) Disc tray (p. 8) NATURAL...
Owner's Manual
Page 7
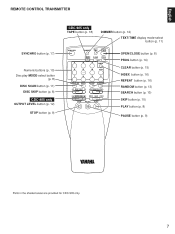
English REMOTE CONTROL TRANSMITTER SYNCHRO button (p. 17) Numeric buttons (p. 10) Disc play MODE-select button (p. 8) DISC SCAN button (p. 11) DISC SKIP button (p. 8) CDC-905 only OUTPUT LEVEL button (p. 12) STOP button (p. 9) CDC-905 only TAPE button (p. 18) DIMMER button (p. 12) TEXT/TIME display mode-select button (p. 11) SYNCHRO 1 4 TEXT/ OPEN/ DIMMER TIME CLOSE TAPE CLEAR PROG... (p. 16) REPEAT button (p. 16) RANDOM button (p. 13) SEARCH button (p. 10) SKIP button (p. 10) PLAY button (p. 8) PAUSE button (p. 9) Parts in the shaded areas are provided for CDC-905 only. 7
English REMOTE CONTROL TRANSMITTER SYNCHRO button (p. 17) Numeric buttons (p. 10) Disc play MODE-select button (p. 8) DISC SCAN button (p. 11) DISC SKIP button (p. 8) CDC-905 only OUTPUT LEVEL button (p. 12) STOP button (p. 9) CDC-905 only TAPE button (p. 18) DIMMER button (p. 12) TEXT/TIME display mode-select button (p. 11) SYNCHRO 1 4 TEXT/ OPEN/ DIMMER TIME CLOSE TAPE CLEAR PROG... (p. 16) REPEAT button (p. 16) RANDOM button (p. 13) SEARCH button (p. 10) SKIP button (p. 10) PLAY button (p. 8) PAUSE button (p. 9) Parts in the shaded areas are provided for CDC-905 only. 7
Owner's Manual
Page 8
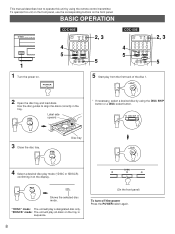
OUTPUT LEVEL + SKIP STOP PAUSE PLAY 2, 3 5 CDC-505 4 5 SYNCHRO 1 4 TEXT/ OPEN/ DIMMER TIME CLOSE CLEAR PROG 2 3 INDEX 5 6 +I0 7 8 9 0 DISC SCAN MODE REPEAT RANDOM DISC SKIP SEARCH SKIP STOP PAUSE PLAY 2, 3 5 ... SKIP button or a DISC-select button. To operate this unit by using the remote control transmitter. PLAY OPEN/ CLOSE 4 Select a desired disc play from the first track of the disc 1. MODE 1DISC 5DISCS Shows the selected disc mode. POWER CDC-905 4 5 SYNCHRO 1 4 TEXT/ OPEN/ DIMMER TIME CLOSE TAPE CLEAR PROG 2 3 INDEX 5 6 +I0 7 8 ...
OUTPUT LEVEL + SKIP STOP PAUSE PLAY 2, 3 5 CDC-505 4 5 SYNCHRO 1 4 TEXT/ OPEN/ DIMMER TIME CLOSE CLEAR PROG 2 3 INDEX 5 6 +I0 7 8 9 0 DISC SCAN MODE REPEAT RANDOM DISC SKIP SEARCH SKIP STOP PAUSE PLAY 2, 3 5 ... SKIP button or a DISC-select button. To operate this unit by using the remote control transmitter. PLAY OPEN/ CLOSE 4 Select a desired disc play from the first track of the disc 1. MODE 1DISC 5DISCS Shows the selected disc mode. POWER CDC-905 4 5 SYNCHRO 1 4 TEXT/ OPEN/ DIMMER TIME CLOSE TAPE CLEAR PROG 2 3 INDEX 5 6 +I0 7 8 ...

Owner's Manual
Page 10
... now playing 5 SKIP 1DISC 5 6 7 8 9 10 11 12 The selected track number is played forward (or backward) rapidly. q When using the SKIP/SEARCH buttons on the remote control transmitter: * If the button is pressed and held, the track number is paused. In this case, no sound will be played. q When using the...
... now playing 5 SKIP 1DISC 5 6 7 8 9 10 11 12 The selected track number is played forward (or backward) rapidly. q When using the SKIP/SEARCH buttons on the remote control transmitter: * If the button is pressed and held, the track number is paused. In this case, no sound will be played. q When using the...
Owner's Manual
Page 13
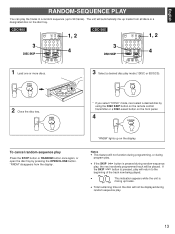
...OPEN/ CLOSE CLEAR PROG 2 3 INDEX 5 6 +I0 7 8 9 0 DISC SCAN MODE REPEAT RANDOM DISC SKIP SEARCH SKIP STOP PAUSE PLAY 1, 2 4 1 Load one or more discs. CDC-905 3 DISC SKIP SYNCHRO 1 4 TEXT/ OPEN/ DIMMER TIME CLOSE TAPE CLEAR PROG 2 3 INDEX 5 6 +I0 7 8 9 0 DISC SCAN MODE REPEAT RANDOM DISC SKIP SEARCH - OPEN/ ...play Press the STOP button or RANDOM button once again, or open the disc tray by using the DISC SKIP button on the remote control transmitter or a DISC-select button on the disc tray. "RNDM" lights up on the disc will automatically mix up tracks....
...OPEN/ CLOSE CLEAR PROG 2 3 INDEX 5 6 +I0 7 8 9 0 DISC SCAN MODE REPEAT RANDOM DISC SKIP SEARCH SKIP STOP PAUSE PLAY 1, 2 4 1 Load one or more discs. CDC-905 3 DISC SKIP SYNCHRO 1 4 TEXT/ OPEN/ DIMMER TIME CLOSE TAPE CLEAR PROG 2 3 INDEX 5 6 +I0 7 8 9 0 DISC SCAN MODE REPEAT RANDOM DISC SKIP SEARCH - OPEN/ ...play Press the STOP button or RANDOM button once again, or open the disc tray by using the DISC SKIP button on the remote control transmitter or a DISC-select button on the disc tray. "RNDM" lights up on the disc will automatically mix up tracks....
Owner's Manual
Page 17
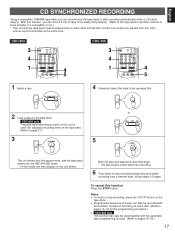
OUTPUT LEVEL + SKIP STOP PAUSE PLAY 4 5 CDC-505 3 4 1 SYNCHRO 1 4 TEXT/ DIMMER TIME OPEN/ CLOSE...recording automatically when a CD starts playing. To cancel this mode, the time display on the tape deck. CDC-905 3 4 1 SYNCHRO 1 4 TEXT/ DIMMER TIME OPEN/ CLOSE TAPE CLEAR PROG 2 3 INDEX 5... Press the STOP button. English CD SYNCHRONIZED RECORDING Using a compatible YAMAHA tape deck, you can synchronize the tape deck to each other so... to know whether it is useful for the programming procedure.) q CDC-905 only This function can also be recorded with this function, instead of...
OUTPUT LEVEL + SKIP STOP PAUSE PLAY 4 5 CDC-505 3 4 1 SYNCHRO 1 4 TEXT/ DIMMER TIME OPEN/ CLOSE...recording automatically when a CD starts playing. To cancel this mode, the time display on the tape deck. CDC-905 3 4 1 SYNCHRO 1 4 TEXT/ DIMMER TIME OPEN/ CLOSE TAPE CLEAR PROG 2 3 INDEX 5... Press the STOP button. English CD SYNCHRONIZED RECORDING Using a compatible YAMAHA tape deck, you can synchronize the tape deck to each other so... to know whether it is useful for the programming procedure.) q CDC-905 only This function can also be recorded with this function, instead of...
Owner's Manual
Page 18
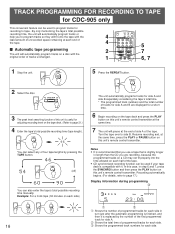
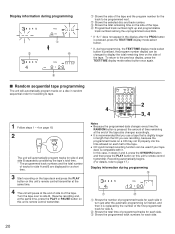
...compatible with it is slightly longer in step 6 and 7, press the SYNCHRO button and then press the PLAY button on this unit's remote control transmitter. TRACK PROGRAMMING FOR RECORDING TO TAPE ffoorr CCDDCC--960555 oonnllyy This convenient feature can be used to program tracks for a short... time. 6 Begin recording on the tape deck and press the PLAY button on this unit's remote control transmitter at the same time. 7 The unit will automatically program tracks on a disc with the original order of tracks unchanged. 4 4 2 1...
...compatible with it is slightly longer in step 6 and 7, press the SYNCHRO button and then press the PLAY button on this unit's remote control transmitter. TRACK PROGRAMMING FOR RECORDING TO TAPE ffoorr CCDDCC--960555 oonnllyy This convenient feature can be used to program tracks for a short... time. 6 Begin recording on the tape deck and press the PLAY button on this unit's remote control transmitter at the same time. 7 The unit will automatically program tracks on a disc with the original order of tracks unchanged. 4 4 2 1...

Owner's Manual
Page 19
... in the display, the track number just selected cannot be used to program up in the display, you will read the contents of this unit's remote control transmitter. Turn the tape over to page 15. Recording automatically begins. (For details, refer to page 17.) Notes on the Disc 1 tray..., make this operation. You can program another track of which this unit's remote control transmitter. Resume recording and, at the end of side A of the tape. STOP 2 If you can select the same track again. * If "ERROR...
... in the display, the track number just selected cannot be used to program up in the display, you will read the contents of this unit's remote control transmitter. Turn the tape over to page 15. Recording automatically begins. (For details, refer to page 17.) Notes on the Disc 1 tray..., make this operation. You can program another track of which this unit's remote control transmitter. Resume recording and, at the end of side A of the tape. STOP 2 If you can select the same track again. * If "ERROR...
Owner's Manual
Page 20
... display after the automatic programming is pressed, the amount of time remaining at the same time, press the PLAY or PAUSE button on this unit's remote control transmitter. OUTPUT LEVEL + SKIP STOP PAUSE PLAY 2 3, 4 1 Follow steps 1 - 4 on page 18. 2 RANDOM The unit will automatically program tracks for side A and...of tracks for side A and B are recording, because the programmed tracks on a CD may not fit properly into the time allowed on this unit's remote control transmitter at the same time. 4 The unit will pause at the end of side A of the tape. q It is recommended that you ...
... display after the automatic programming is pressed, the amount of time remaining at the same time, press the PLAY or PAUSE button on this unit's remote control transmitter. OUTPUT LEVEL + SKIP STOP PAUSE PLAY 2 3, 4 1 Follow steps 1 - 4 on page 18. 2 RANDOM The unit will automatically program tracks for side A and...of tracks for side A and B are recording, because the programmed tracks on a CD may not fit properly into the time allowed on this unit's remote control transmitter at the same time. 4 The unit will pause at the end of side A of the tape. q It is recommended that you ...
Owner's Manual
Page 22
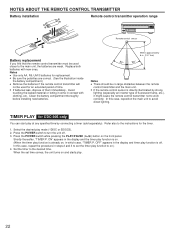
... the POWER switch while pressing the PLAY/PAUSE ( ) button on .) 4. NOTES ABOUT THE REMOTE CONTROL TRANSMITTER Battery installation Remote control transmitter operation range 2 1 3 Battery replacement If you find that the remote control transmitter must be used for the timer. 1. Refer also to avoid direct lighting. Shortly thereafter...them immediately. In this case, repeat the procedure in contact with new ones. Notes q Use only AA, R6, UM-3 batteries for CDC-905 only You can start play function to turn the unit off . Avoid touching the leaked material or letting it come in steps 2 ...
... the POWER switch while pressing the PLAY/PAUSE ( ) button on .) 4. NOTES ABOUT THE REMOTE CONTROL TRANSMITTER Battery installation Remote control transmitter operation range 2 1 3 Battery replacement If you find that the remote control transmitter must be used for the timer. 1. Refer also to avoid direct lighting. Shortly thereafter...them immediately. In this case, repeat the procedure in contact with new ones. Notes q Use only AA, R6, UM-3 batteries for CDC-905 only You can start play function to turn the unit off . Avoid touching the leaked material or letting it come in steps 2 ...


