
Owner's Manual
Page 4
...chemical solvents; To prevent fire or electrical shock, do not pull the cord. do not expose to clean the unit with a Compatible YAMAHA Tape Deck q Optical Digital Output q Automatic Programming for future reference. 2 Install your unit in a cool, dry, clean place, and... q Text Search q Random Access Programmable Play q Random-Sequence Play q Single Track/Entire Disc/All Disc Repeat Play q Adjustable Display Brightness q Remote Control Capability 4 q Disc Scanning Capability Useful for Changing 5 Discs at a Time q PLAYXCHANGE; CAUTION: READ THIS BEFORE OPERATING YOUR UNIT 1 To...
...chemical solvents; To prevent fire or electrical shock, do not pull the cord. do not expose to clean the unit with a Compatible YAMAHA Tape Deck q Optical Digital Output q Automatic Programming for future reference. 2 Install your unit in a cool, dry, clean place, and... q Text Search q Random Access Programmable Play q Random-Sequence Play q Single Track/Entire Disc/All Disc Repeat Play q Adjustable Display Brightness q Remote Control Capability 4 q Disc Scanning Capability Useful for Changing 5 Discs at a Time q PLAYXCHANGE; CAUTION: READ THIS BEFORE OPERATING YOUR UNIT 1 To...
Owner's Manual
Page 5
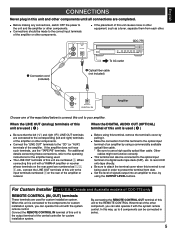
...unit and the amplifier or other components until all connections are used in series. 5 When this unit to the optical input terminal of CDC-775 only REMOTE CONTROL (IN, OUT) terminals These terminals are completed. q Before making any connections, switch OFF the power to the components for custom ... them from each other components. When the LINE OUT (analog) terminals of this unit are used . When connecting this unit with a YAMAHA amplifier or receiver whose terminals on the rear of the amplifier or other component, you can also be connected in order to protect the ...
...unit and the amplifier or other components until all connections are used in series. 5 When this unit to the optical input terminal of CDC-775 only REMOTE CONTROL (IN, OUT) terminals These terminals are completed. q Before making any connections, switch OFF the power to the components for custom ... them from each other components. When the LINE OUT (analog) terminals of this unit are used . When connecting this unit with a YAMAHA amplifier or receiver whose terminals on the rear of the amplifier or other component, you can also be connected in order to protect the ...
Owner's Manual
Page 6
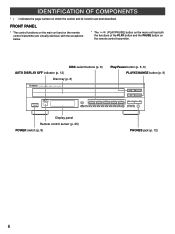
... transmitter. FRONT PANEL * The control functions on the main unit and on the remote control transmitter are virtually identical, with the exceptions below. * The (PLAY/PAUSE) button on the main unit has both the functions of the PLAY button ... (p. 8, 9) PLAYXCHANGE button (p. 9) NATURAL SOUND COMPACT DISC PLAYER POWER AUTO DISPLAY OFF / OPEN/CLOSE PLAYXCHANGE PROG 1 +10 1 2 3 DISC 2 3 4 4 5 6 7 8 5 9 0 PEAK SKIP/SEARCH OUTPUT LEVEL PHONES - + Display panel Remote control sensor (p. 25) POWER switch (p. 8) PHONES jack (p. 12) 6
... transmitter. FRONT PANEL * The control functions on the main unit and on the remote control transmitter are virtually identical, with the exceptions below. * The (PLAY/PAUSE) button on the main unit has both the functions of the PLAY button ... (p. 8, 9) PLAYXCHANGE button (p. 9) NATURAL SOUND COMPACT DISC PLAYER POWER AUTO DISPLAY OFF / OPEN/CLOSE PLAYXCHANGE PROG 1 +10 1 2 3 DISC 2 3 4 4 5 6 7 8 5 9 0 PEAK SKIP/SEARCH OUTPUT LEVEL PHONES - + Display panel Remote control sensor (p. 25) POWER switch (p. 8) PHONES jack (p. 12) 6
Owner's Manual
Page 7
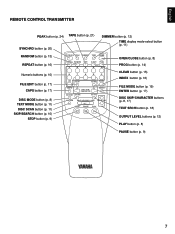
English REMOTE CONTROL TRANSMITTER PEAK button (p. 24) TAPE button (p. 21) SYNCHRO button (p. 20) DIMMER button (p. 12) TIME display mode-select button (p. 11) RANDOM button (p. 13) REPEAT button (p. ...
English REMOTE CONTROL TRANSMITTER PEAK button (p. 24) TAPE button (p. 21) SYNCHRO button (p. 20) DIMMER button (p. 12) TIME display mode-select button (p. 11) RANDOM button (p. 13) REPEAT button (p. ...
Owner's Manual
Page 8
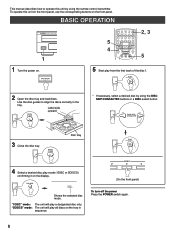
... OPEN/ CLOSE * If necessary, select a desired disc by using the DISC SKIP/CHARACTER buttons or a DISC-select button. To operate this unit by using the remote control transmitter.
... OPEN/ CLOSE * If necessary, select a desired disc by using the DISC SKIP/CHARACTER buttons or a DISC-select button. To operate this unit by using the remote control transmitter.
Owner's Manual
Page 13
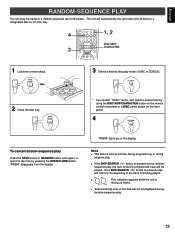
... program play Press the STOP button or RANDOM button once again, or open the disc tray by using the DISC SKIP/CHARACTER button on the remote control transmitter or a DISC-select button on the display. OPEN/ CLOSE * If you select "1DISC" mode, next select a desired disc by pressing the OPEN/CLOSE...
... program play Press the STOP button or RANDOM button once again, or open the disc tray by using the DISC SKIP/CHARACTER button on the remote control transmitter or a DISC-select button on the display. OPEN/ CLOSE * If you select "1DISC" mode, next select a desired disc by pressing the OPEN/CLOSE...
Owner's Manual
Page 20
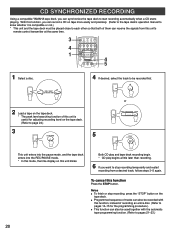
... a compatible YAMAHA tape deck, you can synchronize the tape deck to pages 14-15 for adjusting recording level on the tape deck. (Refer to page 24.) 3 SYNCHRO 4 If desired, select the track to be used together with this function, you want to pages 21-23.) 20 To cancel this unit's remote control...
... a compatible YAMAHA tape deck, you can synchronize the tape deck to pages 14-15 for adjusting recording level on the tape deck. (Refer to page 24.) 3 SYNCHRO 4 If desired, select the track to be used together with this function, you want to pages 21-23.) 20 To cancel this unit's remote control...
Owner's Manual
Page 21
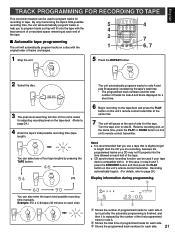
STOP 5 Press the REPEAT button. In this case, in step 6 and 7, press the SYNCHRO button and then press the PLAY button on this unit's remote control transmitter. By only memorizing the tape's total possible recording time, the unit will automatically program tracks or help you use a tape that is compatible ... each side. Ž Shows the programmed track numbers for a short time. 6 Begin recording on the tape deck and press the PLAY button on this unit's remote control transmitter at the same time. 7 The unit will pause at the same time, press the PLAY or PAUSE button on this unit...
STOP 5 Press the REPEAT button. In this case, in step 6 and 7, press the SYNCHRO button and then press the PLAY button on this unit's remote control transmitter. By only memorizing the tape's total possible recording time, the unit will automatically program tracks or help you use a tape that is compatible ... each side. Ž Shows the programmed track numbers for a short time. 6 Begin recording on the tape deck and press the PLAY button on this unit's remote control transmitter at the same time. 7 The unit will pause at the same time, press the PLAY or PAUSE button on this unit...
Owner's Manual
Page 22
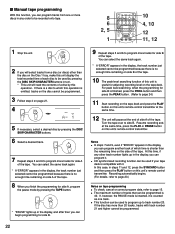
...discs in steps 11 and 12, press the SYNCHRO button and then press the PLAY button on this unit's remote control transmitter. Notes q In steps 7 and 9, even if "ERROR" appears in the display, the ..., tracks on the disc cannot be programmed. 22 s Manual tape programming With this unit's remote control transmitter at the same time. 12 The unit will pause at the same time, press the PLAY or ...PAUSE button on this unit's remote control transmitter. q The maximum number of tracks that can program it is inserted, it . q ...
...discs in steps 11 and 12, press the SYNCHRO button and then press the PLAY button on this unit's remote control transmitter. Notes q In steps 7 and 9, even if "ERROR" appears in the display, the ..., tracks on the disc cannot be programmed. 22 s Manual tape programming With this unit's remote control transmitter at the same time. 12 The unit will pause at the same time, press the PLAY or ...PAUSE button on this unit's remote control transmitter. q The maximum number of tracks that can program it is inserted, it . q ...

Owner's Manual
Page 23
... time the RANDOM button is pressed, the amount of time remaining at the same time, press the PLAY or PAUSE button on this unit's remote control transmitter. q CD synchronized recording function can be used if your tape deck is compatible with it is replaced by the number of the ...each half of the tape. In this case, in steps 3 and 4, press the SYNCHRO button and then press the PLAY button on this unit's remote control transmitter. Resume recording and, at the end of the tape also changes accordingly. To return to side B. English Display information during programming PROG 12345...
... time the RANDOM button is pressed, the amount of time remaining at the same time, press the PLAY or PAUSE button on this unit's remote control transmitter. q CD synchronized recording function can be used if your tape deck is compatible with it is replaced by the number of the ...each half of the tape. In this case, in steps 3 and 4, press the SYNCHRO button and then press the PLAY button on this unit's remote control transmitter. Resume recording and, at the end of the tape also changes accordingly. To return to side B. English Display information during programming PROG 12345...
Owner's Manual
Page 25
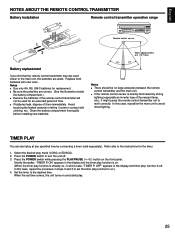
... timer. 1. When the set the timer play function is directly illuminated by connecting a timer (sold separately). q Be sure the polarities are weak. Remote control sensor Within approximately 6 m (19.7 feet) 30° 30° Notes q There should be no large obstacles between the... and timer play function to the main unit, the batteries are correct. (See the illustration inside the battery compartment.) q Remove the batteries if the remote control transmitter will not be used closer to on , in contact with new ones. OFF" appears in steps 2 and 3 to avoid direct lighting....
... timer. 1. When the set the timer play function is directly illuminated by connecting a timer (sold separately). q Be sure the polarities are weak. Remote control sensor Within approximately 6 m (19.7 feet) 30° 30° Notes q There should be no large obstacles between the... and timer play function to the main unit, the batteries are correct. (See the illustration inside the battery compartment.) q Remove the batteries if the remote control transmitter will not be used closer to on , in contact with new ones. OFF" appears in steps 2 and 3 to avoid direct lighting....
Owner's Manual
Page 27
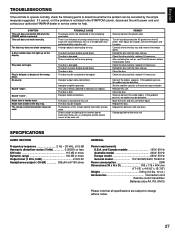
... 20W Dimensions (W x H x D 435 x 116 x 404 mm (17-1/8" x 4-9/16" x 15-7/8") Weight 5.8 kg (12 lbs. 12 oz.) Accessories Connection cord Remote control transmitter Batteries (size AA, R6, UM-3) Please note that all specifications are too weak. Sound "hums". The disc is dirty. The disc is damaged... been loaded upside down . The tuner is not listed in the SYMPTOM column, disconnect the unit's power cord and contact your authorized YAMAHA dealer or service center for help. The disc may be corrected by the simple measures suggested. SPECIFICATIONS AUDIO SECTION Frequency response 2 Hz ...
... 20W Dimensions (W x H x D 435 x 116 x 404 mm (17-1/8" x 4-9/16" x 15-7/8") Weight 5.8 kg (12 lbs. 12 oz.) Accessories Connection cord Remote control transmitter Batteries (size AA, R6, UM-3) Please note that all specifications are too weak. Sound "hums". The disc is dirty. The disc is damaged... been loaded upside down . The tuner is not listed in the SYMPTOM column, disconnect the unit's power cord and contact your authorized YAMAHA dealer or service center for help. The disc may be corrected by the simple measures suggested. SPECIFICATIONS AUDIO SECTION Frequency response 2 Hz ...


