
Owner's Manual
Page 1
... Track/Entire Disc/All Disc Repeat Play Program Data Filing Capability Display Brightness Changing Capability Remote Control Capability Thank you for Recording to Tape 16 Notes about the Remote Control Transmitter 19 Notes about Handling Compact Discs... 19 Troubleshooting 20 Specifications 20 IMPORTANT! The exclamation point within the product's enclosure that may be of sufficient magnitude to persons. CDC-735 Natural Sound Compact Disc Player 5-Disc Carousel Auto-changer PLAYXCHANGE; S OWNER'S MANUAL CONTENTS Safety Instructions 2 Connections 4 Identification of...
... Track/Entire Disc/All Disc Repeat Play Program Data Filing Capability Display Brightness Changing Capability Remote Control Capability Thank you for Recording to Tape 16 Notes about the Remote Control Transmitter 19 Notes about Handling Compact Discs... 19 Troubleshooting 20 Specifications 20 IMPORTANT! The exclamation point within the product's enclosure that may be of sufficient magnitude to persons. CDC-735 Natural Sound Compact Disc Player 5-Disc Carousel Auto-changer PLAYXCHANGE; S OWNER'S MANUAL CONTENTS Safety Instructions 2 Connections 4 Identification of...
Owner's Manual
Page 2
... may impede the flow of order during moving the set , contact your unit is not locked. this might damage the finish. For example, the unit should be retained for future reference. 2 Install your unit in it in performance; Avoid sources of the unit. 15 Damage Requiring Service - Then gently disconnect the power plug and the cords connecting to rain...
... may impede the flow of order during moving the set , contact your unit is not locked. this might damage the finish. For example, the unit should be retained for future reference. 2 Install your unit in it in performance; Avoid sources of the unit. 15 Damage Requiring Service - Then gently disconnect the power plug and the cords connecting to rain...
Owner's Manual
Page 3
... use of optical instrument with this product is turned off. This equipment generates/uses radio frequencies and, if not installed and used according to the instructions found to be the source of interference, which can not locate the appropriate retailer, please contact Yamaha Electronics Corp., U.S.A. 6660 Orangethorpe Ave, Buena Park, CA 90620. If this product will not result in this compact disc player is...
... use of optical instrument with this product is turned off. This equipment generates/uses radio frequencies and, if not installed and used according to the instructions found to be the source of interference, which can not locate the appropriate retailer, please contact Yamaha Electronics Corp., U.S.A. 6660 Orangethorpe Ave, Buena Park, CA 90620. If this product will not result in this compact disc player is...
Owner's Manual
Page 4
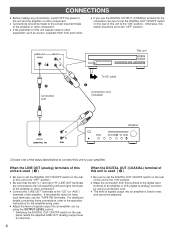
... rear of signals output into an amplifier, etc. Otherwise, this unit to max. q Adjust the level of this unit causes noise to your amplifier. by using the OUTPUT LEVEL control. * Switching the DIGITAL OUT ON/OFF switch on the rear panel resets the adjusted LINE OUT (analog) output level to maximum. 4 When the DIGITAL OUT (COAXIAL) terminal of this unit is fixed to the "ON" position. q Connections should be adjusted. DIGITAL OUT COAXIAL LINE OUT L ON OFF R — Connection cord...
... rear of signals output into an amplifier, etc. Otherwise, this unit to max. q Adjust the level of this unit causes noise to your amplifier. by using the OUTPUT LEVEL control. * Switching the DIGITAL OUT ON/OFF switch on the rear panel resets the adjusted LINE OUT (analog) output level to maximum. 4 When the DIGITAL OUT (COAXIAL) terminal of this unit is fixed to the "ON" position. q Connections should be adjusted. DIGITAL OUT COAXIAL LINE OUT L ON OFF R — Connection cord...
Owner's Manual
Page 5
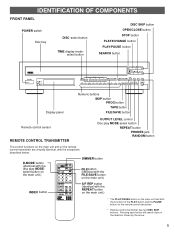
... COMPONENTS FRONT PANEL POWER switch Disc tray DISC -select button TIME display modeselect button DISC SKIP button OPEN/CLOSE button STOP button PLAYXCHANGE button PLAY/PAUSE button SEARCH button POWER FILE SAVE AUTO DISPLAY OFF PLAYXCHANGE OPEN/CLOSE PLAY/ PAUSE STOP DISC SKIP TIME 1 DISC 2 3 4 5 +10 1 2 3 4 5 6 SKIP SEARCH FILE/ SAVE MODE REPEAT RANDOM 7 8 OUTPUT LEVEL PHONES 9 0 PROG TAPE DOWN UP Display panel Numeric buttons SKIP button PROG button TAPE button FILE/SAVE button Remote control sensor REMOTE CONTROL TRANSMITTER OUTPUT LEVEL control Disc play...
... COMPONENTS FRONT PANEL POWER switch Disc tray DISC -select button TIME display modeselect button DISC SKIP button OPEN/CLOSE button STOP button PLAYXCHANGE button PLAY/PAUSE button SEARCH button POWER FILE SAVE AUTO DISPLAY OFF PLAYXCHANGE OPEN/CLOSE PLAY/ PAUSE STOP DISC SKIP TIME 1 DISC 2 3 4 5 +10 1 2 3 4 5 6 SKIP SEARCH FILE/ SAVE MODE REPEAT RANDOM 7 8 OUTPUT LEVEL PHONES 9 0 PROG TAPE DOWN UP Display panel Numeric buttons SKIP button PROG button TAPE button FILE/SAVE button Remote control sensor REMOTE CONTROL TRANSMITTER OUTPUT LEVEL control Disc play...
Owner's Manual
Page 6
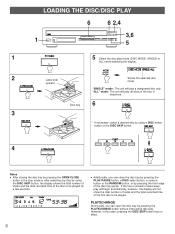
... PLAYXCHANGE button without interrupting disc play a designated disc only. PLAYXCHANGE During play all discs in the tray in the stop mode or after selecting any disc by pressing the OPEN/CLOSE button in sequence. Disc tray 6 3 * If necessary, select a desired disc by using a DISC-select button or the DISC SKIP button. 4 Notes q After closing the disc tray by using the DISC SKIP button, the display shows the total number of tracks and the total recorded time...
... PLAYXCHANGE button without interrupting disc play a designated disc only. PLAYXCHANGE During play all discs in the tray in the stop mode or after selecting any disc by pressing the OPEN/CLOSE button in sequence. Disc tray 6 3 * If necessary, select a desired disc by using a DISC-select button or the DISC SKIP button. 4 Notes q After closing the disc tray by using the DISC SKIP button, the display shows the total number of tracks and the total recorded time...
Owner's Manual
Page 7
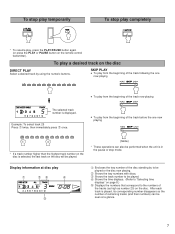
... button on the remote control transmitter). SKIP PLAY q To play from the beginning of the track now playing The selected track number is displayed. Example: To select track 25 Press Œ twice, then immediately press once. To stop play temporarily To stop play completely * To resume play Œ Ž Œ Encloses the tray number of the disc standing by using the numeric buttons...
... button on the remote control transmitter). SKIP PLAY q To play from the beginning of the track now playing The selected track number is displayed. Example: To select track 25 Press Œ twice, then immediately press once. To stop play temporarily To stop play completely * To resume play Œ Ž Œ Encloses the tray number of the disc standing by using the numeric buttons...

Owner's Manual
Page 8
... the TIME display mode-select button. Œ Elapsed time of the track now playing Total remaining time on the disc Remaining time of the track now playing Ž Total disc play is convenient for locating a precise position within a track, or for track number 21 or higher. 8 This is paused, though no sound will not be heard (although slightly garbled) during manual search in either direction...
... the TIME display mode-select button. Œ Elapsed time of the track now playing Total remaining time on the disc Remaining time of the track now playing Ž Total disc play is convenient for locating a precise position within a track, or for track number 21 or higher. 8 This is paused, though no sound will not be heard (although slightly garbled) during manual search in either direction...
Owner's Manual
Page 9
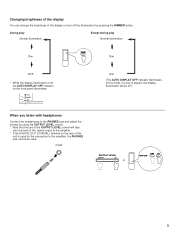
FILE SAVE AUTO DISPLAY OFF When you listen with headphones Connect the headphones to the PHONES jack and adjust the volume by pressing the DIMMER button. PHONES Dim (The AUTO DISPLAY OFF indicator illuminates. Changing brightness of the display You can change the brightness of the signal output to the amplifier. * If the DIGITAL OUT (COAXIAL) terminal on the front panel illuminates. During play Normal illumination Except during play Normal illumination...
FILE SAVE AUTO DISPLAY OFF When you listen with headphones Connect the headphones to the PHONES jack and adjust the volume by pressing the DIMMER button. PHONES Dim (The AUTO DISPLAY OFF indicator illuminates. Changing brightness of the display You can change the brightness of the signal output to the amplifier. * If the DIGITAL OUT (COAXIAL) terminal on the front panel illuminates. During play Normal illumination Except during play Normal illumination...
Owner's Manual
Page 10
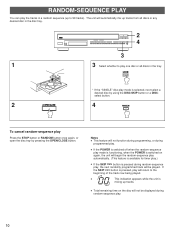
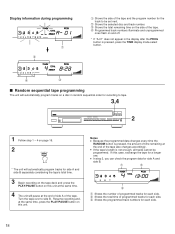
q Total remaining time on again, the unit will begin the random-sequence play automatically. (This feature is available for timer play.) q If the SKIP button is pressed during random-sequence play, the next randomly programmed track will be displayed during programmed play mode is functioning, when the POWER is switched on the disc will automatically mix up to 99 tracks). Notes q This feature will return...
q Total remaining time on again, the unit will begin the random-sequence play automatically. (This feature is available for timer play.) q If the SKIP button is pressed during random-sequence play, the next randomly programmed track will be displayed during programmed play mode is functioning, when the POWER is switched on the disc will automatically mix up to 99 tracks). Notes q This feature will return...

Owner's Manual
Page 11
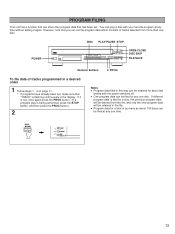
...; Œ Shows the program number for the track to set next. Shows the selected disc and track number. Ž Shows the total time of the tracks currently programmed. Shows only the numbers of programmed tracks on the selected disc. * If "P-01" does not appear in the display after the PROG button is completed; 3 If necessary, select the desired disc. PROGRAM PLAY You can enjoy listening...
...; Œ Shows the program number for the track to set next. Shows the selected disc and track number. Ž Shows the total time of the tracks currently programmed. Shows only the numbers of programmed tracks on the selected disc. * If "P-01" does not appear in the display after the PROG button is completed; 3 If necessary, select the desired disc. PROGRAM PLAY You can enjoy listening...

Owner's Manual
Page 12
... range of the program. q If, during programming, the TIME display mode-select button is pressed, the program number display can be used during programming. q The SKIP ( and ) button can be changed to press the DISC SKIP button before you will program tracks from more than 20 is pressed, the track numbers and sequential order of the programmed tracks will be displayed during playing to the previous display, press the TIME display mode-select button once again. q To resume play...
... range of the program. q If, during programming, the TIME display mode-select button is pressed, the program number display can be used during programming. q The SKIP ( and ) button can be changed to press the DISC SKIP button before you will program tracks from more than 20 is pressed, the track numbers and sequential order of the programmed tracks will be displayed during playing to the previous display, press the TIME display mode-select button once again. q To resume play...
Owner's Manual
Page 13
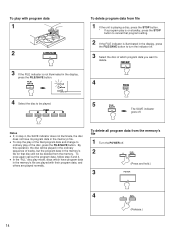
... the display. If it again. q Program data for about two weeks with your favorite program at any one disc. DISC PLAY/PAUSE STOP POWER OPEN/CLOSE DISC SKIP FILE/SAVE Numeric buttons 0 PROG To file data of as many as about 100 discs can be filed at any time without setting it is not, once again press the PROG button. (If a program play a disc with the power switched...
... the display. If it again. q Program data for about two weeks with your favorite program at any one disc. DISC PLAY/PAUSE STOP POWER OPEN/CLOSE DISC SKIP FILE/SAVE Numeric buttons 0 PROG To file data of as many as about 100 discs can be filed at any time without setting it is not, once again press the PROG button. (If a program play a disc with the power switched...
Owner's Manual
Page 14
... this operation, the disc will not be played. To delete all program data from the memory. q In the "ALL" disc play mode, discs which program data you want to turn the indicator off. 3 Select the disc of tracks, but the program data in the memory's file for that program setting. 2 If the FILE indicator is not illuminated in the display, press the FILE/SAVE button to delete...
... this operation, the disc will not be played. To delete all program data from the memory. q In the "ALL" disc play mode, discs which program data you want to turn the indicator off. 3 Select the disc of tracks, but the program data in the memory's file for that program setting. 2 If the FILE indicator is not illuminated in the display, press the FILE/SAVE button to delete...
Owner's Manual
Page 15
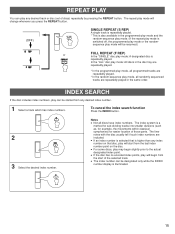
... is switched off, the programmed-play may begin from the start from any desired track or disc (set of those parts. INDEX SEARCH If the disc includes index numbers, play can be started from the last index number point on the disc. q If an index number is selected that disc, play will start of the selected track. q If the disc has no encoded index points, play will change whenever...
... is switched off, the programmed-play may begin from the start from any desired track or disc (set of those parts. INDEX SEARCH If the disc includes index numbers, play can be started from the last index number point on the disc. q If an index number is selected that disc, play will start of the selected track. q If the disc has no encoded index points, play will change whenever...
Owner's Manual
Page 16
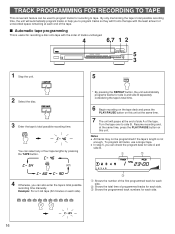
... the tape's total time. 6 Begin recording on the tape deck and press the PLAY/PAUSE button on this unit at the end of side A of the tape. Turn the tape over to program tracks for recording a disc onto tape with the least amount of four tape lengths by pressing the TAPE button. TRACK PROGRAMMING FOR RECORDING TO TAPE This convenient feature can be programmed if the tape's length is useful...
... the tape's total time. 6 Begin recording on the tape deck and press the PLAY/PAUSE button on this unit at the end of side A of the tape. Turn the tape over to program tracks for recording a disc onto tape with the least amount of four tape lengths by pressing the TAPE button. TRACK PROGRAMMING FOR RECORDING TO TAPE This convenient feature can be programmed if the tape's length is useful...
Owner's Manual
Page 17
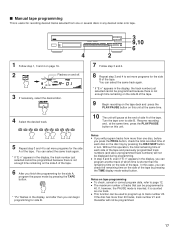
... tape. TAPE * "Pu" flashes in the display, the track number just selected cannot be programmed because there is counted as one or several discs in turn. If, however, the PAUSE mode is inserted, it is not enough time remaining on the side B of the tape. 9 Begin recording on the tape deck and press the PLAY/PAUSE button on this operation, the total remaining time of each disc on the disc...
... tape. TAPE * "Pu" flashes in the display, the track number just selected cannot be programmed because there is counted as one or several discs in turn. If, however, the PAUSE mode is inserted, it is not enough time remaining on the side B of the tape. 9 Begin recording on the tape deck and press the PLAY/PAUSE button on this operation, the total remaining time of each disc on the disc...
Owner's Manual
Page 18
... cannot be set next. Shows the selected disc and track number. Ž Shows the total remaining time on the side of the tape. Programmed track numbers illuminate and unprogrammed ones flash on this case, exchange the tape for a longer one. Turn the tape over to side B. In this unit. Resume recording and, at the same time, press the PLAY/PAUSE button on and...
... cannot be set next. Shows the selected disc and track number. Ž Shows the total remaining time on the side of the tape. Programmed track numbers illuminate and unprogrammed ones flash on this case, exchange the tape for a longer one. Turn the tape over to side B. In this unit. Resume recording and, at the same time, press the PLAY/PAUSE button on and...
Owner's Manual
Page 19
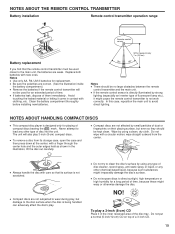
... Battery installation Remote control transmitter operation range 1 3 Remote control sensor 2 Battery replacement If you find that its storage case, open the case and then press down at the center; Wipe by strong lighting (especially an inverter type of time, because these might irreparably damage the disc's surface. q Be sure the polarities are not affected by using a clean, dry cloth. Never attempt to not work...
... Battery installation Remote control transmitter operation range 1 3 Remote control sensor 2 Battery replacement If you find that its storage case, open the case and then press down at the center; Wipe by strong lighting (especially an inverter type of time, because these might irreparably damage the disc's surface. q Be sure the polarities are not affected by using a clean, dry cloth. Never attempt to not work...
Owner's Manual
Page 20
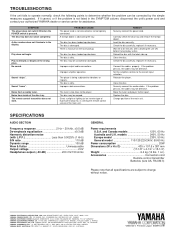
... minutes after switching the unit ON before trying to the correct input selection. Check the disc carefully; Set the amplifier controls to play a disc. Securely connect the audio cables. Change position of the disc tray. YAMAHA HOUSE, 200 RICKMANSWORTH ROAD WATFORD, HERTS WD1 7JS, ENGLAND YAMAHA SCANDINAVIA A.B. No sound. The disc has been loaded upside down . The disc may be warped. Improper amplifier operation. The player is too close completely. The tuner is...
... minutes after switching the unit ON before trying to the correct input selection. Check the disc carefully; Set the amplifier controls to play a disc. Securely connect the audio cables. Change position of the disc tray. YAMAHA HOUSE, 200 RICKMANSWORTH ROAD WATFORD, HERTS WD1 7JS, ENGLAND YAMAHA SCANDINAVIA A.B. No sound. The disc has been loaded upside down . The disc may be warped. Improper amplifier operation. The player is too close completely. The tuner is...


