

Owner's Manual
Page 3
... front speaker unit can also enjoy stronger bass and surround effects by adding the separately available YAMAHA NX-SW70, consisting of Dolby Laboratories. q Preset Remote Control The remote control can reproduce the sound field of various sources, from movies, to enhance the power and...two rear speakers. "Dolby", "Pro Logic" and the double-D symbol are inside the action. q Seven DSP programs including YAMAHA CINEMA DSP Connecting the YAMAHA NX-SW70 (sold separately) allows seven different DSP programs to be used to concerts, and sporting events. CONTENTS PREPARATION FEATURES 1...
... front speaker unit can also enjoy stronger bass and surround effects by adding the separately available YAMAHA NX-SW70, consisting of Dolby Laboratories. q Preset Remote Control The remote control can reproduce the sound field of various sources, from movies, to enhance the power and...two rear speakers. "Dolby", "Pro Logic" and the double-D symbol are inside the action. q Seven DSP programs including YAMAHA CINEMA DSP Connecting the YAMAHA NX-SW70 (sold separately) allows seven different DSP programs to be used to concerts, and sporting events. CONTENTS PREPARATION FEATURES 1...
Owner's Manual
Page 4
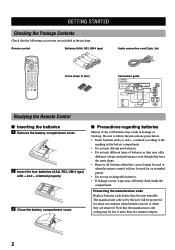
... shape. • Remove all battery fluid inside the compartment. oriented properly. 3 Close the battery compartment cover. Remote control Batteries (AAA, R03, UM-4 type) Audio connection cord (2 pin, 3m) Velcro strips (2 sets) Connection guide Readying the Remote Control s Inserting the batteries 1 Remove the battery compartment cover. 2 Insert the four batteries (AAA, R03, .... • Do not use rechargeable batteries. • If leakage occurs, wipe away all batteries when they can no longer be used or when the remote control will be lost if more than two minutes elapses. 2
... shape. • Remove all battery fluid inside the compartment. oriented properly. 3 Close the battery compartment cover. Remote control Batteries (AAA, R03, UM-4 type) Audio connection cord (2 pin, 3m) Velcro strips (2 sets) Connection guide Readying the Remote Control s Inserting the batteries 1 Remove the battery compartment cover. 2 Insert the four batteries (AAA, R03, .... • Do not use rechargeable batteries. • If leakage occurs, wipe away all batteries when they can no longer be used or when the remote control will be lost if more than two minutes elapses. 2

Owner's Manual
Page 5
...the front speaker unit when an object blocks the remote control sensor on the unit. • Do not subject the remote control to impact. Adjust the relative positions of the remote control starts to high humidity. • The remote control operations become shorter. Do not allow it ...become difficult when direct sunlight or other strong light (such as from an inverter fluorescent lamp) strikes the sensor. PREPARATION Operational Area of the Remote Control GETTING STARTED Front speaker 30° 30° Approx. 20 cm - 6 m s Battery replacement cycle Replace all four batteries ...
...the front speaker unit when an object blocks the remote control sensor on the unit. • Do not subject the remote control to impact. Adjust the relative positions of the remote control starts to high humidity. • The remote control operations become shorter. Do not allow it ...become difficult when direct sunlight or other strong light (such as from an inverter fluorescent lamp) strikes the sensor. PREPARATION Operational Area of the Remote Control GETTING STARTED Front speaker 30° 30° Approx. 20 cm - 6 m s Battery replacement cycle Replace all four batteries ...

Owner's Manual
Page 6
The STANDBY indicator will light when power is turned off using p on and off the subwoofer's power when a YAMAHA subwoofer and rear speakers NX-SW70 (sold separately) are connected. Display VIRTUAL indicator (page 20) TRUBASS indicator (page 18) ENHANCED indicator VIRTUAL TRUBASS DIGITAL ENHANCED ... Panel) INPUT selector button (page 17) DSP selector button (page 20) VOLUME +/- (page 17) STANDBY indicator POWER (page 17) Turns the unit's power on the remote control. This button also turns off .
The STANDBY indicator will light when power is turned off using p on and off the subwoofer's power when a YAMAHA subwoofer and rear speakers NX-SW70 (sold separately) are connected. Display VIRTUAL indicator (page 20) TRUBASS indicator (page 18) ENHANCED indicator VIRTUAL TRUBASS DIGITAL ENHANCED ... Panel) INPUT selector button (page 17) DSP selector button (page 20) VOLUME +/- (page 17) STANDBY indicator POWER (page 17) Turns the unit's power on the remote control. This button also turns off .

Owner's Manual
Page 7
... selector button (page 17) Numeric buttons (page 23) MENU + (page 21) SUBWOOFER + (page 18) TEST (page 15) Not used with this unit. PREPARATION Remote Control p (power) (page 17) Remote control selector buttons (page 23) VOL - (page 17) m (page 18) SET/DSP (pages 20 and 23) MENU (page 21) MENU - (page 21) ...- (page 18) NIGHT MODE (page 18) t (page 18) NAMES OF ALL PARTS DSP ON/OFF (page 20) Transmission indicator Not used with this unit. OPERATION REMOTE CONTROL APPENDIX English y Of the buttons on the remote control, those used to control this unit is colored in dark gray. 5
... selector button (page 17) Numeric buttons (page 23) MENU + (page 21) SUBWOOFER + (page 18) TEST (page 15) Not used with this unit. PREPARATION Remote Control p (power) (page 17) Remote control selector buttons (page 23) VOL - (page 17) m (page 18) SET/DSP (pages 20 and 23) MENU (page 21) MENU - (page 21) ...- (page 18) NIGHT MODE (page 18) t (page 18) NAMES OF ALL PARTS DSP ON/OFF (page 20) Transmission indicator Not used with this unit. OPERATION REMOTE CONTROL APPENDIX English y Of the buttons on the remote control, those used to control this unit is colored in dark gray. 5

Owner's Manual
Page 9
... the positions determined in this will weaken its adhesive strength. • Thoroughly wipe clean the surface where the velcro strip is sloped. Smooth surface OPERATION REMOTE CONTROL APPENDIX Protrusion 2 Place the front speaker unit where it on top of the television ) to determine where to apply the velcro strip with the...
... the positions determined in this will weaken its adhesive strength. • Thoroughly wipe clean the surface where the velcro strip is sloped. Smooth surface OPERATION REMOTE CONTROL APPENDIX Protrusion 2 Place the front speaker unit where it on top of the television ) to determine where to apply the velcro strip with the...
Owner's Manual
Page 11
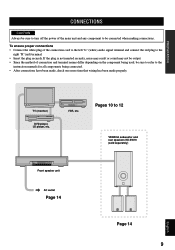
...8226; Connect the white plug of the connection cord to the left "L" (white) audio signal terminal and connect the red plug to 12 YAMAHA subwoofer and rear speakers NX-SW70 (sold separately) Front speaker unit AC outlet Page 14 Page 14 9 APPENDIX English PREPARATION CONNECTIONS CAUTION Always ... manuals for all components being connected. • After connections have been made, check one more time that wiring has been made properly. OPERATION REMOTE CONTROL TV (monitor) DVD player, LD player, etc. If the plug is not inserted securely, noise may result or sound may not be...
...8226; Connect the white plug of the connection cord to the left "L" (white) audio signal terminal and connect the red plug to 12 YAMAHA subwoofer and rear speakers NX-SW70 (sold separately) Front speaker unit AC outlet Page 14 Page 14 9 APPENDIX English PREPARATION CONNECTIONS CAUTION Always ... manuals for all components being connected. • After connections have been made, check one more time that wiring has been made properly. OPERATION REMOTE CONTROL TV (monitor) DVD player, LD player, etc. If the plug is not inserted securely, noise may result or sound may not be...

Owner's Manual
Page 13
PREPARATION OPERATION s Connecting to the VIDEO terminals. REMOTE CONTROL APPENDIX English 11 When only the VIDEO terminals are connected Connect the audio output terminals on the VCR to the audio input terminals of ...
PREPARATION OPERATION s Connecting to the VIDEO terminals. REMOTE CONTROL APPENDIX English 11 When only the VIDEO terminals are connected Connect the audio output terminals on the VCR to the audio input terminals of ...
Owner's Manual
Page 15
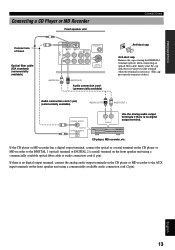
... to the DIGITAL 1 (optical) terminal or DIGITAL 2 (coaxial) terminal on the front speaker unit using a commercially available optical fiber cable or audio connection cord (1 pin). REMOTE CONTROL APPENDIX English 13 If the CD player or MD recorder has a digital output terminal, connect the optical or coaxial terminal on the CD player...
... to the DIGITAL 1 (optical) terminal or DIGITAL 2 (coaxial) terminal on the front speaker unit using a commercially available optical fiber cable or audio connection cord (1 pin). REMOTE CONTROL APPENDIX English 13 If the CD player or MD recorder has a digital output terminal, connect the optical or coaxial terminal on the CD player...

Owner's Manual
Page 17
...out the particular flavor of these sound fields. Test tones (like pink noise) will be adjusted by using p on the remote control. LEFT SURROUND RIGHT SURROUND Rear speakers REMOTE CONTROL APPENDIX English 15 Even when a different DSP program is used or the VIRTUAL SURROUND DSP program is selected: Front ...the front speaker unit. q When only the front speaker unit is being used , it is not lit), turn on the power using the remote control before playback by pressing POWER on the power. Speaker output levels may be output in question. If the STANDBY indicator is lit, turn on...
...out the particular flavor of these sound fields. Test tones (like pink noise) will be adjusted by using p on the remote control. LEFT SURROUND RIGHT SURROUND Rear speakers REMOTE CONTROL APPENDIX English 15 Even when a different DSP program is used or the VIRTUAL SURROUND DSP program is selected: Front ...the front speaker unit. q When only the front speaker unit is being used , it is not lit), turn on the power using the remote control before playback by pressing POWER on the power. Speaker output levels may be output in question. If the STANDBY indicator is lit, turn on...

Owner's Manual
Page 19
... levels. on the remote control. PREPARATION OPERATION OPERATION OPERATING THE UNIT Enjoying the Home Theater Sound System This section describes how to select audio output from A/V component such as a TV, VCR, or DVD, LD, CD player, or MD recorder as input source to the Home Theater Sound System AV-S70 and how to... turn on the power by pressing POWER on the remote control) increases the level, while pressing VOLUME - (or VOL -
... levels. on the remote control. PREPARATION OPERATION OPERATION OPERATING THE UNIT Enjoying the Home Theater Sound System This section describes how to select audio output from A/V component such as a TV, VCR, or DVD, LD, CD player, or MD recorder as input source to the Home Theater Sound System AV-S70 and how to... turn on the power by pressing POWER on the remote control) increases the level, while pressing VOLUME - (or VOL -

Owner's Manual
Page 20
To cancel NIGHT MODE, press NIGHT MODE again. on the remote control). C Ç Adjusting the subwoofer level Subwoofer level can be adjusted if a subwoofer is difficult to dialog and song lyrics. y The level can be adjusted .... decreases the A level. Å Increasing the power of SRS Labs, Inc. TruBass technology is reduced. USING CONVENIENT FUNCTIONS You can use convenient functions with the remote control during audio reproduction. ı Listening to the original volume level, press m again. 18 in the display. • This will increase the level of the...
To cancel NIGHT MODE, press NIGHT MODE again. on the remote control). C Ç Adjusting the subwoofer level Subwoofer level can be adjusted if a subwoofer is difficult to dialog and song lyrics. y The level can be adjusted .... decreases the A level. Å Increasing the power of SRS Labs, Inc. TruBass technology is reduced. USING CONVENIENT FUNCTIONS You can use convenient functions with the remote control during audio reproduction. ı Listening to the original volume level, press m again. 18 in the display. • This will increase the level of the...
Owner's Manual
Page 21
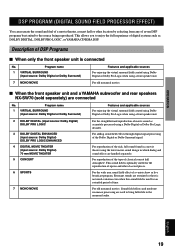
...found in which dialog and sound effects are restained so there is not much variation even when this sound field is connected No. REMOTE CONTROL APPENDIX English 19 For reproduction of the Dolby Digital or Dolby Surround signal. Program name 1 VIRTUAL SURROUND (input source: Dolby ... 6 SPORTS 7 MONO MOVIE For the straightforward reproduction of movie sound as DOLBY DIGITAL, DOLBY PRO LOGIC, or YAMAHA CINEMA DSP. s When the front speaker unit and a YAMAHA subwoofer and rear speakers NX-SW70 (sold separately) are used for the reproduction of operas and other location by...
...found in which dialog and sound effects are restained so there is not much variation even when this sound field is connected No. REMOTE CONTROL APPENDIX English 19 For reproduction of the Dolby Digital or Dolby Surround signal. Program name 1 VIRTUAL SURROUND (input source: Dolby ... 6 SPORTS 7 MONO MOVIE For the straightforward reproduction of movie sound as DOLBY DIGITAL, DOLBY PRO LOGIC, or YAMAHA CINEMA DSP. s When the front speaker unit and a YAMAHA subwoofer and rear speakers NX-SW70 (sold separately) are used for the reproduction of operas and other location by...

Owner's Manual
Page 22
... selected in the case of the right and left main channels may differ based on the input source being listened to the glossary on the remote control). q When only the front speaker unit is stored in memory so that you feel sounds best for each input source (AUX, TV, VIDEO,... DIGITAL 1, and DIGITAL 2) is connected: VIRTUAL SURROUND MONO MOVIE DSP OFF q When the front speaker unit and a YAMAHA subwoofer and rear speakers NX-SW70 are used. • Select the DSP program that the DSP program is automatically selected when the input source is...
... selected in the case of the right and left main channels may differ based on the input source being listened to the glossary on the remote control). q When only the front speaker unit is stored in memory so that you feel sounds best for each input source (AUX, TV, VIDEO,... DIGITAL 1, and DIGITAL 2) is connected: VIRTUAL SURROUND MONO MOVIE DSP OFF q When the front speaker unit and a YAMAHA subwoofer and rear speakers NX-SW70 are used. • Select the DSP program that the DSP program is automatically selected when the input source is...

Owner's Manual
Page 23
... OFF 1 2 3 Setting/Symptom Do not use the MENU - The currently brightness level (such as "Dimmer: ±0") will be performed with the remote control. Brightness can refer to the table given below . 1. To set Auto Power Off, use the Auto Power function. will brighten the display, while...is input, Auto Power On automatically turns the power on. (Or power can be turned on again using the Auto Power function. REMOTE CONTROL APPENDIX English 21 To cancel the menu functions, press MENU until the input display returns. to select the "Auto Power 2". ...
... OFF 1 2 3 Setting/Symptom Do not use the MENU - The currently brightness level (such as "Dimmer: ±0") will be performed with the remote control. Brightness can refer to the table given below . 1. To set Auto Power Off, use the Auto Power function. will brighten the display, while...is input, Auto Power On automatically turns the power on. (Or power can be turned on again using the Auto Power function. REMOTE CONTROL APPENDIX English 21 To cancel the menu functions, press MENU until the input display returns. to select the "Auto Power 2". ...

Owner's Manual
Page 25
... setting the code: manual preset and auto preset. A manufacturer code can be set . The transmission indicator will go out. Notes • Remote control of some component from other manufacturers cannot be controlled, or only limited functions can not be performed if your TV, VCR or satellite tuner...tuner/cable TV on the remote control allows you encounter this problem, please use the numeric buttons to enter the 4-digit 3 manufacturer code for the component to be controlled. The signals for controlling the front speaker unit have already been set for the S70 button so that only ...
... setting the code: manual preset and auto preset. A manufacturer code can be set . The transmission indicator will go out. Notes • Remote control of some component from other manufacturers cannot be controlled, or only limited functions can not be performed if your TV, VCR or satellite tuner...tuner/cable TV on the remote control allows you encounter this problem, please use the numeric buttons to enter the 4-digit 3 manufacturer code for the component to be controlled. The signals for controlling the front speaker unit have already been set for the S70 button so that only ...

Owner's Manual
Page 26
..." for VCR, and "SAT" for satellite tuner/cable TV.) The signals for controlling the front speaker unit have already been set for the S70 button so that only the manufacturer code for the TV, VCR or SAT needs to the component for cable TV. OPERATING OTHER COMPONENTS USING THE... REMOTE CONTROL s Using auto preset 3 Hold down SET and press c until the transmission indicator lights. Transmission indicator 2 3,5 4 The indicator will go out. 5 Hold ...
..." for VCR, and "SAT" for satellite tuner/cable TV.) The signals for controlling the front speaker unit have already been set for the S70 button so that only the manufacturer code for the TV, VCR or SAT needs to the component for cable TV. OPERATING OTHER COMPONENTS USING THE... REMOTE CONTROL s Using auto preset 3 Hold down SET and press c until the transmission indicator lights. Transmission indicator 2 3,5 4 The indicator will go out. 5 Hold ...

Owner's Manual
Page 27
...'s power turns off. Up to go through the manufacturer codes in question. Transmission 6 indicator 7 The indicator will go out. 6 Point the remote control at the component to be stored in the memory of times to 300 manufacturer codes (for TV) may be controlled (the component turned on... If the transmission indicator does not go out once the manufacturer code has been set by pressing p and cycling in the memory of the remote control. Note • During step 6, if you press p about 300 times and the transmission indicator flashes twice slowly and the component's ...
...'s power turns off. Up to go through the manufacturer codes in question. Transmission 6 indicator 7 The indicator will go out. 6 Point the remote control at the component to be stored in the memory of times to 300 manufacturer codes (for TV) may be controlled (the component turned on... If the transmission indicator does not go out once the manufacturer code has been set by pressing p and cycling in the memory of the remote control. Note • During step 6, if you press p about 300 times and the transmission indicator flashes twice slowly and the component's ...

Owner's Manual
Page 28
...* Plays the VCR* Records on the VCR* y A VCR can control your TV by setting the corresponding manufacturer code for the remote control selector button "VCR". OPERATING OTHER COMPONENTS USING THE REMOTE CONTROL Controlling a TV You can be controlled using * marked buttons once the manufacturer code for that VCR has been set for...
...* Plays the VCR* Records on the VCR* y A VCR can control your TV by setting the corresponding manufacturer code for the remote control selector button "VCR". OPERATING OTHER COMPONENTS USING THE REMOTE CONTROL Controlling a TV You can be controlled using * marked buttons once the manufacturer code for that VCR has been set for...

Owner's Manual
Page 29
... for the VCR to be controlled using * marked buttons once the manufacturer code for that TV has been set for the remote control selector button "VCR". Press VCR. PREPARATION OPERATION REMOTE CONTROL VCR power ON/OFF Decreases TV volume* Selects the next lower channel Mutes the TV* Rewind Stop Pause Selects the... the channel Fast forward Play Record This button needs to begin recording. y A TV can control your VCR by setting the corresponding manufacturer code for the remote control select button "TV". 27 APPENDIX English
... for the VCR to be controlled using * marked buttons once the manufacturer code for that TV has been set for the remote control selector button "VCR". Press VCR. PREPARATION OPERATION REMOTE CONTROL VCR power ON/OFF Decreases TV volume* Selects the next lower channel Mutes the TV* Rewind Stop Pause Selects the... the channel Fast forward Play Record This button needs to begin recording. y A TV can control your VCR by setting the corresponding manufacturer code for the remote control select button "TV". 27 APPENDIX English


