Owners Manual
Page 4
... shock to the user and/or damage to sudden temperature changes from use this unit with a voltage other than specified is needed. Contact qualified Yamaha service personnel when any reasons. 15 When not planning to use of this unit. 3 Locate this unit away from other electrical appliances, motors,... in a safe place for future reference. 2 Install this unit upside-down. Voltages are complete. 8 Do not operate this sound system in the standby mode, and disconnect the AC power plug from the wall outlet. 16 Install this unit must be reached easily. 17 Be sure to this unit...
... shock to the user and/or damage to sudden temperature changes from use this unit with a voltage other than specified is needed. Contact qualified Yamaha service personnel when any reasons. 15 When not planning to use of this unit. 3 Locate this unit away from other electrical appliances, motors,... in a safe place for future reference. 2 Install this unit upside-down. Voltages are complete. 8 Do not operate this sound system in the standby mode, and disconnect the AC power plug from the wall outlet. 16 Install this unit must be reached easily. 17 Be sure to this unit...
Owners Manual
Page 12
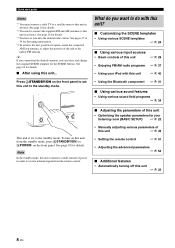
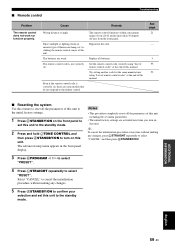
Press ASTANDBY/ON on the front panel to set to the standby mode. To turn on the front panel. Note In the standby mode, this unit consumes a small amount of this unit ☞ P. 43 • Setting the remote control ☞ P. 51 • Adjusting the advanced parameters... room (BASIC SETUP) ☞ P. 22 • Manually adjusting various parameters of power in order to receive infrared signals from the standby mode, press ASTANDBY/ON (or DPOWER) on this unit to the standby mode. y If you cannot find the desired situation, you want to do with this unit ☞ ...
Press ASTANDBY/ON on the front panel to set to the standby mode. To turn on the front panel. Note In the standby mode, this unit consumes a small amount of this unit ☞ P. 43 • Setting the remote control ☞ P. 51 • Adjusting the advanced parameters... room (BASIC SETUP) ☞ P. 22 • Manually adjusting various parameters of power in order to receive infrared signals from the standby mode, press ASTANDBY/ON (or DPOWER) on this unit to the standby mode. y If you cannot find the desired situation, you want to do with this unit ☞ ...

Owners Manual
Page 16
... (-) 1 Press down the tab. 2 Insert the bare end of the speaker wire into the hole on or off . Note The setting you are to the standby mode. The following display appears in the front panel display. to "6ΩMIN" as follows BEFORE using this unit. 12 En The following display appears...
... (-) 1 Press down the tab. 2 Insert the bare end of the speaker wire into the hole on or off . Note The setting you are to the standby mode. The following display appears in the front panel display. to "6ΩMIN" as follows BEFORE using this unit. 12 En The following display appears...
Owners Manual
Page 22
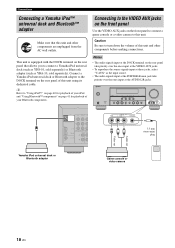
...VIDEO AUX jacks on the front panel to connect a game console or a video camera to this unit and other components before making connections. VOLUME STANDBY /ON PHONES SILENT CINEMA SPEAKERS A/B/OFF EDIT PRESET/TUNING BAND A/B/C/D/E TONE CONTROL 1 PROGRAM PRESET/TUNING SCENE 2 3 4 MEMORY TUNING AUTO/MAN'L... L/R jacks. y Refer to "Using iPod™" on page 40 for playback of this unit using its dedicated cable. Connect a Yamaha iPod universal dock or Bluetooth adapter to turn down the volume of your Bluetooth components. Caution Be sure to the DOCK terminal on the...
...VIDEO AUX jacks on the front panel to connect a game console or a video camera to this unit and other components before making connections. VOLUME STANDBY /ON PHONES SILENT CINEMA SPEAKERS A/B/OFF EDIT PRESET/TUNING BAND A/B/C/D/E TONE CONTROL 1 PROGRAM PRESET/TUNING SCENE 2 3 4 MEMORY TUNING AUTO/MAN'L... L/R jacks. y Refer to "Using iPod™" on page 40 for playback of this unit using its dedicated cable. Connect a Yamaha iPod universal dock or Bluetooth adapter to turn down the volume of your Bluetooth components. Caution Be sure to the DOCK terminal on the...

Owners Manual
Page 23
...Consult the nearest authorized Yamaha dealer or service center about outdoor antennas. • The AM loop antenna should always be connected, even if an outdoor AM antenna is a metal stake driven into the AC wall outlet. Power cable (U.S.A. y When you turn on the models. Press ASTANDBY/ON (or E STANDBY) to set this... For maximum safety and minimum interference, connect the antenna GND terminal to 32 ft) of vinyl-covered wire extended outdoors from this unit to receive infrared signals from the remote control. Outdoor AM antenna Use a 5 to 10 m (16 to a good earth ground.
...Consult the nearest authorized Yamaha dealer or service center about outdoor antennas. • The AM loop antenna should always be connected, even if an outdoor AM antenna is a metal stake driven into the AC wall outlet. Power cable (U.S.A. y When you turn on the models. Press ASTANDBY/ON (or E STANDBY) to set this... For maximum safety and minimum interference, connect the antenna GND terminal to 32 ft) of vinyl-covered wire extended outdoors from this unit to receive infrared signals from the remote control. Outdoor AM antenna Use a 5 to 10 m (16 to a good earth ground.
Owners Manual
Page 32
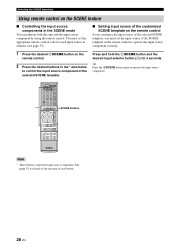
... button (3) for details of the function of the selected SCENE template. y Press the 5SCENE button again to operate the input source component. * POWER POWER STANDBY POWER TV AV A B C MUTE CD MD/CD-R TUNER DVD DTV/CBL DVR TV CH V-AUX/DOCK D E AMP TV INPUT TV MUTE TV VOL SCENE 1 2 3 4 BAND LEVEL TITLE...
... button (3) for details of the function of the selected SCENE template. y Press the 5SCENE button again to operate the input source component. * POWER POWER STANDBY POWER TV AV A B C MUTE CD MD/CD-R TUNER DVD DTV/CBL DVR TV CH V-AUX/DOCK D E AMP TV INPUT TV MUTE TV VOL SCENE 1 2 3 4 BAND LEVEL TITLE...

Owners Manual
Page 33
... AM tuning instructions. Check whether your speakers. If you play back a CD encoded in DTS on the video monitor connected to this unit to the standby mode automatically See page 31 35 31 30 35 33 English 29 En Also, check the sound output level of the currently selected input source...
... AM tuning instructions. Check whether your speakers. If you play back a CD encoded in DTS on the video monitor connected to this unit to the standby mode automatically See page 31 35 31 30 35 33 English 29 En Also, check the sound output level of the currently selected input source...
Owners Manual
Page 34
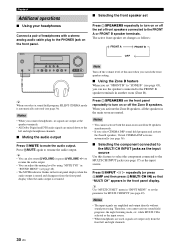
... you switch the front speaker setting. ■ Using the Zone B feature When you set "FRONT B" to "ZONE B" (see page 17) as follows: FRONT A FRONT B VOLUME STANDBY /ON PHONES SILENT CINEMA SPEAKERS A/B/OFF EDIT PRESET/TUNING BAND A/B/C/D/E 1 l PRESET/TUNING h SCENE 2 3 4 MEMORY TUNING AUTO/MAN'L TONE CONTROL l PROGRAM h STRAIGHT NIGHT l INPUT h AUDIO SELECT...
... you switch the front speaker setting. ■ Using the Zone B feature When you set "FRONT B" to "ZONE B" (see page 17) as follows: FRONT A FRONT B VOLUME STANDBY /ON PHONES SILENT CINEMA SPEAKERS A/B/OFF EDIT PRESET/TUNING BAND A/B/C/D/E 1 l PRESET/TUNING h SCENE 2 3 4 MEMORY TUNING AUTO/MAN'L TONE CONTROL l PROGRAM h STRAIGHT NIGHT l INPUT h AUDIO SELECT...

Owners Manual
Page 37
... 60min The SLEEP indicator flashes while you press OSLEEP, the front panel display changes as shown below. For example, you can enjoy listening to the standby mode after a certain amount of time. ■ Using the sleep timer Use this feature to automatically set this unit to set the amount of time.... Press 4AMP and then press OSLEEP repeatedly to the standby mode. y • To cancel the sleep timer, press OSLEEP on the remote control to the selected sound field program. CD MD/CD-R TUNER DVD ...
... 60min The SLEEP indicator flashes while you press OSLEEP, the front panel display changes as shown below. For example, you can enjoy listening to the standby mode after a certain amount of time. ■ Using the sleep timer Use this feature to automatically set this unit to set the amount of time.... Press 4AMP and then press OSLEEP repeatedly to the standby mode. y • To cancel the sleep timer, press OSLEEP on the remote control to the selected sound field program. CD MD/CD-R TUNER DVD ...
Owners Manual
Page 44
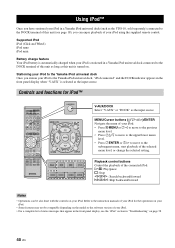
... iPod (Click and Wheel) iPod nano iPod mini Battery charge feature Your iPod battery is automatically charged when your iPod is stationed in a Yamaha iPod universal dock connected to the DOCK terminal of status messages that appear in the front panel display, see page 18), you station your ... control. Controls and functions for the operations on your iPod to the subsequent menu, start playback of your iPod for iPod™ POWER POWER STANDBY POWER TV AV A B C MUTE CD MD/CD-R TUNER DVD DTV/CBL DVR TV CH V-AUX/DOCK D E AMP TV INPUT TV MUTE TV VOL SCENE 1 2 3 4 ...
... iPod (Click and Wheel) iPod nano iPod mini Battery charge feature Your iPod battery is automatically charged when your iPod is stationed in a Yamaha iPod universal dock connected to the DOCK terminal of status messages that appear in the front panel display, see page 18), you station your ... control. Controls and functions for the operations on your iPod to the subsequent menu, start playback of your iPod for iPod™ POWER POWER STANDBY POWER TV AV A B C MUTE CD MD/CD-R TUNER DVD DTV/CBL DVR TV CH V-AUX/DOCK D E AMP TV INPUT TV MUTE TV VOL SCENE 1 2 3 4 ...

Owners Manual
Page 46
Therefore, if your country to record from the recording components. If the component is set to the standby mode, you cannot record between other components connected to this unit. • The settings of copyrighted material may be recorded. • Digital signals input at ...
Therefore, if your country to record from the recording components. If the component is set to the standby mode, you cannot record between other components connected to this unit. • The settings of copyrighted material may be recorded. • Digital signals input at ...
Owners Manual
Page 55
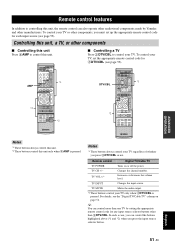
... For details, see page 53). - y You can control the buttons highlighted above (*1 and *2) when you can control more than one TV by Yamaha and other audiovisual components made by setting the appropriate remote control code for each input source (see the "Digital TV/Cable TV" column on or... off the power. Remote control features Remote control features In addition to control this unit. AMP *2 POWER POWER STANDBY POWER TV AV A B C MUTE CD MD/CD-R TUNER DVD DTV/CBL DVR TV CH V-AUX/DOCK D E AMP TV INPUT TV MUTE TV VOL SCENE 1 2 3 4...
... For details, see page 53). - y You can control the buttons highlighted above (*1 and *2) when you can control more than one TV by Yamaha and other audiovisual components made by setting the appropriate remote control code for each input source (see the "Digital TV/Cable TV" column on or... off the power. Remote control features Remote control features In addition to control this unit. AMP *2 POWER POWER STANDBY POWER TV AV A B C MUTE CD MD/CD-R TUNER DVD DTV/CBL DVR TV CH V-AUX/DOCK D E AMP TV INPUT TV MUTE TV VOL SCENE 1 2 3 4...

Owners Manual
Page 56
...En Be advised that the remote control can control the desired component without changing the input source of this unit. [1] POWER POWER STANDBY POWER TV AV A B C MUTE CD MD/CD-R TUNER DVD DTV/CBL DVR TV CH V-AUX/DOCK D E AMP TV INPUT TV MUTE...components so that some buttons may not correctly operate the selected component. DECODE 3 4 STRAIGHT NIGHT 5 6 7 8 MULTI CH IN AUDIO SEL 9 0 SLEEP 10 ENT [9] Remote control [1] AV POWER [2] TITLE [3] PRESET/CH k PRESET/CH n A/B/C/D/E l A/B/C/D/E h ENTER [4] RETURN [5] REC p w f e b a s [6] 1-9, 0, +10 [7] MENU [8] DISPLAY ...
...En Be advised that the remote control can control the desired component without changing the input source of this unit. [1] POWER POWER STANDBY POWER TV AV A B C MUTE CD MD/CD-R TUNER DVD DTV/CBL DVR TV CH V-AUX/DOCK D E AMP TV INPUT TV MUTE...components so that some buttons may not correctly operate the selected component. DECODE 3 4 STRAIGHT NIGHT 5 6 7 8 MULTI CH IN AUDIO SEL 9 0 SLEEP 10 ENT [9] Remote control [1] AV POWER [2] TITLE [3] PRESET/CH k PRESET/CH n A/B/C/D/E l A/B/C/D/E h ENTER [4] RETURN [5] REC p w f e b a s [6] 1-9, 0, +10 [7] MENU [8] DISPLAY ...

Owners Manual
Page 58
... the parameter you are using the advanced setup menu. • No other areas. ■ Initializing PRESET Use this feature to set this unit to the standby mode. 2 Press and hold JTONE CONTROL and then press ASTANDBY/ON to 6 Ω . Choices: CANCEL, RESET • Select "CANCEL" not to reset... operations can be 8 Ω or higher. 6ΩMIN Front (A or B) Center Surround The impedance of this unit including the set this unit to the standby mode. SP IMP. Choices: AM10/FM100, AM9/FM50 • Select "AM10/FM100" for North, Central and South America. • Select "AM9/FM50" ...
... the parameter you are using the advanced setup menu. • No other areas. ■ Initializing PRESET Use this feature to set this unit to the standby mode. 2 Press and hold JTONE CONTROL and then press ASTANDBY/ON to 6 Ω . Choices: CANCEL, RESET • Select "CANCEL" not to reset... operations can be 8 Ω or higher. 6ΩMIN Front (A or B) Center Surround The impedance of this unit including the set this unit to the standby mode. SP IMP. Choices: AM10/FM100, AM9/FM50 • Select "AM10/FM100" for North, Central and South America. • Select "AM9/FM50" ...

Owners Manual
Page 59
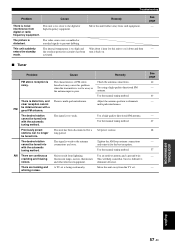
...with ISPEAKERS. Speaker connections are being input from a source component, such as lightning or strong static electricity). The front speakers to the standby mode, disconnect the power cable, plug it back in "SP LEVEL". Signals this unit cannot reproduce are not secure. The protection ... each connection does not touch anything other and then turn on this unit, disconnect the power cable, and contact the nearest authorized Yamaha dealer or service center. ■ General Problem Cause Remedy This unit fails to match your speakers. This unit has been exposed...
...with ISPEAKERS. Speaker connections are being input from a source component, such as lightning or strong static electricity). The front speakers to the standby mode, disconnect the power cable, plug it back in "SP LEVEL". Signals this unit cannot reproduce are not secure. The protection ... each connection does not touch anything other and then turn on this unit, disconnect the power cable, and contact the nearest authorized Yamaha dealer or service center. ■ General Problem Cause Remedy This unit fails to match your speakers. This unit has been exposed...
Owners Manual
Page 61
... input is difficult to the digital or high-frequency equipment. Set preset stations. There are continuous crackling and hissing noises. This unit suddenly enters the standby mode. This unit is noise interference from lightning, fluorescent lamps, motors, thermostats and other electrical equipment. A TV set . AM There are buzzing and whining noises...
... input is difficult to the digital or high-frequency equipment. Set preset stations. There are continuous crackling and hissing noises. This unit suddenly enters the standby mode. This unit is noise interference from lightning, fluorescent lamps, motors, thermostats and other electrical equipment. A TV set . AM There are buzzing and whining noises...
Owners Manual
Page 63
... to turn on this manual. Even if the remote control code is not correctly set this unit to the standby mode. 2 Press and hold JTONE CONTROL and then press ASTANDBY/ON to the standby mode. Direct sunlight or lighting (from the front panel. The batteries are some models that do not respond...
... to turn on this manual. Even if the remote control code is not correctly set this unit to the standby mode. 2 Press and hold JTONE CONTROL and then press ASTANDBY/ON to the standby mode. Direct sunlight or lighting (from the front panel. The batteries are some models that do not respond...
Owners Manual
Page 66
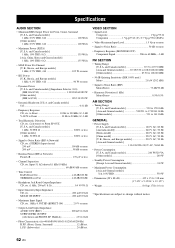
... [Asia and General models 110-120/220-240 V AC, 50/60 Hz • Power Consumption [U.S.A. and Canada models 240 W/320 VA [Other models 240 W • Standby Power Consumption [Except Asia and General models 0.8 W • Maximum Power Consumption [Asia and General models] 5ch, 10%/THD 530 W • Dimensions (W x H x D 435 x 151 x 318 mm...
... [Asia and General models 110-120/220-240 V AC, 50/60 Hz • Power Consumption [U.S.A. and Canada models 240 W/320 VA [Other models 240 W • Standby Power Consumption [Except Asia and General models 0.8 W • Maximum Power Consumption [Asia and General models] 5ch, 10%/THD 530 W • Dimensions (W x H x D 435 x 151 x 318 mm...
Owners Manual
Page 68
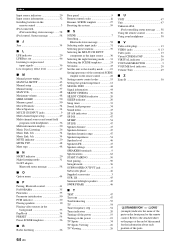
... connected, iPod controlling status message ....... 58 iPod control, Status message 58 ■J Jazz 34 ■L LFE indicator 20 LFE/Bass out 46 Listening to the standby mode .........19 Setting input source of the customized SCENE template on the front panel or the remote control. LR 45 Surround left/right speakers 45...
... connected, iPod controlling status message ....... 58 iPod control, Status message 58 ■J Jazz 34 ■L LFE indicator 20 LFE/Bass out 46 Listening to the standby mode .........19 Setting input source of the customized SCENE template on the front panel or the remote control. LR 45 Surround left/right speakers 45...

Owners Manual
Page 69
■ Front panel A BC D E FG H VOLUME STANDBY /ON PHONES SILENT CINEMA SPEAKERS A/B/OFF EDIT PRESET/TUNING BAND A/B/C/D/E TONE CONTROL 1 PROGRAM PRESET/TUNING SCENE 2 3 4 MEMORY TUNING AUTO/MAN'L STRAIGHT NIGHT INPUT AUDIO SELECT EFFECT VIDEO VIDEO AUX L AUDIO R PORTABLE I J K LM N OP i
■ Front panel A BC D E FG H VOLUME STANDBY /ON PHONES SILENT CINEMA SPEAKERS A/B/OFF EDIT PRESET/TUNING BAND A/B/C/D/E TONE CONTROL 1 PROGRAM PRESET/TUNING SCENE 2 3 4 MEMORY TUNING AUTO/MAN'L STRAIGHT NIGHT INPUT AUDIO SELECT EFFECT VIDEO VIDEO AUX L AUDIO R PORTABLE I J K LM N OP i

