Statement of Volatility - WorkCentre 4150
Page 1
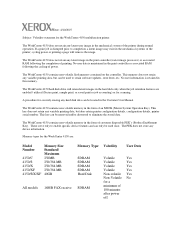
...not retain any hard disk data can be located in the Customer User Manual The WorkCentre 4150 contains non-volatile memory in the form of an MSOK (Master System Operation Key). The WorkCentre 4150 does not retain any latent user image in the mechanical system of the... retain printer configuration details, configuration details, printer serial number. Date: 4/10/2007 Subject: Volatility statement for the WorkCentre 4150 multifunction printer The WorkCentre 4150 does not retain any latent image in the print controller (raster image processor) or associated RAM following the cycling of power...
...not retain any hard disk data can be located in the Customer User Manual The WorkCentre 4150 contains non-volatile memory in the form of an MSOK (Master System Operation Key). The WorkCentre 4150 does not retain any latent user image in the mechanical system of the... retain printer configuration details, configuration details, printer serial number. Date: 4/10/2007 Subject: Volatility statement for the WorkCentre 4150 multifunction printer The WorkCentre 4150 does not retain any latent image in the print controller (raster image processor) or associated RAM following the cycling of power...

Getting Started Guide
Page 13
... > TCP/IP Settings. • The allocated TCP/IP address is in the next steps. This is a 4150s, 4150x or 4150xf, follow these instructions to connect the WorkCentre to an Ethernet TCP/IP network. To use other protocols, refer to the System Administration CD. RJ45 Network Connector...assign an IP address. Test the WorkCentre Before connecting the WorkCentre to your network, make 3 copies. 2 If the copies are connecting your WorkCentre to a different type of the following methods: • DHCP: Use this method to manually assign an IP address provided by Xerox. 2 Continue on to the ...
... > TCP/IP Settings. • The allocated TCP/IP address is in the next steps. This is a 4150s, 4150x or 4150xf, follow these instructions to connect the WorkCentre to an Ethernet TCP/IP network. To use other protocols, refer to the System Administration CD. RJ45 Network Connector...assign an IP address. Test the WorkCentre Before connecting the WorkCentre to your network, make 3 copies. 2 If the copies are connecting your WorkCentre to a different type of the following methods: • DHCP: Use this method to manually assign an IP address provided by Xerox. 2 Continue on to the ...
Getting Started Guide
Page 25
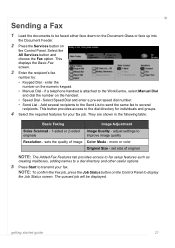
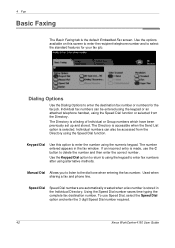
...- They are shown in the following table: Basic Faxing Image Adjustment Sides Scanned - 1-sided or 2-sided Image Quality - adjust settings to the WorkCentre, select Manual Dial and dial the number on the Control Panel to the dial directory for individuals and groups. 4 Select the required features for your fax. sets...either face down on the Document Glass or face up into the Document Feeder. 2 Press the Services button on the numeric keypad. • Manual Dial - Select the All Services button and choose the Fax option. Add several recipients to the Send List to send the same fax to ...
...- They are shown in the following table: Basic Faxing Image Adjustment Sides Scanned - 1-sided or 2-sided Image Quality - adjust settings to the WorkCentre, select Manual Dial and dial the number on the Control Panel to the dial directory for individuals and groups. 4 Select the required features for your fax. sets...either face down on the Document Glass or face up into the Document Feeder. 2 Press the Services button on the numeric keypad. • Manual Dial - Select the All Services button and choose the Fax option. Add several recipients to the Send List to send the same fax to ...

User Guide
Page 16
...compliance with FCC regulations. Regulatory Information FCC Part 15 This equipment has been tested and found to comply with Canadian ICES-003. For further 12 Xerox WorkCentre 4150 User Guide Shielded interface cables must be limited or special mitigation measures taken. This equipment generates, uses and can radiate radio frequency energy and, ...operate this equipment. US Regulatory Information for which case the user will be used with this equipment to operate in accordance with the instruction manual, may have to be entered when installing the Embedded Fax kit option.
...compliance with FCC regulations. Regulatory Information FCC Part 15 This equipment has been tested and found to comply with Canadian ICES-003. For further 12 Xerox WorkCentre 4150 User Guide Shielded interface cables must be limited or special mitigation measures taken. This equipment generates, uses and can radiate radio frequency energy and, ...operate this equipment. US Regulatory Information for which case the user will be used with this equipment to operate in accordance with the instruction manual, may have to be entered when installing the Embedded Fax kit option.
User Guide
Page 45
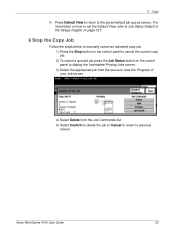
... set the Default View, refer to Job Status Default in the Setups chapter on page 127. 6 Stop the Copy Job Follow the steps below to manually cancel an activated copy job. 1) Press the Stop button on the control panel to cancel the current copy job. 2) To cancel a queued job press the.... 5) Select Confirm to delete the job or Cancel to return to the preset default job queue screen. Press Default View to return to previous screen. Xerox WorkCentre 4150 User Guide 23 3 Copy 6.
... set the Default View, refer to Job Status Default in the Setups chapter on page 127. 6 Stop the Copy Job Follow the steps below to manually cancel an activated copy job. 1) Press the Stop button on the control panel to cancel the current copy job. 2) To cancel a queued job press the.... 5) Select Confirm to delete the job or Cancel to return to the preset default job queue screen. Press Default View to return to previous screen. Xerox WorkCentre 4150 User Guide 23 3 Copy 6.
User Guide
Page 51
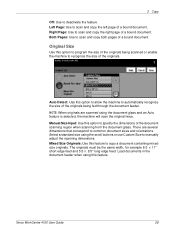
...the size of a bound document. Auto Detect: Use this feature. NOTE: When originals are several dimensions that correspond to manually adjust the scanning dimensions. Xerox WorkCentre 4150 User Guide 29 Select a standard size using this option to allow the machine to recognize the size of the document ... sizes and orientations. Original Size Use this option to program the size of the originals being fed through the document feeder. Manual Size Input: Use this option to specify the dimensions of the originals. There are scanned using the document glass and an ...
...the size of a bound document. Auto Detect: Use this feature. NOTE: When originals are several dimensions that correspond to manually adjust the scanning dimensions. Xerox WorkCentre 4150 User Guide 29 Select a standard size using this option to allow the machine to recognize the size of the document ... sizes and orientations. Original Size Use this option to program the size of the originals being fed through the document feeder. Manual Size Input: Use this option to specify the dimensions of the originals. There are scanned using the document glass and an ...
User Guide
Page 62
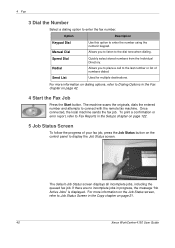
Option Description Keypad Dial Manual Dial Use this option to Job Status Screen in the Setups chapter on page 122. 5 Job Status Screen To follow the progress of numbers dialed. Used for multiple destinations. For more information on page 21. 40 Xerox WorkCentre 4150 User Guide Allows you to place a call to enter the fax...
Option Description Keypad Dial Manual Dial Use this option to Job Status Screen in the Setups chapter on page 122. 5 Job Status Screen To follow the progress of numbers dialed. Used for multiple destinations. For more information on page 21. 40 Xerox WorkCentre 4150 User Guide Allows you to place a call to enter the fax...

User Guide
Page 63
4 Fax 6 Stop the Fax Job Follow the steps below to manually cancel an activated fax job. 1) Press the Stop button on the control panel to cancel the current fax job. 2) To cancel a queued job press the Job Status button on the control panel to display the Incomplete Printing Jobs screen. 3) Select the appropriate job from the queue to view the Progress of your Job screen. 4) Select Delete from the Job Commands list. 5) Select Confirm to delete the job or Cancel to return to previous screen. Xerox WorkCentre 4150 User Guide 41
4 Fax 6 Stop the Fax Job Follow the steps below to manually cancel an activated fax job. 1) Press the Stop button on the control panel to cancel the current fax job. 2) To cancel a queued job press the Job Status button on the control panel to display the Incomplete Printing Jobs screen. 3) Select the appropriate job from the queue to view the Progress of your Job screen. 4) Select Delete from the Job Commands list. 5) Select Confirm to delete the job or Cancel to return to previous screen. Xerox WorkCentre 4150 User Guide 41
User Guide
Page 64
... stored in the fax window. Keypad Dial Use this screen to enter the recipient telephone number and to enter fax numbers after using alternative methods. Manual Dial Allows you to listen to enter the number using the keypad to select the standard features for the fax job. The number entered appears... the Directory. If an incorrect entry is made, use Speed Dial, select the Speed Dial option and enter the 3 digit Speed Dial number required. 42 Xerox WorkCentre 4150 User Guide Using the Speed Dial number saves time typing the complete fax destination number.
... stored in the fax window. Keypad Dial Use this screen to enter the recipient telephone number and to enter fax numbers after using alternative methods. Manual Dial Allows you to listen to enter the number using the keypad to select the standard features for the fax job. The number entered appears... the Directory. If an incorrect entry is made, use Speed Dial, select the Speed Dial option and enter the 3 digit Speed Dial number required. 42 Xerox WorkCentre 4150 User Guide Using the Speed Dial number saves time typing the complete fax destination number.
User Guide
Page 65
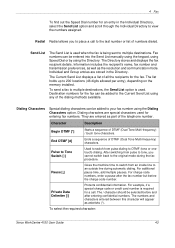
... Pulse to Tone Switch [:] Used to switch from pulse to tone, you to place a call . To select the required character: Xerox WorkCentre 4150 User Guide 43 Information includes the recipient's name, fax number and transmission preferences, as well as part of the telephone number. Destination ... Send List is required for an entry in the Directory. Dialing Characters Special dialing characters can be entered into the Send List manually using the keypad, using Speed Dial or by using the Dialing Characters option. Private Data Delimiter [/] Protects confidential information. The...
... Pulse to Tone Switch [:] Used to switch from pulse to tone, you to place a call . To select the required character: Xerox WorkCentre 4150 User Guide 43 Information includes the recipient's name, fax number and transmission preferences, as well as part of the telephone number. Destination ... Send List is required for an entry in the Directory. Dialing Characters Special dialing characters can be entered into the Send List manually using the keypad, using Speed Dial or by using the Dialing Characters option. Private Data Delimiter [/] Protects confidential information. The...
User Guide
Page 68
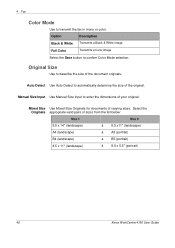
... Input Use Manual Size Input to describe the size of your original. Full Color Transmits a Color image. Mixed Size Use Mixed Size Originals for documents of sizes from the list below: Size 1 Size 2 8.5 x 14" (landscape) & 8.5 x11" (landscape) A4 (landscape) & A5 (portrait) B4 (landscape) & B5 (portrait) 8.5 x 11" (landscape) & 8.5 x 5.5" (portrait) 46 Xerox WorkCentre 4150 User Guide...
... Input Use Manual Size Input to describe the size of your original. Full Color Transmits a Color image. Mixed Size Use Mixed Size Originals for documents of sizes from the list below: Size 1 Size 2 8.5 x 14" (landscape) & 8.5 x11" (landscape) A4 (landscape) & A5 (portrait) B4 (landscape) & B5 (portrait) 8.5 x 11" (landscape) & 8.5 x 5.5" (portrait) 46 Xerox WorkCentre 4150 User Guide...

User Guide
Page 82
5 Network Scan 7 Stop the Network Scanning Job Follow the steps below to manually cancel an activated network scanning job. 1) Press the Stop button on the control panel to cancel the current network scanning job. 2) To cancel a queued job press the Job Status button on the control panel to display the Incomplete Printing Jobs screen. 3) Select the appropriate job from the queue to view the Progress of your Job screen. 4) Select Delete from the Job Commands list. 5) Select Confirm to delete the job or Cancel to return to previous screen. 60 Xerox WorkCentre 4150 User Guide
5 Network Scan 7 Stop the Network Scanning Job Follow the steps below to manually cancel an activated network scanning job. 1) Press the Stop button on the control panel to cancel the current network scanning job. 2) To cancel a queued job press the Job Status button on the control panel to display the Incomplete Printing Jobs screen. 3) Select the appropriate job from the queue to view the Progress of your Job screen. 4) Select Delete from the Job Commands list. 5) Select Confirm to delete the job or Cancel to return to previous screen. 60 Xerox WorkCentre 4150 User Guide
User Guide
Page 83
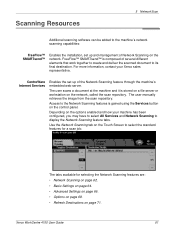
..., you may have to select All Services and Network Scanning to display the Network Scanning feature tabs. Xerox WorkCentre 4150 User Guide 61 The user scans a document at the machine and it is stored on a file ...server or workstation on the options enabled and how your Xerox sales representative. Depending on the network, called the scan repository. Use the Network Scanning tab on the ... through the machine's embedded web server. The user manually retrieves the image from the scan repository. The tabs available for a scan job.
..., you may have to select All Services and Network Scanning to display the Network Scanning feature tabs. Xerox WorkCentre 4150 User Guide 61 The user scans a document at the machine and it is stored on a file ...server or workstation on the options enabled and how your Xerox sales representative. Depending on the network, called the scan repository. Use the Network Scanning tab on the ... through the machine's embedded web server. The user manually retrieves the image from the scan repository. The tabs available for a scan job.

User Guide
Page 88
... originals being scanned. Option Description Lighten / Darken Background Suppression Adjusts the lightness or darkness of the originals automatically, or a size can be entered manually. To lighten the output, select the scroll up button. The machine can determine the size of the output. To darken the output, select the... your scanned image. Image Options Use this option to enhance the quality of the originals being fed through the document feeder. 66 Xerox WorkCentre 4150 User Guide This option is recommended that the originals used when scanning mixed sized originals.
... originals being scanned. Option Description Lighten / Darken Background Suppression Adjusts the lightness or darkness of the originals automatically, or a size can be entered manually. To lighten the output, select the scroll up button. The machine can determine the size of the output. To darken the output, select the... your scanned image. Image Options Use this option to enhance the quality of the originals being fed through the document feeder. 66 Xerox WorkCentre 4150 User Guide This option is recommended that the originals used when scanning mixed sized originals.

User Guide
Page 89
... scan edges to prevent uneven lines around the edges. It produces the largest image file size, but delivers the best image quality. Xerox WorkCentre 4150 User Guide 67 NOTE: If Color mode is selected, the maximum resolution is recommended for average quality text documents and line art.... Resolution Resolution affects the appearance of the scanned image. The higher the scanning resolution (dpi - 5 Network Scan Option Manual Size Input Description Use this option to scan the image to the edges of the original. Can also be viewed electronically or archived....
... scan edges to prevent uneven lines around the edges. It produces the largest image file size, but delivers the best image quality. Xerox WorkCentre 4150 User Guide 67 NOTE: If Color mode is selected, the maximum resolution is recommended for average quality text documents and line art.... Resolution Resolution affects the appearance of the scanned image. The higher the scanning resolution (dpi - 5 Network Scan Option Manual Size Input Description Use this option to scan the image to the edges of the original. Can also be viewed electronically or archived....

User Guide
Page 99
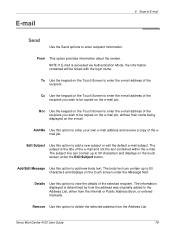
... book loaded onto your machine. 6 Scan to E-mail Feature Description E-mail Use this tab to the following: E-mail - page 81 Advanced Settings- Xerox WorkCentre 4150 User Guide 77 address fields, subject lines, message body, etc. For information on the first few letters. Repeat the process as an e-mail attachment.... keypad to access the advanced e-mail settings, e.g. page 79 Basic Settings - If necessary, press one of entering the e-mail address: • Manually enter the e-mail address. • Use the Address Book option to accompany the scanned original.
... book loaded onto your machine. 6 Scan to E-mail Feature Description E-mail Use this tab to the following: E-mail - page 81 Advanced Settings- Xerox WorkCentre 4150 User Guide 77 address fields, subject lines, message body, etc. For information on the first few letters. Repeat the process as an e-mail attachment.... keypad to access the advanced e-mail settings, e.g. page 79 Basic Settings - If necessary, press one of entering the e-mail address: • Manually enter the e-mail address. • Use the Address Book option to accompany the scanned original.

User Guide
Page 100
... jobs in the Copy chapter on page 21. 6 Stop the E-mail Job Follow the steps below to manually cancel an activated e-mail job. 1) Press the Stop button on the control panel to previous screen. 78 Xerox WorkCentre 4150 User Guide 6 Scan to e-mail job. To display the progress of your e-mail job, press the...
... jobs in the Copy chapter on page 21. 6 Stop the E-mail Job Follow the steps below to manually cancel an activated e-mail job. 1) Press the Stop button on the control panel to previous screen. 78 Xerox WorkCentre 4150 User Guide 6 Scan to e-mail job. To display the progress of your e-mail job, press the...
User Guide
Page 101
... Address List. E-mail 6 Scan to E-mail Send Use the Send options to delete the selected address from the Internal or Public Address Book, or entered manually. NOTE: If E-mail is determined by how the address was originally added to 50 characters and displays on the e-mail job. Add Me Use this... the e-mail. Edit Subject Use this option to add a new subject or edit the default e-mail subject. Remove Use this option to enter recipient information. Xerox WorkCentre 4150 User Guide 79
... Address List. E-mail 6 Scan to E-mail Send Use the Send options to delete the selected address from the Internal or Public Address Book, or entered manually. NOTE: If E-mail is determined by how the address was originally added to 50 characters and displays on the e-mail job. Add Me Use this... the e-mail. Edit Subject Use this option to add a new subject or edit the default e-mail subject. Remove Use this option to enter recipient information. Xerox WorkCentre 4150 User Guide 79
User Guide
Page 102
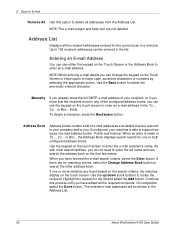
...few letters. Entering an E-mail Address You can use the keypad on the Touch Screen or the Address Book to locate the recipient. Manually If you . Address Book Address books contain a list of the configured address books, you can use either the keypad on the touch...addresses will be entered in the list. fields. Continue this option to 128 recipient addresses can be shown in the Address List. 80 Xerox WorkCentre 4150 User Guide or Bcc... the Address Book displays search results for the current scan to delete the previously entered character. or Bcc... As...
...few letters. Entering an E-mail Address You can use the keypad on the Touch Screen or the Address Book to locate the recipient. Manually If you . Address Book Address books contain a list of the configured address books, you can use either the keypad on the touch...addresses will be entered in the list. fields. Continue this option to 128 recipient addresses can be shown in the Address List. 80 Xerox WorkCentre 4150 User Guide or Bcc... the Address Book displays search results for the current scan to delete the previously entered character. or Bcc... As...
User Guide
Page 106
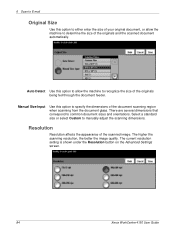
Manual Size Input Use this option to specify the dimensions of the scanned image. Auto Detect Use this option to allow the machine to determine the ... select Custom to common document sizes and orientations. There are several dimensions that correspond to manually adjust the scanning dimensions. The current resolution setting is shown under the Resolution button on the Advanced Settings screen. 84 Xerox WorkCentre 4150 User Guide 6 Scan to E-mail Original Size Use this option to either enter the size...
Manual Size Input Use this option to specify the dimensions of the scanned image. Auto Detect Use this option to allow the machine to determine the ... select Custom to common document sizes and orientations. There are several dimensions that correspond to manually adjust the scanning dimensions. The current resolution setting is shown under the Resolution button on the Advanced Settings screen. 84 Xerox WorkCentre 4150 User Guide 6 Scan to E-mail Original Size Use this option to either enter the size...


