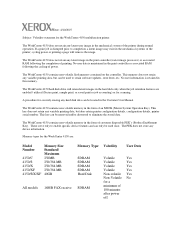
Statement of Volatility - WorkCentre 4150
Page 1
... can be used once. No user information is retained in the form of customer disposable PEK's (Product Enablement Key). Memory types for the WorkCentre 4150 are enabled / utilized (Secure print, sample print, or saved print or job accounting) or for securely erasing any device information. A procedure... disk data can only be located in the Customer User Manual The WorkCentre 4150 contains non-volatile memory in the hard disk only when the job retention features are : Model Number 4150/C 4150/S 4150/X 4150/XF 4150/S/X/XF Memory Size Standard/ Maximum 256MB 256/384 MB 256/384 MB...
... can be used once. No user information is retained in the form of customer disposable PEK's (Product Enablement Key). Memory types for the WorkCentre 4150 are enabled / utilized (Secure print, sample print, or saved print or job accounting) or for securely erasing any device information. A procedure... disk data can only be located in the Customer User Manual The WorkCentre 4150 contains non-volatile memory in the hard disk only when the job retention features are : Model Number 4150/C 4150/S 4150/X 4150/XF 4150/S/X/XF Memory Size Standard/ Maximum 256MB 256/384 MB 256/384 MB...
Getting Started Guide
Page 5
Xerox WorkCentre 4150 Getting Started Guide Thank you will successfully: Connect the WorkCentre Set-up the WorkCentre Install optional features Operate the WorkCentre Contents Install the WorkCentre 3 Switch On the WorkCentre 4 Your WorkCentre 6 Connecting to the Network 9 Install Print Drivers 11 E-mail Setup 12 Fax Setup 14 Installing ...17 Printing a Document 19 Sending a Fax 21 Network Scanning 23 Sending an E-mail 25 LAN Fax 27 Enhance your WorkCentre's productivity 29 Troubleshooting 31 Help 33 getting started guide 1 If you work through the procedures in this book in ...
Xerox WorkCentre 4150 Getting Started Guide Thank you will successfully: Connect the WorkCentre Set-up the WorkCentre Install optional features Operate the WorkCentre Contents Install the WorkCentre 3 Switch On the WorkCentre 4 Your WorkCentre 6 Connecting to the Network 9 Install Print Drivers 11 E-mail Setup 12 Fax Setup 14 Installing ...17 Printing a Document 19 Sending a Fax 21 Network Scanning 23 Sending an E-mail 25 LAN Fax 27 Enhance your WorkCentre's productivity 29 Troubleshooting 31 Help 33 getting started guide 1 If you work through the procedures in this book in ...
Getting Started Guide
Page 6
... acknowledged. For product support and information about ordering consumables and print media go to www.xerox.com/support. 2 getting started guide The information in subsequent editions of Xerox Corporation. Changes and technical updates will be added in this publication are trademarks of the ...refer to the relevant sections in this document is correct at any of other companies are displayed on your WorkCentre, please refer to the Xerox website www.xerox.com/support. All rights reserved. For the latest information go to the User Guide and the System Administration...
... acknowledged. For product support and information about ordering consumables and print media go to www.xerox.com/support. 2 getting started guide The information in subsequent editions of Xerox Corporation. Changes and technical updates will be added in this publication are trademarks of the ...refer to the relevant sections in this document is correct at any of other companies are displayed on your WorkCentre, please refer to the Xerox website www.xerox.com/support. All rights reserved. For the latest information go to the User Guide and the System Administration...
Getting Started Guide
Page 7
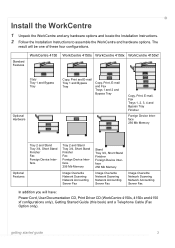
Standard Features WorkCentre 4150 WorkCentre 4150s WorkCentre 4150x WorkCentre 4150xf Copy Tray 1 and Bypass Tray Optional Hardware Copy, Print and E-mail Tray 1 and Bypass Tray Copy, Print, E-mail and Fax Trays 1.... The result will have: Power Cord, User Documentation CD, Print Driver CD (WorkCentre 4150s, 4150x and 4150 xf configurations only), Getting Started Guide (this book) and a Telephone Cable (Fax Option only). Install the WorkCentre 1 Unpack the WorkCentre and any hardware options and locate the Installation Instructions. 2 Follow the Installation Instructions ...
Standard Features WorkCentre 4150 WorkCentre 4150s WorkCentre 4150x WorkCentre 4150xf Copy Tray 1 and Bypass Tray Optional Hardware Copy, Print and E-mail Tray 1 and Bypass Tray Copy, Print, E-mail and Fax Trays 1.... The result will have: Power Cord, User Documentation CD, Print Driver CD (WorkCentre 4150s, 4150x and 4150 xf configurations only), Getting Started Guide (this book) and a Telephone Cable (Fax Option only). Install the WorkCentre 1 Unpack the WorkCentre and any hardware options and locate the Installation Instructions. 2 Follow the Installation Instructions ...

Getting Started Guide
Page 8
... Product Enablement Key into the Card Reader Slot on the screen. Select Next. 7 The Product Enablement Settings screen will be displayed. Switch On the WorkCentre Once the WorkCentre has been assembled it must be displayed. This is done using the Product Enablement Key when the machine is as follows: 1 Locate the tube...
... Product Enablement Key into the Card Reader Slot on the screen. Select Next. 7 The Product Enablement Settings screen will be displayed. Switch On the WorkCentre Once the WorkCentre has been assembled it must be displayed. This is done using the Product Enablement Key when the machine is as follows: 1 Locate the tube...
Getting Started Guide
Page 9
...information. 11 The next 4 screens will display a Machine self test in progress screen while the machine applies the configuration settings. Your WorkCentre is the basis for reference only. Either locate the GMT Offset for your Customer Support Representative for you to set the Date Format...Size screen is displayed. NOTE: In some locations a popup screen will be displayed. If this is included at the end of the Xerox Installation Wizard. Enter the Customer Support Telephone Number and the Supplies Telephone Number and select Next. A table of GMT Offset is complete ...
...information. 11 The next 4 screens will display a Machine self test in progress screen while the machine applies the configuration settings. Your WorkCentre is the basis for reference only. Either locate the GMT Offset for your Customer Support Representative for you to set the Date Format...Size screen is displayed. NOTE: In some locations a popup screen will be displayed. If this is included at the end of the Xerox Installation Wizard. Enter the Customer Support Telephone Number and the Supplies Telephone Number and select Next. A table of GMT Offset is complete ...
Getting Started Guide
Page 10
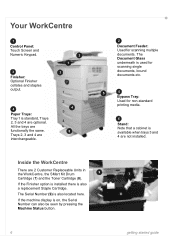
The Document Glass underneath is available when trays 3 and 4 are not installed. Your WorkCentre 1 Control Panel: Touch Screen and Numeric Keypad. 3 Finisher: Optional Finisher collates and staples output. 4 Paper Trays: Tray 1 is on, ...the Serial Number can also be seen by pressing the Machine Status button. 7 8 6 getting started guide All the trays are 2 Customer Replaceable Units in the WorkCentre, the SMart Kit Drum 9 Cartridge (7) and the Toner Cartridge (8). If the machine display is standard, Trays 2, 3 and 4 are interchangeable. 2 1 3 1 2 4 3 4 6 2 ...
The Document Glass underneath is available when trays 3 and 4 are not installed. Your WorkCentre 1 Control Panel: Touch Screen and Numeric Keypad. 3 Finisher: Optional Finisher collates and staples output. 4 Paper Trays: Tray 1 is on, ...the Serial Number can also be seen by pressing the Machine Status button. 7 8 6 getting started guide All the trays are 2 Customer Replaceable Units in the WorkCentre, the SMart Kit Drum 9 Cartridge (7) and the Toner Cartridge (8). If the machine display is standard, Trays 2, 3 and 4 are interchangeable. 2 1 3 1 2 4 3 4 6 2 ...
Getting Started Guide
Page 11
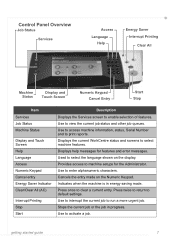
Displays help messages for the Administrator. Displays the current WorkCentre status and screens to clear a current entry. Press once to select machine features. Stops the current job or the job in energy saving mode. Control ...
Displays help messages for the Administrator. Displays the current WorkCentre status and screens to clear a current entry. Press once to select machine features. Stops the current job or the job in energy saving mode. Control ...

Getting Started Guide
Page 13
... in the Document Feeder and make 3 copies. 2 If the copies are connecting your WorkCentre to a different type of the following methods: • DHCP: Use this method to manually assign an IP address provided by Xerox. 2 Continue on page 10. If you wish to use a static IP address, ... Network If your network, make sure that it automatically uses DHCP to obtain its network configuration. When the WorkCentre is a 4150s, 4150x or 4150xf, follow these instructions to connect the WorkCentre to an Ethernet TCP/IP network. To use other protocols, refer to the System Administration CD.
... in the Document Feeder and make 3 copies. 2 If the copies are connecting your WorkCentre to a different type of the following methods: • DHCP: Use this method to manually assign an IP address provided by Xerox. 2 Continue on page 10. If you wish to use a static IP address, ... Network If your network, make sure that it automatically uses DHCP to obtain its network configuration. When the WorkCentre is a 4150s, 4150x or 4150xf, follow these instructions to connect the WorkCentre to an Ethernet TCP/IP network. To use other protocols, refer to the System Administration CD.
Getting Started Guide
Page 15
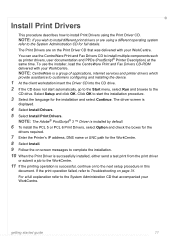
... insert the Driver CD into the CD drive. 2 If the CD does not start the installation procedure. 3 Select the language for the WorkCentre. 8 Select Install. 9 Follow the on screen messages to complete the installation. 10 When the Print Driver is successfully installed, either send ...PostScript® Printer Description) at the same time. You can use the installer, load the CentreWare Print and Fax Drivers CD-ROM delivered with your WorkCentre. NOTE: The Adobe® PostScript® 3 ™ Driver is displayed. 4 Select Install Drivers. 5 Select Install Print Drivers. The Print...
... insert the Driver CD into the CD drive. 2 If the CD does not start the installation procedure. 3 Select the language for the WorkCentre. 8 Select Install. 9 Follow the on screen messages to complete the installation. 10 When the Print Driver is successfully installed, either send ...PostScript® Printer Description) at the same time. You can use the installer, load the CentreWare Print and Fax Drivers CD-ROM delivered with your WorkCentre. NOTE: The Adobe® PostScript® 3 ™ Driver is displayed. 4 Select Install Drivers. 5 Select Install Print Drivers. The Print...

Getting Started Guide
Page 16
...Names are configured on the device and fully functional. E-mail Setup If you wish to be used. You will use Internet Services to the Xerox device account. Refer to Network Setup Using a Static IP Address on page 10. • Obtain the IP Address of a functional SMTP ...Services screen. • Ensure that accepts inbound mail traffic. • Ensure the DNS settings are available or have been performed. • Ensure the WorkCentre is fully functioning on the network and that the E-mail service is case sensitive, and [1111]. 5 From the Protocols menu select SMTP Server. 6...
...Names are configured on the device and fully functional. E-mail Setup If you wish to be used. You will use Internet Services to the Xerox device account. Refer to Network Setup Using a Static IP Address on page 10. • Obtain the IP Address of a functional SMTP ...Services screen. • Ensure that accepts inbound mail traffic. • Ensure the DNS settings are available or have been performed. • Ensure the WorkCentre is fully functioning on the network and that the E-mail service is case sensitive, and [1111]. 5 From the Protocols menu select SMTP Server. 6...
Getting Started Guide
Page 18
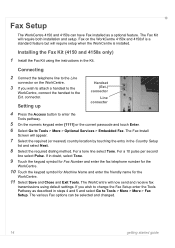
...a handset to the WorkCentre, connect the handset to Tools > More > More > Fax Setup. For a tone line select Tone. The Fax Kit will now send and receive fax transmissions using the instructions in steps 4 and 5 and select Go to the Ext. Installing the Fax Kit (4150 and 4150s only) 1 Install the...select Next. 8 Select the required dialing method. Connecting 2 Connect the telephone line to Tools > More > Optional Services > Embedded Fax. Fax Setup The WorkCentre 4150 and 4150s can be selected and changed. 14 getting started guide The Fax Install Screen will require setup when the...
...a handset to the WorkCentre, connect the handset to Tools > More > More > Fax Setup. For a tone line select Tone. The Fax Kit will now send and receive fax transmissions using the instructions in steps 4 and 5 and select Go to the Ext. Installing the Fax Kit (4150 and 4150s only) 1 Install the...select Next. 8 Select the required dialing method. Connecting 2 Connect the telephone line to Tools > More > Optional Services > Embedded Fax. Fax Setup The WorkCentre 4150 and 4150s can be selected and changed. 14 getting started guide The Fax Install Screen will require setup when the...
Getting Started Guide
Page 19
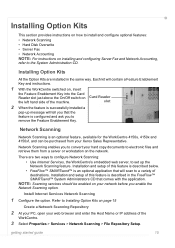
... application that comes with the application. Refer to Installing Option Kits on page 15 Create a Network Scanning Repository 2 At your PC, open your Xerox Sales Representative. slot 2 When the feature is successfully installed a pop-up the Network Scanning feature. Install Internet Services Network Scanning 1 Configure the option... your web browser and enter the Host Name or IP address of this feature is an optional feature, available for the WorkCentre 4150s, 4150x and 4150xf, and can be enabled on the network. getting started guide 15 Installation and setup of the...
... application that comes with the application. Refer to Installing Option Kits on page 15 Create a Network Scanning Repository 2 At your PC, open your Xerox Sales Representative. slot 2 When the feature is successfully installed a pop-up the Network Scanning feature. Install Internet Services Network Scanning 1 Configure the option... your web browser and enter the Host Name or IP address of this feature is an optional feature, available for the WorkCentre 4150s, 4150x and 4150xf, and can be enabled on the network. getting started guide 15 Installation and setup of the...
Getting Started Guide
Page 20
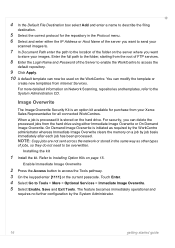
...Image Overwrite. 5 Select Enable, Save and Exit Tools. Refer to the System Administration CD. You can delete the processed jobs from your Xerox Sales Representative for purchase from the hard drive using either the IP Address or Host Name of the server you want to send your ...images. The feature becomes immediately operational and requires no further configuration by the WorkCentre administrator whereas Immediate Image Overwrite clears the memory on page 15. Enable Immediate Image Overwrite 2 Press the Access button to store ...
...Image Overwrite. 5 Select Enable, Save and Exit Tools. Refer to the System Administration CD. You can delete the processed jobs from your Xerox Sales Representative for purchase from the hard drive using either the IP Address or Host Name of the server you want to send your ...images. The feature becomes immediately operational and requires no further configuration by the WorkCentre administrator whereas Immediate Image Overwrite clears the memory on page 15. Enable Immediate Image Overwrite 2 Press the Access button to store ...
Getting Started Guide
Page 22
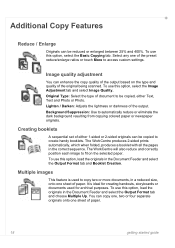
...option, select the Image Adjustment tab and select Image Quality. Background Suppression: Use to fit on the type and quality of the output. The WorkCentre produces 2-sided prints automatically, which when folded, produces a booklet with all the pages in a reduced size, onto one of document to ... and Photo or Photo. To use this option, select the Basic Copying tab. It is used for archival purposes. The WorkCentre will also reduce and correctly position each image to automatically reduce or eliminate the dark background resulting from copying colored paper or newspaper originals....
...option, select the Image Adjustment tab and select Image Quality. Background Suppression: Use to fit on the type and quality of the output. The WorkCentre produces 2-sided prints automatically, which when folded, produces a booklet with all the pages in a reduced size, onto one of document to ... and Photo or Photo. To use this option, select the Basic Copying tab. It is used for archival purposes. The WorkCentre will also reduce and correctly position each image to automatically reduce or eliminate the dark background resulting from copying colored paper or newspaper originals....
Getting Started Guide
Page 23
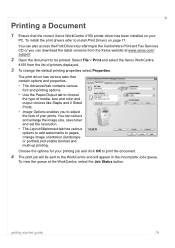
The print driver has various tabs that the correct Xerox WorkCentre 4150 printer driver has been installed on page 11. You...to pages, change the default printing properties select Properties. Select File > Print and select the Xerox WorkCentre 4150 from the Xerox website at the WorkCentre, select the Job Status button. Printing a Document 1 Ensure that contain options and properties....Prints. • Image Options enables you can also access the Print Drivers by referring to the WorkCentre and will be printed. You can download the latest versions from the list of your PC. ...
The print driver has various tabs that the correct Xerox WorkCentre 4150 printer driver has been installed on page 11. You...to pages, change the default printing properties select Properties. Select File > Print and select the Xerox WorkCentre 4150 from the Xerox website at the WorkCentre, select the Job Status button. Printing a Document 1 Ensure that contain options and properties....Prints. • Image Options enables you can also access the Print Drivers by referring to the WorkCentre and will be printed. You can download the latest versions from the list of your PC. ...
Getting Started Guide
Page 25
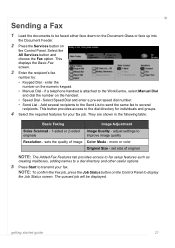
... the Control Panel to several recipients to the Send List to send the same fax to display the Job Status screen. adjust settings to the WorkCentre, select Manual Dial and dial the number on the numeric keypad. • Manual Dial - Sending a Fax 1 Load the documents to the dial directory for individuals...
... the Control Panel to several recipients to the Send List to send the same fax to display the Job Status screen. adjust settings to the WorkCentre, select Manual Dial and dial the number on the numeric keypad. • Manual Dial - Sending a Fax 1 Load the documents to the dial directory for individuals...
Getting Started Guide
Page 26
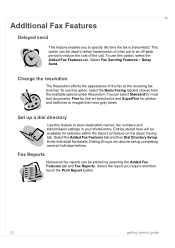
... can be used to delay transmission of a fax job to an off-peak period to store destination names, fax numbers and transmission settings in your WorkCentre. Set up comprising several Individual entries. You can also be available for photos and halftones or images that have gray tones. Select Fax Sending Features...
... can be used to delay transmission of a fax job to an off-peak period to store destination names, fax numbers and transmission settings in your WorkCentre. Set up comprising several Individual entries. You can also be available for photos and halftones or images that have gray tones. Select Fax Sending Features...

Getting Started Guide
Page 28
...templates can be able to a file repository setup by the System Administrator or transmitted as a fax if Fax Server is enable on the WorkCentre. Optionally you can add a description and the name of the scanned document, select Edit. Input the Administrator's user name and passcode [...configured for the Default Template or you can copy and modify existing templates. Your new template will appear in the Templates list on the WorkCentre. 24 getting started guide The template will appear in the Address bar. Select Apply. Enter a name for your most frequent scanning jobs...
...templates can be able to a file repository setup by the System Administrator or transmitted as a fax if Fax Server is enable on the WorkCentre. Optionally you can add a description and the name of the scanned document, select Edit. Input the Administrator's user name and passcode [...configured for the Default Template or you can copy and modify existing templates. Your new template will appear in the Templates list on the WorkCentre. 24 getting started guide The template will appear in the Address bar. Select Apply. Enter a name for your most frequent scanning jobs...
Getting Started Guide
Page 30
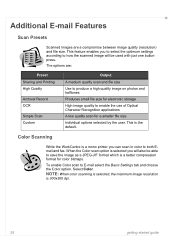
This is 300x300 dpi. 26 getting started guide The options are a compromise between image quality (resolution) and file size. Color Scanning While the WorkCentre is a better compression format for a smaller file size Individual options selected by the user. NOTE: When color scanning is selected, the maximum image resolution is ...
This is 300x300 dpi. 26 getting started guide The options are a compromise between image quality (resolution) and file size. Color Scanning While the WorkCentre is a better compression format for a smaller file size Individual options selected by the user. NOTE: When color scanning is selected, the maximum image resolution is ...


