Statement of Volatility - WorkCentre 4150
Page 1
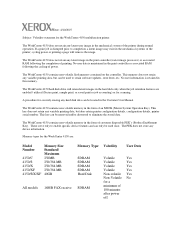
... printer configuration details, configuration details, printer serial number. Memory types for the WorkCentre 4150 are enabled / utilized (Secure print, sample print, or saved print or job accounting) or for a minimum of the printer during normal operation. The WorkCentre 4150 hard disk drive will remove the image. No user information is disrupted prior to completion a latent image may exist in the mechanical systems of customer disposable PEK's (Product Enablement Key). This key can only be removed and/or destroyed to retain software updates...
... printer configuration details, configuration details, printer serial number. Memory types for the WorkCentre 4150 are enabled / utilized (Secure print, sample print, or saved print or job accounting) or for a minimum of the printer during normal operation. The WorkCentre 4150 hard disk drive will remove the image. No user information is disrupted prior to completion a latent image may exist in the mechanical systems of customer disposable PEK's (Product Enablement Key). This key can only be removed and/or destroyed to retain software updates...
Getting Started Guide
Page 7
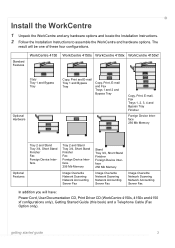
...and Fax Trays 1 and 2 and Bypass Tray Copy, Print, E-mail, Fax Trays 1, 2, 3, 4 and Bypass Tray Finisher Foreign Device Interface 256 Mb Memory Optional Features Tray 2 and Stand Tray 3/4, Short Stand Finisher Fax Foreign Device Interface. Install the WorkCentre 1 Unpack the WorkCentre and any hardware options and locate the Installation Instructions. 2 Follow the Installation Instructions to assemble the WorkCentre and hardware options. The result will have: Power Cord, User Documentation CD, Print Driver CD (WorkCentre 4150s, 4150x and 4150 xf configurations only), Getting Started Guide...
...and Fax Trays 1 and 2 and Bypass Tray Copy, Print, E-mail, Fax Trays 1, 2, 3, 4 and Bypass Tray Finisher Foreign Device Interface 256 Mb Memory Optional Features Tray 2 and Stand Tray 3/4, Short Stand Finisher Fax Foreign Device Interface. Install the WorkCentre 1 Unpack the WorkCentre and any hardware options and locate the Installation Instructions. 2 Follow the Installation Instructions to assemble the WorkCentre and hardware options. The result will have: Power Cord, User Documentation CD, Print Driver CD (WorkCentre 4150s, 4150x and 4150 xf configurations only), Getting Started Guide...

Getting Started Guide
Page 13
... Ethernet cable is the factory default setting. • Static IP address: Use this method to allow a DHCP server to automatically assign an IP address. RJ45 Network Connector Network Setup Using DHCP 1 After the WorkCentre starts, it automatically uses DHCP to obtain its network configuration. getting started guide 9 This is not supplied by the network administrator. Connecting to the Network If your WorkCentre is operating correctly as a copier. 1 Place a document in the Document Feeder and make 3 copies. 2 If the copies are connecting your network, make sure...
... Ethernet cable is the factory default setting. • Static IP address: Use this method to allow a DHCP server to automatically assign an IP address. RJ45 Network Connector Network Setup Using DHCP 1 After the WorkCentre starts, it automatically uses DHCP to obtain its network configuration. getting started guide 9 This is not supplied by the network administrator. Connecting to the Network If your WorkCentre is operating correctly as a copier. 1 Place a document in the Document Feeder and make 3 copies. 2 If the copies are connecting your network, make sure...
Getting Started Guide
Page 15
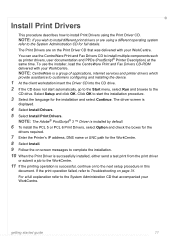
... CD drive. The driver screen is successful, continue on screen messages to complete the installation. 10 When the Print Driver is successfully installed, either send a test print from the print driver or submit a job to the WorkCentre. 11 If the printing operation is displayed. 4 Select Install Drivers. 5 Select Install Print Drivers. If the print operation failed, refer to install multiple components such as printer drivers, user documentation and PPDs (PostScript® Printer Description) at the same time. You can use the installer, load the CentreWare Print and Fax Drivers...
... CD drive. The driver screen is successful, continue on screen messages to complete the installation. 10 When the Print Driver is successfully installed, either send a test print from the print driver or submit a job to the WorkCentre. 11 If the printing operation is displayed. 4 Select Install Drivers. 5 Select Install Print Drivers. If the print operation failed, refer to install multiple components such as printer drivers, user documentation and PPDs (PostScript® Printer Description) at the same time. You can use the installer, load the CentreWare Print and Fax Drivers...
Getting Started Guide
Page 17
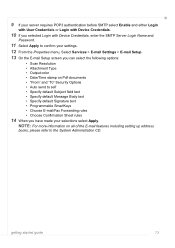
...; Output color • Date/Time stamp on Pdf documents • "From" and "To" Security Options • Auto send to the System Administration CD. getting started guide 13 9 If your server requires POP3 authentication before SMTP select Enable and either Login with User Credentials or Login with Device Credentials. 10 If you selected Login with Device Credentials, enter the SMTP Server Login Name and Password. 11 Select Apply to confirm your settings. 12 From the Properties menu, Select Services > E-mail Settings > E-mail Setup...
...; Output color • Date/Time stamp on Pdf documents • "From" and "To" Security Options • Auto send to the System Administration CD. getting started guide 13 9 If your server requires POP3 authentication before SMTP select Enable and either Login with User Credentials or Login with Device Credentials. 10 If you selected Login with Device Credentials, enter the SMTP Server Login Name and Password. 11 Select Apply to confirm your settings. 12 From the Properties menu, Select Services > E-mail Settings > E-mail Setup...
Getting Started Guide
Page 23
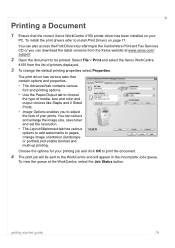
Select File > Print and select the Xerox WorkCentre 4150 from the Xerox website at the WorkCentre, select the Job Status button. You can also access the Print Drivers by referring to the CentreWare Print and Fax Services CD or you to adjust the look of printers displayed. 3 To change image orientation (landscape or portrait) and enable booklet and multi-up printing. getting started guide 19 The print driver has various tabs that the correct Xerox WorkCentre 4150 printer driver has been installed on page 11...
Select File > Print and select the Xerox WorkCentre 4150 from the Xerox website at the WorkCentre, select the Job Status button. You can also access the Print Drivers by referring to the CentreWare Print and Fax Services CD or you to adjust the look of printers displayed. 3 To change image orientation (landscape or portrait) and enable booklet and multi-up printing. getting started guide 19 The print driver has various tabs that the correct Xerox WorkCentre 4150 printer driver has been installed on page 11...
Getting Started Guide
Page 25
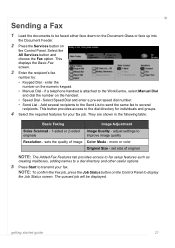
... Adjustment Sides Scanned - 1-sided or 2-sided Image Quality - mono or color Original Size - set speed dial number. • Send List - This button provides access to the dial directory for individuals and groups. 4 Select the required features for your fax. enter the number on the handset. • Speed Dial - Select Speed Dial and enter a pre-set size of image Color Mode - getting started guide 21 if a telephone handset is attached to the WorkCentre, select Manual Dial and dial the number on the numeric keypad. • Manual Dial - NOTE: To confirm the Fax job...
... Adjustment Sides Scanned - 1-sided or 2-sided Image Quality - mono or color Original Size - set speed dial number. • Send List - This button provides access to the dial directory for individuals and groups. 4 Select the required features for your fax. enter the number on the handset. • Speed Dial - Select Speed Dial and enter a pre-set size of image Color Mode - getting started guide 21 if a telephone handset is attached to the WorkCentre, select Manual Dial and dial the number on the numeric keypad. • Manual Dial - NOTE: To confirm the Fax job...
Getting Started Guide
Page 33
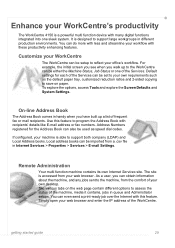
... the Services. Enhance your web browser and enter the IP address of the WorkCentre. Address Numbers registered for each of the Services can be setup to the WorkCentre can be imported from the comfort of your WorkCentre The WorkCentre can be used as the default paper tray, customized reduction ratios and 2-sided copying to save on the web page contain different options to support both company (LDAP) and Local Address books. It is a powerful multi function device with...
... the Services. Enhance your web browser and enter the IP address of the WorkCentre. Address Numbers registered for each of the Services can be setup to the WorkCentre can be imported from the comfort of your WorkCentre The WorkCentre can be used as the default paper tray, customized reduction ratios and 2-sided copying to save on the web page contain different options to support both company (LDAP) and Local Address books. It is a powerful multi function device with...
Getting Started Guide
Page 35
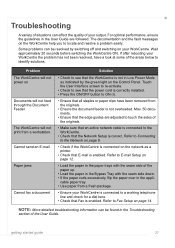
... send an E-mail Paper jams Cannot fax a document Solution • Check to see that the power cord is correctly installed. • Press the ON/OFF button to ON (I). • Ensure that Fax is not overloaded. Refer to Fax Setup on the Control Panel. Some problems can be found in Low Power Mode as a printer. • Check that the Network Setup is enabled. Problem The WorkCentre will not power on your WorkCentre is connected to a working telephone line and check for a dial tone...
... send an E-mail Paper jams Cannot fax a document Solution • Check to see that the power cord is correctly installed. • Press the ON/OFF button to ON (I). • Ensure that Fax is not overloaded. Refer to Fax Setup on the Control Panel. Some problems can be found in Low Power Mode as a printer. • Check that the Network Setup is enabled. Problem The WorkCentre will not power on your WorkCentre is connected to a working telephone line and check for a dial tone...
Quick Reference Poster
Page 1
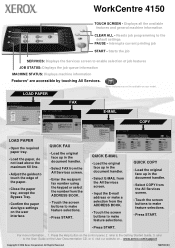
... paper size/type settings on the User Documentation CD, or 4. Press the Help button on your model. Interrupts current printing job START - LOAD PAPER FAX E-MAIL COPY LOAD PAPER • Open the required paper tray. • Load the paper, do not load above the maximum fill line. • Adjust the guides to the User Guide on the user interface. Displays all the available features and general machine information CLEAR ALL - refer to touch the edge of job features JOB STATUS: Displays the job queue information MACHINE STATUS: Displays machine information Features* are accessible...
... paper size/type settings on the User Documentation CD, or 4. Press the Help button on your model. Interrupts current printing job START - LOAD PAPER FAX E-MAIL COPY LOAD PAPER • Open the required paper tray. • Load the paper, do not load above the maximum fill line. • Adjust the guides to the User Guide on the user interface. Displays all the available features and general machine information CLEAR ALL - refer to touch the edge of job features JOB STATUS: Displays the job queue information MACHINE STATUS: Displays machine information Features* are accessible...
User Guide
Page 4
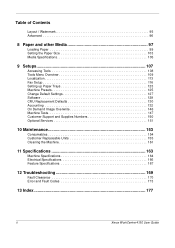
... Fax Setup 116 Setting up Paper Trays 123 Machine Presets 125 Change Default Settings 127 Software 129 CRU Replacement Defaults 130 Accounting 132 On Demand Image Overwrite 146 Machine Tests 147 Customer Support and Supplies Numbers 150 Optional Services 151 10 Maintenance 153 Consumables 154 Customer Replaceable Units 155 Cleaning the Machine 161 11 Specifications 163 Machine Specifications 164 Electrical Specifications 166 Feature Specifications 167 12 Troubleshooting 169 Fault Clearance 170 Error and Fault Codes 173 13 Index 177 ii Xerox WorkCentre 4150 User Guide
... Fax Setup 116 Setting up Paper Trays 123 Machine Presets 125 Change Default Settings 127 Software 129 CRU Replacement Defaults 130 Accounting 132 On Demand Image Overwrite 146 Machine Tests 147 Customer Support and Supplies Numbers 150 Optional Services 151 10 Maintenance 153 Consumables 154 Customer Replaceable Units 155 Cleaning the Machine 161 11 Specifications 163 Machine Specifications 164 Electrical Specifications 166 Feature Specifications 167 12 Troubleshooting 169 Fault Clearance 170 Error and Fault Codes 173 13 Index 177 ii Xerox WorkCentre 4150 User Guide
User Guide
Page 62
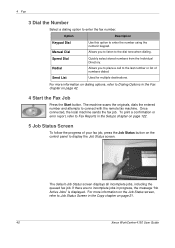
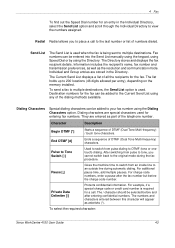
... on page 21. 40 Xerox WorkCentre 4150 User Guide The machine scans the originals, dials the entered number and attempts to enter the number using the numeric keypad. Speed Dial Redial Send List Quickly select stored numbers from the Individual Directory. If there are no incomplete jobs in the Setups chapter on page 122. 5 Job Status Screen To follow the progress of numbers dialed. Once connected, the local machine sends the fax job. The default Job Status screen displays all incomplete jobs, including the queued fax job. Option Description Keypad Dial Manual Dial Use this...
... on page 21. 40 Xerox WorkCentre 4150 User Guide The machine scans the originals, dials the entered number and attempts to enter the number using the numeric keypad. Speed Dial Redial Send List Quickly select stored numbers from the Individual Directory. If there are no incomplete jobs in the Setups chapter on page 122. 5 Job Status Screen To follow the progress of numbers dialed. Once connected, the local machine sends the fax job. The default Job Status screen displays all incomplete jobs, including the queued fax job. Option Description Keypad Dial Manual Dial Use this...
User Guide
Page 64
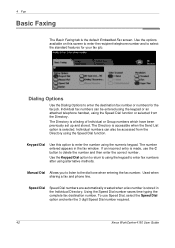
... Speed Dial number required. 42 Xerox WorkCentre 4150 User Guide Dialing Options Use the Dialing Options to select the standard features for the fax job. Used when sharing a fax and phone line. Using the Speed Dial number saves time typing the complete fax destination number. 4 Fax Basic Faxing The Basic Faxing tab is a listing of Individual or Group numbers which have been previously set up and stored. Use the options available on this option to the dial tone when entering the fax number. The Directory is the default Embedded Fax screen. The Directory is accessible...
... Speed Dial number required. 42 Xerox WorkCentre 4150 User Guide Dialing Options Use the Dialing Options to select the standard features for the fax job. Used when sharing a fax and phone line. Using the Speed Dial number saves time typing the complete fax destination number. 4 Fax Basic Faxing The Basic Faxing tab is a listing of Individual or Group numbers which have been previously set up and stored. Use the options available on this option to the dial tone when entering the fax number. The Directory is the default Embedded Fax screen. The Directory is accessible...
User Guide
Page 65
... the memory installed. For additional pause time, add multiple pauses. To select the required character: Xerox WorkCentre 4150 User Guide 43 To send a fax to multiple destinations, the Send List option is used when the fax is being sent to the last number or list of the telephone number. They are stored in the Individual Directory, select the Send List option and scroll through the Individual Directory to the original mode during automatic dialing. Private Data Delimiter...
... the memory installed. For additional pause time, add multiple pauses. To select the required character: Xerox WorkCentre 4150 User Guide 43 To send a fax to multiple destinations, the Send List option is used when the fax is being sent to the last number or list of the telephone number. They are stored in the Individual Directory, select the Send List option and scroll through the Individual Directory to the original mode during automatic dialing. Private Data Delimiter...
User Guide
Page 83
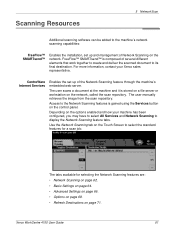
...™ Enables the installation, set up and management of the Network Scanning feature through the machine's embedded web server. CentreWare Internet Services Enables the set up of Network Scanning on the network. Access to display the Network Scanning feature tabs. Xerox WorkCentre 4150 User Guide 61 Depending on the options enabled and how your Xerox sales representative. FreeFlow™ SMARTsend™ is stored on a file server or workstation on the control panel. For more information, contact your machine has been configured, you...
...™ Enables the installation, set up and management of the Network Scanning feature through the machine's embedded web server. CentreWare Internet Services Enables the set up of Network Scanning on the network. Access to display the Network Scanning feature tabs. Xerox WorkCentre 4150 User Guide 61 Depending on the options enabled and how your Xerox sales representative. FreeFlow™ SMARTsend™ is stored on a file server or workstation on the control panel. For more information, contact your machine has been configured, you...
User Guide
Page 90
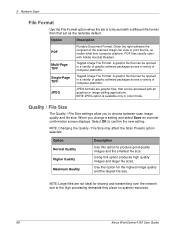
... Save an override confirmation screen displays. NOTE: Large files are graphic files, that set as the template default. NOTE: Changing the Quality / File Size may affect the Scan Presets option selected. Using this option to produce good quality images and the smallest file size. 5 Network Scan File Format Use the File Format option when the job is available only in Color mode. When you to be opened in a variety of graphic software packages across a variety of the scanned image can be accessed...
... Save an override confirmation screen displays. NOTE: Large files are graphic files, that set as the template default. NOTE: Changing the Quality / File Size may affect the Scan Presets option selected. Using this option to produce good quality images and the smallest file size. 5 Network Scan File Format Use the File Format option when the job is available only in Color mode. When you to be opened in a variety of graphic software packages across a variety of the scanned image can be accessed...
User Guide
Page 179
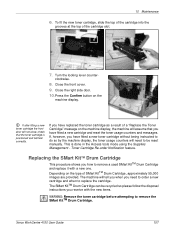
... have replaced the toner cartridge as a result of a "Replace the Toner Cartridge" message on the machine display, the machine will assume that the toner cartridge is done in the Access tools mode using the Supplies Management - Turn the locking lever counter- Close the right side door. 10.Press the Confirm button on the type of the cartridge slot. 7. Replacing the SMart KitTM Drum Cartridge This procedure shows you have fitted a new cartridge and reset the toner usage counters and messages. Xerox WorkCentre 4150 User Guide 157...
... have replaced the toner cartridge as a result of a "Replace the Toner Cartridge" message on the machine display, the machine will assume that the toner cartridge is done in the Access tools mode using the Supplies Management - Turn the locking lever counter- Close the right side door. 10.Press the Confirm button on the type of the cartridge slot. 7. Replacing the SMart KitTM Drum Cartridge This procedure shows you have fitted a new cartridge and reset the toner usage counters and messages. Xerox WorkCentre 4150 User Guide 157...
User Guide
Page 195
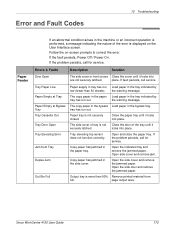
..., Power Off / Power On. the warning message. The side cover of tray is more than 50 sheets). Copy paper has jammed in the bypass tray. Output tray is not Close the door of the tray until it securely latched. Xerox WorkCentre 4150 User Guide 173 If fault persists, call for service. Open the side cover and remove the jammed paper. Errors & Faults Description Solution Door Open The side cover or front covers Close the cover until it locks into place. Tray Paper Low Paper Empty at Tray Paper...
..., Power Off / Power On. the warning message. The side cover of tray is more than 50 sheets). Copy paper has jammed in the bypass tray. Output tray is not Close the door of the tray until it securely latched. Xerox WorkCentre 4150 User Guide 173 If fault persists, call for service. Open the side cover and remove the jammed paper. Errors & Faults Description Solution Door Open The side cover or front covers Close the cover until it locks into place. Tray Paper Low Paper Empty at Tray Paper...
User Guide
Page 199
... Reset All Counters 135 User Access 140 User Accounts 133 View Counts 143 Auto Answer Delay, Fax Receive Settings 118 Auto Center, Image Shift 30 Auto Detect, E-mail 84 Auto Detect, Original Size 29 Auto Reduction, Fax Receive Settings 118 Automatic Redial Setup, Fax Setup 116 B Background Suppression, Faxing 45 Batch Send, Fax Setup 117 Book Center, Edge Erase 30 Book Copying 28 Booklet Creation 31 Border Erase, Edge Erase 30 C Cleaning Control Panel / Touch Screen 161 DADF and Output Tray 162 Document Glass 161 Color Mode, Faxing 46 Color Scanning, E-mail 81 Control Options, Print...
... Reset All Counters 135 User Access 140 User Accounts 133 View Counts 143 Auto Answer Delay, Fax Receive Settings 118 Auto Center, Image Shift 30 Auto Detect, E-mail 84 Auto Detect, Original Size 29 Auto Reduction, Fax Receive Settings 118 Automatic Redial Setup, Fax Setup 116 B Background Suppression, Faxing 45 Batch Send, Fax Setup 117 Book Center, Edge Erase 30 Book Copying 28 Booklet Creation 31 Border Erase, Edge Erase 30 C Cleaning Control Panel / Touch Screen 161 DADF and Output Tray 162 Document Glass 161 Color Mode, Faxing 46 Color Scanning, E-mail 81 Control Options, Print...
User Guide
Page 200
... Jams, Paper 170 Jams, Staples 172 Junk Fax, Fax Receive Settings 119 L Layout / Watermark, Print 95 Lighten / Darken, Faxing 45 Line Configuration, Fax Settings 121 M Machine Configurations Accessibility 164 Copier Speed 164 First Copy Out Time 164 Hardware 164 Machine Size 164 Warm Up Time 164 Machine Tests Image Quality 147 UI Test Application Checksum Verification 149 Audio Tone 148 Communications Self Test 149 Display Pixel 148 LED Indicator 148 Reset UI 149 Touch Area 147 UI Button 147 Video Memory 148 User...
... Jams, Paper 170 Jams, Staples 172 Junk Fax, Fax Receive Settings 119 L Layout / Watermark, Print 95 Lighten / Darken, Faxing 45 Line Configuration, Fax Settings 121 M Machine Configurations Accessibility 164 Copier Speed 164 First Copy Out Time 164 Hardware 164 Machine Size 164 Warm Up Time 164 Machine Tests Image Quality 147 UI Test Application Checksum Verification 149 Audio Tone 148 Communications Self Test 149 Display Pixel 148 LED Indicator 148 Reset UI 149 Touch Area 147 UI Button 147 Video Memory 148 User...


