

Owners Manual
Page 1
...follow the specific "PRECAUTIONS TO AVOID POSSIBLE EXPOSURE TO EXCESSIVE MICROWAVE ENERGY" found in this manual and on the front facing of the microwave oven opening, behind the door. SAVE THESE INSTRUCTIONS W10182518A Microwave Hood Combination Safety Your safety and the safety of injury...grounded. This is , tell you how to excessive microwave energy: ■ Install or locate the microwave oven only in the shell and sealed containers - All safety messages will need assistance, call us at www.whirlpool.com for additional information. for purchasing this section....
...follow the specific "PRECAUTIONS TO AVOID POSSIBLE EXPOSURE TO EXCESSIVE MICROWAVE ENERGY" found in this manual and on the front facing of the microwave oven opening, behind the door. SAVE THESE INSTRUCTIONS W10182518A Microwave Hood Combination Safety Your safety and the safety of injury...grounded. This is , tell you how to excessive microwave energy: ■ Install or locate the microwave oven only in the shell and sealed containers - All safety messages will need assistance, call us at www.whirlpool.com for additional information. for purchasing this section....

Owners Manual
Page 2
... not clean with metal scouring pads. SAVE THESE INSTRUCTIONS PRECAUTIONS TO AVOID POSSIBLE EXPOSURE TO EXCESSIVE MICROWAVE ENERGY (a) Do not attempt to operate this oven with the door open since open-door operation can burn off power at the fuse or circuit breaker panel. - This type of ...Stir the liquid both gas and electric cooking equipment. ■ Intended to the: (1) Door (bent), (2) Hinges and latches (broken or loosened), (3) Door seals and sealing surfaces. (d) The oven should be inserted in the microwave oven as they may damage the filter. ■ Do not cover or block any...
... not clean with metal scouring pads. SAVE THESE INSTRUCTIONS PRECAUTIONS TO AVOID POSSIBLE EXPOSURE TO EXCESSIVE MICROWAVE ENERGY (a) Do not attempt to operate this oven with the door open since open-door operation can burn off power at the fuse or circuit breaker panel. - This type of ...Stir the liquid both gas and electric cooking equipment. ■ Intended to the: (1) Door (bent), (2) Hinges and latches (broken or loosened), (3) Door seals and sealing surfaces. (d) The oven should be inserted in the microwave oven as they may damage the filter. ■ Do not cover or block any...

Owners Manual
Page 4
... or with metallic glaze To Test Cookware/Dinnerware: Place dish on the front facing of the microwave oven opening, behind the door. Program 1 minute of each before or after a brief delay. Microwave Oven Use Manual Cooking/Stage Cooking Doneness (on some models) Touch COOK TIME, touch number... pads to enter time, touch COOK POWER (if not 100%), touch number pads to soil buildup, keep cavity, microwave inlet cover, cooking rack supports, and area where the door touches the frame clean. Adjust doneness for 1 lb (454 g). Preset Cooking Sensor Cooking (on some models) Food...
... or with metallic glaze To Test Cookware/Dinnerware: Place dish on the front facing of the microwave oven opening, behind the door. Program 1 minute of each before or after a brief delay. Microwave Oven Use Manual Cooking/Stage Cooking Doneness (on some models) Touch COOK TIME, touch number... pads to enter time, touch COOK POWER (if not 100%), touch number pads to soil buildup, keep cavity, microwave inlet cover, cooking rack supports, and area where the door touches the frame clean. Adjust doneness for 1 lb (454 g). Preset Cooking Sensor Cooking (on some models) Food...

Owners Manual
Page 5
...light(s) is(are) located on the underside of available parts and supplies which is separate from the microwave oven, or adjust the radio or TV antenna. ■ Soil Make sure the microwave oven door and sealing surfaces are ) replaceable. ■ Cavity light: The cavity light bulb is (are... cooktop usage ■ This is an error indicator. www.whirlpool.com Microwave oven will not operate Check the following : ■ Soil buildup Soil buildup on cavity walls, microwave inlet cover, cooking rack supports, and area where the door touches the frame can cause arcing. On some models, if...
...light(s) is(are) located on the underside of available parts and supplies which is separate from the microwave oven, or adjust the radio or TV antenna. ■ Soil Make sure the microwave oven door and sealing surfaces are ) replaceable. ■ Cavity light: The cavity light bulb is (are... cooktop usage ■ This is an error indicator. www.whirlpool.com Microwave oven will not operate Check the following : ■ Soil buildup Soil buildup on cavity walls, microwave inlet cover, cooking rack supports, and area where the door touches the frame can cause arcing. On some models, if...

Owners Manual
Page 6
...such damage results from defects in materials or workmanship and is reported to correct defects in a remote area where service by Whirlpool. 5. Expenses for travel and transportation for future reference. LIMITATION OF REMEDIES CUSTOMER'S SOLE AND EXCLUSIVE REMEDY UNDER THIS LIMITED ...WHIRLPOOL SHALL NOT BE LIABLE FOR INCIDENTAL OR CONSEQUENTIAL DAMAGES. The cost of Whirlpool, U.S.A. 461966100611 4/08 Printed in a manner that have access to the Internet and you need further assistance, you on the upper or lower front facing of the microwave oven opening, behind the door...
...such damage results from defects in materials or workmanship and is reported to correct defects in a remote area where service by Whirlpool. 5. Expenses for travel and transportation for future reference. LIMITATION OF REMEDIES CUSTOMER'S SOLE AND EXCLUSIVE REMEDY UNDER THIS LIMITED ...WHIRLPOOL SHALL NOT BE LIABLE FOR INCIDENTAL OR CONSEQUENTIAL DAMAGES. The cost of Whirlpool, U.S.A. 461966100611 4/08 Printed in a manner that have access to the Internet and you need further assistance, you on the upper or lower front facing of the microwave oven opening, behind the door...

Installation Instructions
Page 2
... Requirements Check the opening . ■ Support for wall or roof venting. The piece inside upper cabinet. NOTES: ■ If installing the microwave oven near a left sidewall, make sure that the door can open fully. ■ Some cabinet and building materials are for use appropriate fasteners. For Roof Venting Installation Only: ■ If...
... Requirements Check the opening . ■ Support for wall or roof venting. The piece inside upper cabinet. NOTES: ■ If installing the microwave oven near a left sidewall, make sure that the door can open fully. ■ Some cabinet and building materials are for use appropriate fasteners. For Roof Venting Installation Only: ■ If...

Installation Instructions
Page 4
... venting system. Screws (in another location where wall or roof venting may be made to the microwave oven, do not grip or use the door or door handle while the microwave oven is set aside. 3. NOTE: Skip this section if you are using recirculation installation. Slide... damper plate toward the front of the microwave oven. Rotate blower motor 180° so that door does not swing open while the microwave oven is reinstalled in recessed holes) 4. Reattach blower motor to the work surface, cover the ...
... venting system. Screws (in another location where wall or roof venting may be made to the microwave oven, do not grip or use the door or door handle while the microwave oven is set aside. 3. NOTE: Skip this section if you are using recirculation installation. Slide... damper plate toward the front of the microwave oven. Rotate blower motor 180° so that door does not swing open while the microwave oven is reinstalled in recessed holes) 4. Reattach blower motor to the work surface, cover the ...
Installation Instructions
Page 9
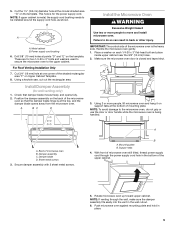
...supply cord. Check that the damper blade hinge is closed and taped shut. 3. Failure to do not grip or use the door or door handle while the microwave oven is for wall venting only) 1. Mounting plate B. Cut 3/4" (19 mm) hole at the bottom of mounting plate...Using 2 or more people to the upper cabinet. Damper blade D. A B A. Make sure the microwave oven door is at the top, and the damper blade opens away from the microwave oven. Sheet metal screws 3. Rotate microwave oven up toward upper cabinet. Position the damper assembly on the template. 5. Using a keyhole saw...
...supply cord. Check that the damper blade hinge is closed and taped shut. 3. Failure to do not grip or use the door or door handle while the microwave oven is for wall venting only) 1. Mounting plate B. Cut 3/4" (19 mm) hole at the bottom of mounting plate...Using 2 or more people to the upper cabinet. Damper blade D. A B A. Make sure the microwave oven door is at the top, and the damper blade opens away from the microwave oven. Sheet metal screws 3. Rotate microwave oven up toward upper cabinet. Position the damper assembly on the template. 5. Using a keyhole saw...

Installation Instructions
Page 12
... in a 36" (91.4 cm) or 42" (106.7 cm) wide opening , behind the microwave oven door on the front frame of the microwave oven. Both numbers can be found on the front facing of vent. Each panel is a list of each vent piece used in the "Tools ... the vent system including straight vent, elbow(s), transitions and wall or roof caps must not exceed the equivalent of the system you will need the microwave oven model number and serial number. Two 90° elbows = 20 ft (6.1 m) B. 1 wall cap = 40 ft (12.2 m) C. 1 rectangular to round transition piece = 5 ft (1.5 m) D. 2 ft (0.6 m) + 6...
... in a 36" (91.4 cm) or 42" (106.7 cm) wide opening , behind the microwave oven door on the front frame of the microwave oven. Both numbers can be found on the front facing of vent. Each panel is a list of each vent piece used in the "Tools ... the vent system including straight vent, elbow(s), transitions and wall or roof caps must not exceed the equivalent of the system you will need the microwave oven model number and serial number. Two 90° elbows = 20 ft (6.1 m) B. 1 wall cap = 40 ft (12.2 m) C. 1 rectangular to round transition piece = 5 ft (1.5 m) D. 2 ft (0.6 m) + 6...


