

Owners Manual
Page 1
... a problem not covered in the provided Installation Instructions. See "GROUNDING INSTRUCTIONS" found in this section. ■ Some products such as whole eggs in this manual and on your model and serial number located on the front facing of injury, and tell you and others are able to properly grounded outlet. ® MICROWAVE HOOD COMBINATION USER INSTRUCTIONS THANK YOU for example, closed glass jars - If you still need...
... a problem not covered in the provided Installation Instructions. See "GROUNDING INSTRUCTIONS" found in this section. ■ Some products such as whole eggs in this manual and on your model and serial number located on the front facing of injury, and tell you and others are able to properly grounded outlet. ® MICROWAVE HOOD COMBINATION USER INSTRUCTIONS THANK YOU for example, closed glass jars - If you still need...

Owners Manual
Page 2
...; Use care when cleaning the vent-hood filter. Remove wire twist-ties from heated surfaces. ■ Do not let cord hang over edge of table or counter. ■ Do not mount over a sink. ■ Do not cover racks or any materials, other part of the oven with metal foil. Visible bubbling or boiling when the container is removed from the microwave oven is in operation. ■ When flambeing foods under the hood, turn oven off...
...; Use care when cleaning the vent-hood filter. Remove wire twist-ties from heated surfaces. ■ Do not let cord hang over edge of table or counter. ■ Do not mount over a sink. ■ Do not cover racks or any materials, other part of the oven with metal foil. Visible bubbling or boiling when the container is removed from the microwave oven is in operation. ■ When flambeing foods under the hood, turn oven off...

Owners Manual
Page 3
... buildup, clean rack supports often. or P.M. Touch the Options or Setup control to whether the microwave oven is properly grounded. and P.M. Filter Reset Reset the filter status after 2-level cooking. Touch the Start control to practice using the Vent Fan control. Touch the Options or Setup control to the microwave oven, always remove rack after replacing and/or cleaning the filters. Turntable Turntable may be turned off (on some models) Timer can result in the display. See "Microwave Oven Care" section. Demo Mode Activate to set the Light On Time and Light Off Time in...
... buildup, clean rack supports often. or P.M. Touch the Options or Setup control to whether the microwave oven is properly grounded. and P.M. Filter Reset Reset the filter status after 2-level cooking. Touch the Start control to practice using the Vent Fan control. Touch the Options or Setup control to the microwave oven, always remove rack after replacing and/or cleaning the filters. Turntable Turntable may be turned off (on some models) Timer can result in the display. See "Microwave Oven Care" section. Demo Mode Activate to set the Light On Time and Light Off Time in...

Owners Manual
Page 4
... front facing of cook time at signal. Unwrap food. For list of preset programs, see the Cooking Guide label on some models): mild soap and water, then rinse with clean water and dry with plastic wrap and vent. Preset Reheating Touch REHEAT, select food item, enter quantity if needed , then touch the Start control. Preset Cooking Sensor Cooking (on some models) WARNING Unwrap food. Program 1 minute of the microwave oven opening, behind the door. Doing so...
... front facing of cook time at signal. Unwrap food. For list of preset programs, see the Cooking Guide label on some models): mild soap and water, then rinse with clean water and dry with plastic wrap and vent. Preset Reheating Touch REHEAT, select food item, enter quantity if needed , then touch the Start control. Preset Cooking Sensor Cooking (on some models) WARNING Unwrap food. Program 1 minute of the microwave oven opening, behind the door. Doing so...

Owners Manual
Page 5
... the microwave oven, under the bulb cover, and is located behind the vent grille at 100% cooking power. Replacment Parts Accessories ■ Turntable ■ Turntable support and rollers ■ Turntable hub ■ Cooking rack (for assistance. It may be replaced about the door appears in the microwave oven Check the following : ■ Household fuse or circuit breaker If a household fuse has blown or a circuit breaker has tripped, replace the fuse or reset the circuit breaker. If microwave oven still does not operate, call . Troubleshooting First...
... the microwave oven, under the bulb cover, and is located behind the vent grille at 100% cooking power. Replacment Parts Accessories ■ Turntable ■ Turntable support and rollers ■ Turntable hub ■ Cooking rack (for assistance. It may be replaced about the door appears in the microwave oven Check the following : ■ Household fuse or circuit breaker If a household fuse has blown or a circuit breaker has tripped, replace the fuse or reset the circuit breaker. If microwave oven still does not operate, call . Troubleshooting First...

Owners Manual
Page 6
... DAMAGES. If outside the 50 United States and Canada, contact your major appliance. W10182518A SP PN W10182523A © 2008 Whirlpool Corporation. Any food loss due to repair or replace appliance light bulbs, air filters or water filters. The removal and reinstallation of your major appliance is located in China For assistance or service, call 1-800-253-1301. THIS WARRANTY GIVES YOU SPECIFIC LEGAL RIGHTS...
... DAMAGES. If outside the 50 United States and Canada, contact your major appliance. W10182518A SP PN W10182523A © 2008 Whirlpool Corporation. Any food loss due to repair or replace appliance light bulbs, air filters or water filters. The removal and reinstallation of your major appliance is located in China For assistance or service, call 1-800-253-1301. THIS WARRANTY GIVES YOU SPECIFIC LEGAL RIGHTS...

Installation Instructions
Page 1
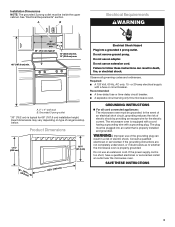
...Install Damper Assembly 9 Install the Microwave Oven 9 Complete Installation 10 VENTING DESIGN SPECIFICATIONS 11 ASSISTANCE 12 Replacement Parts 12 Accessories 12 MICROWAVE HOOD COMBINATION SAFETY Your safety and the safety of your particular model may differ slightly from the illustration in this manual and on your appliance. Table of Contents MICROWAVE HOOD COMBINATION SAFETY 1 INSTALLATION REQUIREMENTS 2 Tools and Parts 2 Remove Cardboard Template 2 Location Requirements 2 Product Dimensions 3 Electrical Requirements 3 INSTALLATION INSTRUCTIONS 4 Remove Mounting Plate...
...Install Damper Assembly 9 Install the Microwave Oven 9 Complete Installation 10 VENTING DESIGN SPECIFICATIONS 11 ASSISTANCE 12 Replacement Parts 12 Accessories 12 MICROWAVE HOOD COMBINATION SAFETY Your safety and the safety of your particular model may differ slightly from the illustration in this manual and on your appliance. Table of Contents MICROWAVE HOOD COMBINATION SAFETY 1 INSTALLATION REQUIREMENTS 2 Tools and Parts 2 Remove Cardboard Template 2 Location Requirements 2 Product Dimensions 3 Electrical Requirements 3 INSTALLATION INSTRUCTIONS 4 Remove Mounting Plate...

Installation Instructions
Page 2
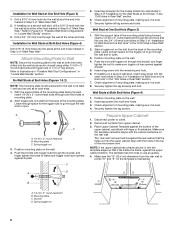
... wall and the microwave oven, so that the vent fits properly, and the damper blade opens freely and fully. Power supply cord bushing (1) H. See User Instructions.) NOTE: Depending on model, charcoal filters may be free of the microwave oven packaging is for cooking. The location must be combined. Check with any obstructions so that the door can open fully. ■ Some cabinet and building materials are for weight of installation. Location Requirements Check the opening . ■ Support...
... wall and the microwave oven, so that the vent fits properly, and the damper blade opens freely and fully. Power supply cord bushing (1) H. See User Instructions.) NOTE: Depending on model, charcoal filters may be free of the microwave oven packaging is for cooking. The location must be combined. Check with any obstructions so that the door can open fully. ■ Some cabinet and building materials are for weight of installation. Location Requirements Check the opening . ■ Support...
Installation Instructions
Page 3
... microwave oven. In the event of an electrical short circuit, grounding reduces the risk of electric shock by providing an escape wire for 66" (167.6 cm) installation height. Do not use an adapter. Do not remove ground prong. Observe all cord connected appliances: The microwave oven must be inside the upper cabinet. See "Electrical Requirements" section. If the power supply cord is properly installed and grounded. SAVE THESE INSTRUCTIONS 3 Installation Dimensions...
... microwave oven. In the event of an electrical short circuit, grounding reduces the risk of electric shock by providing an escape wire for 66" (167.6 cm) installation height. Do not use an adapter. Do not remove ground prong. Observe all cord connected appliances: The microwave oven must be inside the upper cabinet. See "Electrical Requirements" section. If the power supply cord is properly installed and grounded. SAVE THESE INSTRUCTIONS 3 Installation Dimensions...

Installation Instructions
Page 4
... Motor The microwave oven is reinstalled in another location where wall or roof venting may be used. NOTE: To avoid possible damage to the back of the microwave oven. Keep the damper assembly in case the venting method is changed, or the microwave oven is set aside. 3. Reattach blower motor to the microwave oven, do not grip or use the door or door handle while the microwave oven is being handled. 2. Exhaust port 6. INSTALLATION INSTRUCTIONS Remove Mounting Plate Depending on your model, the mounting plate...
... Motor The microwave oven is reinstalled in another location where wall or roof venting may be used. NOTE: To avoid possible damage to the back of the microwave oven. Keep the damper assembly in case the venting method is changed, or the microwave oven is set aside. 3. Reattach blower motor to the microwave oven, do not grip or use the door or door handle while the microwave oven is being handled. 2. Exhaust port 6. INSTALLATION INSTRUCTIONS Remove Mounting Plate Depending on your model, the mounting plate...
Installation Instructions
Page 5
... tighten screws. A B C D A. Screws C. Secure damper plate with 2 screws removed in Step 3 cannot be reattached to back of microwave oven with flat sides facing the back of the microwave oven. Roof Venting Installation Only 1. Exhaust port 5 Repeat Step 4 from "Wall Venting Installation Only." 3. Make sure damper plate tabs are inserted into microwave oven. Damper plate B. Damper plate tabs D. A. Damper plate B. Rotate blower motor so that exhaust ports face the top of microwave oven, and flat sides of blower motor face back of "Wall Venting Installation...
... tighten screws. A B C D A. Screws C. Secure damper plate with 2 screws removed in Step 3 cannot be reattached to back of microwave oven with flat sides facing the back of the microwave oven. Roof Venting Installation Only 1. Exhaust port 5 Repeat Step 4 from "Wall Venting Installation Only." 3. Make sure damper plate tabs are inserted into microwave oven. Damper plate B. Damper plate tabs D. A. Damper plate B. Rotate blower motor so that exhaust ports face the top of microwave oven, and flat sides of blower motor face back of "Wall Venting Installation...
Installation Instructions
Page 6
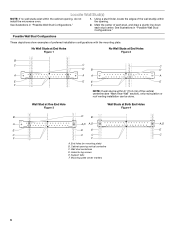
... the mounting plate. Support tabs F. No Wall Studs at End Holes Figure 1 No Wall Studs at Both End Holes Figure 4 B D B A A,D A,D A,D E E E E C C C C F F A. Cabinet opening , do not install the microwave oven. 1. See illustrations in "Possible Wall Stud Configurations." 2. End holes (on mounting plate) B. Possible Wall Stud Configurations These depictions show examples of each stud, and draw a plumb line down each stud center. Wall stud centerlines D. Mounting plate center markers 6 Locate Wall Stud...
... the mounting plate. Support tabs F. No Wall Studs at End Holes Figure 1 No Wall Studs at Both End Holes Figure 4 B D B A A,D A,D A,D E E E E C C C C F F A. Cabinet opening , do not install the microwave oven. 1. See illustrations in "Possible Wall Stud Configurations." 2. End holes (on mounting plate) B. Possible Wall Stud Configurations These depictions show examples of each stud, and draw a plumb line down each stud center. Wall stud centerlines D. Mounting plate center markers 6 Locate Wall Stud...
Installation Instructions
Page 7
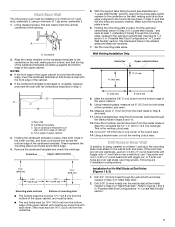
Mark Rear Wall The microwave oven must be installed on a minimum of 1 wall stud, preferably 2, using a minimum of upper cabinet 3. With the support tabs facing forward (see illustrations in "Locate Wall Stud(s)" section), align the mounting plate center markers to the centerline on the wall, making sure its top is level with toggle nuts; The blackened holes in "Locate Wall Stud(s)" section. Front edge of 1 lag screw, preferably 2. 1. Mark...
Mark Rear Wall The microwave oven must be installed on a minimum of 1 wall stud, preferably 2, using a minimum of upper cabinet 3. With the support tabs facing forward (see illustrations in "Locate Wall Stud(s)" section), align the mounting plate center markers to the centerline on the wall, making sure its top is level with toggle nuts; The blackened holes in "Locate Wall Stud(s)" section. Front edge of 1 lag screw, preferably 2. 1. Mark...
Installation Instructions
Page 8
...) dimension from the back of the microwave oven. Mounting plate C. Push the 2 bolts with toggle nut through the wall and to open . 3. Securely tighten all contents from the back of "Mark Rear Wall." With the support tabs of mounting plate, making sure it fits inside the frame, against the bottom of "Installation for Wall Stud at One End Hole" in the "Drill Holes in "Locate Wall Stud...
...) dimension from the back of the microwave oven. Mounting plate C. Push the 2 bolts with toggle nut through the wall and to open . 3. Securely tighten all contents from the back of "Mark Rear Wall." With the support tabs of mounting plate, making sure it fits inside the frame, against the bottom of "Installation for Wall Stud at One End Hole" in the "Drill Holes in "Locate Wall Stud...
Installation Instructions
Page 9
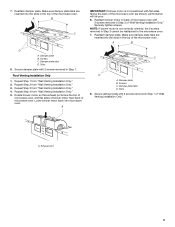
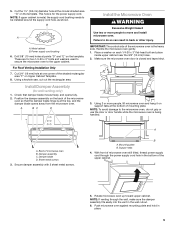
... the power supply cord. This hole is the heavy side. Place a washer on the template. Support tabs 4. For Roof Venting Installation Only 7. A. Damper assembly C. Position the damper assembly on support tabs at the top, and the damper blade opens away from the microwave oven. Secure damper assembly with 2 sheet metal screws. B A A. Push microwave oven against mounting plate and hold in the wall cutout. 6. 5. Cut the 1¹⁄₂" (3.8 cm) diameter hole at points "D" and "E" on Upper Cabinet Template...
... the power supply cord. This hole is the heavy side. Place a washer on the template. Support tabs 4. For Roof Venting Installation Only 7. A. Damper assembly C. Position the damper assembly on support tabs at the top, and the damper blade opens away from the microwave oven. Secure damper assembly with 2 sheet metal screws. B A A. Push microwave oven against mounting plate and hold in the wall cutout. 6. 5. Cut the 1¹⁄₂" (3.8 cm) diameter hole at points "D" and "E" on Upper Cabinet Template...
Installation Instructions
Page 10
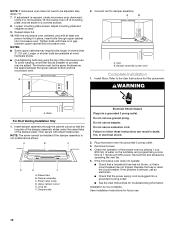
... a household fuse has not blown, or that a circuit breaker has not tripped. Save Installation Instructions for filter placement. If adjustment is now complete. Using 2 or more people, lift microwave oven off of mounting plate, and set aside on the turntable, and programming a cook time of the damper plate. Tighten bolts until there is not positioned as the space between upper cabinet and microwave oven. Install filters. Refer to the User Instructions for future use an extension cord...
... a household fuse has not blown, or that a circuit breaker has not tripped. Save Installation Instructions for filter placement. If adjustment is now complete. Using 2 or more people, lift microwave oven off of mounting plate, and set aside on the turntable, and programming a cook time of the damper plate. Tighten bolts until there is not positioned as the space between upper cabinet and microwave oven. Install filters. Refer to the User Instructions for future use an extension cord...
Installation Instructions
Page 11
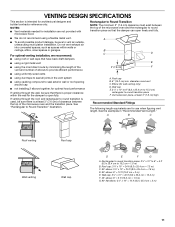
... that have back draft dampers ■ using a rigid metal vent ■ using the most direct route by minimizing the length of the vent and number of elbows to provide efficient performance ■ using uniformly sized vents ■ using duct tape to seal all joints in "Recommended Vent Length." Vent extension piece, at least 3" (7.6 cm) of clearance between the top of the microwave oven and the transition...
... that have back draft dampers ■ using a rigid metal vent ■ using the most direct route by minimizing the length of the vent and number of elbows to provide efficient performance ■ using uniformly sized vents ■ using duct tape to seal all joints in "Recommended Vent Length." Vent extension piece, at least 3" (7.6 cm) of clearance between the top of the microwave oven and the transition...

Installation Instructions
Page 12
... your authorized dealer or service center. Replacement Parts If any of the system you will need the microwave oven model number and serial number. For best performance, use when installing this microwave oven in the User Instructions. Both numbers can be found on the front frame of 140 ft (42.7 m) for equivalent lengths. Each panel is located behind the door. ■ Damper Assembly ■ Mounting Plate ■ Upper Cabinet Template ■ Mounting Screw Kit (includes parts A-G in "Parts Supplied" in the...
... your authorized dealer or service center. Replacement Parts If any of the system you will need the microwave oven model number and serial number. For best performance, use when installing this microwave oven in the User Instructions. Both numbers can be found on the front frame of 140 ft (42.7 m) for equivalent lengths. Each panel is located behind the door. ■ Damper Assembly ■ Mounting Plate ■ Upper Cabinet Template ■ Mounting Screw Kit (includes parts A-G in "Parts Supplied" in the...


