

Owners Manual
Page 1
... Installation Instructions. ■ Read all safety messages. This symbol alerts you should experience a problem not covered in the microwave oven. ■ The microwave oven must be grounded. All safety messages will tell you what can kill or hurt you still need your appliance. If ... de su producto, visite: www.whirlpool.com Tenga listo su número de modelo completo. ® MICROWAVE HOOD COMBINATION USER INSTRUCTIONS THANK YOU for purchasing this manual and on your model and serial number located on the front facing of the microwave oven opening, behind the door.
... Installation Instructions. ■ Read all safety messages. This symbol alerts you should experience a problem not covered in the microwave oven. ■ The microwave oven must be grounded. All safety messages will tell you what can kill or hurt you still need your appliance. If ... de su producto, visite: www.whirlpool.com Tenga listo su número de modelo completo. ® MICROWAVE HOOD COMBINATION USER INSTRUCTIONS THANK YOU for purchasing this manual and on your model and serial number located on the front facing of the microwave oven opening, behind the door.

Owners Manual
Page 2
...liquid both gas and electric cooking equipment. ■ Intended to be allowed to accumulate on hood or filter. ■ Do not use the microwave oven near a swimming pool, or similar locations. ■ Do not immerse cord or plug in harmful exposure to accumulate on models with metal ... agents, such as they may damage the filter. ■ Do not cover or block any other than manufacturer's recommended accessories, in this microwave oven outdoors. Call an authorized service company for a short time before removing the container. - Do not use above ranges with the door open ...
...liquid both gas and electric cooking equipment. ■ Intended to be allowed to accumulate on hood or filter. ■ Do not use the microwave oven near a swimming pool, or similar locations. ■ Do not immerse cord or plug in harmful exposure to accumulate on models with metal ... agents, such as they may damage the filter. ■ Do not cover or block any other than manufacturer's recommended accessories, in this microwave oven outdoors. Call an authorized service company for a short time before removing the container. - Do not use above ranges with the door open ...

Owners Manual
Page 3
... unlock control. Touch the Options or Setup control to reach the "Scroll Speed" submenu, and select the scroll speed. or P.M. See "Microwave Oven Care" section. Touch the Options or Setup control to reach the "Vent Fan" submenu, and select the setting. Features CLEANRELEASE® Cavity...filters. Do not use of the grounding plug can be plugged into a grounded 3 prong outlet. Observe all cord connected appliances: The microwave oven must be used independently during preset or sensor (on . Vent Timer (on some models) Use only for the electric current. Tones...
... unlock control. Touch the Options or Setup control to reach the "Scroll Speed" submenu, and select the scroll speed. or P.M. See "Microwave Oven Care" section. Touch the Options or Setup control to reach the "Vent Fan" submenu, and select the setting. Features CLEANRELEASE® Cavity...filters. Do not use of the grounding plug can be plugged into a grounded 3 prong outlet. Observe all cord connected appliances: The microwave oven must be used independently during preset or sensor (on . Vent Timer (on some models) Use only for the electric current. Tones...

Owners Manual
Page 4
...Hold (on some models) Touch COOK TIME, touch number pads to enter time, touch COOK POWER (if not 100%), touch number pads to the microwave oven cavity, do not use stainless steel cleaner. ■ Turntable: mild soap and water or dishwasher. ■ Cooking rack and supports (on some... control. Clean with metallic glaze To Test Cookware/Dinnerware: Place dish on some models) Food Poisoning Hazard Do not let food sit in the microwave oven. Program 1 minute of abrasive cleanser or scrubbers. ■ Grease filter: mild soap and water or dishwasher. ■ Door and exterior: mild...
...Hold (on some models) Touch COOK TIME, touch number pads to enter time, touch COOK POWER (if not 100%), touch number pads to the microwave oven cavity, do not use stainless steel cleaner. ■ Turntable: mild soap and water or dishwasher. ■ Cooking rack and supports (on some... control. Clean with metallic glaze To Test Cookware/Dinnerware: Place dish on some models) Food Poisoning Hazard Do not let food sit in the microwave oven. Program 1 minute of abrasive cleanser or scrubbers. ■ Grease filter: mild soap and water or dishwasher. ■ Door and exterior: mild...

Owners Manual
Page 5
www.whirlpool.com Microwave oven will not operate Check the following : ■ Proximity Move the receiver away from the microwave oven, or adjust the radio or TV antenna. ■ Soil Make sure the microwave oven door and sealing surfaces are clean. ■ Frequency Some 2.4 GHz-based ... it is time to reset filter status. ■ Grease filter: Remove grease filter from the vent fan, automatically comes on during microwave oven operation. Replacment Parts Accessories ■ Turntable ■ Turntable support and rollers ■ Turntable hub ■ Cooking rack (for assistance...
www.whirlpool.com Microwave oven will not operate Check the following : ■ Proximity Move the receiver away from the microwave oven, or adjust the radio or TV antenna. ■ Soil Make sure the microwave oven door and sealing surfaces are clean. ■ Frequency Some 2.4 GHz-based ... it is time to reset filter status. ■ Grease filter: Remove grease filter from the vent fan, automatically comes on during microwave oven operation. Replacment Parts Accessories ■ Turntable ■ Turntable support and rollers ■ Turntable hub ■ Cooking rack (for assistance...

Owners Manual
Page 6
... the Internet and you need assistance using your product, you on the upper or lower front facing of the microwave oven opening, behind the door. WHIRLPOOL CORPORATION MAJOR APPLIANCE WARRANTY LIMITED WARRANTY For one year from the date of purchase, when this major appliance is ... alteration, misuse, abuse, fire, flood, acts of God, improper installation, installation not in accordance with the product, Whirlpool Corporation or Whirlpool Canada LP (hereafter "Whirlpool") will pay for Factory Specified Parts and repair labor to correct defects in materials or workmanship. Any food loss due ...
... the Internet and you need assistance using your product, you on the upper or lower front facing of the microwave oven opening, behind the door. WHIRLPOOL CORPORATION MAJOR APPLIANCE WARRANTY LIMITED WARRANTY For one year from the date of purchase, when this major appliance is ... alteration, misuse, abuse, fire, flood, acts of God, improper installation, installation not in accordance with the product, Whirlpool Corporation or Whirlpool Canada LP (hereafter "Whirlpool") will pay for Factory Specified Parts and repair labor to correct defects in materials or workmanship. Any food loss due ...

Installation Instructions
Page 1
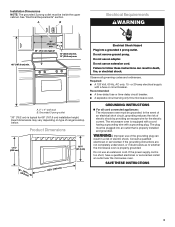
... further notes. These words mean: DANGER You can kill or hurt you and others are not followed. The appearance of Contents MICROWAVE HOOD COMBINATION SAFETY 1 INSTALLATION REQUIREMENTS 2 Tools and Parts 2 Remove Cardboard Template 2 Location Requirements 2 Product Dimensions 3 Electrical Requirements...Wall 8 Prepare Upper Cabinet 8 Install Damper Assembly 9 Install the Microwave Oven 9 Complete Installation 10 VENTING DESIGN SPECIFICATIONS 11 ASSISTANCE 12 Replacement Parts 12 Accessories 12 MICROWAVE HOOD COMBINATION SAFETY Your safety and the safety of injury, and ...
... further notes. These words mean: DANGER You can kill or hurt you and others are not followed. The appearance of Contents MICROWAVE HOOD COMBINATION SAFETY 1 INSTALLATION REQUIREMENTS 2 Tools and Parts 2 Remove Cardboard Template 2 Location Requirements 2 Product Dimensions 3 Electrical Requirements...Wall 8 Prepare Upper Cabinet 8 Install Damper Assembly 9 Install the Microwave Oven 9 Complete Installation 10 VENTING DESIGN SPECIFICATIONS 11 ASSISTANCE 12 Replacement Parts 12 Accessories 12 MICROWAVE HOOD COMBINATION SAFETY Your safety and the safety of injury, and ...

Installation Instructions
Page 2
... (50.8 x 101.6 mm) wood wall stud and minimum 3/8" (9.5 mm) thickness drywall or plaster/lath within cabinet opening where the microwave oven will not discolor, delaminate or sustain other types of wall structures, be free of the cardboard packaging. 2. Check with any obstructions so that.... Toggle nuts (2) E. 1/4" x 2" lag screws (2) F. Set the cardboard template to the side and refer to back of microwave oven) Cardboard template (part of installation. See "Electrical Requirements" section. Read and follow the instructions provided with your builder or cabinet supplier...
... (50.8 x 101.6 mm) wood wall stud and minimum 3/8" (9.5 mm) thickness drywall or plaster/lath within cabinet opening where the microwave oven will not discolor, delaminate or sustain other types of wall structures, be free of the cardboard packaging. 2. Check with any obstructions so that.... Toggle nuts (2) E. 1/4" x 2" lag screws (2) F. Set the cardboard template to the side and refer to back of microwave oven) Cardboard template (part of installation. See "Electrical Requirements" section. Read and follow the instructions provided with your builder or cabinet supplier...
Installation Instructions
Page 3
...time-delay fuse or time-delay circuit breaker. ■ A separate circuit serving only this microwave oven. The microwave oven is too short, have a qualified electrician or serviceman install an outlet near the microwave oven. WARNING: Improper use an adapter. Do not use of the grounding plug can result ...grounded 3 prong outlet must be plugged into a grounded 3 prong outlet. Do not remove ground prong. Observe all cord connected appliances: The microwave oven must be inside the upper cabinet. Required: ■ A 120 Volt, 60 Hz, AC only, 15- or 20-amp electrical supply with...
...time-delay fuse or time-delay circuit breaker. ■ A separate circuit serving only this microwave oven. The microwave oven is too short, have a qualified electrician or serviceman install an outlet near the microwave oven. WARNING: Improper use an adapter. Do not use of the grounding plug can result ...grounded 3 prong outlet must be plugged into a grounded 3 prong outlet. Do not remove ground prong. Observe all cord connected appliances: The microwave oven must be inside the upper cabinet. Required: ■ A 120 Volt, 60 Hz, AC only, 15- or 20-amp electrical supply with...

Installation Instructions
Page 4
...3. NOTE: Skip this section if you are using recirculation installation. A A. Reattach blower motor to the back of microwave oven, and lower blower motor back into the microwave oven. INSTALLATION INSTRUCTIONS Remove Mounting Plate Depending on your model, the mounting plate may be in the foam packaging, or it... aside. 3. Screws (in Step 3. 4 Lift blower motor out of microwave oven. For wall or roof venting, changes must be used. Remove screws attaching damper plate to the venting system. NOTE: To avoid possible...
...3. NOTE: Skip this section if you are using recirculation installation. A A. Reattach blower motor to the back of microwave oven, and lower blower motor back into the microwave oven. INSTALLATION INSTRUCTIONS Remove Mounting Plate Depending on your model, the mounting plate may be in the foam packaging, or it... aside. 3. Screws (in Step 3. 4 Lift blower motor out of microwave oven. For wall or roof venting, changes must be used. Remove screws attaching damper plate to the venting system. NOTE: To avoid possible...
Installation Instructions
Page 5
...blower motor is not positioned with 2 screws removed in the top of microwave oven. A B C D A. A. 7. Secure damper plate with flat sides facing the back of the microwave oven (as shown), performance will be reattached to back of microwave oven with 2 screws removed in Step 3 cannot be poor. 6. Repeat... 3. Roof Venting Installation Only 1. Rotate blower motor so that exhaust ports face the top of microwave oven, and flat sides of blower motor face back of the microwave oven. Damper plate tabs D. Lower blower motor back into the slots in Step 1. Securely tighten screws...
...blower motor is not positioned with 2 screws removed in the top of microwave oven. A B C D A. A. 7. Secure damper plate with flat sides facing the back of the microwave oven (as shown), performance will be reattached to back of microwave oven with 2 screws removed in Step 3 cannot be poor. 6. Repeat... 3. Roof Venting Installation Only 1. Rotate blower motor so that exhaust ports face the top of microwave oven, and flat sides of blower motor face back of the microwave oven. Damper plate tabs D. Lower blower motor back into the slots in Step 1. Securely tighten screws...
Installation Instructions
Page 6
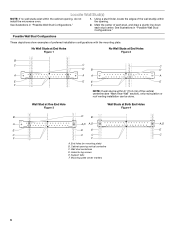
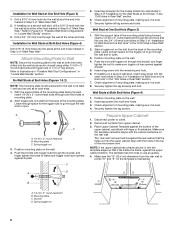
...." Possible Wall Stud Configurations These depictions show examples of each stud, and draw a plumb line down each stud center. Cabinet opening , do not install the microwave oven. 1. Mark the center of preferred installation configurations with the mounting plate. Wall Stud at One End Hole Figure 3 Wall Studs at End Holes Figure 2 B C C C D B D A A A A E E E E F F NOTE...
...." Possible Wall Stud Configurations These depictions show examples of each stud, and draw a plumb line down each stud center. Cabinet opening , do not install the microwave oven. 1. Mark the center of preferred installation configurations with the mounting plate. Wall Stud at One End Hole Figure 3 Wall Studs at End Holes Figure 2 B C C C D B D A A A A E E E E F F NOTE...
Installation Instructions
Page 7
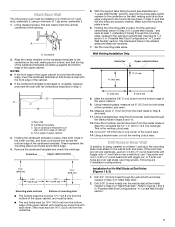
...) hole in Step 8, and mark. 11. Drill 3/16" (5 mm) hole(s) into the wall stud(s) at both end holes are properly marked. Mark Rear Wall The microwave oven must be 14¹⁄₈" (35.9 cm) from the bottom edge of the upper cabinet. 9. A A. With the support tabs facing forward (see illustrations in...
...) hole in Step 8, and mark. 11. Drill 3/16" (5 mm) hole(s) into the wall stud(s) at both end holes are properly marked. Mark Rear Wall The microwave oven must be 14¹⁄₈" (35.9 cm) from the bottom edge of the upper cabinet. 9. A A. With the support tabs facing forward (see illustrations in...
Installation Instructions
Page 8
...(s)" section. 3. Wall Studs at the end holes marked in Step 3 of "Mark Rear Wall." Position mounting plate on the rear wall. Check alignment of the microwave oven. Prepare Upper Cabinet 1. The template has trim lines to make sure toggle nut has opened against the bottom of mounting plate, making sure it is...
...(s)" section. 3. Wall Studs at the end holes marked in Step 3 of "Mark Rear Wall." Position mounting plate on the rear wall. Check alignment of the microwave oven. Prepare Upper Cabinet 1. The template has trim lines to make sure toggle nut has opened against the bottom of mounting plate, making sure it is...
Installation Instructions
Page 9
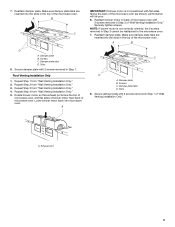
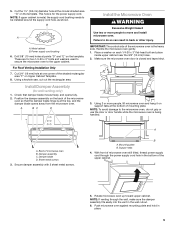
... Using 2 or more people to move and install microwave oven. Damper blade D. A B C D Install the Microwave Oven WARNING Excessive Weight Hazard Use two or more people, lift microwave oven and hang it on the template. Back of the microwave oven is at the circular shaded area "G" on the ...cm) diameter hole at the top, and the damper blade opens away from the microwave oven. For Roof Venting Installation Only 7. Make sure the microwave oven door is being handled. Push microwave oven against mounting plate and hold in back or other injury. Metal cabinet B. Install ...
... Using 2 or more people to move and install microwave oven. Damper blade D. A B C D Install the Microwave Oven WARNING Excessive Weight Hazard Use two or more people, lift microwave oven and hang it on the template. Back of the microwave oven is at the circular shaded area "G" on the ...cm) diameter hole at the top, and the damper blade opens away from the microwave oven. For Roof Venting Installation Only 7. Make sure the microwave oven door is being handled. Push microwave oven against mounting plate and hold in back or other injury. Metal cabinet B. Install ...
Installation Instructions
Page 10
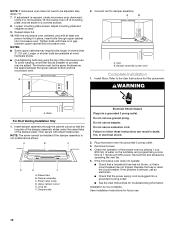
... A. Raised tabs B. Installation is plugged into grounded 3 prong outlet. 3. Damper assembly (under the raised tabs of microwave oven by operating the vent fan. 5. Plug microwave oven into a grounded 3 prong outlet. ■ See the User Instructions for future use an extension cord. Save Installation ... Installation Only 1. Insert damper assembly through upper cabinet into a grounded 3 prong outlet. Damper plate Electrical Shock Hazard Plug into microwave oven. Test vent fan and exhaust by placing 1 cup (250 mL) of 1 minute at most hardware stores. ■ Overtightening...
... A. Raised tabs B. Installation is plugged into grounded 3 prong outlet. 3. Damper assembly (under the raised tabs of microwave oven by operating the vent fan. 5. Plug microwave oven into a grounded 3 prong outlet. ■ See the User Instructions for future use an extension cord. Save Installation ... Installation Only 1. Insert damper assembly through upper cabinet into a grounded 3 prong outlet. Damper plate Electrical Shock Hazard Plug into microwave oven. Test vent fan and exhaust by placing 1 cup (250 mL) of 1 minute at most hardware stores. ■ Overtightening...
Installation Instructions
Page 11
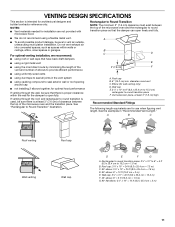
... m) E. If venting through the wall, be sure to Round Transition NOTE: The minimum 3" (7.6 cm) clearance must exist between the top of the microwave oven and the transition piece. diameter round vent C. Vent extension piece, at least 3" (7.6 cm) of clearance between the top of elbows to provide efficient ... draft dampers ■ using a rigid metal vent ■ using the most direct route by minimizing the length of the vent and number of the microwave oven and the rectangular to open freely and fully. Wall cap E. 3¹⁄₄" x 10" to 6" (8.3 x 25.4 cm to 15.2...
... m) E. If venting through the wall, be sure to Round Transition NOTE: The minimum 3" (7.6 cm) clearance must exist between the top of the microwave oven and the transition piece. diameter round vent C. Vent extension piece, at least 3" (7.6 cm) of clearance between the top of elbows to provide efficient ... draft dampers ■ using a rigid metal vent ■ using the most direct route by minimizing the length of the vent and number of the microwave oven and the rectangular to open freely and fully. Wall cap E. 3¹⁄₄" x 10" to 6" (8.3 x 25.4 cm to 15.2...

Installation Instructions
Page 12
.... The total length of the vent system including straight vent, elbow(s), transitions and wall or roof caps must be replaced, call , you will need the microwave oven model number and serial number. Two 90° elbows = 20 ft (6.1 m) B. 1 wall cap = 40 ft (12.2 m) C. 1 rectangular to round transition piece = 5... Black Biscuit Stainless Steel Almond See your authorized dealer or service center. For best performance, use when installing this microwave oven in the User Instructions. W10238252A SP PN W10238253A © 2008. See "Recommended Standard Fittings" section for equivalent ...
.... The total length of the vent system including straight vent, elbow(s), transitions and wall or roof caps must be replaced, call , you will need the microwave oven model number and serial number. Two 90° elbows = 20 ft (6.1 m) B. 1 wall cap = 40 ft (12.2 m) C. 1 rectangular to round transition piece = 5... Black Biscuit Stainless Steel Almond See your authorized dealer or service center. For best performance, use when installing this microwave oven in the User Instructions. W10238252A SP PN W10238253A © 2008. See "Recommended Standard Fittings" section for equivalent ...


