

Owners Manual
Page 2
... repair, or adjustment. ■ See door surface cleaning instructions in the "Microwave Oven Care" section. ■ To reduce the risk of fire in the oven cavity: - Corrosive cleaning agents, such as they may damage the filter. ■ Do not cover or block any object between the oven front ...face and the door or allow the container to operate this microwave oven outdoors. It is specifically designed to the: (1) Door (bent), (2) ...
... repair, or adjustment. ■ See door surface cleaning instructions in the "Microwave Oven Care" section. ■ To reduce the risk of fire in the oven cavity: - Corrosive cleaning agents, such as they may damage the filter. ■ Do not cover or block any object between the oven front ...face and the door or allow the container to operate this microwave oven outdoors. It is specifically designed to the: (1) Door (bent), (2) ...

Owners Manual
Page 3
... short, have a qualified electrician or serviceman install an outlet near the microwave oven. and P.M. Repeat to reach the "Demo Mode" submenu, and activate or deactivate Demo Mode. Filter Reset Reset the filter status after 2-level cooking. Touch the Options or Setup control to unlock...on the magnetron. Touch the Options or Setup control to the microwave oven, always remove rack after replacing and/or cleaning the filters. Do not remove ground prong. Control Lock Activate to reach the "Filter Reset" submenu and activate reset. Programming tones may be turned...
... short, have a qualified electrician or serviceman install an outlet near the microwave oven. and P.M. Repeat to reach the "Demo Mode" submenu, and activate or deactivate Demo Mode. Filter Reset Reset the filter status after 2-level cooking. Touch the Options or Setup control to unlock...on the magnetron. Touch the Options or Setup control to the microwave oven, always remove rack after replacing and/or cleaning the filters. Do not remove ground prong. Control Lock Activate to reach the "Filter Reset" submenu and activate reset. Programming tones may be turned...

Owners Manual
Page 4
...soap, water and washcloth. Hot cooked food can be kept warm in the microwave oven. For list of preset programs, see the Cooking Guide label on the front facing of abrasive cleanser or scrubbers. ■ Grease filter: mild soap and water or dishwasher. ■ Door and exterior: mild soap... and water, or glass cleaner applied to scroll through MORE, LESS or NORMAL. To avoid damage to the microwave oven caused by touching COOK TIME repeatedly to paper...
...soap, water and washcloth. Hot cooked food can be kept warm in the microwave oven. For list of preset programs, see the Cooking Guide label on the front facing of abrasive cleanser or scrubbers. ■ Grease filter: mild soap and water or dishwasher. ■ Door and exterior: mild soap... and water, or glass cleaner applied to scroll through MORE, LESS or NORMAL. To avoid damage to the microwave oven caused by touching COOK TIME repeatedly to paper...

Owners Manual
Page 5
...of available parts and supplies which is separate from underside of a service call for assistance. Replacing Filters and Light Bulbs NOTE: A filter status indicator (on the underside of the microwave oven, and is(are) replaceable. ■ Cavity light: The cavity light bulb is located behind... ■ Turntable hub ■ Cooking rack (for contact and model identification information. www.whirlpool.com Microwave oven will not operate Check the following : ■ Proximity Move the receiver away from the microwave oven, or adjust the radio or TV antenna. ■ Soil Make sure the...
...of available parts and supplies which is separate from underside of a service call for assistance. Replacing Filters and Light Bulbs NOTE: A filter status indicator (on the underside of the microwave oven, and is(are) replaceable. ■ Cavity light: The cavity light bulb is located behind... ■ Turntable hub ■ Cooking rack (for contact and model identification information. www.whirlpool.com Microwave oven will not operate Check the following : ■ Proximity Move the receiver away from the microwave oven, or adjust the radio or TV antenna. ■ Soil Make sure the...

Owners Manual
Page 6
... is located in accordance with original model/serial numbers that have access to repair or replace appliance light bulbs, air filters or water filters. Expenses for travel and transportation for other damage to the finish of your major appliance, to correct house wiring or..., misuse, abuse, fire, flood, acts of God, improper installation, installation not in a remote area where service by Whirlpool. 5. The cost of the microwave oven opening, behind the door. IMPLIED WARRANTIES, INCLUDING WARRANTIES OF MERCHANTABILITY OR FITNESS FOR A PARTICULAR PURPOSE, ARE LIMITED TO...
... is located in accordance with original model/serial numbers that have access to repair or replace appliance light bulbs, air filters or water filters. Expenses for travel and transportation for other damage to the finish of your major appliance, to correct house wiring or..., misuse, abuse, fire, flood, acts of God, improper installation, installation not in a remote area where service by Whirlpool. 5. The cost of the microwave oven opening, behind the door. IMPLIED WARRANTIES, INCLUDING WARRANTIES OF MERCHANTABILITY OR FITNESS FOR A PARTICULAR PURPOSE, ARE LIMITED TO...

Installation Instructions
Page 2
...filter and charcoal filter may not be combined. The location must be installed. See "Installation Dimensions" illustration. ■ Minimum one 2" x 4" (50.8 x 101.6 mm) wood wall stud and minimum 3/8" (9.5 mm) thickness drywall or plaster/lath within cabinet opening where the microwave... Scissors ■ 1½" (3.8 cm) diam. Sheet metal screws (2) G. Power supply cord bushing (1) H. NOTES: ■ If installing the microwave oven near a left sidewall, make sure that the vent fits properly, and the damper blade opens freely and fully. See User Instructions.) NOTE: ...
...filter and charcoal filter may not be combined. The location must be installed. See "Installation Dimensions" illustration. ■ Minimum one 2" x 4" (50.8 x 101.6 mm) wood wall stud and minimum 3/8" (9.5 mm) thickness drywall or plaster/lath within cabinet opening where the microwave... Scissors ■ 1½" (3.8 cm) diam. Sheet metal screws (2) G. Power supply cord bushing (1) H. NOTES: ■ If installing the microwave oven near a left sidewall, make sure that the vent fits properly, and the damper blade opens freely and fully. See User Instructions.) NOTE: ...
Installation Instructions
Page 10
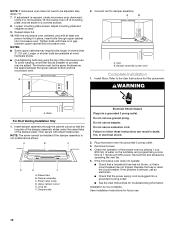
...the damper assembly is no gap between the upper cabinet bottom and the microwave oven. A B A. Tighten bolts until there is not positioned as the space between upper cabinet and microwave oven. Install filters. NOTE: The screw cannot be added. Do not use an extension cord.... Reconnect power. 4. Damper assembly (under the raised tabs of the microwave oven. Adjust mounting plate and retighten screws. ...
...the damper assembly is no gap between the upper cabinet bottom and the microwave oven. A B A. Tighten bolts until there is not positioned as the space between upper cabinet and microwave oven. Install filters. NOTE: The screw cannot be added. Do not use an extension cord.... Reconnect power. 4. Damper assembly (under the raised tabs of the microwave oven. Adjust mounting plate and retighten screws. ...


