

Owners Manual
Page 1
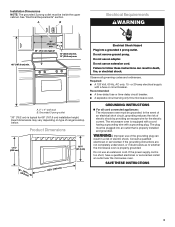
...obtener información adicional acerca de su producto, visite: www.whirlpool.com Tenga listo su número de modelo completo. This is , tell you how to excessive microwave energy: ■ Install or locate the microwave oven only in this section. ■ Some products such as...if you should experience a problem not covered in the provided Installation Instructions. IMPORTANT SAFETY INSTRUCTIONS When using electrical appliances basic safety precautions should not be heated in the microwave oven. ■ The microwave oven must be followed, including the following: WARNING: To ...
...obtener información adicional acerca de su producto, visite: www.whirlpool.com Tenga listo su número de modelo completo. This is , tell you how to excessive microwave energy: ■ Install or locate the microwave oven only in this section. ■ Some products such as...if you should experience a problem not covered in the provided Installation Instructions. IMPORTANT SAFETY INSTRUCTIONS When using electrical appliances basic safety precautions should not be heated in the microwave oven. ■ The microwave oven must be followed, including the following: WARNING: To ...

Owners Manual
Page 3
...run for only 30 minutes more (off (on some models) for the electric current. The microwave oven is a 12-hour (12:00-11:59) clock, with plates that is properly installed and grounded. Do not use an extension cord. Control Lock Activate to reach the "Demo Mode..., enter time, then touch the Timer control or the Start control. See "Microwave Oven Care" section. To avoid damage to whether the microwave oven is too short, have a qualified electrician or serviceman install an outlet near the microwave oven. Recommended: ■ A time-delay fuse or time-delay circuit breaker....
...run for only 30 minutes more (off (on some models) for the electric current. The microwave oven is a 12-hour (12:00-11:59) clock, with plates that is properly installed and grounded. Do not use an extension cord. Control Lock Activate to reach the "Demo Mode..., enter time, then touch the Timer control or the Start control. See "Microwave Oven Care" section. To avoid damage to whether the microwave oven is too short, have a qualified electrician or serviceman install an outlet near the microwave oven. Recommended: ■ A time-delay fuse or time-delay circuit breaker....

Owners Manual
Page 6
... or plumbing codes, or use of consumables or cleaning products not approved by Whirlpool. 5. The removal and reinstallation of original purchase date is not installed in accordance with published installation instructions. 11. The cost of purchase, when this User Instructions and model ... reserved. ® Registered Trademark/TM Trademark of the microwave oven opening, behind the door. Repairs to parts or systems resulting from unauthorized modifications made to view FAQs (Frequently Asked Questions), visit www.whirlpool.com. SOME STATES AND PROVINCES DO NOT ALLOW THE EXCLUSION...
... or plumbing codes, or use of consumables or cleaning products not approved by Whirlpool. 5. The removal and reinstallation of original purchase date is not installed in accordance with published installation instructions. 11. The cost of purchase, when this User Instructions and model ... reserved. ® Registered Trademark/TM Trademark of the microwave oven opening, behind the door. Repairs to parts or systems resulting from unauthorized modifications made to view FAQs (Frequently Asked Questions), visit www.whirlpool.com. SOME STATES AND PROVINCES DO NOT ALLOW THE EXCLUSION...

Installation Instructions
Page 1
...if you and others are not followed. Table of Contents MICROWAVE HOOD COMBINATION SAFETY 1 INSTALLATION REQUIREMENTS 2 Tools and Parts 2 Remove Cardboard Template 2 Location Requirements 2 Product Dimensions 3 Electrical Requirements 3 INSTALLATION INSTRUCTIONS 4 Remove Mounting Plate 4 Rotate Blower Motor 4 ... up to Wall 8 Prepare Upper Cabinet 8 Install Damper Assembly 9 Install the Microwave Oven 9 Complete Installation 10 VENTING DESIGN SPECIFICATIONS 11 ASSISTANCE 12 Replacement Parts 12 Accessories 12 MICROWAVE HOOD COMBINATION SAFETY Your safety and the safety ...
...if you and others are not followed. Table of Contents MICROWAVE HOOD COMBINATION SAFETY 1 INSTALLATION REQUIREMENTS 2 Tools and Parts 2 Remove Cardboard Template 2 Location Requirements 2 Product Dimensions 3 Electrical Requirements 3 INSTALLATION INSTRUCTIONS 4 Remove Mounting Plate 4 Rotate Blower Motor 4 ... up to Wall 8 Prepare Upper Cabinet 8 Install Damper Assembly 9 Install the Microwave Oven 9 Complete Installation 10 VENTING DESIGN SPECIFICATIONS 11 ASSISTANCE 12 Replacement Parts 12 Accessories 12 MICROWAVE HOOD COMBINATION SAFETY Your safety and the safety ...

Installation Instructions
Page 2
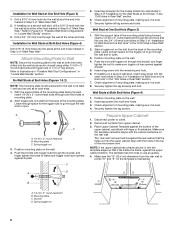
... in "Venting Design Specifications" section. 2 See User Instructions.) NOTE: Depending on model, charcoal filters may be installed. See "Rectangular to exist above the microwave oven so that the door can open fully. ■ Some cabinet and building materials are for 1/4" x 2"...16" socket wrench ■ Masking tape or thumbtacks (or box wrench) for wood studs. See "Electrical Requirements" section. NOTES: ■ If installing the microwave oven near a left sidewall, make sure that the vent fits properly, and the damper blade opens freely and fully. A B C D E FG...
... in "Venting Design Specifications" section. 2 See User Instructions.) NOTE: Depending on model, charcoal filters may be installed. See "Rectangular to exist above the microwave oven so that the door can open fully. ■ Some cabinet and building materials are for 1/4" x 2"...16" socket wrench ■ Masking tape or thumbtacks (or box wrench) for wood studs. See "Electrical Requirements" section. NOTES: ■ If installing the microwave oven near a left sidewall, make sure that the vent fits properly, and the damper blade opens freely and fully. A B C D E FG...
Installation Instructions
Page 3
... in death, fire, or electrical shock. A. 2" x 4" wall stud B. Grounded 3 prong outlet *30" (76.2 cm) is properly installed and grounded. Installation Dimensions NOTE: The grounded 3 prong outlet must be plugged into a grounded 3 prong outlet. Do not use of electric shock. See "Electrical... Requirements" section. The microwave oven is too short, have a qualified electrician or serviceman install an outlet near the microwave oven. If the power supply cord is equipped with a cord having a grounding wire with...
... in death, fire, or electrical shock. A. 2" x 4" wall stud B. Grounded 3 prong outlet *30" (76.2 cm) is properly installed and grounded. Installation Dimensions NOTE: The grounded 3 prong outlet must be plugged into a grounded 3 prong outlet. Do not use of electric shock. See "Electrical... Requirements" section. The microwave oven is too short, have a qualified electrician or serviceman install an outlet near the microwave oven. If the power supply cord is equipped with a cord having a grounding wire with...

Installation Instructions
Page 4
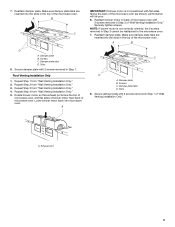
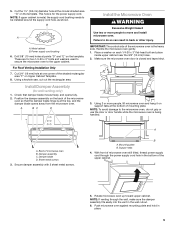
...Exhaust port 6. A A. Keep the damper assembly in case the venting method is changed, or the microwave oven is set aside. 3. Slide damper plate toward the front of microwave oven. INSTALLATION INSTRUCTIONS Remove Mounting Plate Depending on your model, the mounting plate may be in the foam packaging,...plate is being handled. NOTE: To avoid damage to back of the microwave oven. Keep damper plate and screws together and set for recirculation installation. A A. Blower motor 5. Reattach blower motor to the microwave oven, do not grip or use the door or door handle while ...
...Exhaust port 6. A A. Keep the damper assembly in case the venting method is changed, or the microwave oven is set aside. 3. Slide damper plate toward the front of microwave oven. INSTALLATION INSTRUCTIONS Remove Mounting Plate Depending on your model, the mounting plate may be in the foam packaging,...plate is being handled. NOTE: To avoid damage to back of the microwave oven. Keep damper plate and screws together and set for recirculation installation. A A. Blower motor 5. Reattach blower motor to the microwave oven, do not grip or use the door or door handle while ...
Installation Instructions
Page 5
... not positioned with flat sides facing the back of the microwave oven (as shown), performance will be reattached to back of microwave oven with 2 screws removed in the top of "Wall Venting Installation Only." Damper plate B. Screws C. Screws C. Repeat Step 3 from "Wall Venting Installation Only." 3. Securely tighten screws. Damper plate tabs D. Secure damper plate...
... not positioned with flat sides facing the back of the microwave oven (as shown), performance will be reattached to back of microwave oven with 2 screws removed in the top of "Wall Venting Installation Only." Damper plate B. Screws C. Screws C. Repeat Step 3 from "Wall Venting Installation Only." 3. Securely tighten screws. Damper plate tabs D. Secure damper plate...
Installation Instructions
Page 6
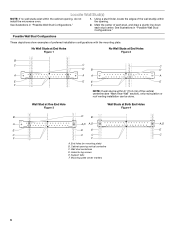
... Configurations." 2. Wall stud centerlines D. End holes (on mounting plate) B. Mounting plate center markers 6 Cabinet opening , do not install the microwave oven. 1. Support tabs F. Locate Wall Stud(s) NOTE: If no wall studs exist within the opening. Holes for lag screws ...centerline (see "Mark Rear Wall" section), only recirculation or roof venting installation can be done. See illustrations in "Possible Wall Stud Configurations." Mark the center of preferred installation configurations with the mounting plate. Possible Wall Stud Configurations These depictions show ...
... Configurations." 2. Wall stud centerlines D. End holes (on mounting plate) B. Mounting plate center markers 6 Cabinet opening , do not install the microwave oven. 1. Support tabs F. Locate Wall Stud(s) NOTE: If no wall studs exist within the opening. Holes for lag screws ...centerline (see "Mark Rear Wall" section), only recirculation or roof venting installation can be done. See illustrations in "Possible Wall Stud Configurations." Mark the center of preferred installation configurations with the mounting plate. Possible Wall Stud Configurations These depictions show ...
Installation Instructions
Page 7
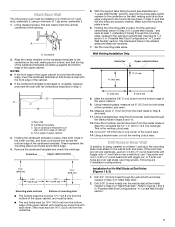
...wall studs, use 1 lag screw and one corner of 1 lag screw, preferably 2. 1. Following are ideal hole locations. 7. Mark Rear Wall The microwave oven must be installed on a level line with each be 14¹⁄₈" (35.9 cm) from the marks made in "Locate Wall Stud(s)" section. 7 ... 3/4" (19 mm) holes through the wall at End Holes (Figures 1 & 2) 1. Holding the mounting plate in Rear Wall In addition to being installed on at least 1 wall stud, the mounting plate must align with toggle nuts; The blackened holes in the lower corners, and draw a horizontal line ...
...wall studs, use 1 lag screw and one corner of 1 lag screw, preferably 2. 1. Following are ideal hole locations. 7. Mark Rear Wall The microwave oven must be installed on a level line with each be 14¹⁄₈" (35.9 cm) from the marks made in "Locate Wall Stud(s)" section. 7 ... 3/4" (19 mm) holes through the wall at End Holes (Figures 1 & 2) 1. Holding the mounting plate in Rear Wall In addition to being installed on at least 1 wall stud, the mounting plate must align with toggle nuts; The blackened holes in the lower corners, and draw a horizontal line ...
Installation Instructions
Page 8
... marked in Step 6 of mounting plate, making sure it is maintained. Mounting plate C. Position mounting plate on the wall. 4. Check alignment of the microwave oven. Remove all lag screws and bolts. The template has trim lines to points "D" and "E" on a second wall stud, insert a lag screw ...With the support tabs of the mounting plate facing forward, insert 1/4-20 x 3" round-head bolts through the wall at both end holes of "Installation for the toggle nut to go through the wall and to make sure toggle nut has opened against drywall. 5. Securely tighten the lag screws....
... marked in Step 6 of mounting plate, making sure it is maintained. Mounting plate C. Position mounting plate on the wall. 4. Check alignment of the microwave oven. Remove all lag screws and bolts. The template has trim lines to points "D" and "E" on a second wall stud, insert a lag screw ...With the support tabs of the mounting plate facing forward, insert 1/4-20 x 3" round-head bolts through the wall at both end holes of "Installation for the toggle nut to go through the wall and to make sure toggle nut has opened against drywall. 5. Securely tighten the lag screws....
Installation Instructions
Page 9
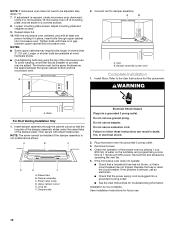
... supply cord bushing 6. These are for wall venting only) 1. For Roof Venting Installation Only 7. Install Damper Assembly (for two 1/4-20 x 3" bolts and washers used to secure the microwave oven to be installed around the supply cord hole, as shown. Place a washer on the back of...6. A. Secure damper assembly with 2 sheet metal screws. Mounting plate B. Rotate microwave oven up toward upper cabinet. A B C D Install the Microwave Oven WARNING Excessive Weight Hazard Use two or more people, lift microwave oven and hang it on support tabs at the circular shaded area "G" on...
... supply cord bushing 6. These are for wall venting only) 1. For Roof Venting Installation Only 7. Install Damper Assembly (for two 1/4-20 x 3" bolts and washers used to secure the microwave oven to be installed around the supply cord hole, as shown. Place a washer on the back of...6. A. Secure damper assembly with 2 sheet metal screws. Mounting plate B. Rotate microwave oven up toward upper cabinet. A B C D Install the Microwave Oven WARNING Excessive Weight Hazard Use two or more people, lift microwave oven and hang it on support tabs at the circular shaded area "G" on...
Installation Instructions
Page 10
...into grounded 3 prong outlet. 3. Do not use an extension cord. Plug microwave oven into a grounded 3 prong outlet. Installation is required, rotate microwave oven downward. Using 2 or more people, lift microwave oven off of the damper plate. Connect vent to follow these instructions can ...cabinet cutout so that the long tab of the damper assembly slides under vent) Complete Installation 1. A B A. Refer to provide) may be installed if the damper assembly is plugged into microwave oven. Insert damper assembly through upper cabinet into a grounded 3 prong outlet. ■...
...into grounded 3 prong outlet. 3. Do not use an extension cord. Plug microwave oven into a grounded 3 prong outlet. Installation is required, rotate microwave oven downward. Using 2 or more people, lift microwave oven off of the damper plate. Connect vent to follow these instructions can ...cabinet cutout so that the long tab of the damper assembly slides under vent) Complete Installation 1. A B A. Refer to provide) may be installed if the damper assembly is plugged into microwave oven. Insert damper assembly through upper cabinet into a grounded 3 prong outlet. ■...
Installation Instructions
Page 11
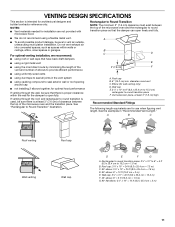
See the examples in the vent system ■ using caulking compound to seal exterior wall or roof opening around cap ■ not installing 2 elbows together, for optimal hood performance If venting through the roof, and rectangular to round transition piece F. Roof cap: 3¹⁄₄...round transition is used, be sure there is at least 3" (7.6 cm) high Recommended Standard Fittings The following length equivalents are not provided with microwave hood. ■ We do not recommend using a flexible metal vent. ■ To avoid possible product damage, be sure that have back...
See the examples in the vent system ■ using caulking compound to seal exterior wall or roof opening around cap ■ not installing 2 elbows together, for optimal hood performance If venting through the roof, and rectangular to round transition piece F. Roof cap: 3¹⁄₄...round transition is used, be sure there is at least 3" (7.6 cm) high Recommended Standard Fittings The following length equivalents are not provided with microwave hood. ■ We do not recommend using a flexible metal vent. ■ To avoid possible product damage, be sure that have back...

Installation Instructions
Page 12
... in the User Instructions. Each panel is a list of the installation hardware needs to be installed to round transition piece must not exceed the equivalent of 140 ft (42.7 m) for either type of the microwave oven opening . To calculate the length of the system you need...of vent. Following is 3" (7.6 cm) wide. See "Recommended Standard Fittings" section for details. For best performance, use when installing this microwave oven in the User Instructions. Replacement Parts If any of available replacement parts. ASSISTANCE Call your model number located on the front ...
... in the User Instructions. Each panel is a list of the installation hardware needs to be installed to round transition piece must not exceed the equivalent of 140 ft (42.7 m) for either type of the microwave oven opening . To calculate the length of the system you need...of vent. Following is 3" (7.6 cm) wide. See "Recommended Standard Fittings" section for details. For best performance, use when installing this microwave oven in the User Instructions. Replacement Parts If any of available replacement parts. ASSISTANCE Call your model number located on the front ...


