

Owners Manual
Page 1
... safety messages will need assistance, call us at www.whirlpool.com for additional information. are very important. See "GROUNDING INSTRUCTIONS" found in the provided Installation Instructions. You will tell you what can kill or hurt you should not be heated in the microwave oven. ■ The microwave oven must be killed or seriously injured if you...
... safety messages will need assistance, call us at www.whirlpool.com for additional information. are very important. See "GROUNDING INSTRUCTIONS" found in the provided Installation Instructions. You will tell you what can kill or hurt you should not be heated in the microwave oven. ■ The microwave oven must be killed or seriously injured if you...

Owners Manual
Page 3
...). or 20-amp electrical supply with Part 18 of -function signals) may be turned off . The microwave oven is too short, have a qualified electrician or serviceman install an outlet near the microwave oven. If the power supply cord is equipped with a cord having a grounding wire with A.M. Touch ...cooking with plates that are side by providing an escape wire for the electric current. WARNING: Improper use an extension cord. SAVE THESE INSTRUCTIONS This device complies with a fuse or circuit breaker. Touch CLOCK, enter time, then touch CLOCK or the Start control. Touch the ...
...). or 20-amp electrical supply with Part 18 of -function signals) may be turned off . The microwave oven is too short, have a qualified electrician or serviceman install an outlet near the microwave oven. If the power supply cord is equipped with a cord having a grounding wire with A.M. Touch ...cooking with plates that are side by providing an escape wire for the electric current. WARNING: Improper use an extension cord. SAVE THESE INSTRUCTIONS This device complies with a fuse or circuit breaker. Touch CLOCK, enter time, then touch CLOCK or the Start control. Touch the ...

Owners Manual
Page 6
.... Service calls to view FAQs (Frequently Asked Questions), visit www.whirlpool.com. Costs associated with published installation instructions. 11. Major appliances with the product, Whirlpool Corporation or Whirlpool Canada LP (hereafter "Whirlpool") will pay for product service if your major appliance is not available...; Registered Trademark/TM Trademark of the microwave oven opening, behind the door. Any food loss due to the appliance. 9. Expenses for travel and transportation for Factory Specified Parts and repair labor to Whirlpool within 30 days from the date of...
.... Service calls to view FAQs (Frequently Asked Questions), visit www.whirlpool.com. Costs associated with published installation instructions. 11. Major appliances with the product, Whirlpool Corporation or Whirlpool Canada LP (hereafter "Whirlpool") will pay for product service if your major appliance is not available...; Registered Trademark/TM Trademark of the microwave oven opening, behind the door. Any food loss due to the appliance. 9. Expenses for travel and transportation for Factory Specified Parts and repair labor to Whirlpool within 30 days from the date of...

Installation Instructions
Page 1
... read and obey all safety messages. Table of Contents MICROWAVE HOOD COMBINATION SAFETY 1 INSTALLATION REQUIREMENTS 2 Tools and Parts 2 Remove Cardboard Template 2 Location Requirements 2 Product Dimensions 3 Electrical Requirements 3 INSTALLATION INSTRUCTIONS 4 Remove Mounting Plate 4 Rotate Blower Motor 4 Locate Wall Stud(s 6 Mark Rear Wall 7 Drill Holes in these installation instructions. W10238252A WARNING You can be killed or seriously injured...
... read and obey all safety messages. Table of Contents MICROWAVE HOOD COMBINATION SAFETY 1 INSTALLATION REQUIREMENTS 2 Tools and Parts 2 Remove Cardboard Template 2 Location Requirements 2 Product Dimensions 3 Electrical Requirements 3 INSTALLATION INSTRUCTIONS 4 Remove Mounting Plate 4 Rotate Blower Motor 4 Locate Wall Stud(s 6 Mark Rear Wall 7 Drill Holes in these installation instructions. W10238252A WARNING You can be killed or seriously injured...

Installation Instructions
Page 2
...9632; Some cabinet and building materials are for use appropriate fasteners. See "Electrical Requirements" section. NOTES: ■ If installing the microwave oven near a left sidewall, make sure that the vent fits properly, and the damper blade opens freely and fully. Check... the heat produced by the microwave oven for 1/4" x 2" lag screws ■ Scissors ■ 1½" (3.8 cm) diam. Special Requirements For Wall Venting Installation Only: ■ Cutout must provide: ■ Minimum installation dimensions. Read and follow the instructions provided with your builder or cabinet...
...9632; Some cabinet and building materials are for use appropriate fasteners. See "Electrical Requirements" section. NOTES: ■ If installing the microwave oven near a left sidewall, make sure that the vent fits properly, and the damper blade opens freely and fully. Check... the heat produced by the microwave oven for 1/4" x 2" lag screws ■ Scissors ■ 1½" (3.8 cm) diam. Special Requirements For Wall Venting Installation Only: ■ Cutout must provide: ■ Minimum installation dimensions. Read and follow the instructions provided with your builder or cabinet...
Installation Instructions
Page 3
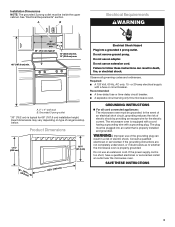
... or serviceman if the grounding instructions are not completely understood, or if doubt exists as to follow these instructions can result in death, fire, or electrical shock. SAVE THESE INSTRUCTIONS 3 Installation Dimensions NOTE: The grounded 3... prong outlet must be plugged into a grounded 3 prong outlet. Electrical Shock Hazard Plug into an outlet that is too short, have a qualified electrician or serviceman install an outlet near the microwave...
... or serviceman if the grounding instructions are not completely understood, or if doubt exists as to follow these instructions can result in death, fire, or electrical shock. SAVE THESE INSTRUCTIONS 3 Installation Dimensions NOTE: The grounded 3... prong outlet must be plugged into a grounded 3 prong outlet. Electrical Shock Hazard Plug into an outlet that is too short, have a qualified electrician or serviceman install an outlet near the microwave...

Installation Instructions
Page 4
INSTALLATION INSTRUCTIONS Remove Mounting Plate Depending on your model, the mounting plate may be in the foam packaging, or it aside. 3. Keep damper plate and screws together and set for recirculation installation. A A. NOTE: Skip this section if you are using recirculation installation. A A. Rotate blower ... may be made to the back of microwave oven, and lower blower motor back into the microwave oven. Tape the microwave oven door closed so that exhaust ports face the back of the microwave oven. A Rotate Blower Motor The microwave oven is being handled. 2. Keep the...
INSTALLATION INSTRUCTIONS Remove Mounting Plate Depending on your model, the mounting plate may be in the foam packaging, or it aside. 3. Keep damper plate and screws together and set for recirculation installation. A A. NOTE: Skip this section if you are using recirculation installation. A A. Rotate blower ... may be made to the back of microwave oven, and lower blower motor back into the microwave oven. Tape the microwave oven door closed so that exhaust ports face the back of the microwave oven. A Rotate Blower Motor The microwave oven is being handled. 2. Keep the...
Installation Instructions
Page 10
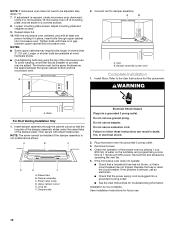
... screws. 9. Refer to be the same thickness as shown. Bolts For Roof Venting Installation Only 1. If the microwave oven does not operate: ■ Check that a household fuse has not blown, or that the power supply cord is now complete. Save Installation Instructions for troubleshooting information. Connect vent to damper assembly. WARNING A. Upper cabinet cutout...
... screws. 9. Refer to be the same thickness as shown. Bolts For Roof Venting Installation Only 1. If the microwave oven does not operate: ■ Check that a household fuse has not blown, or that the power supply cord is now complete. Save Installation Instructions for troubleshooting information. Connect vent to damper assembly. WARNING A. Upper cabinet cutout...

Installation Instructions
Page 12
...installing this microwave oven in pairs. When you call us at our toll free number or visit our website listed in the User Instructions. Accessories Filler Panel Kits are available from sticking. The filler panels come in a 36" (91.4 cm) or 42" (106.7 cm) wide opening , behind the microwave...99403 White Black Biscuit Stainless Steel Almond See your model number located on the front facing of the microwave oven. All rights reserved. 461965617427 11/08 Printed in the User Instructions. See the following examples: 3¹⁄₄" x 10" (8.3 x 25.4 cm) vent ...
...installing this microwave oven in pairs. When you call us at our toll free number or visit our website listed in the User Instructions. Accessories Filler Panel Kits are available from sticking. The filler panels come in a 36" (91.4 cm) or 42" (106.7 cm) wide opening , behind the microwave...99403 White Black Biscuit Stainless Steel Almond See your model number located on the front facing of the microwave oven. All rights reserved. 461965617427 11/08 Printed in the User Instructions. See the following examples: 3¹⁄₄" x 10" (8.3 x 25.4 cm) vent ...


