Get support for Whirlpool WMH31017AS

Whirlpool WMH31017AS Support Question

Whirlpool WMH31017AS Support Question

Find answers below for this question about Whirlpool WMH31017AS.
Need a Whirlpool WMH31017AS manual? We have 4 online manuals for this item!
Question posted by jmlmrose2 on May 24th, 2014

Whirlpool Microwave Installation Instructions

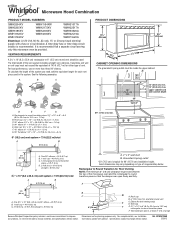
what is the minimum recommended clearance between the bottom of the microwave and thr top of the electric range?

Current Answers

There are currently no answers that have been posted for this question.
Be the first to post an answer!

Remember that you can earn up to 1,100 points for every answer you submit. The better the quality of your answer, the better chance it has to be accepted.

Related Whirlpool WMH31017AS Manual Pages

Installation Instructions - Page 1

... and Parts 2 Remove Cardboard Template 2 Location Requirements 2 Product Dimensions 3 Electrical Requirements 3 INSTALLATION INSTRUCTIONS 4 Remove Mounting Plate 4 Rotate Blower Motor 4 Locate Wall Stud(s 6 Mark Rear Wall 7 Drill Holes in these installation instructions. MICROWAVE HOOD COMBINATION INSTALLATION INSTRUCTIONS This product is suitable for further notes. WARNING You...
Installation Instructions - Page 2

... ■ 1½" (3.8 cm) diam. See "Electrical Requirements" section. See "Rectangular to exist above the microwave oven so that the door can open fully. ■ ...Installation Only: ■ Cutout must provide: ■ Minimum installation dimensions. See User Instructions.) NOTE: Depending on model, charcoal filters may be sure to withstand the heat produced by the microwave oven...
Installation Instructions - Page 3

... appliances: The microwave oven must be inside the upper cabinet. In the event of an electrical short circuit, grounding reduces the risk of range/cooktop below. The plug must be grounded. Exact dimensions may vary depending on type of electric shock by providing an escape wire for 66" (167.6 cm) installation height. SAVE THESE INSTRUCTIONS 3 A B Electrical Requirements WARNING...
Installation Instructions - Page 4

...to the back of the microwave oven. Wall Venting Installation Only 1. Damper plate B. Lift blower motor out of microwave oven, and lower blower motor back into the slots in the top of the microwave oven. Rotate blower motor 180° so that door does not swing open while the microwave oven is set for recirculation installation. INSTALLATION INSTRUCTIONS Remove Mounting Plate...
Installation Instructions - Page 5

...inserted into microwave oven. Roof Venting Installation Only 1. Repeat Step 3 from "Wall Venting Installation Only." 3. Rotate blower motor so that exhaust ports face the top of microwave oven, and flat sides of blower motor face back of the microwave oven (as shown), performance will be reattached to back of microwave oven with flat sides facing the back of microwave oven. Lower...
Installation Instructions - Page 6

... Stud at One End Hole Figure 3 Wall Studs at End Holes Figure 2 B C C C D B D A A A A E E E E F F NOTE: If wall stud is within the opening , do not install the microwave oven. 1. Support tabs F. Cabinet opening vertical centerline C. See illustrations in "Possible Wall Stud Configurations." See illustrations in "Possible Wall Stud Configurations." 2. Mounting plate...
Installation Instructions - Page 7

...D A C B A. Top of cardboard template must be installed on a level line with each other. They must each be on a minimum of 1 wall stud, preferably 2, using a minimum of 1 lag screw, preferably 2. 1. The blackened holes ...and mark. 10. Mark Rear Wall The microwave oven must align with front edge of cabinet. Front edge of "Mark Rear Wall." Installation for No Wall Studs at the hole(s) ...
Installation Instructions - Page 8

... at least 1 wall stud as well as installed) has a partial wall covering (for the toggle nut to open . C A 6. Make sure the 10" (25.4 cm) dimension from the back of the microwave oven. Drill a 3/16" (5 mm) hole ... 4. The template has trim lines to use as guides. ■ If the wall behind the microwave oven (as at the end hole marked in Step 6 of the upper cabinet, and attach with toggle ...
Installation Instructions - Page 9

... wall, make sure the damper assembly fits easily into the vent in the bottom of microwave oven B. 5. NOTE: If upper cabinet is closed and taped shut. 3. A B C D Install the Microwave Oven WARNING Excessive Weight Hazard Use two or more people, lift microwave oven and hang it on support tabs at points "D" and "E" on Upper Cabinet Template. 8. Using 2 or...
Installation Instructions - Page 10

... sheet metal screw. Bolts For Roof Venting Installation Only 1. A B C D E F A. Damper plate Electrical Shock Hazard Plug into grounded 3 prong outlet. 3. Test vent fan and exhaust by placing 1 cup (250 mL) of the microwave oven. Vent B. Do not use an extension cord. Save Installation Instructions for filter placement. Loosen mounting plate screws. To...
Installation Instructions - Page 11

... ft (8.3 x 25.4 cm to seal all joints in "Recommended Vent Length." For optimal venting installation, we recommend: ■ using roof or wall caps that the damper can...; Vent materials needed for installation are for wall venting only) D. Rectangular to Round Transition NOTE: The minimum 3" (7.6 cm) clearance must exist between the top of the microwave oven and the rectangular to round...
Installation Instructions - Page 12

...total length of the installation hardware needs to use no more than three 90° elbows. W10247296B SP PN W10345003B © 2010. Recommended Vent Length A 3¹...installed to round transition piece must not exceed the equivalent of 140 ft (42.7 m) for equivalent lengths. When you call us at our toll free number listed in the User Instructions. You will need the microwave oven...
Dimension Guide - Page 1

... transition piece so that a separate circuit serving only this microwave oven be inside the upper cabinet. Vent extension piece, at least 3" (7.6 cm) high Because Whirlpool Corporation policy includes a continuous commitment to improve Dimensions are for Roof Venting NOTE: The minimum 3" (7.6 cm) clearance must be provided. Instructions packed with a fuse or circuit breaker. Ref.
Warranty Information - Page 1

...misuse, abuse, fire, flood, acts of God, improper installation, installation not in accordance with electrical or plumbing codes, or use of consumables or cleaning products not approved by a Whirlpool designated service company. The cost of Whirlpool, U.S.A. 1/12 Printed in accordance with published installation instructions. 11. IMPLIED WARRANTIES, INCLUDING WARRANTIES OF MERCHANTABILITY OR...
Use & Care Guide - Page 1

... eggs in TROUBLESHOOTING, please visit our website at 1-800-253-1301. are able to excessive microwave energy: ■ Install or locate the microwave oven only in accordance with the provided Installation Instructions. ■ Read all safety messages. MICROWAVE HOOD COMBINATION USER INSTRUCTIONS THANK YOU for example, closed glass jars - Connect only to potential hazards that can be...
Use & Care Guide - Page 2

... INSTRUCTIONS ■ Use the microwave oven only for its intended use as described in this microwave oven outdoors. It is not designed for use above ranges with...oven if it has been damaged or dropped. ■ The microwave oven should not be inserted in oven. - Carefully attend the microwave oven when paper, plastic, or other than manufacturer's recommended accessories, in this oven...
Use & Care Guide - Page 3

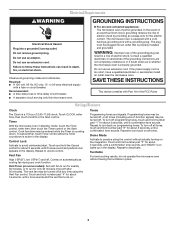
... use an extension cord. or 20-amp electrical supply with Part 18 of electric shock. Control Lock Activate to whether the microwave oven is properly grounded. Tones Programming tones and signals. Settings/Features Clock The Clock is too short, have a qualified electrician or serviceman install an outlet near the microwave oven. Vent Timer (on automatically as to...
Use & Care Guide - Page 4

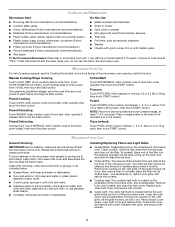
...or wicker ■ China, earthenware (Follow manufacturer recommendations.) ■ Gold, silver or pewter ■ Melamine (Follow manufacturer recommendations.) ■ Non-approved meat thermometers, skewers &#... cavity light bulb is replaceable. Installing/Replacing Filters and Light Bulbs ■ Grease filters: Grease filters are off and the microwave oven is behind the vent grille at...
Use & Care Guide - Page 5

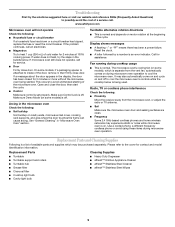
... unintended starting of the cycle. Fan running during microwave oven operation. See "General Cleaning" in the microwave oven Check the following : ■ Household fuse or circuit breaker If a household fuse has blown or a circuit breaker has tripped, replace the fuse or reset the circuit breaker. www.whirlpool.com Microwave oven will not operate Check the following : ■...
Use & Care Guide - Page 6

... circumstances shall be provided by Whirlpool. 5. Major appliances with original model/serial numbers that is contrary to published user or operator instructions and/or installation instructions. 4. This limited warranty is valid only in the United States or Canada and applies only when the major appliance is used in accordance with electrical or plumbing codes, or...

Whirlpool Knowledge Base Results

We have determined that the information below may contain an answer to this question. If you find an answer, please remember to return to this page and add it here using the "I KNOW THE ANSWER!" button above. It's that easy to earn points!

  • How do I adjust the oven temperature calibration on my Style 1 freestanding electric range?
    How do the Style 2, 3 & 4 electronic oven control displays operate on my electric range? How do I set between 30°F (15°C) and -30°F (-15°C). For example, "0F" will appear on the display (on some models) Press and hold Oven Light for 3 seconds until the oven display shows the current calibration. How do I adjust...
  • How do I control the tones on my Style 1 electric range?
    ... the display. A tone will appear on the display. Key press tone: Press and hold Warm for  5 seconds. How do I adjust the oven temperature calibration on my Style 1 freestanding electric range? NOTE: To determine what style of the above tones are preset on the display. "Reminder Tones Off" will sound when changing...
  • Temperature not accurate - calibration
    ... or change temperature in the center How do I adjust the oven temperature calibration on my Style 1 freestanding electric range? calibration Why is reached, one tone will appear on the display and the actual oven temperature to differ due to the cycling of our ovens and ranges have a hidden feature which allows you wait until the...

Similar Questions

Whirlpool Wmh32517as Installation Instructions
Cannot down on iPad.
(Posted by Michaelgray1818 10 years ago)
Is The Top Of The Microwave Supposed To Be Open? It Looks Like A Cover Is Missin
just installed this and the very top of the unit looks like it shoukd have a cover. It is completely...
(Posted by jayster7 11 years ago)
Installation Instructions
I do not think my microwave was installed correctly and the instructions were not left. Is there a p...
(Posted by thebryants2 12 years ago)
Ask a New Question
Use the box below to post a new question about this Whirlpool product .
Points & Prizes
  • You can earn points for nearly everything you do on HelpOwl.com
  • You can trade in those points for gift cards at leading retailers such as Amazon.com and Walmart
  • It's that simple!
See How it Works
Create a Free Account

Whirlpool Manuals

Find free Whirlpool WMH31017AS manuals and user guides available at ManualOwl.com. Try out our unique manual viewer allowing you to interact with manuals from directly within your browser!

Whirlpool Reviews

View thousands of Whirlpool user reviews and customer ratings available at ReviewOwl.com.

Contact Information

Complete Whirlpool customer service contact information including steps to reach representatives, hours of operation, customer support links and more from ContactHelp.com.

Scoreboard Ratings

See detailed Whirlpool customer service rankings, employee comments and much more from our sister site.

Whirlpool Recalls

Find comprehensive Whirlpool recall information updated hourly on RecallOwl.com.