Use & Care Guide
Page 6
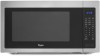
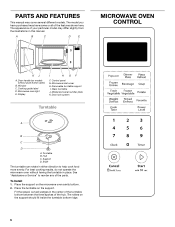
...fit inside the turntable bottom ridge. 6 Turntable B. Hub C. See "Assistance or Service" to help cook food more evenly. To Install: 1. Place the support on the support. PARTS AND FEATURES This manual may differ slightly from the illustrations in either direction to ...of your particular model may cover several different models. Microwave oven light E. Place the turntable on the microwave oven cavity bottom. 2. Cooking guide label D. Fit the raised, curved wedges in place. Window C. Glass turntable J. Support D. Display I . For best cooking results, ...
...fit inside the turntable bottom ridge. 6 Turntable B. Hub C. See "Assistance or Service" to help cook food more evenly. To Install: 1. Place the support on the support. PARTS AND FEATURES This manual may differ slightly from the illustrations in either direction to ...of your particular model may cover several different models. Microwave oven light E. Place the turntable on the microwave oven cavity bottom. 2. Cooking guide label D. Fit the raised, curved wedges in place. Window C. Glass turntable J. Support D. Display I . For best cooking results, ...
Use & Care Guide
Page 16
...damage to the finish of purchase. 7. Repairs to parts or systems resulting from state to state or province to Whirlpool within the first year of purchase or installation date for any such damage. 5. This warranty gives you specific legal rights, and you ever need it is void..., serial number and shipping address. 3. In Canada call 1-800-253-1301. If you also may not apply to correct the installation of the Use & Care Guide. ITEMS EXCLUDED FROM WARRANTY 1. In-home service. Your microwave must provide proof of ownership: 1. This warranty is used in -warranty...
...damage to the finish of purchase. 7. Repairs to parts or systems resulting from state to state or province to Whirlpool within the first year of purchase or installation date for any such damage. 5. This warranty gives you specific legal rights, and you ever need it is void..., serial number and shipping address. 3. In Canada call 1-800-253-1301. If you also may not apply to correct the installation of the Use & Care Guide. ITEMS EXCLUDED FROM WARRANTY 1. In-home service. Your microwave must provide proof of ownership: 1. This warranty is used in -warranty...

Warranty Information
Page 2
... slip together for other damage to you reside in accordance with original model/serial numbers that vary from the date of the Use & Care Guide. Consumable parts are responsible for any such damage. 5. Any food loss due to repair or replace light bulbs. Give the consultant your name... free of purchase (register receipt, charge slip, etc.). If you how to use or when it is reported to Whirlpool within the first year of your microwave, to correct the installation of ownership: 1. In Canada call 1-800-253-1301. Service calls to instruct you need it. In-home service....
... slip together for other damage to you reside in accordance with original model/serial numbers that vary from the date of the Use & Care Guide. Consumable parts are responsible for any such damage. 5. Any food loss due to repair or replace light bulbs. Give the consultant your name... free of purchase (register receipt, charge slip, etc.). If you how to use or when it is reported to Whirlpool within the first year of your microwave, to correct the installation of ownership: 1. In Canada call 1-800-253-1301. Service calls to instruct you need it. In-home service....
Installation Guide
Page 4
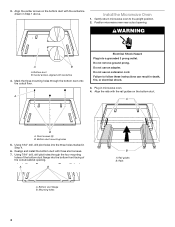
... can result in Step 4. 6. Do not use an extension cord. Align the rails with three short screws. 7. Realign and install the bottom duct with the rail guides on the bottom duct with centerline 4. Install the Microwave Oven 1. A Electrical Shock Hazard Plug into the three holes marked in death, fire, or electrical shock. 3. Do...
... can result in Step 4. 6. Do not use an extension cord. Align the rails with three short screws. 7. Realign and install the bottom duct with the rail guides on the bottom duct with centerline 4. Install the Microwave Oven 1. A Electrical Shock Hazard Plug into the three holes marked in death, fire, or electrical shock. 3. Do...
Installation Guide
Page 5
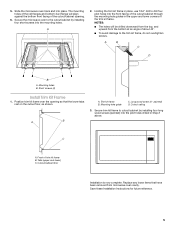
... holes drilled in Step 2 above. A B C D B A. Secure trim kit frame to the cutout/cabinet by installing four long wood screws (painted) into the mounting holes. Tabs (upper and lower) C. Mounting hole guide C. Replace any loose items that the lower tabs rest on the cutout floor, as shown. Slide the microwave... oven back and into the front facing of the cutout/cabinet through the mounting hole guides in place, use 7/64" drill to the trim kit frame, do not overtighten screws. Holding the trim kit frame in the upper and...
... holes drilled in Step 2 above. A B C D B A. Secure trim kit frame to the cutout/cabinet by installing four long wood screws (painted) into the mounting holes. Tabs (upper and lower) C. Mounting hole guide C. Replace any loose items that the lower tabs rest on the cutout floor, as shown. Slide the microwave... oven back and into the front facing of the cutout/cabinet through the mounting hole guides in place, use 7/64" drill to the trim kit frame, do not overtighten screws. Holding the trim kit frame in the upper and...


