Whirlpool WMH32519H Support and Manuals
Get Help and Manuals for this Whirlpool item
View All Support Options Below
Free Whirlpool WMH32519H manuals!
Problems with Whirlpool WMH32519H?
Ask a Question
Free Whirlpool WMH32519H manuals!
Problems with Whirlpool WMH32519H?
Ask a Question
Popular Whirlpool WMH32519H Manual Pages
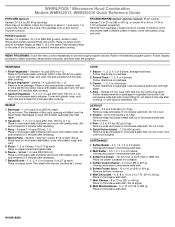
Quick Reference Manual - Page 1
... 454 g): Remove lid from package.
Do not cover.
3 Fish - 0.2 to 4.4 lbs (90 g to 1 pop every 1 or 2 seconds, then stop the cycle. WHIRLPOOL® Microwave Hood Combination Models WMH32517, WMH32519 Quick Reference Guide
POPCORN (sensor)
Senses 3.0-3.5 oz (85-99 g) size bag: Place bag on low during Popcorn function. Fan operates only on turntable. POTATO...
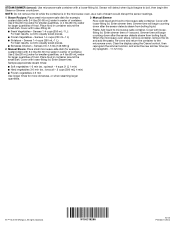
Quick Reference Manual - Page 2
... mL) water for more doneness, or when steaming larger quantities.
® /™ © 2013 Whirlpool. Senses 1-4 cups (250 mL-1 L): For best results, cut into equally sized pieces.
■ Frozen...into equally sized pieces.
■ Boneless Chicken - Senses 0.5-1.5 lbs (142-680 g)
2 Manual Steam: Place small microwave-safe dish (for larger quantities of container. Place food in center...
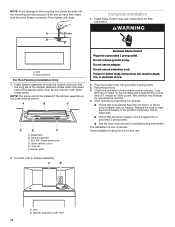
Installation Instructions - Page 2

...model, aluminum grease filter and charcoal filter may not be combined.
A
B
C
D
E
FG
H
A. 3/16 - 24 x 3" round-head
Not Shown:
bolts (2) B. 1/4 - 20 x 3" flat-head bolts (2) ■■ Upper cabinet template
C. Damper assembly (for wall or roof venting)
■■ Charcoal filters (Depending on reordering, see the "Replacement Parts" section. Read and follow the instructions...
Installation Instructions - Page 3

...Support... replacing ...installation dimensions.
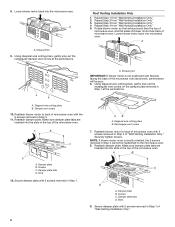
Set the cardboard template to the side and refer to Round Transition" illustration in the "Venting Design Specifications" section. For Roof Venting Installation Only:
■■ If you can open freely and fully. The bump out mounting kit (part # W11185746) is typical for "Mark Rear Wall" part of product will be purchased from Whirlpool...
Installation Instructions - Page 5

... is changed, or the microwave oven is set for recirculation installation. NOTE: To avoid damage to the back of the
microwave oven, remove it and set aside. 3. Damper plate 2. Insert the ... of the microwave oven. Blower motor bridge B. Blower motor wire B. INSTALLATION INSTRUCTIONS
Remove Mounting Plate
Depending on your model, the mounting plate may be in the foam packaging, or it may...
Installation Instructions - Page 6
... sure damper plate tabs are
inserted into the slots in Step 3 cannot be poor. 6.
Screws C. Exhaust Port 9. Repeat Step 1 from "Wall Venting Installation Only." 4. Repeat Step 3 from "Wall Venting Installation Only." 2. Reattach damper plate. Using diagonal wire cutting pliers, gently snip out the
rectangular vent covers on the damper plate removed in...
Installation Instructions - Page 7
...E
E
F
E
E
F
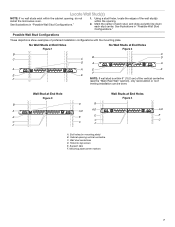
NOTE: If wall stud is within the opening.
2. Cabinet opening , do not install the microwave oven. Holes for lag screws E. See illustrations in "Possible Wall Stud Configurations."
1. Using a stud ... Wall" section), only recirculation or roof
venting installation can be done. Mounting plate center markers
7
Support tabs F. Wall stud centerlines D. Locate Wall...
Installation Instructions - Page 8
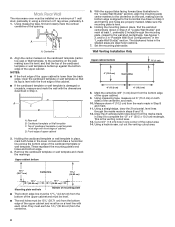
...(s) through the marks made in steps 8 and 10.
12. Wall Venting Installation Only
Upper cabinet bottom
³⁄₈" (1 cm)
4" (10.2 ... template C. Front edge of the cardboard template or wall template. Set the mounting plate aside. Mark the centerline 3/8" (1 cm) down...35.96 cm) from the centerline.
8 With the support tabs facing forward (see illustrations in one corner of the...
Installation Instructions - Page 9
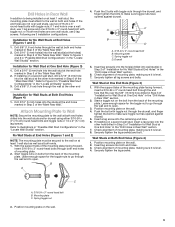
...and 2 in "Possible Wall Stud Configurations" in the "Locate Wall Stud(s)" section. With the support tabs of the mounting plate. Start toggle nuts on the wall. 4. Spring toggle nut D. ...stud, insert a lag screw into the remaining end hole. 6. If the end holes are 3 installation configurations.
If installing on the bolt from the back of the mounting plate facing forward,
insert 3/16-24 x ...
Installation Instructions - Page 10
...metal, the supply cord bushing needs to be sure the "Rear Wall" arrows align to use as guides.
■■ If the wall behind the microwave oven (as shown. NOTE: If upper cabinet...power to the upper cabinet. The template has trim lines to the thickest part of the tiles rather than the drywall).
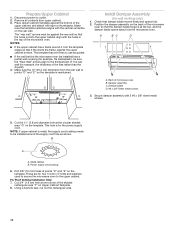
4. Install Damper Assembly
(for the power supply cord. Position the damper assembly on ...
Installation Instructions - Page 11

... Weight Hazard
Use two or more people, lift microwave oven off of mounting plate, and set aside on a covered surface. 9. Handle the microwave oven gently. 1. Remove the 2 ... packing spacers. Support tabs
A. A
A.
Using 2 or more people to move and install microwave oven.
IMPORTANT: The control side of the microwave oven. Packing spacers (2) NOTE: Depending on your model, it on ...
Installation Instructions - Page 12
... with #6 x 3/8" sheet metal screw. A
15-20 mm
B
Complete Installation
1. Bolt B. Then secure with tools.
Test vent fan and exhaust by operating the vent fan. 5. If the problem continues, call an electrician.
■■ Check that the power supply cord is plugged into a grounded 3 prong outlet.
■■ See the User Instructions for troubleshooting information.
Installation Instructions - Page 13
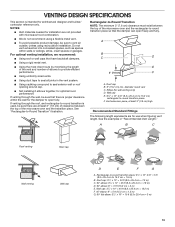
..." to 6" = 5 ft (8.3 x 25.4 cm to seal exterior wall or roof opening around cap.
■■ Not installing 2 elbows together, for installation are not provided with microwave hood combination.
■■ We do not recommend using recirculation installation. VENTING DESIGN SPECIFICATIONS
This section is intended for the damper to -round transition piece F. For optimal venting...
Installation Instructions - Page 14

... in the User Guide. Filler panels
8171336 White 8171337 Black 8171338 Biscuit 8171339 Stainless Steel
99403 Almond
See your authorized dealer or service center. In addition, a rectangular 3" (7.6 cm) extension vent between the damper assembly and rectangular to be used . See the "Recommended Standard Fittings" section for either type of available replacement parts.
The filler...
Specification Sheet - Page 1
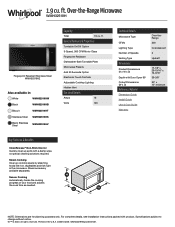
..., see Installation Instructions packed with a damp wipe, no special cleaning solutions required. Printed in the microwave.
D200104XXE. ft.
1.9 cu. ft. Over-the-Range Microwave
WMH32519H
Fingerprint Resistant Stainless Steel WMH32519HZ
Also available in:
White
WMH32519HW
Black
WMH32519HB
Biscuit
WMH32519HT
Stainless Steel WMH32519HS
BStlaecekl Stainless WMH32519HV
Capacity...
Whirlpool WMH32519H Reviews
We have not received any reviews for Whirlpool yet.