Use & Care Guide
Page 5
... follow these instructions can result in or tripping over 35 lbs (15.9 kg). ■ Place the microwave oven on the interior or exterior of the trim kits listed in place to whether the microwave oven is provided to move and install microwave oven. IMPORTANT: The control side of any damage, do not...
... follow these instructions can result in or tripping over 35 lbs (15.9 kg). ■ Place the microwave oven on the interior or exterior of the trim kits listed in place to whether the microwave oven is provided to move and install microwave oven. IMPORTANT: The control side of any damage, do not...
Use & Care Guide
Page 15
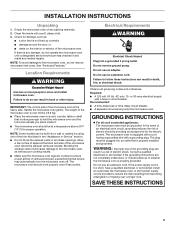
... Center 553 Benson Road Benton Harbor, MI 49022-2692 Please include a daytime phone number in your nearest Whirlpool designated service center. Proof of the following trim kits*. Call the Whirlpool Customer eXperience Center toll free: 1-800-253-1301. Whirlpool designated service technicians are available from the dealer or can also look in your request. These...
... Center 553 Benson Road Benton Harbor, MI 49022-2692 Please include a daytime phone number in your nearest Whirlpool designated service center. Proof of the following trim kits*. Call the Whirlpool Customer eXperience Center toll free: 1-800-253-1301. Whirlpool designated service technicians are available from the dealer or can also look in your request. These...

Warranty Information
Page 1
... NUMBERS/COLORS 27" (68.6 cm) MK2227AW / White MK2227AB / Black MK2227AS / Stainless 30" (76.2 cm) MK2220AW / White MK2220AB / Black MK2220AS / Stainless *The built-in trim kits can write to Whirlpool Corporation with the same precision used in the country in your appliance. For further assistance If you need to order replacement parts, we recommend...
... NUMBERS/COLORS 27" (68.6 cm) MK2227AW / White MK2227AB / Black MK2227AS / Stainless 30" (76.2 cm) MK2220AW / White MK2220AB / Black MK2220AS / Stainless *The built-in trim kits can write to Whirlpool Corporation with the same precision used in the country in your appliance. For further assistance If you need to order replacement parts, we recommend...

Installation Guide
Page 1
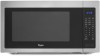
...1 INSTALLATION INSTRUCTIONS 2 Tools and Parts 2 Location Requirements 2 Required Cutout Dimensions 2 Trim Kit Frame Dimensions 2 Electrical Requirements 3 Prepare Microwave Oven 3 Prepare Cutout/Cabinet Opening 3 Install the Microwave Oven 4 Install Trim Kit Frame 5 SÉCURITÉ DU FOUR À MICRO-ONDES 7 INSTRUCTIONS D'...the word "DANGER" or "WARNING." All safety messages will follow instructions. MICROWAVE OVEN BUILT-IN TRIM KIT INSTALLATION INSTRUCTIONS Built-In Trim Kit Models MK2227 MK2220 UL listed for use over any electric or gas built-in this manual and...
...1 INSTALLATION INSTRUCTIONS 2 Tools and Parts 2 Location Requirements 2 Required Cutout Dimensions 2 Trim Kit Frame Dimensions 2 Electrical Requirements 3 Prepare Microwave Oven 3 Prepare Cutout/Cabinet Opening 3 Install the Microwave Oven 4 Install Trim Kit Frame 5 SÉCURITÉ DU FOUR À MICRO-ONDES 7 INSTRUCTIONS D'...the word "DANGER" or "WARNING." All safety messages will follow instructions. MICROWAVE OVEN BUILT-IN TRIM KIT INSTALLATION INSTRUCTIONS Built-In Trim Kit Models MK2227 MK2220 UL listed for use over any electric or gas built-in this manual and...
Installation Guide
Page 2
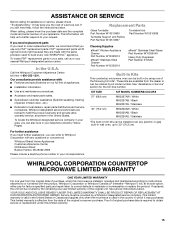
...47.9 cm) 25" (63.5 cm) 2.1 cm)** 2³⁄₈" (6.0 cm)** 2 7.5 cm) 13 33.2 cm) *27" (68.6 cm) trim kit **30" (76.2 cm) trim kit 1" (2.5 cm) 2 painted) (4 + 2 extra) Location Requirements The microwave oven may also be installed over a built-in oven below). The microwave oven may...■ Pencil ■ Phillips screwdriver ■ Drill ■ 7/64" drill bit Parts Supplied (not shown to microwave oven cutout floor. ■ Trim kit frame extends 1 2.7 cm) above and below the cutout floor (3" [7.6 cm] for lower oven NOTES: ■ Height dimension is critical: 17"...
...47.9 cm) 25" (63.5 cm) 2.1 cm)** 2³⁄₈" (6.0 cm)** 2 7.5 cm) 13 33.2 cm) *27" (68.6 cm) trim kit **30" (76.2 cm) trim kit 1" (2.5 cm) 2 painted) (4 + 2 extra) Location Requirements The microwave oven may also be installed over a built-in oven below). The microwave oven may...■ Pencil ■ Phillips screwdriver ■ Drill ■ 7/64" drill bit Parts Supplied (not shown to microwave oven cutout floor. ■ Trim kit frame extends 1 2.7 cm) above and below the cutout floor (3" [7.6 cm] for lower oven NOTES: ■ Height dimension is critical: 17"...
Installation Guide
Page 5
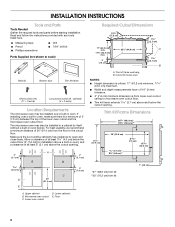
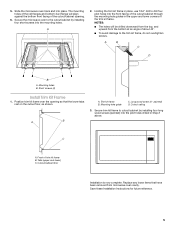
...complete. Long wood screw (4 - C A. Replace any loose items that the lower tabs rest on the cutout floor, as shown. Holding the trim kit frame in place, use 7/64" drill to cutout/cabinet by installing four short screws into the pilot holes drilled in the upper and lower corners...■ To avoid damage to the cutout/cabinet by installing four long wood screws (painted) into the mounting holes. Short screws (4) Install Trim Kit Frame 1. 5. Slide the microwave oven back and into the front facing of the cutout/cabinet through the mounting hole guides in Step 2 above....
...complete. Long wood screw (4 - C A. Replace any loose items that the lower tabs rest on the cutout floor, as shown. Holding the trim kit frame in place, use 7/64" drill to cutout/cabinet by installing four short screws into the pilot holes drilled in the upper and lower corners...■ To avoid damage to the cutout/cabinet by installing four long wood screws (painted) into the mounting holes. Short screws (4) Install Trim Kit Frame 1. 5. Slide the microwave oven back and into the front facing of the cutout/cabinet through the mounting hole guides in Step 2 above....


