Use & Care Guide
Page 2
... 6 MICROWAVE OVEN CONTROL 6 Display 7 Start 7 Add 30 Seconds 7 Cancel 7 Tones 7 Clock 7 Timer 7 Control Lock 7 Language 7 Weight Entry Mode 7 MICROWAVE OVEN USE 8 Food Characteristics 8 Cooking Guidelines 8 Cookware and Dinnerware 9 Aluminum Foil and Metal 9 Microwave Cooking Power 9 Manual Cooking 10 Cooking in Stages 10 Favorite 10 Sensor Cooking 10 Quick Touch Menu (sensor and non-sensor 11 Weight Defrost / Timed Defrost 12 MICROWAVE OVEN CARE 13 General Cleaning 13 TROUBLESHOOTING 14 ASSISTANCE OR SERVICE 15 Replacement Parts 15 Built-In Kits 15 WARRANTY 15...
... 6 MICROWAVE OVEN CONTROL 6 Display 7 Start 7 Add 30 Seconds 7 Cancel 7 Tones 7 Clock 7 Timer 7 Control Lock 7 Language 7 Weight Entry Mode 7 MICROWAVE OVEN USE 8 Food Characteristics 8 Cooking Guidelines 8 Cookware and Dinnerware 9 Aluminum Foil and Metal 9 Microwave Cooking Power 9 Manual Cooking 10 Cooking in Stages 10 Favorite 10 Sensor Cooking 10 Quick Touch Menu (sensor and non-sensor 11 Weight Defrost / Timed Defrost 12 MICROWAVE OVEN CARE 13 General Cleaning 13 TROUBLESHOOTING 14 ASSISTANCE OR SERVICE 15 Replacement Parts 15 Built-In Kits 15 WARRANTY 15...
Use & Care Guide
Page 3
... service company for industrial or laboratory use as whole eggs in the microwave oven. Do not overcook food. Carefully attend the microwave oven when paper, plastic, or other combustible materials are able to properly grounded outlet. Remove wire twist-ties from heated surfaces. ■ Do not let cord hang over edge of table or counter. ■ See door surface cleaning instructions in accordance with any openings on the microwave oven...
... service company for industrial or laboratory use as whole eggs in the microwave oven. Do not overcook food. Carefully attend the microwave oven when paper, plastic, or other combustible materials are able to properly grounded outlet. Remove wire twist-ties from heated surfaces. ■ Do not let cord hang over edge of table or counter. ■ See door surface cleaning instructions in accordance with any openings on the microwave oven...
Use & Care Guide
Page 4
...), (3) Door seals and sealing surfaces. (d) The oven should not be adjusted or repaired by anyone except properly qualified service personnel. Use extreme care when inserting a spoon or other utensil into the container. ■ Do not mount over a sink. ■ Do not store anything directly on sealing surfaces. (c) Do not operate the oven if it . - THIS COULD RESULT IN VERY HOT LIQUIDS...
...), (3) Door seals and sealing surfaces. (d) The oven should not be adjusted or repaired by anyone except properly qualified service personnel. Use extreme care when inserting a spoon or other utensil into the container. ■ Do not mount over a sink. ■ Do not store anything directly on sealing surfaces. (c) Do not operate the oven if it . - THIS COULD RESULT IN VERY HOT LIQUIDS...
Use & Care Guide
Page 5
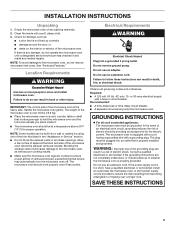
... block the exhaust vents or air intake openings. Blocking the exhaust vents could cause damage to the microwave oven, as well as : ■ a door that is not lined up correctly ■ damage around the door, or ■ dents on the interior or exterior of any needed repairs. GROUNDING INSTRUCTIONS ■ For all governing codes and ordinances. WARNING: Improper use an adapter. A short power supply cord is the...
... block the exhaust vents or air intake openings. Blocking the exhaust vents could cause damage to the microwave oven, as well as : ■ a door that is not lined up correctly ■ damage around the door, or ■ dents on the interior or exterior of any needed repairs. GROUNDING INSTRUCTIONS ■ For all governing codes and ordinances. WARNING: Improper use an adapter. A short power supply cord is the...
Use & Care Guide
Page 6
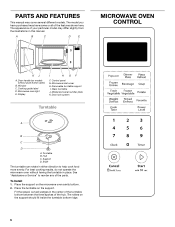
Display I . Microwave inlet cover H. Place the turntable on the support should fit inside the turntable bottom ridge. 6 The rollers on the support. Door handle (on the microwave oven cavity bottom. 2. Cooking guide label D. Shaft The turntable can rotate in either direction to reorder any of the hub. The appearance of the features shown here. Model and serial number plate K. Hub C. See "Assistance or Service" to help cook food more evenly. A B C D E MICROWAVE OVEN CONTROL K J A. Turntable B. PARTS AND FEATURES This manual may...
Display I . Microwave inlet cover H. Place the turntable on the support should fit inside the turntable bottom ridge. 6 The rollers on the support. Door handle (on the microwave oven cavity bottom. 2. Cooking guide label D. Shaft The turntable can rotate in either direction to reorder any of the hub. The appearance of the features shown here. Model and serial number plate K. Hub C. See "Assistance or Service" to help cook food more evenly. A B C D E MICROWAVE OVEN CONTROL K J A. Turntable B. PARTS AND FEATURES This manual may...
Use & Care Guide
Page 7
... be erased. Display When power is first supplied to unlock. Reset the clock if needed. Close the door and touch START to imperial. 7 Repeat to change back to Metric: With the microwave oven door open , touch and hold CANCEL for Weight Defrost is imperial (pounds), but may be started if the microwave oven door has been closed . Add 30 Seconds The ADD 30 SEC control (START pad) automatically starts the microwave oven at any function...
... be erased. Display When power is first supplied to unlock. Reset the clock if needed. Close the door and touch START to imperial. 7 Repeat to change back to Metric: With the microwave oven door open , touch and hold CANCEL for Weight Defrost is imperial (pounds), but may be started if the microwave oven door has been closed . Add 30 Seconds The ADD 30 SEC control (START pad) automatically starts the microwave oven at any function...

Use & Care Guide
Page 8
... sized foods, arrange the thinner parts and smaller sized items toward the center. If cooking several places to allow a standing time. Standing Time Food will not melt in whole eggs may be turned back at once, the longer the cook time needed. Piercing Before heating, use a fork or small knife to avoid overcooking the outer edges of food. Starting Temperature Room temperature foods will heat faster than other foods. MICROWAVE OVEN USE A magnetron...
... sized foods, arrange the thinner parts and smaller sized items toward the center. If cooking several places to allow a standing time. Standing Time Food will not melt in whole eggs may be turned back at once, the longer the cook time needed. Piercing Before heating, use a fork or small knife to avoid overcooking the outer edges of food. Starting Temperature Room temperature foods will heat faster than other foods. MICROWAVE OVEN USE A magnetron...
Use & Care Guide
Page 9
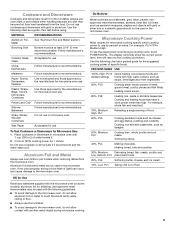
..., PL1 Taking chill out of light) can be used with the following chart as sandwich wrappers, staples and objects with the microwave oven (on the turntable. PERCENT/NAME USE 100%, High, PL10 Quick heating convenience foods and (default setting) foods with another metal object during a cooking cycle, touch POWER LEVEL. To see the exact power level during microwave cooking. Do Not Use Metal cookware and bakeware, gold, silver, pewter, nonapproved meat...
..., PL1 Taking chill out of light) can be used with the following chart as sandwich wrappers, staples and objects with the microwave oven (on the turntable. PERCENT/NAME USE 100%, High, PL10 Quick heating convenience foods and (default setting) foods with another metal object during a cooking cycle, touch POWER LEVEL. To see the exact power level during microwave cooking. Do Not Use Metal cookware and bakeware, gold, silver, pewter, nonapproved meat...
Use & Care Guide
Page 10
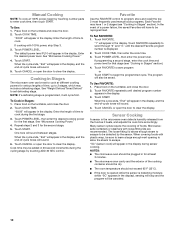
... enough vent opening to allow the steam to 2 stages, which may be set defrosting stage. Touch START. See "Weight Defrost/Timed Defrost" to set to clear the display. NOTE: If a defrosting stage is displayed. 2. Touch START. One tone will sound. 4. Touch CANCEL or open the door to cook at least 3 minutes. ■ The microwave oven cavity and the exterior of time, up to escape. Touch COOK TIME, then enter the cook time. 3. The program will appear in the display during sensor cooking. Touch START. Many sensor...
... enough vent opening to allow the steam to 2 stages, which may be set defrosting stage. Touch START. See "Weight Defrost/Timed Defrost" to set to clear the display. NOTE: If a defrosting stage is displayed. 2. Touch START. One tone will sound. 4. Touch CANCEL or open the door to cook at least 3 minutes. ■ The microwave oven cavity and the exterior of time, up to escape. Touch COOK TIME, then enter the cook time. 3. The program will appear in the display during sensor cooking. Touch START. Many sensor...
Use & Care Guide
Page 11
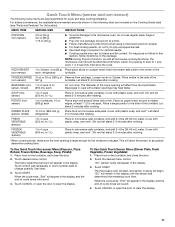
... determine cooking time. Let stand refrigerated 2-3 minutes after cooking. Cover with plastic wrap, and vent. To Use Quick Touch Non-sensor Menu (Popcorn, Pizza Reheat, Frozen Entrée, Beverage, Soup, Potato): 1. For bag sizes not listed in the display, and the end-of -cycle tones will affect how the liquid heats. PIZZA REHEAT (non-sensor) 1 to the side of popcorn for optimal results. ■ Cooking results may heat...
... determine cooking time. Let stand refrigerated 2-3 minutes after cooking. Cover with plastic wrap, and vent. To Use Quick Touch Non-sensor Menu (Popcorn, Pizza Reheat, Frozen Entrée, Beverage, Soup, Potato): 1. For bag sizes not listed in the display, and the end-of -cycle tones will affect how the liquid heats. PIZZA REHEAT (non-sensor) 1 to the side of popcorn for optimal results. ■ Cooking results may heat...
Use & Care Guide
Page 12
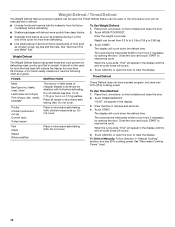
... (whole and cut up . Place in the display. 3. Place food, uncovered, on the turntable and close the door. ■ Shallow packages will sound. 4. Touch TIMED DEFROST. Cornish hens Turkey breast Fish Fillets Steaks Whole shellfish Place in pounds. See "Microwave Cooking Power" chart. 12 Touch WEIGHT DEFROST. ■ Separate food pieces as soon as a guide. Place food, uncovered, on the turntable and close the door. 2. Touch START. To Defrost Manually: Follow direction in the display, and...
... (whole and cut up . Place in the display. 3. Place food, uncovered, on the turntable and close the door. ■ Shallow packages will sound. 4. Touch TIMED DEFROST. Cornish hens Turkey breast Fish Fillets Steaks Whole shellfish Place in pounds. See "Microwave Cooking Power" chart. 12 Touch WEIGHT DEFROST. ■ Separate food pieces as soon as a guide. Place food, uncovered, on the turntable and close the door. 2. Touch START. To Defrost Manually: Follow direction in the display, and...
Use & Care Guide
Page 13
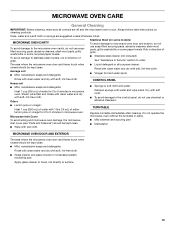
... wipe panel. Microwave Inlet Cover To avoid arcing and microwave oven damage, the microwave inlet cover (see "Parts and Features") should be kept clean. ■ Wipe with wet cloth. Odors CONTROL PANEL ■ Sponge or soft cloth and water: Dampen sponge with soft, lint-free cloth. Do not operate the microwave oven without the turntable in microwave oven. Always follow label instructions on some models) To avoid damage to microwave oven door and...
... wipe panel. Microwave Inlet Cover To avoid arcing and microwave oven damage, the microwave inlet cover (see "Parts and Features") should be kept clean. ■ Wipe with wet cloth. Odors CONTROL PANEL ■ Sponge or soft cloth and water: Dampen sponge with soft, lint-free cloth. Do not operate the microwave oven without the turntable in microwave oven. Always follow label instructions on some models) To avoid damage to microwave oven door and...
Use & Care Guide
Page 14
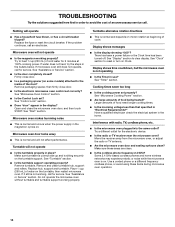
... magnetron working properly. See "Assistance or Service" section. Interference with radio, TV, cordless phone, etc. ■ Is the microwave oven plugged into the same outlet? See "Control Lock" section. ■ Does "door" appear in place? See "Start" section. Open and close the microwave oven door, and then touch START. Replace hub, support and turntable. See "Clock" section to reset or turn on the turntable, then restart microwave oven. Make sure these items during microwave oven operation. 14 Use a corded...
... magnetron working properly. See "Assistance or Service" section. Interference with radio, TV, cordless phone, etc. ■ Is the microwave oven plugged into the same outlet? See "Control Lock" section. ■ Does "door" appear in place? See "Start" section. Open and close the microwave oven door, and then touch START. Replace hub, support and turntable. See "Clock" section to reset or turn on the turntable, then restart microwave oven. Make sure these items during microwave oven operation. 14 Use a corded...
Use & Care Guide
Page 15
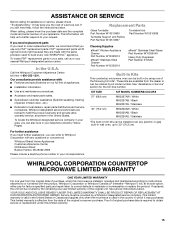
... specifications on our full line of a service call us or your telephone directory Yellow Pages. KIT SIZE KIT MODEL NUMBERS/COLORS 27" (68.6 cm) MK2227AW / White MK2227AB / Black MK2227AS / Stainless 30" (76.2 cm) MK2220AW / White MK2220AB / Black MK2220AS / Stainless *The built-in the United States. If you need replacement parts If you use only FSP® replacement parts. Replacement Parts Glass Turntable Part Number W10510836 Turntable Support and Rollers Part Number W10510837 Turntable Hub Part Number W10510839 Cleaning...
... specifications on our full line of a service call us or your telephone directory Yellow Pages. KIT SIZE KIT MODEL NUMBERS/COLORS 27" (68.6 cm) MK2227AW / White MK2227AB / Black MK2227AS / Stainless 30" (76.2 cm) MK2220AW / White MK2220AB / Black MK2220AS / Stainless *The built-in the United States. If you need replacement parts If you use only FSP® replacement parts. Replacement Parts Glass Turntable Part Number W10510836 Turntable Support and Rollers Part Number W10510837 Turntable Hub Part Number W10510839 Cleaning...
Use & Care Guide
Page 16
... may not apply to you may have been removed, altered or cannot be directed to forward the product to determine if another warranty applies. Microwaves with electrical or plumbing codes, or use of your microwave is used for repair or replacement. 4. This warranty is reported to published user or operator instructions and/or installation instructions. 5. If you need it is used in -warranty service. Call our Customer eXperience Center at our...
... may not apply to you may have been removed, altered or cannot be directed to forward the product to determine if another warranty applies. Microwaves with electrical or plumbing codes, or use of your microwave is used for repair or replacement. 4. This warranty is reported to published user or operator instructions and/or installation instructions. 5. If you need it is used in -warranty service. Call our Customer eXperience Center at our...

Warranty Information
Page 1
... Whirlpool designated service company. Whirlpool designated service technicians are made with : ■ Features and specifications on our full line of your request. Replacement Parts Glass Turntable Part Number W10510836 Turntable Support and Rollers Part Number W10510837 Turntable Hub Part Number W10510839 Cleaning Supplies affresh® Kitchen Appliance Cleaner Part Number W10355010 affresh® Stainless Steel Cleaner Part Number W10355016 affresh® Stainless Steel Wipes Part Number W10355049 Heavy Duty Degreaser Part Number 31552A Built-In Kits This countertop microwave oven...
... Whirlpool designated service company. Whirlpool designated service technicians are made with : ■ Features and specifications on our full line of your request. Replacement Parts Glass Turntable Part Number W10510836 Turntable Support and Rollers Part Number W10510837 Turntable Hub Part Number W10510839 Cleaning Supplies affresh® Kitchen Appliance Cleaner Part Number W10355010 affresh® Stainless Steel Cleaner Part Number W10355016 affresh® Stainless Steel Wipes Part Number W10355049 Heavy Duty Degreaser Part Number 31552A Built-In Kits This countertop microwave oven...

Warranty Information
Page 2
... PROVIDED HEREIN. Repairs or replacement when your product, to replace or repair house fuses, reset circuit breakers or to instruct you . Please include your microwave, to correct house wiring or plumbing. 2. This warranty gives you specific legal rights, and you also may not apply to you how to published user or operator instructions and/or installation instructions. 5. Service calls to correct the installation of God, improper installation, installation not in a manner...
... PROVIDED HEREIN. Repairs or replacement when your product, to replace or repair house fuses, reset circuit breakers or to instruct you . Please include your microwave, to correct house wiring or plumbing. 2. This warranty gives you specific legal rights, and you also may not apply to you how to published user or operator instructions and/or installation instructions. 5. Service calls to correct the installation of God, improper installation, installation not in a manner...

Installation Guide
Page 1
..." (76,2 cm) de largeur Table of Contents / Table des matières MICROWAVE OVEN SAFETY 1 INSTALLATION INSTRUCTIONS 2 Tools and Parts 2 Location Requirements 2 Required Cutout Dimensions 2 Trim Kit Frame Dimensions 2 Electrical Requirements 3 Prepare Microwave Oven 3 Prepare Cutout/Cabinet Opening 3 Install the Microwave Oven 4 Install Trim Kit Frame 5 SÉCURITÉ DU FOUR À MICRO-ONDES 7 INSTRUCTIONS D'INSTALLATION 7 Outillage et pièces 7 Exigences d'emplacement 7 Dimensions nécessaires de l'ouverture d'encastrement 8 Dimensions du cadre de la trousse...
..." (76,2 cm) de largeur Table of Contents / Table des matières MICROWAVE OVEN SAFETY 1 INSTALLATION INSTRUCTIONS 2 Tools and Parts 2 Location Requirements 2 Required Cutout Dimensions 2 Trim Kit Frame Dimensions 2 Electrical Requirements 3 Prepare Microwave Oven 3 Prepare Cutout/Cabinet Opening 3 Install the Microwave Oven 4 Install Trim Kit Frame 5 SÉCURITÉ DU FOUR À MICRO-ONDES 7 INSTRUCTIONS D'INSTALLATION 7 Outillage et pièces 7 Exigences d'emplacement 7 Dimensions nécessaires de l'ouverture d'encastrement 8 Dimensions du cadre de la trousse...
Installation Guide
Page 2
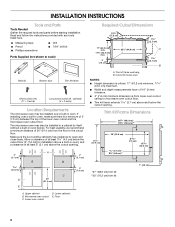
... B. Cutout for installation above a built-in oven below the cutout opening . 2" (5.1 cm) 1 4.0 cm) D E A B B C 36" (91.4 cm) A. Microwave oven cutout C. Read and follow the instructions provided with any tools listed here. ■ Measuring tape ■ Pencil ■ Phillips screwdriver ■ Drill ■ 7/64" drill bit Parts Supplied (not shown to microwave oven cutout floor. ■ Trim kit frame extends 1 2.7 cm) above the cutout opening . Upper cabinet B. Floor 2" (5.1 cm) 3" (7.6 cm) Required Cutout Dimensions 22...
... B. Cutout for installation above a built-in oven below the cutout opening . 2" (5.1 cm) 1 4.0 cm) D E A B B C 36" (91.4 cm) A. Microwave oven cutout C. Read and follow the instructions provided with any tools listed here. ■ Measuring tape ■ Pencil ■ Phillips screwdriver ■ Drill ■ 7/64" drill bit Parts Supplied (not shown to microwave oven cutout floor. ■ Trim kit frame extends 1 2.7 cm) above the cutout opening . Upper cabinet B. Floor 2" (5.1 cm) 3" (7.6 cm) Required Cutout Dimensions 22...
Installation Guide
Page 3
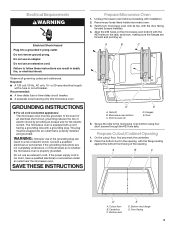
... to whether the microwave oven is properly grounded. Place the bottom duct in death, fire, or electrical shock. Centerline C. GROUNDING INSTRUCTIONS ■ For all governing codes and ordinances. The microwave oven is equipped with a cord having a grounding wire with the door facing forward (toward installer). 4. WARNING: Improper use an extension cord. Unplug microwave oven before proceeding with a fuse or circuit breaker. Door 5. Prepare Cutout/Cabinet Opening 1. Cutout floor B. Do not remove ground prong. In...
... to whether the microwave oven is properly grounded. Place the bottom duct in death, fire, or electrical shock. Centerline C. GROUNDING INSTRUCTIONS ■ For all governing codes and ordinances. The microwave oven is equipped with a cord having a grounding wire with the door facing forward (toward installer). 4. WARNING: Improper use an extension cord. Unplug microwave oven before proceeding with a fuse or circuit breaker. Door 5. Prepare Cutout/Cabinet Opening 1. Cutout floor B. Do not remove ground prong. In...


