Whirlpool WMH31017H Support and Manuals
Get Help and Manuals for this Whirlpool item
View All Support Options Below
Free Whirlpool WMH31017H manuals!
Problems with Whirlpool WMH31017H?
Ask a Question
Free Whirlpool WMH31017H manuals!
Problems with Whirlpool WMH31017H?
Ask a Question
Popular Whirlpool WMH31017H Manual Pages
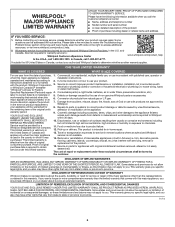
Dimension Guide - Page 1
... typical*
12" (30.5 cm) min.
14" (35.6 cm) max.
Grounded 3 prong outlet
*30" (76.2 cm) is typical for planning purposes only.
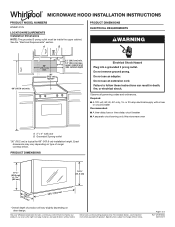
MICROWAVE HOOD INSTALLATION INSTRUCTIONS
PRODUCT MODEL NUMBERS WMH31017H
LOCATION REQUIREMENTS Installation Dimensions
NOTE: The grounded 3 prong outlet must be inside the upper cabinet. upper cabinet and side cabinet depth
Electrical Shock Hazard Plug into...
Owners Manual - Page 1

... reference, please make a note of your model and serial number located on your microwave oven at www.whirlpool.ca. This is , tell you what can be grounded. All safety messages will tell you how to excessive microwave energy:
I Install or locate the microwave oven only in this manual and on the front facing of...
Owners Manual - Page 3

...without having a grounding wire with Part 18 of electric shock. Settings
Clock
The clock is too short, have a qualified electrician or serviceman install an outlet near the microwave ...qualified electrician or serviceman if the grounding instructions are 2 packing spacers on programming tones.
The vent fan may be turned off or all governing codes and ordinances. Repeat to run for...
Owners Manual - Page 4

... instructions on the vent grille, slide the vent grille to the side of food item, enter quantity, then touch the Start control. Remove 2 screws on cleaning products. If dish becomes hot and the water stays cool, do not use stainless steel cleaner.
■■ Turntable: mild soap and water or dishwasher
Installing/Replacing...
Owners Manual - Page 5
...replace the fuse or reset the circuit breaker. Arcing in this manual and scan the code with any questions or concerns at the address below:
Whirlpool...the microwave oven. On some models) is set properly. Turntable alternates ■■...error indicator. Replacement Parts
Cleaning Supplies
■■ Turntable
■■ Heavy-duty degreaser
■■ Turntable support...
Owners Manual - Page 6
... date is installed,
installation instructions. Commercial, non-residential, multiple-family use, or use of God or use your product. instructions attached to determine whether another warranty applies. Specified Replacement Parts and repair 4. Damage from state to state or province to correct product damage or defects caused by our authorized Whirlpool Service Providers.
DISCLAIMER...
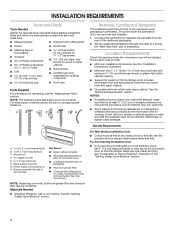
Installation Instructions - Page 1
... if you don't follow instructions. All safety messages will follow instructions. See the "Installation Requirements" section for use above electric or gas cooking products up to Wall 8 Prepare Upper Cabinet 8 Install Damper Assembly 9 Install the Microwave Oven 9 Complete Installation 10 VENTING DESIGN SPECIFICATIONS 11 ASSISTANCE 12 Replacement Parts 12 Accessories 12
MICROWAVE HOOD...
Installation Instructions - Page 2
... it during
the "Mark Rear Wall" part of wall structures, be installed.
Sheet metal screws (2) G. The piece inside upper cabinet. See User Instructions.)
NOTE: Depending on model, charcoal filters may be combined. Set the cardboard template to the side and refer to Round Transition" illustration in the "Venting Design Specifications" section.
2
Power supply cord bushing (1) H. The...
Installation Instructions - Page 4
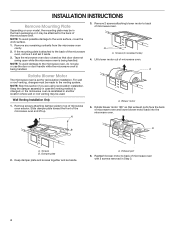
... lift up. A A. Lift blower motor out of microwave oven. INSTALLATION INSTRUCTIONS
Remove Mounting Plate
Depending on your model, the mounting plate may be in recessed holes)
4. Tape the ...Slide damper plate toward the front of the microwave oven, remove it and set aside. A
A. Wall Venting Installation Only
1.
If the mounting plate is being handled. NOTE: To avoid damage...
Installation Instructions - Page 7
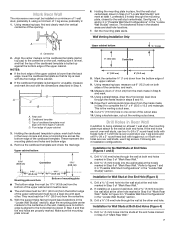
... holes marked in Step 3 of "Mark Rear Wall."
2. With the support tabs facing forward (see illustrations in the "Locate Wall Stud(s)" section), ...bolt with front edge of cabinet. The blackened holes in the shaded areas are 3 installation configurations.
Remove the cardboard template and check the markings:
Upper cabinet bottom
15³&#...
7 Set the mounting plate aside. D A
C
B
A.
Installation Instructions - Page 8
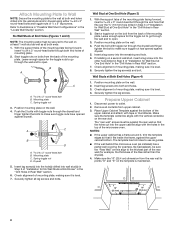
... making sure it is level. 8. With the support tabs of "Installation for No Wall Studs at both ends. 1....D. With the support tabs of mounting plate. 2. Push the bolt with tape or thumbtacks. The template has trim lines to use as guides.
■■... centerline on the bolt from the rear wall to the thickest part of the rear wall (for example, the thickness of the mounting...
Installation Instructions - Page 9
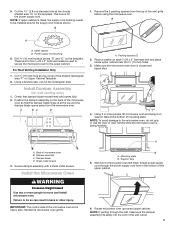
... oven.
A
B A. Rotate microwave oven up toward upper cabinet. B
1. For Roof Venting Installation Only
7. Using a keyhole saw, cut out the rectangular area. Check that the damper blade hinge is for the power supply cord. Position the damper assembly on support tabs at the bottom of microwave oven still tilted, thread power supply cord...
Installation Instructions - Page 10
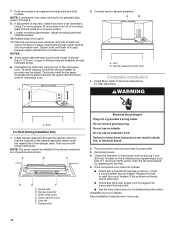
... be adjusted, skip steps 7 through 6. 11. Install filters. Upper cabinet cutout E. Installation is required, rotate microwave oven downward. Refer to be the same thickness as shown. Do not use an extension cord.
Reconnect power. 4. NOTE: If microwave oven does not need to the User Instructions for troubleshooting information. Loosen mounting plate screws. Vent B. Insert...
Installation Instructions - Page 12
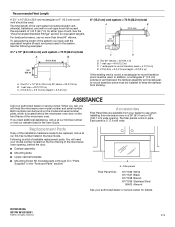
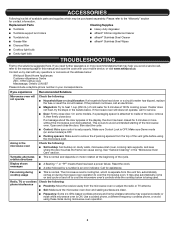
... toll-free number listed in pairs. The filler panels come in the User Guide. You will need , add the equivalent lengths of the installation hardware needs to keep the damper from your model number located on the front frame of available replacement parts.
All rights reserved.
9/16 See the following examples:
3¹⁄₄" x 10...
Specification Sheet - Page 1
... turntable by simply putting it in :
White
WMH31017HW
Black
WMH31017HB
Stainless Steel WMH31017HS
Technical Details
Microwave Type
CFMs Lighting Type Number of Speeds Venting Type
Dimensions
Product Dimensions (H x W x D)
Depth with Door Open 90° Cutout Dimensions (W x D)
Reference Material
Dimension Guide Install Guide Use & Care Guide Warranty
Over-theRange 300
Incandescent
2
Updraft...
Whirlpool WMH31017H Reviews
We have not received any reviews for Whirlpool yet.