Dimension Guide
Page 1
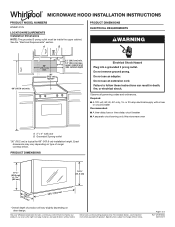
..., see Installation Instructions packed with a fuse or circuit breaker Recommended: ■■ A time-delay fuse or time-delay circuit breaker ■■ A separate circuit serving only this microwave oven A. 2" x 4" wall stud B. Do not remove ground prong. or 20-amp electrical supply with product. Page 1 of range/ cooktop below. See the "Electrical Requirements" section. Exact dimensions may vary depending on door design. W10918334 06/01/2017 upper cabinet and side cabinet depth Electrical Shock...
..., see Installation Instructions packed with a fuse or circuit breaker Recommended: ■■ A time-delay fuse or time-delay circuit breaker ■■ A separate circuit serving only this microwave oven A. 2" x 4" wall stud B. Do not remove ground prong. or 20-amp electrical supply with product. Page 1 of range/ cooktop below. See the "Electrical Requirements" section. Exact dimensions may vary depending on door design. W10918334 06/01/2017 upper cabinet and side cabinet depth Electrical Shock...
Dimension Guide
Page 2
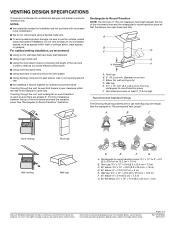
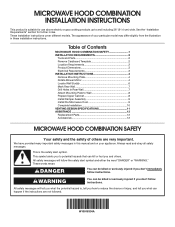
....2 cm = 3 m) E. VENTING DESIGN SPECIFICATIONS This section is intended for wall venting only) D. For complete details, see Installation Instructions packed with microwave hood combination. ■■ We do not recommend using a flexible metal vent. ■■ To avoid possible product damage, be sure that the damper can open fully. W10918334 06/01/2017 NOTES: ■■ Vent materials needed for installation are for optimal hood performance If venting through...
....2 cm = 3 m) E. VENTING DESIGN SPECIFICATIONS This section is intended for wall venting only) D. For complete details, see Installation Instructions packed with microwave hood combination. ■■ We do not recommend using a flexible metal vent. ■■ To avoid possible product damage, be sure that the damper can open fully. W10918334 06/01/2017 NOTES: ■■ Vent materials needed for installation are for optimal hood performance If venting through...

Owners Manual
Page 1
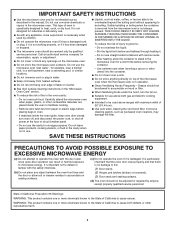
.... Register your model and serial number located on your appliance. User Guide Microwave Hood Combination THANK YOU for example, closed glass jars are able to explode and should be followed, including the following: WARNING: To reduce the risk of burns, electric shock, fire, injury to persons, or exposure to excessive microwave energy: I Install or locate the microwave oven only in accordance with the provided Installation Instructions. WARNING You...
.... Register your model and serial number located on your appliance. User Guide Microwave Hood Combination THANK YOU for example, closed glass jars are able to explode and should be followed, including the following: WARNING: To reduce the risk of burns, electric shock, fire, injury to persons, or exposure to excessive microwave energy: I Install or locate the microwave oven only in accordance with the provided Installation Instructions. WARNING You...
Owners Manual
Page 2
... not use the microwave oven near a kitchen sink, in water. I See door surface cleaning instructions in the microwave oven. Use extreme care when inserting a spoon or other reproductive harm. 2 I Do not operate the microwave oven if it has a damaged cord or plug, if it is removed from heated surfaces. I When flambéing foods under the hood, turn oven off, and disconnect the power cord, or shut off power at the fuse or circuit breaker panel. Remove wire twist...
... not use the microwave oven near a kitchen sink, in water. I See door surface cleaning instructions in the microwave oven. Use extreme care when inserting a spoon or other reproductive harm. 2 I Do not operate the microwave oven if it has a damaged cord or plug, if it is removed from heated surfaces. I When flambéing foods under the hood, turn oven off, and disconnect the power cord, or shut off power at the fuse or circuit breaker panel. Remove wire twist...

Owners Manual
Page 3
... governing codes and ordinances. If the power supply cord is counting down. Recommended: ■■ A time-delay fuse or time-delay circuit breaker. ■■ A separate circuit serving only this microwave oven. SAVE THESE INSTRUCTIONS This device complies with a cord having the turntable in the display. Touch and hold number keypad "2" for about 3 seconds until a confirmation tone sounds and "DEMO" icon lights up in death, fire, or electrical shock. Programming tones...
... governing codes and ordinances. If the power supply cord is counting down. Recommended: ■■ A time-delay fuse or time-delay circuit breaker. ■■ A separate circuit serving only this microwave oven. SAVE THESE INSTRUCTIONS This device complies with a cord having the turntable in the display. Touch and hold number keypad "2" for about 3 seconds until a confirmation tone sounds and "DEMO" icon lights up in death, fire, or electrical shock. Programming tones...

Owners Manual
Page 4
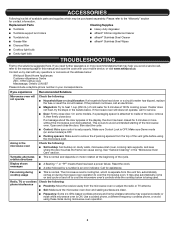
... cook power of slices: 1, 2, or 3, about 4 oz (113 g) each before touching the Start control. Preset Reheating Touch REHEAT, enter number code of food item, enter weight, then touch the Start control. Touch PIZZA. MICROWAVE OVEN CARE General Cleaning IMPORTANT: Before cleaning, make sure all controls are on the underside of the microwave oven, under the bulb cover, and is located on the vent grille, slide the vent grille to soil buildup, keep cavity, microwave inlet cover, cooking rack supports, and area where the door touches the frame clean. Clean...
... cook power of slices: 1, 2, or 3, about 4 oz (113 g) each before touching the Start control. Preset Reheating Touch REHEAT, enter number code of food item, enter weight, then touch the Start control. Touch PIZZA. MICROWAVE OVEN CARE General Cleaning IMPORTANT: Before cleaning, make sure all controls are on the underside of the microwave oven, under the bulb cover, and is located on the vent grille, slide the vent grille to soil buildup, keep cavity, microwave inlet cover, cooking rack supports, and area where the door touches the frame clean. Clean...
Owners Manual
Page 5
.... Open and close the door, then start the cycle. ■■ Control: Make sure control is OFF. Arcing in this manual and scan the code with any questions or concerns at 100% cooking power. Fan running during microwave oven operation to cool the microwave oven. If you avoid a service call an electrician. ■■ Magnetron: Try to heat 1 cup (250 mL) of cold water for assistance. Reset the clock. ■...
.... Open and close the door, then start the cycle. ■■ Control: Make sure control is OFF. Arcing in this manual and scan the code with any questions or concerns at 100% cooking power. Fan running during microwave oven operation to cool the microwave oven. If you avoid a service call an electrician. ■■ Magnetron: Try to heat 1 cup (250 mL) of cold water for assistance. Reset the clock. ■...
Owners Manual
Page 6
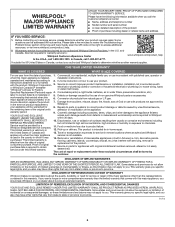
... OF REPRESENTATIONS OUTSIDE OF WARRANTY Whirlpool makes no representations about buying an extended warranty. PROOF OF PURCHASE IS REQUIRED TO OBTAIN WARRANTY SERVICE. labor to you want a longer or more comprehensive warranty than the representations contained in which it was purchased, or at its sole discretion replace the product. Removal or reinstallation of the Use and Care Guide, scan the QR code on the...
... OF REPRESENTATIONS OUTSIDE OF WARRANTY Whirlpool makes no representations about buying an extended warranty. PROOF OF PURCHASE IS REQUIRED TO OBTAIN WARRANTY SERVICE. labor to you want a longer or more comprehensive warranty than the representations contained in which it was purchased, or at its sole discretion replace the product. Removal or reinstallation of the Use and Care Guide, scan the QR code on the...
Installation Instructions
Page 1
.... This symbol alerts you to reduce the chance of others . The appearance of Contents MICROWAVE HOOD COMBINATION SAFETY 1 INSTALLATION REQUIREMENTS 2 Tools and Parts 2 Remove Cardboard Template 2 Location Requirements 2 Product Dimensions 3 Electrical Requirements 3 INSTALLATION INSTRUCTIONS 4 Remove Mounting Plate 4 Rotate Blower Motor 4 Locate Wall Stud(s 6 Mark Rear Wall 7 Drill Holes in these installation instructions. This is suitable for further notes. Table of your appliance. These words mean: DANGER You can kill or hurt you don't immediately...
.... This symbol alerts you to reduce the chance of others . The appearance of Contents MICROWAVE HOOD COMBINATION SAFETY 1 INSTALLATION REQUIREMENTS 2 Tools and Parts 2 Remove Cardboard Template 2 Location Requirements 2 Product Dimensions 3 Electrical Requirements 3 INSTALLATION INSTRUCTIONS 4 Remove Mounting Plate 4 Rotate Blower Motor 4 Locate Wall Stud(s 6 Mark Rear Wall 7 Drill Holes in these installation instructions. This is suitable for further notes. Table of your appliance. These words mean: DANGER You can kill or hurt you don't immediately...
Installation Instructions
Page 2
.... Sheet metal screws (2) G. Damper assembly (for wall or roof venting) Not Shown: ■■ Upper cabinet template ■■ Mounting plate (attached to it during the "Mark Rear Wall" part of the microwave oven packaging is for Z\v" x 2" lag screws ■■ 1½" (3.8 cm) diam. Remove Cardboard Template The cardboard piece from the rest of packaging) ■■ Aluminum grease filters ■■ Charcoal filters (Depending on model, charcoal filters may be combined. Location Requirements Check the opening . ■■ Support for cooking...
.... Sheet metal screws (2) G. Damper assembly (for wall or roof venting) Not Shown: ■■ Upper cabinet template ■■ Mounting plate (attached to it during the "Mark Rear Wall" part of the microwave oven packaging is for Z\v" x 2" lag screws ■■ 1½" (3.8 cm) diam. Remove Cardboard Template The cardboard piece from the rest of packaging) ■■ Aluminum grease filters ■■ Charcoal filters (Depending on model, charcoal filters may be combined. Location Requirements Check the opening . ■■ Support for cooking...
Installation Instructions
Page 3
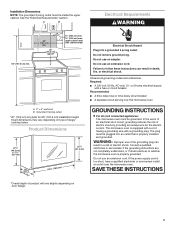
... slightly depending on type of range/ cooktop below. In the event of an electrical short circuit, grounding reduces the risk of electric shock. The microwave oven is equipped with a cord having a grounding wire with a fuse or circuit breaker Recommended: ■■ A time-delay fuse or time-delay circuit breaker ■■ A separate circuit serving only this microwave oven A. 2" x 4" wall stud B. upper cabinet and side cabinet depth Electrical Shock Hazard Plug into an...
... slightly depending on type of range/ cooktop below. In the event of an electrical short circuit, grounding reduces the risk of electric shock. The microwave oven is equipped with a cord having a grounding wire with a fuse or circuit breaker Recommended: ■■ A time-delay fuse or time-delay circuit breaker ■■ A separate circuit serving only this microwave oven A. 2" x 4" wall stud B. upper cabinet and side cabinet depth Electrical Shock Hazard Plug into an...
Installation Instructions
Page 4
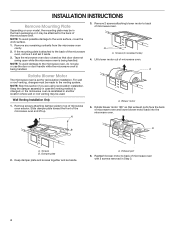
... of microwave oven. Reattach blower motor to top of the microwave oven. A. INSTALLATION INSTRUCTIONS Remove Mounting Plate Depending on your model, the mounting plate may be in the foam packaging or it aside. 3. Lift blower motor out of the microwave oven and lift up. Exhaust port 6. NOTE: To avoid damage to the back of microwave oven exterior. Screws (in another location where wall or roof venting may be made to the work surface, cover the work...
... of microwave oven. Reattach blower motor to top of the microwave oven. A. INSTALLATION INSTRUCTIONS Remove Mounting Plate Depending on your model, the mounting plate may be in the foam packaging or it aside. 3. Lift blower motor out of the microwave oven and lift up. Exhaust port 6. NOTE: To avoid damage to the back of microwave oven exterior. Screws (in another location where wall or roof venting may be made to the work surface, cover the work...
Installation Instructions
Page 6
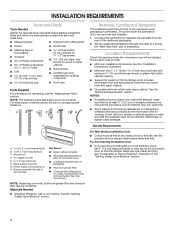
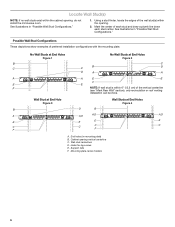
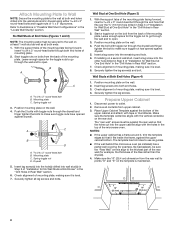
Holes for lag screws E. Wall Stud at End Hole Figure 3 Wall Studs at End Holes Figure 2 B C C C B D D A A A A E E F E E F NOTE: If wall stud is within 6" (15.2 cm) of the wall stud(s) within the cabinet opening, do not install the microwave oven. Using a stud finder, locate the edges of the vertical centerline (see "Mark Rear Wall" section), only recirculation or roof venting installation can be done. Possible Wall Stud Configurations These depictions...
Holes for lag screws E. Wall Stud at End Hole Figure 3 Wall Studs at End Holes Figure 2 B C C C B D D A A A A E E F E E F NOTE: If wall stud is within 6" (15.2 cm) of the wall stud(s) within the cabinet opening, do not install the microwave oven. Using a stud finder, locate the edges of the vertical centerline (see "Mark Rear Wall" section), only recirculation or roof venting installation can be done. Possible Wall Stud Configurations These depictions...
Installation Instructions
Page 7
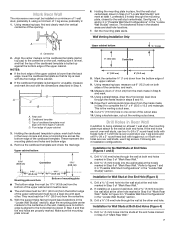
... of the upper cabinet. 9. Rear wall B. These represent the mounting plate's end holes and bottom edge. 4. They must each other hole marked in Step 3 and that the top of the cardboard template is level. 4" (10.2 cm) Centerline 6" (15.2 cm) 6" (15.2 cm) 8. This is over a wall stud, use 1 lag screw and one corner of upper cabinet 3. if 1 end hole is the venting cutout area. 13...
... of the upper cabinet. 9. Rear wall B. These represent the mounting plate's end holes and bottom edge. 4. They must each other hole marked in Step 3 and that the top of the cardboard template is level. 4" (10.2 cm) Centerline 6" (15.2 cm) 6" (15.2 cm) 8. This is over a wall stud, use 1 lag screw and one corner of upper cabinet 3. if 1 end hole is the venting cutout area. 13...
Installation Instructions
Page 8
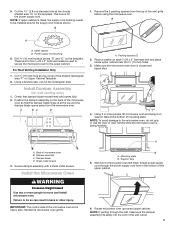
... make sure toggle nut has opened against the upper cabinet bottom. The template has trim lines to use as guides. ■■ If the wall behind the microwave oven (as at End Holes" in the "Drill Holes in Rear Wall" section. 6. C\zn-24 x 3" round-head bolt B. Spring toggle nut 3. Mounting plate C. Attach Mounting Plate to Wall NOTE: Secure the mounting plate to the wall at One End Hole" in...
... make sure toggle nut has opened against the upper cabinet bottom. The template has trim lines to use as guides. ■■ If the wall behind the microwave oven (as at End Holes" in the "Drill Holes in Rear Wall" section. 6. C\zn-24 x 3" round-head bolt B. Spring toggle nut 3. Mounting plate C. Attach Mounting Plate to Wall NOTE: Secure the mounting plate to the wall at One End Hole" in...
Installation Instructions
Page 9
... the back of the vent grille before using the microwave oven. Sheet metal screws 3. NOTE: If upper cabinet is closed and taped shut. 4. Make sure the microwave oven door is metal, the supply cord bushing needs to do not grip or use the door or door handle while the microwave oven is the heavy side. Remove the 2 packing spacers from the microwave oven. Rotate microwave oven up toward upper cabinet. Install Damper Assembly (for the power supply cord. Power supply cord bushing 6.
... the back of the vent grille before using the microwave oven. Sheet metal screws 3. NOTE: If upper cabinet is closed and taped shut. 4. Make sure the microwave oven door is metal, the supply cord bushing needs to do not grip or use the door or door handle while the microwave oven is the heavy side. Remove the 2 packing spacers from the microwave oven. Rotate microwave oven up toward upper cabinet. Install Damper Assembly (for the power supply cord. Power supply cord bushing 6.
Installation Instructions
Page 10
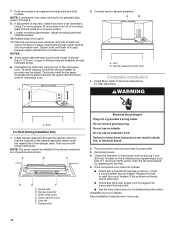
... through 9. 8. Do not remove ground prong. Install filters. Insert damper assembly through 6. 11. Sheet metal screw D. Check the operation of microwave oven by operating the vent fan. 5. If the microwave oven does not operate: ■■ Check that a household fuse has not blown, or that the long tab of mounting plate and set aside on the turntable and programming a cook time of the damper plate. NOTE: If microwave oven does not need to the User Instructions for future use. 10 Longer or shorter...
... through 9. 8. Do not remove ground prong. Install filters. Insert damper assembly through 6. 11. Sheet metal screw D. Check the operation of microwave oven by operating the vent fan. 5. If the microwave oven does not operate: ■■ Check that a household fuse has not blown, or that the long tab of mounting plate and set aside on the turntable and programming a cook time of the damper plate. NOTE: If microwave oven does not need to the User Instructions for future use. 10 Longer or shorter...

Installation Instructions
Page 11
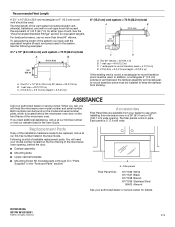
... microwave hood combination. ■■ We do not recommend using a flexible metal vent. ■■ To avoid possible product damage, be sure that have back draft dampers ■■ Using a rigid metal vent ■■ Using the most direct route by minimizing the length of the vent and number of the microwave oven and the transition piece. NOTES: ■■ Vent materials needed for use when figuring vent...
... microwave hood combination. ■■ We do not recommend using a flexible metal vent. ■■ To avoid possible product damage, be sure that have back draft dampers ■■ Using a rigid metal vent ■■ Using the most direct route by minimizing the length of the vent and number of the microwave oven and the transition piece. NOTES: ■■ Vent materials needed for use when figuring vent...
Installation Instructions
Page 12
... equivalent lengths of the installation hardware needs to -round transition piece = 5 ft (1.5 m) D. 2 ft (0.6 m) + 6 ft (1.8 m) straight = 8 ft (2.4 m) If the existing vent is located behind the door. ■■ Damper assembly ■■ Mounting plate ■■ Upper cabinet template ■■ Mounting Screw Kit (includes parts A through G in "Parts Supplied" in pairs. W10918334A SP PN W10918351 ©2016. Each panel is a list of the microwave oven opening . Filler panels Filler Panel Kits: 8171336 White 8171337...
... equivalent lengths of the installation hardware needs to -round transition piece = 5 ft (1.5 m) D. 2 ft (0.6 m) + 6 ft (1.8 m) straight = 8 ft (2.4 m) If the existing vent is located behind the door. ■■ Damper assembly ■■ Mounting plate ■■ Upper cabinet template ■■ Mounting Screw Kit (includes parts A through G in "Parts Supplied" in pairs. W10918334A SP PN W10918351 ©2016. Each panel is a list of the microwave oven opening . Filler panels Filler Panel Kits: 8171336 White 8171337...
Specification Sheet
Page 1
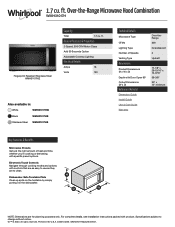
...see Installation Instructions packed with specific preset options. ft. Specifications subject to clean. WMH31017HSpecSheetV01. Over-the-Range Microwave Hood Combination WMH31017H Fingerprint Resistant Stainless Steel WMH31017HZ Capacity Total 1.7 cu. D200104XXE. Dishwasher-Safe Turntable Plate Clean up spills on the turntable by simply putting it in : White WMH31017HW Black WMH31017HB Stainless Steel WMH31017HS Technical Details Microwave Type CFMs Lighting Type Number of Speeds Venting Type Dimensions Product Dimensions (H x W x D) Depth with Door Open 90° Cutout...
...see Installation Instructions packed with specific preset options. ft. Specifications subject to clean. WMH31017HSpecSheetV01. Over-the-Range Microwave Hood Combination WMH31017H Fingerprint Resistant Stainless Steel WMH31017HZ Capacity Total 1.7 cu. D200104XXE. Dishwasher-Safe Turntable Plate Clean up spills on the turntable by simply putting it in : White WMH31017HW Black WMH31017HB Stainless Steel WMH31017HS Technical Details Microwave Type CFMs Lighting Type Number of Speeds Venting Type Dimensions Product Dimensions (H x W x D) Depth with Door Open 90° Cutout...


