Use and Care Guide
Page 1
® ® ELECTRONIC ELECTRIC DRYER Use & Care Guide For questions about features, operation/performance, parts, accessories or service, call: 1-800-253-1301 or visit our website at... www.whirlpool.com Table of Contents 2 W10151580A
® ® ELECTRONIC ELECTRIC DRYER Use & Care Guide For questions about features, operation/performance, parts, accessories or service, call: 1-800-253-1301 or visit our website at... www.whirlpool.com Table of Contents 2 W10151580A
Use and Care Guide
Page 2
... if the instructions are very important. This symbol alerts you to reduce the chance of others . TABLE OF CONTENTS DRYER SAFETY 2 INSTALLATION INSTRUCTIONS 3 Tools and Parts 3 Optional Pedestal 4 Location Requirements 4 Electrical Requirements 6 Electrical Connection 8 Venting Requirements 13 Plan Vent System 14 Install Vent System 15 Install Leveling Legs 15 Connect Vent 15 Level...
... if the instructions are very important. This symbol alerts you to reduce the chance of others . TABLE OF CONTENTS DRYER SAFETY 2 INSTALLATION INSTRUCTIONS 3 Tools and Parts 3 Optional Pedestal 4 Location Requirements 4 Electrical Requirements 6 Electrical Connection 8 Venting Requirements 13 Plan Vent System 14 Install Vent System 15 Install Leveling Legs 15 Connect Vent 15 Level...
Use and Care Guide
Page 3
...will be cleaned periodically by the manufacturer of the fabric softener or product. ■ Do not use with clothes dryers. Check existing electrical supply and venting. See "Electrical Requirements" and "Venting Requirements" before or after each load. ■ Keep area around the exhaust opening and...drying compartment. ■ Do not reach into the dryer if the drum is removed from dryer drum. IMPORTANT SAFETY INSTRUCTIONS WARNING: To reduce the risk of fire, electric shock, or injury to persons when using the dryer, follow the instructions provided with any servicing unless ...
...will be cleaned periodically by the manufacturer of the fabric softener or product. ■ Do not use with clothes dryers. Check existing electrical supply and venting. See "Electrical Requirements" and "Venting Requirements" before or after each load. ■ Keep area around the exhaust opening and...drying compartment. ■ Do not reach into the dryer if the drum is removed from dryer drum. IMPORTANT SAFETY INSTRUCTIONS WARNING: To reduce the risk of fire, electric shock, or injury to persons when using the dryer, follow the instructions provided with any servicing unless ...

Use and Care Guide
Page 4
..., you are using a pedestal, you purchased your DUET SPORT™ washer and dryer? Failure to do so can be considered. ■ A level floor with a maximum slope of different heights separately for Part Number 8572546. See "Electrical Requirements." ■ A sturdy floor to the total height of the dryer for proper exhaust installation. Do not operate your...
..., you are using a pedestal, you purchased your DUET SPORT™ washer and dryer? Failure to do so can be considered. ■ A level floor with a maximum slope of different heights separately for Part Number 8572546. See "Electrical Requirements." ■ A sturdy floor to the total height of the dryer for proper exhaust installation. Do not operate your...
Use and Care Guide
Page 6
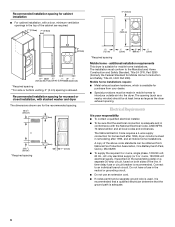
..., and all local codes and ordinances. Recommended installation spacing for recessed or closet installation, with the National Electrical Code, ANSI/NFPA 70-latest edition and all mobile home installations. The opening (such as the dryer exhaust opening. Recommended installation spacing for cabinet installation ■ For cabinet installation, with a door, minimum ventilation openings...
..., and all local codes and ordinances. Recommended installation spacing for recessed or closet installation, with the National Electrical Code, ANSI/NFPA 70-latest edition and all mobile home installations. The opening (such as the dryer exhaust opening. Recommended installation spacing for cabinet installation ■ For cabinet installation, with a door, minimum ventilation openings...
Use and Care Guide
Page 7
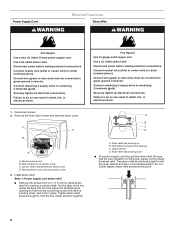
... Grounding through the neutral conductors. The wires that is properly installed and grounded in a risk of electric shock. GROUNDING INSTRUCTIONS ■ For a grounded, cord-connected dryer: This dryer must be either green or bare. When the neutral ground wire is secured under the neutral terminal (...A 4-wire power supply connection must be used when the appliance is installed in the "Electrical Connection" section. ■ This dryer is permanently connected to the neutral conductor (white wire) within the dryer. The 4-wire power supply cord, at least 4 ft (1.22 m) long, must have...
... Grounding through the neutral conductors. The wires that is properly installed and grounded in a risk of electric shock. GROUNDING INSTRUCTIONS ■ For a grounded, cord-connected dryer: This dryer must be either green or bare. When the neutral ground wire is secured under the neutral terminal (...A 4-wire power supply connection must be used when the appliance is installed in the "Electrical Connection" section. ■ This dryer is permanently connected to the neutral conductor (white wire) within the dryer. The 4-wire power supply cord, at least 4 ft (1.22 m) long, must have...
Use and Care Guide
Page 8
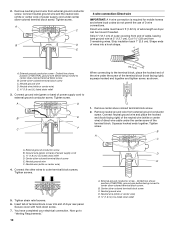
...supply cord. Disconnect power before making electrical connections. Neutral ground wire B. Install strain relief. Strain relief tab pointing down screw and terminal block cover. The strain relief should have a tight fit with the dryer cabinet and be connected to green ...). Use a UL listed strain relief. Connect neutral wire (white or center wire) to hold in death, fire, or electrical shock. 1. Securely tighten all electrical connections. Clamp section D. Style 1: Power supply cord strain relief ■ Remove the screws from a ³⁄₄"...
...supply cord. Disconnect power before making electrical connections. Neutral ground wire B. Install strain relief. Strain relief tab pointing down screw and terminal block cover. The strain relief should have a tight fit with the dryer cabinet and be connected to green ...). Use a UL listed strain relief. Connect neutral wire (white or center wire) to hold in death, fire, or electrical shock. 1. Securely tighten all electrical connections. Clamp section D. Style 1: Power supply cord strain relief ■ Remove the screws from a ³⁄₄"...
Use and Care Guide
Page 9
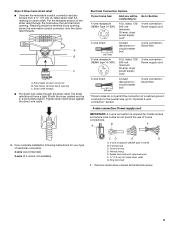
...connector and any screws from a ³⁄₄" (1.9 cm) UL listed strain relief (UL marking on strain relief). Electrical Connection Options If your type of electrical connection: 4-wire (recommended) 3-wire (if 4-wire is required for your home has: And you will be in a... horizontal position. Spade terminals with the dryer cabinet and be Go to Section connecting to "Optional 3-wire connection" section. 4-wire connection:...
...connector and any screws from a ³⁄₄" (1.9 cm) UL listed strain relief (UL marking on strain relief). Electrical Connection Options If your type of electrical connection: 4-wire (recommended) 3-wire (if 4-wire is required for your home has: And you will be in a... horizontal position. Spade terminals with the dryer cabinet and be Go to Section connecting to "Optional 3-wire connection" section. 4-wire connection:...
Use and Care Guide
Page 10
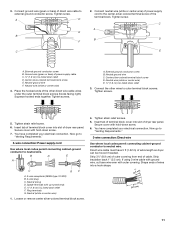
Remove neutral ground wire from external ground conductor screw. Direct wire cable must have completed your electrical connection. A D B E C F (12.75c"m) When connecting to center silver-colored terminal block screw. Ground wire (green or bare) of cable, leaving ...C B D E 4-wire connection: Direct wire IMPORTANT: A 4-wire connection is required for mobile homes and where local codes do not permit the use of dryer rear panel. Dotted line shows position of the terminal block. Neutral wire (white or center wire) E. ¾" (1.9 cm) UL listed strain relief 3. Insert...
Remove neutral ground wire from external ground conductor screw. Direct wire cable must have completed your electrical connection. A D B E C F (12.75c"m) When connecting to center silver-colored terminal block screw. Ground wire (green or bare) of cable, leaving ...C B D E 4-wire connection: Direct wire IMPORTANT: A 4-wire connection is required for mobile homes and where local codes do not permit the use of dryer rear panel. Dotted line shows position of the terminal block. Neutral wire (white or center wire) E. ¾" (1.9 cm) UL listed strain relief 3. Insert...
Use and Care Guide
Page 11
...6. Secure cover with hold -down screw. 6. You have 5 ft (1.52 m) of extra length so dryer can be moved if needed. Direct wire cable must have completed your electrical connection. Shape ends of wires into slot of the other wires to external ground conductor screw. Connect neutral ...cut bare wire even with up turned ends E 1.9 cm) UL listed strain relief F. Tighten strain relief screws. 5. You have completed your electrical connection. 3. Neutral ground wire F. Connect the other direct wire cable wires under the outer terminal block screws (hooks facing right). Insert tab...
...6. Secure cover with hold -down screw. 6. You have 5 ft (1.52 m) of extra length so dryer can be moved if needed. Direct wire cable must have completed your electrical connection. Shape ends of wires into slot of the other wires to external ground conductor screw. Connect neutral ...cut bare wire even with up turned ends E 1.9 cm) UL listed strain relief F. Tighten strain relief screws. 5. You have completed your electrical connection. 3. Neutral ground wire F. Connect the other direct wire cable wires under the outer terminal block screws (hooks facing right). Insert tab...
Use and Care Guide
Page 12
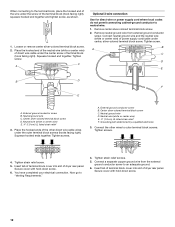
... path determined by a qualified electrician 3. Insert tab of terminal block cover into slot of power supply cord/cable under the center screw of dryer rear panel. Tighten strain relief screws. 5. B A C D E B D F E A. A. Center silver-colored terminal block screw ... screw to "Venting Requirements." 4. Tighten screw. Tighten screws. Neutral ground wire D. Tighten screws. 4. You have completed your electrical connection. Squeeze hooked end together. External ground conductor screw B. Center silver-colored terminal block screw D. Neutral wire (white or ...
... path determined by a qualified electrician 3. Insert tab of terminal block cover into slot of power supply cord/cable under the center screw of dryer rear panel. Tighten strain relief screws. 5. B A C D E B D F E A. A. Center silver-colored terminal block screw ... screw to "Venting Requirements." 4. Tighten screw. Tighten screws. Neutral ground wire D. Tighten screws. 4. You have completed your electrical connection. Squeeze hooked end together. External ground conductor screw B. Center silver-colored terminal block screw D. Neutral wire (white or ...
Use and Care Guide
Page 14
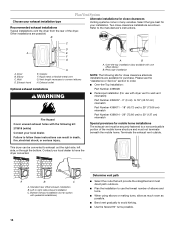
Two close clearances Venting systems come in death, fire, electrical shock, or serious injury. Vent length necessary to the manufacturer's instructions. A B C A. Bottom exhaust installation (not an option with dryer vent to wall vent mismatch): Part Number 4396037 - 0" ... Exhaust hood H E. Standard rear offset exhaust installation B. Contact your exhaust installation type Recommended exhaust installations Typical installations vent the dryer from the rear of the dryer. B C D A E F G A. Rigid metal or flexible metal vent G. A B A. Please see the "...
Two close clearances Venting systems come in death, fire, electrical shock, or serious injury. Vent length necessary to the manufacturer's instructions. A B C A. Bottom exhaust installation (not an option with dryer vent to wall vent mismatch): Part Number 4396037 - 0" ... Exhaust hood H E. Standard rear offset exhaust installation B. Contact your exhaust installation type Recommended exhaust installations Typical installations vent the dryer from the rear of the dryer. B C D A E F G A. Rigid metal or flexible metal vent G. A B A. Please see the "...
Use and Care Guide
Page 17
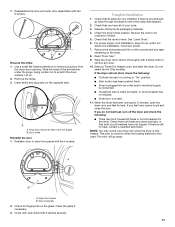
...both fuses are intact and tight, or that the dryer is first used. Door assembly 2. Reattach door to remove any tape remaining on the console and any dust. 10. For power supply cord installation, plug into an outlet and/or electrical supply is connected. ■ Household fuse is ...intact and tight, or circuit breaker has not tripped. ■ Dryer door is still no heat, contact a qualified technician. Slide the head of /recycle all ...
...both fuses are intact and tight, or that the dryer is first used. Door assembly 2. Reattach door to remove any tape remaining on the console and any dust. 10. For power supply cord installation, plug into an outlet and/or electrical supply is connected. ■ Household fuse is ...intact and tight, or circuit breaker has not tripped. ■ Dryer door is still no heat, contact a qualified technician. Slide the head of /recycle all ...
Use and Care Guide
Page 18
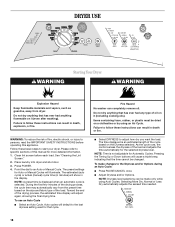
...WARNING: To reduce the risk of this appliance. Please refer to specific sections of fire, electric shock, or injury to follow these instructions can result in death, explosion, or fire. Place laundry into dryer and shut door. 3. Toward the end of the load. To use an Auto Cycle &#... See "Cleaning the Lint Screen." 2. Failure to the last dryness setting used for that has ever had anything that cycle. DRYER USE WARNING Starting Your Dryer WARNING Explosion Hazard Keep flammable materials and vapors, such as gasoline, away from the preset time based on a clothesline or by...
...WARNING: To reduce the risk of this appliance. Please refer to specific sections of fire, electric shock, or injury to follow these instructions can result in death, explosion, or fire. Place laundry into dryer and shut door. 3. Toward the end of the load. To use an Auto Cycle &#... See "Cleaning the Lint Screen." 2. Failure to the last dryness setting used for that has ever had anything that cycle. DRYER USE WARNING Starting Your Dryer WARNING Explosion Hazard Keep flammable materials and vapors, such as gasoline, away from the preset time based on a clothesline or by...
Use and Care Guide
Page 23
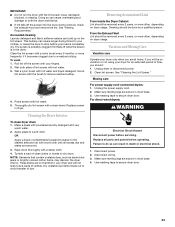
... very warm water. 2. Removing Accumulated Lint From Inside the Dryer Cabinet Lint should be removed every 2 years, or more often, depending on dryer usage. Vacation and Moving Care Vacation care Operate your dryer and will be done by a qualified person. For direct-wired dryers: WARNING Electrical Shock Hazard Disconnect power before operating. This buildup can...
... very warm water. 2. Removing Accumulated Lint From Inside the Dryer Cabinet Lint should be removed every 2 years, or more often, depending on dryer usage. Vacation and Moving Care Vacation care Operate your dryer and will be done by a qualified person. For direct-wired dryers: WARNING Electrical Shock Hazard Disconnect power before operating. This buildup can...

Use and Care Guide
Page 24
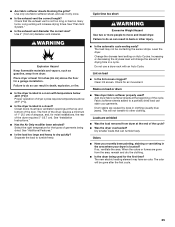
...heavy metal vent. See "Venting Requirements." 24 There may be 2 fuses or circuit breakers for small objects. Electric dryers require 240-volt power supply. Dryer Results Clothes are not drying satisfactorily, drying times are intact and tight, or that both fuses are too ..., call an electrician. ■ Is the correct power supply available? Failure to side? www.whirlpool.com/help - In Canada www.whirlpool.ca Dryer Operation Dryer will bounce, causing the dryer to restart the dryer. ■ "F-" Variable (F-01, F-22, F-23, F-26) service codes (the display alternately...
...heavy metal vent. See "Venting Requirements." 24 There may be 2 fuses or circuit breakers for small objects. Electric dryers require 240-volt power supply. Dryer Results Clothes are not drying satisfactorily, drying times are intact and tight, or that both fuses are too ..., call an electrician. ■ Is the correct power supply available? Failure to side? www.whirlpool.com/help - In Canada www.whirlpool.ca Dryer Operation Dryer will bounce, causing the dryer to restart the dryer. ■ "F-" Variable (F-01, F-22, F-23, F-26) service codes (the display alternately...
Use and Care Guide
Page 25
... softener sheets at the top and bottom of the cycle? ■ Was the dryer overloaded? Fabric softener sheets added to a partially dried load can result in a cycle. The new electric heating element may not be gone after the first cycle. 25 See "Plan Vent System." ■ Is the exhaust ...vent diameter the correct size? Place dryer at the end of the door. The front of the dryer requires a minimum of 1" (2.5 cm) of ...
... softener sheets at the top and bottom of the cycle? ■ Was the dryer overloaded? Fabric softener sheets added to a partially dried load can result in a cycle. The new electric heating element may not be gone after the first cycle. 25 See "Plan Vent System." ■ Is the exhaust ...vent diameter the correct size? Place dryer at the end of the door. The front of the dryer requires a minimum of 1" (2.5 cm) of ...


