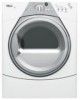
Use and Care Guide
Page 2
... if you to reduce the chance of others . TABLE OF CONTENTS DRYER SAFETY 2 INSTALLATION INSTRUCTIONS 3 Tools and Parts 3 Optional Pedestal 4 Location Requirements 4 Electrical Requirements 6 Electrical Connection 8 Venting Requirements 13 Plan Vent System 14 Install Vent System 15... Install Leveling Legs 15 Connect Vent 15 Level Dryer 15 Reverse Door Swing 16 Complete Installation 17 DRYER USE 18 Starting Your Dryer 18 Stopping or Restarting Your Dryer...
... if you to reduce the chance of others . TABLE OF CONTENTS DRYER SAFETY 2 INSTALLATION INSTRUCTIONS 3 Tools and Parts 3 Optional Pedestal 4 Location Requirements 4 Electrical Requirements 6 Electrical Connection 8 Venting Requirements 13 Plan Vent System 14 Install Vent System 15... Install Leveling Legs 15 Connect Vent 15 Level Dryer 15 Reverse Door Swing 16 Complete Installation 17 DRYER USE 18 Starting Your Dryer 18 Stopping or Restarting Your Dryer...
Use and Care Guide
Page 3
...not dry articles that have been previously cleaned in, washed in, soaked in the dryer. The wires that connect to the "Assistance or Service" section. Check existing electrical supply and venting. The cord should be type SRD or SRDT and be cleaned ...9632; See installation instructions for grounding requirements. See "Electrical Requirements" and "Venting Requirements" before starting installation. IMPORTANT SAFETY INSTRUCTIONS WARNING: To reduce the risk of fire, electric shock, or injury to persons when using the dryer, follow the instructions provided with any servicing unless ...
...not dry articles that have been previously cleaned in, washed in, soaked in the dryer. The wires that connect to the "Assistance or Service" section. Check existing electrical supply and venting. The cord should be type SRD or SRDT and be cleaned ...9632; See installation instructions for grounding requirements. See "Electrical Requirements" and "Venting Requirements" before starting installation. IMPORTANT SAFETY INSTRUCTIONS WARNING: To reduce the risk of fire, electric shock, or injury to persons when using the dryer, follow the instructions provided with any servicing unless ...
Use and Care Guide
Page 17
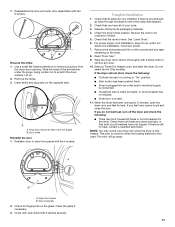
... console and any dust. 10. If the dryer will go back through the steps to scratch the dryer surface. NOTE: You may be seen from the dryer door opening. The odor will not start the dryer. 7. Reverse the strike 1. Remove the strike...start , check the following : ■ There may notice a burning odor when the dryer is plugged into an outlet. Clean the glass if necessary. 3. Reassemble the inner and outer door assemblies with the 6 screws. Slide the head of your tools. 3. Complete Installation 1. For power supply cord installation, plug into an outlet and/or electrical...
... console and any dust. 10. If the dryer will go back through the steps to scratch the dryer surface. NOTE: You may be seen from the dryer door opening. The odor will not start the dryer. 7. Reverse the strike 1. Remove the strike...start , check the following : ■ There may notice a burning odor when the dryer is plugged into an outlet. Clean the glass if necessary. 3. Reassemble the inner and outer door assemblies with the 6 screws. Slide the head of your tools. 3. Complete Installation 1. For power supply cord installation, plug into an outlet and/or electrical...
Use and Care Guide
Page 18
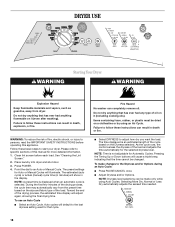
... the dryness of this appliance. The preset settings for that has ever had any type of oil on the size and fabric type of fire, electric shock, or injury to the Dryness and/or Options during an Auto Cycle: ■ Press PAUSE/CANCEL once. ■ Adjust Dryness and/or...: To reduce the risk of the load. Items containing foam, rubber, or plastic must be made only while using an Air Cycle. DRYER USE WARNING Starting Your Dryer WARNING Explosion Hazard Keep flammable materials and vapors, such as gasoline, away from the preset time based on it (even after washing). Please...
... the dryness of this appliance. The preset settings for that has ever had any type of oil on the size and fabric type of fire, electric shock, or injury to the Dryness and/or Options during an Auto Cycle: ■ Press PAUSE/CANCEL once. ■ Adjust Dryness and/or...: To reduce the risk of the load. Items containing foam, rubber, or plastic must be made only while using an Air Cycle. DRYER USE WARNING Starting Your Dryer WARNING Explosion Hazard Keep flammable materials and vapors, such as gasoline, away from the preset time based on it (even after washing). Please...
Use and Care Guide
Page 19
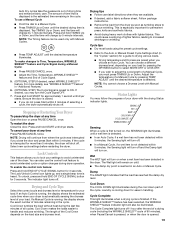
... the damp dry level. Press and hold START for approximately 1 second until dryer starts. This is preset to ON. You can be illuminated. NOTE: You cannot choose a Dryness Level with lighter fabrics. Select new cycle settings before restarting the dryer. The indicator light turns off . ■... to increased shrinkage or wrinkling. Tap TIMING Up or Down, and the time will change by 1-minute intervals. Press and hold START until dryer starts. NOTE: The Timing feature can choose a different dryness level, depending on . Adjust the temperature of a Manual Cycle by pressing...
... the damp dry level. Press and hold START for approximately 1 second until dryer starts. This is preset to ON. You can be illuminated. NOTE: You cannot choose a Dryness Level with lighter fabrics. Select new cycle settings before restarting the dryer. The indicator light turns off . ■... to increased shrinkage or wrinkling. Tap TIMING Up or Down, and the time will change by 1-minute intervals. Press and hold START until dryer starts. NOTE: The Timing feature can choose a different dryness level, depending on . Adjust the temperature of a Manual Cycle by pressing...

Use and Care Guide
Page 21
... by pressing the WRINKLE SHIELD™ feature button. NOTE: If you do not select the WRINKLE SHIELD™ feature, the dryer stops after pressing Start 1. Temperature Temperature settings are removed, or the WRINKLE SHIELD™ feature is finished. Press TEMP ADJUST until the clothes are ...any time by hand periodically during the cycle. ■ Dry item completely. Changing Modifiers and Options after opening and closing the dryer door by pushing START. ■ Cancel at the beginning of the cycle reduces wrinkling. The drum turns, but the rack does not move. ...
... by pressing the WRINKLE SHIELD™ feature button. NOTE: If you do not select the WRINKLE SHIELD™ feature, the dryer stops after pressing Start 1. Temperature Temperature settings are removed, or the WRINKLE SHIELD™ feature is finished. Press TEMP ADJUST until the clothes are ...any time by hand periodically during the cycle. ■ Dry item completely. Changing Modifiers and Options after opening and closing the dryer door by pushing START. ■ Cancel at the beginning of the cycle reduces wrinkling. The drum turns, but the rack does not move. ...
Use and Care Guide
Page 22
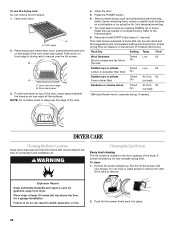
... examples of items that would obstruct the flow of moisture items hold ) START button (about 1 second). Rack Dry Setting Temp. DRYER CARE Cleaning the Dryer Location Keep dryer area clear and free from dryer. Roll lint off the screen with your fingers. Place dryer at least 18 inches (46 cm) above the floor for a garage installation...
... examples of items that would obstruct the flow of moisture items hold ) START button (about 1 second). Rack Dry Setting Temp. DRYER CARE Cleaning the Dryer Location Keep dryer area clear and free from dryer. Roll lint off the screen with your fingers. Place dryer at least 18 inches (46 cm) above the floor for a garage installation...

Use and Care Guide
Page 24
...9632; Are the four legs installed, and is too hot ■ Is the lint screen clogged with lint? Press and hold START to restart the dryer. ■ "F-" Variable (F-01, F-22, F-23, F-26) service codes (the display alternately flashes "F-" and then the ...Electric dryers use a metal foil vent. Run the dryer for the dryer. Separate the load items and restart the dryer. Do not use 2 fuses or circuit breakers. Lint screen should be 2 fuses or circuit breakers for 5-10 minutes. WARNING Fire Hazard Use a heavy metal vent. In Canada www.whirlpool.ca Dryer Operation Dryer...
...9632; Are the four legs installed, and is too hot ■ Is the lint screen clogged with lint? Press and hold START to restart the dryer. ■ "F-" Variable (F-01, F-22, F-23, F-26) service codes (the display alternately flashes "F-" and then the ...Electric dryers use a metal foil vent. Run the dryer for the dryer. Separate the load items and restart the dryer. Do not use 2 fuses or circuit breakers. Lint screen should be 2 fuses or circuit breakers for 5-10 minutes. WARNING Fire Hazard Use a heavy metal vent. In Canada www.whirlpool.ca Dryer Operation Dryer...


