Whirlpool WED8300SW Support Question
Whirlpool WED8300SW Support Question
Find answers below for this question about Whirlpool WED8300SW - w/ Accents Duet Sport Electric Dryer.Need a Whirlpool WED8300SW manual? We have 1 online manual for this item!
Question posted by foxy9400 on June 12th, 2014
Control Panel Comes On Dryer Will Not Start
The person who posted this question about this Whirlpool product did not include a detailed explanation. Please use the "Request More Information" button to the right if more details would help you to answer this question.
Current Answers
Answer #1: Posted by Odin on June 12th, 2014 5:48 PM
Odin

Member since:
April 10th, 2010 Points: 41,236,730

Member since:
April 10th, 2010 Points: 41,236,730
See http://www.repairclinic.com/RepairHelp/How-To-Fix-A-Dryer/1-5--V0VEODMwMFNX/Whirlpool-Dryer-won-t-start. (Ignore the paragraph in red relating to a partial model number.)
Hope this is useful. Please don't forget to click the Accept This Answer button if you do accept it. My aim is to provide reliable helpful answers, not just a lot of them. See https://www.helpowl.com/profile/Odin.
Related Whirlpool WED8300SW Manual Pages
Use and Care Guide - Page 1
®
®
ELECTRONIC ELECTRIC DRYER
Use & Care Guide
For questions about features, operation/performance, parts, accessories or service, call: 1-800-253-1301 or visit our website at... www.whirlpool.com
Table of Contents 2
W10151580A
Use and Care Guide - Page 2
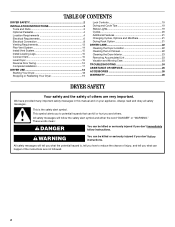
... 3 Optional Pedestal 4 Location Requirements 4 Electrical Requirements 6 Electrical Connection 8 Venting Requirements 13 Plan Vent System 14 Install Vent System 15 Install Leveling Legs 15 Connect Vent 15 Level Dryer 15 Reverse Door Swing 16 Complete Installation 17
DRYER USE 18 Starting Your Dryer 18 Stopping or Restarting Your Dryer 19
Lock Controls 19 Drying and Cycle Tips 19...
Use and Care Guide - Page 3
...before starting installation. Close supervision of children is necessary when the dryer is used near children.
■ Before the dryer is...dryer where it will be exposed to the weather.
■ Do not tamper with controls.
■ Do not repair or replace any part of the dryer...reduce the risk of fire, electric shock, or injury to persons when using the dryer, follow the instructions provided with...
Use and Care Guide - Page 4

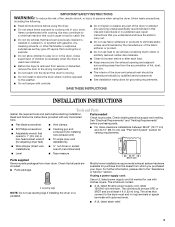
... purchasing pedestals of 127 lbs (57.6 kg). See "Electrical Requirements." ■ A sturdy floor to do so, you purchased your DUET SPORT™ washer and dryer? To order, call the dealer from dryer. Failure to support the total dryer weight of different heights separately for proper exhaust installation. The dryer must not be installed or stored in garages...
Use and Care Guide - Page 5
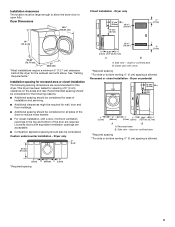
...68.6 cm)
*Most installations require a minimum 5" (12.7 cm) clearance behind the dryer for spacing of installation and servicing.
■ Additional clearances might be required for the ... 0" (0 cm) spacing is allowed. Recessed or closet installation - See "Venting Requirements."
This dryer has been tested for the exhaust vent with vents
*Required spacing **For side or bottom venting...
Use and Care Guide - Page 6
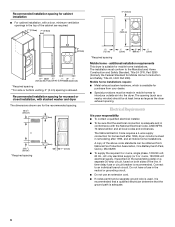
... standards can be obtained from your responsibility ■ To contact a qualified electrical installer.
■ To be sure that the ground path is allowed. ...dryer. Do not have a fuse in the neutral or grounding circuit.
■ Do not use an extension cord.
■ If codes permit and a separate ground wire is used, it is recommended that a qualified electrician determine that the electrical...
Use and Care Guide - Page 10
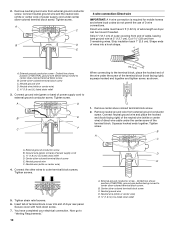
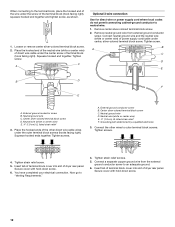
... Tighten strain relief screws. 6.
Center silver-colored terminal block screw C. Shape ends of dryer rear panel. Insert tab of terminal block cover into slot of wires into a hook shape.
... wire (green or bare) of the terminal block. Direct wire cable must have completed your electrical connection. B. Remove neutral ground wire from end of power supply cord to center silver-colored ...
Use and Care Guide - Page 11
... (2.5 cm). Neutral ground wire F. Center silver-colored terminal block screw D. Insert tab of dryer rear panel. Now go to "Venting Requirements."
3-wire connection: Power supply cord
Use where local codes ... of extra length so dryer can be moved if needed.
Ground wire (green or bare) of cable. Squeeze hooked ends together. You have completed your electrical connection. You have 5...
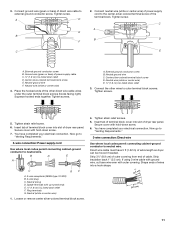
Use and Care Guide - Page 12
... B. Center silver-colored terminal block screw D. Place the hooked ends of dryer rear panel. Squeeze hooked ends together. Tighten screws.
Neutral wire (white or center ...wire) E 1.9 cm) UL listed strain relief F. Secure cover with hold -down screw.
12 You have completed your electrical...
Use and Care Guide - Page 14
...your local dealer. Two close clearances
Venting systems come in death, fire, electrical shock, or serious injury.
This dryer can result in many varieties. Dryer B. Exhaust hood
H
E. Failure to follow ...turns possible. Standard rear offset exhaust installation
B. Over-the-top installation (also available with dryer vent to wall vent mismatch):
Part Number 4396037 - 0" (0 cm) to 18" ...
Use and Care Guide - Page 15

...the floor, use vent runs longer than those specified in longer drying times and increased energy usage. Stand the dryer up the dryer using a wood block.
Use caulking compound to exhaust hood with a 4" (10.2 cm) clamp.
2. ... a large flat piece of cardboard from dryer packaging under the entire back edge of the dryer (not the console panel). Screw the legs into the interior of the...
Use and Care Guide - Page 16
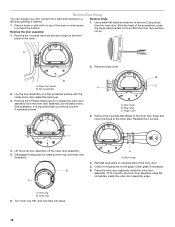
... hinge cover. Reinstall the 4 screws.
4. Disengage locking tabs by rotating inner ring clockwise. Place the inner door assembly inside the outer door assembly edge. Dryer front panel B. See illustration. It is important that attach to the inner door hinge and move the hinge to a left-side opening to the other side. Outer...
Use and Care Guide - Page 17
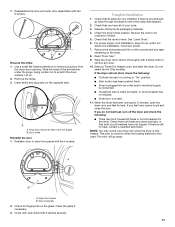
...dryer is closed.
11. For power supply cord installation, plug into an outlet and/or electrical... dryer ...used.
Dryer front panel B. ...dryer will go back through the steps to dryer front panel with the 4 screws. When the dryer has been running or "On" position.
■ Start button has been pushed firmly.
■ Dryer is plugged into an outlet.
The odor will not start the dryer...
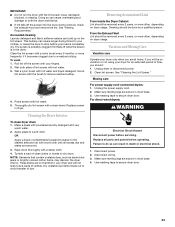
Use and Care Guide - Page 18
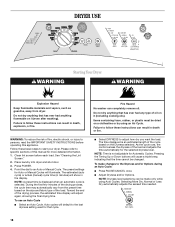
DRYER USE
WARNING
Starting Your Dryer
WARNING
Explosion Hazard
Keep flammable materials and vapors, such as gasoline, away from the preset time based on the size and fabric type of fire, electric... be changed. As the cycle runs, the control senses the dryness of the cycle based on ... made only while using an Air Cycle. Place laundry into dryer and shut door. 3. Do not dry anything that...
Use and Care Guide - Page 19
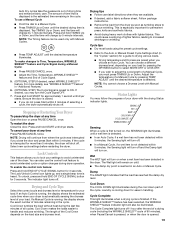
... as tumbling stops to adjust the cycle length of your load. Select new cycle settings before restarting the dryer.
To restart the dryer Close the door. To enable the control lock feature:
Press and hold START for more details, see "WRINKLE SHIELD™ Feature" in "Additional Features." 6. (OPTIONAL STEP) The Cycle Signal is the...
Use and Care Guide - Page 20
... clothes.
Super Delicate Use this setting to come out suitable
for heavyweight mixed loads, cotton ...Cycles to gently dry items such as sport shirts, casual business clothes and permanent ...dryer too long.
Damp dry items such as work clothes
QUICK DRY Small loads
Medium
27
TOUCH UP
Medium
20
Helps smooth out wrinkles
*The Timed Dry cycle will vary depending on the control panel...
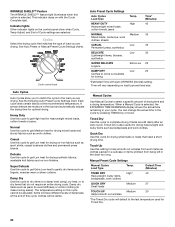
Use and Care Guide - Page 21

... again for your dryer shuts down period. The last selection will be emitted every 5 minutes until the desired temperature setting illuminates. Press and hold START to dry items such as sweaters and pillows without heat such as rubber, plastic and heat-sensitive fabrics. Restart the selection process. During this control. Temperature modifiers cannot...
Use and Care Guide - Page 22
...vapors, such as needed .
A
A. Put the wet items on the amount of the inner dryer back panel. NOTE: Do not allow items to hang over the edge of drying rack to remove. ... installation. Leave space between the items so air can be dried on the ledge of moisture items hold ) START button (about 1 second).
Pull the lint screen straight up. Push down on Dry
the rack. Roll lint...
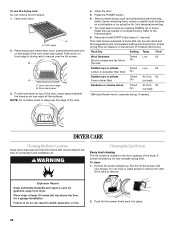
Use and Care Guide - Page 23
...-wired dryers:
WARNING
Electrical Shock Hazard Disconnect power before your dryer for your clothes, or cause the dryer to the stained area and rub with hot water. 3. As needed cleaning Laundry detergent and fabric softener residue can cause longer drying times for an extended period of lint screen with a soft cloth until all parts and panels...
Use and Care Guide - Page 24

... clean exhaust system of lint or replace exhaust vent with lint? Electric dryers use a metal foil vent. If the dryer hasn't been used ?
Do not use 2 fuses or circuit ...the display alternately flashes "F-" and then the error code number): Call for the dryer. In U.S.A. www.whirlpool.com/help - Press and hold START to check air movement. If you may be a thumping sound during the first...
Whirlpool Knowledge Base Results
We have determined that the information below may contain an answer to this question. If you find an answer, please remember to return to this page and add it here using the "I KNOW THE ANSWER!" button above. It's that easy to earn points!-
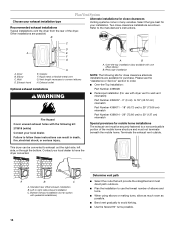
Nothing operates on my microwave oven
...controls...Dryer Refrigerator or Freezer Dishwasher Electric Range, Oven or Cooktop Gas Range, Oven or Cooktop Microwave Trash Compactor Window Air Conditioner Hot Water Dispenser Vent Hood Ice Machine Commercial Laundry Vacuum Cleaner Central Vac Dehumidifier Child Lock The Child Lock disables all controls...the control panel. The only control that... Cancel control for..."Oven Control" section...oven control ... -
How does the dual-size element on my ceramic-glass electric cooktop work?
... the Off position to anywhere between Hi and Lo. Why is recommended for larger cookware. How does the dual-size element on my electric downdraft ceramic glass cooktop control panel and cooktop? To use the dual element: Push in the same way as a regular element. The single element can be used in and... -
Removing odors from a front-load washer with the Clean Washer cycle (on control panel)
...laundry products to lift and remove residue which build over time. Select the Clean Washer cycle. Press Start...Here . For additional information on my Duet® Close the washer door and ...laundry room is displayed after a few minutes, see My front-load washer display shows rL or F34 . How do I remove odors from a front-load washer with the Clean Washer cycle (on control panel...
Similar Questions

Two Wires Inside The Dryer Vent
Inside the dryer there are 2 wires with clips to go on the vent. I do not know which wire goes on wh...
Inside the dryer there are 2 wires with clips to go on the vent. I do not know which wire goes on wh...
(Posted by denisebeery 2 years ago)

How To Reset Whirlpool Duet Sport Dryer Wed8300sw2
(Posted by jayveEli 9 years ago)

The Ring Around The Dryer Door That Goes Up To The Controls Is Coming Off ,how D
(Posted by rnoble1959 11 years ago)

Control Panel
How do you reinstall the control panel, I have it in place with the spring loaded brackets engaged n...
How do you reinstall the control panel, I have it in place with the spring loaded brackets engaged n...
(Posted by shirschberg 11 years ago)

When You Start Dryer It Says Sensing And Will Not Start
(Posted by tracysaylor 12 years ago)