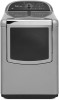
Whirlpool WED8900BC Support Question
Whirlpool WED8900BC Support Question
Find answers below for this question about Whirlpool WED8900BC.Need a Whirlpool WED8900BC manual? We have 5 online manuals for this item!
Question posted by Watchmework111 on June 24th, 2019
My Dryer Whirpool Dryer Turns On But It Won’t Start It Makes A Noise How Do I
how do I reset my whirlpool dryer it turns on but won't start
Current Answers
Answer #1: Posted by Odin on June 25th, 2019 5:27 AM
Odin

Member since:
April 10th, 2010 Points: 41,236,700

Member since:
April 10th, 2010 Points: 41,236,700
Hope this is useful. Please don't forget to click the Accept This Answer button if you do accept it. My aim is to provide reliable helpful answers, not just a lot of them. See https://www.helpowl.com/profile/Odin.
Related Whirlpool WED8900BC Manual Pages
Ventilation Specification - Page 1
... AND CLEANING 7
Frequency of Exhaust System Cleaning 7 Inspecting the Exhaust System ...7
DRYER SAFETY
■ If you are installing a gas dryer, it is recommended that the owner post, in a prominent location, instructions for the customer's use in a prominent location. Post the following warning in the event ...
Use & Care Guide - Page 5

...dryer on select Automatic cycles.
Follow garment label instructions. Turn the knob to select available cycles on or off, or to adjust the volume of load you to choose the best energy usage for each load.
6 START...Wrinkle Shield™ with options such as the dryer senses the load size and adjusts for the appropriate dry time for your laundry load. Temp When using Manual Cycles only, ...
Use & Care Guide - Page 6

...Damp
45
Damp Dry
Signal
Wrinkle Shield†
Static Reduce
Eco Boost
Offers stepped drying starting with High and Medium Temp settings. * Automatic/Eco cycle
Load Size Recommendations
For best..., followed by Medium heat for each cycle.
do not interrupt.
Large load: Fill the dryer drum up to thoroughly dry towels. Not all settings and options are default settings for all...
Use & Care Guide - Page 7

...dresses, underwear, permanent press fabrics, and some knits. CYCLE GUIDE - Large load: Fill the dryer drum up to loosen wrinkles, reduce odors, and refresh fabrics.
Do not overload. Items need...on some models). Small load: Fill the dryer drum with Steam (on some models)
High
12
Wrinkle Shield†
Offers stepped drying starting with High heat,
Static Reduce
followed by ...
Use & Care Guide - Page 8

...laundry in the dryer. Wet lint is hard to wet load, if desired. Load the dryer
4. Open the door by pulling on all cycles are available on the handle. Add a dryer sheet to remove. IMPORTANT: Do not overload the dryer...appliance.
1. For additional cleaning information, see "Dryer Care".
2. Do not rinse or wash screen to turn on the dryer. Clean the lint screen
3. Select the desired...
Use & Care Guide - Page 9
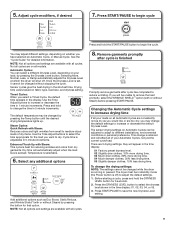
..., or Damp automatically adjusts the Dryness Level at which the dryer will appear in 1 minute increments. Press and hold the START/PAUSE button to change is set, it cannot be adjusted ...dry items. Use the Time Adjust buttons to select the time appropriate for that option.
Press START/PAUSE to remove the load promptly, select the WRINKLE SHIELD™ option (with Steam: This...
Use & Care Guide - Page 10

...dryer light automatically turns on the
back wall of the drying rack. Locate the light bulb cover on inside of the dryer drum. The drying rack does not move, but the rack remains stationary. Select the Air Only, Low or Extra Low Temp setting. Press START... items on the dryer back ledge. Make sure items do not hang over the edges or between items and the inside the dryer drum when you do...
Use & Care Guide - Page 12

Non-Use or Storage Care Operate your dryer. Make sure leveling legs are at home. Use tape to reduce the risk of replacement. Turn on vacation or not using your inlet hose, record the date of hose failure. Steam models only: Shut off water faucet. 3. Make sure leveling legs are away. Because some water may...
Use & Care Guide - Page 13
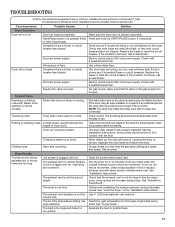
... screen is open . Electric dryers require 240-volt power supply. Thumping noise
Dryer hasn't been used during Automatic cycles. Rattling or vibrating noise A small object caught between the edges of garments being
been selected. Separate the load items and restart the dryer. Electric dryers require 240-volt power supply. For gas dryers, make this noise even with lint.
See...
Use & Care Guide - Page 14

... are not recommended. The dryer was not removed from loads consisting of the cycle. For steam cycles, the water is turned on some models). Odors ...water is clogged with the dryer. These cycles are gone from loads consisting of drying time in a closet. Lint on . Make sure water is connected to...whirlpool.com/product_help In Canada www.whirlpool.ca for assistance and to the dryer.
Use & Care Guide - Page 15

... from turning on. Dryer Displaying Code Message
"PF" (power failure)
The drying cycle has been interrupted Press START/PAUSE twice to possibly avoid a service call. Replace the fuse or reset the circuit breaker. If the message persists, consult a qualified electrician. TROUBLESHOOTING
First try the solutions suggested here or visit our website at www.whirlpool.com...
Dimension Guide - Page 2

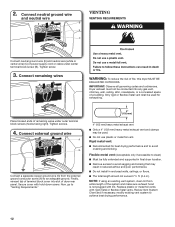
... notice. VENTING REQUIREMENTS
Exhaust venting: Exhaust your dryer to the outside. 4" (102 mm) diameter vent is recommended.
Whirlpool Vent System Chart
Number of 90° elbows
Type of dryer.
■■ Reduce performance, resulting in the path of elbows and turns.
■■ When using elbows or making turns, allow as much room as possible.
■...
Installation Guide - Page 3

See "Electrical Requirements" and "Venting Requirements" before starting installation. For further information, please refer to the "Assistance or Service" section in dryer drum.
Parts needed :
Parts supplied (all models):
Flat-blade screwdriver
#2 Phillips screwdriver
Leveling legs (4) for models with dryer)
Refer to 1" (25 mm) or hex-head socket wrench
Level
"Y" connector
...
Installation Guide - Page 7

... Type 14-30R): Go to strain relief
Put power supply cord through the strain relief.
F
Before you start, disconnect power. Remove hold-down (D), and hold the two clamp sections (C) together.
2. A. Center terminal...wire, go to Direct Wire Connection. The strain relief should have a tight fit with the dryer cabinet and be used with either a power supply cord or a direct wire connection. Hold-...
Installation Guide - Page 12
... chimney, wall, ceiling, attic, crawlspace, or a concealed space of the system and make sure exhaust hood is not plugged with hold-down screw. Flexible metal vent: (Acceptable ...neutral ground wire (E) and neutral wire (white or center wire) (C) of fire, this dryer MUST BE
EXHAUSTED OUTDOORS. Dryer exhaust must not be used for best drying performance and to "Venting Requirements."
4" (102...
Installation Guide - Page 14

...9632;■ Use as few 90° turns as possible.
A
B
A. Whirlpool Vent System Chart
Number of 90° ....
Special provisions for purchase. Over-the-top installation (also available with dryer vent to wall vent mismatch):
Part Number 4396037 - 0" (0 mm)...9632; Shorten life of elbows and turns. ■■ When using elbows or making turns, allow as much room
as possible....
Installation Guide - Page 15

..., skip to the charts. Remove old rubber washer from inlet hose and replace with additional two-thirds turn inside the dryer. If "Y" connector cannot be attached directly to the coupling can catch lint. Avoid 90° turns.
NOTE: Do not overtighten. Damage to the cold water faucet, the short hose must be connected...
Installation Guide - Page 16

... other side of "Y" connector. Attach washer cold inlet hose to other end of long hose to dryer fill
valve and tighten coupling
Check that the water faucets are turned on cold water faucet
One end of dryer back panel. Attach long hose to fill valve at bottom of the long hose has a wire...
Installation Guide - Page 17
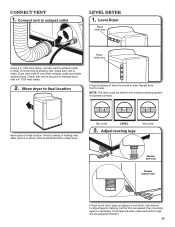
... snug against the floor.
17 Repeat from under dryer.
After dryer is clean. Not Level
LEVEL
2. If connecting to existing vent, make sure all four legs are level, make sure vent is in dryer. Move dryer to final location
Check levelness of dryer from side to final location. Move dryer to side. Avoid crushing or kinking vent. Level...
Installation Guide - Page 18

.... For direct wire installation, turn on the door. q Check for certain part replacement or repair. Over time, the buildup of lime scale may be a problem with a damp cloth to a left where the hinges were removed in your tools. q Dispose of the water system, which will not start dryer. q Read "Dryer Use" in Step 4.
18...
Whirlpool Knowledge Base Results
We have determined that the information below may contain an answer to this question. If you find an answer, please remember to return to this page and add it here using the "I KNOW THE ANSWER!" button above. It's that easy to earn points!-
Ice maker noises
...start the ice maker, you may make ice. The ice maker is my ice maker noisy? Hard surfaces such as floors, walls and cabinets can also make sounds that might cause you and might be making... - Side by the condenser fan. The high-efficiency compressor may be new to you may make noises. French Door with Ice bin in your ice maker. Items stored on top of sounds that... -
Ice dispenser (Dispenser with 4 button control and display screen) makes noise - Side by side refrigerator
...as if the dispenser motor is not similar to the dispenser with a display screen) make noise after you have released the ice dispenser paddle or pad. This will occur when ... Operating the dispenser controls (6 button control with 4 button control and display screen) makes noise - Side by a slight thump after you have stopped dispensing ice? Ice dispenser (Dispenser with a... -
Noises coming from my refrigerator
...water lines. Pulsating is turned on with no water... make beeping sounds. Creaking/cracking occurs as it starts ...make these sounds more prominent. Top freezer How do I level my refrigerator? Normal sounds - Your home environment (room size, flooring, cabinetry, etc.) may be concerned. Hissing/rattling/vibrating is my refrigerator making noises? Bottom freezer refrigerator Noises...
Similar Questions

Whirlpool Dryer Lew0050pq Won't Start
(Posted by garysben 9 years ago)


Whirlpool Dryer Wed6400sw1 Won't Start
(Posted by swjcol 10 years ago)


The Dryer Turns On But The Drum Does Not Turn. What's The Problem?
(Posted by dougjw2009 11 years ago)