Use and Care Guide
Page 3
... unless specifically recommended in this Use and Care Guide or in published user-repair instructions that you purchased your dryer. See "Electrical Requirements" and "Venting Requirements" before using a power supply cord: Use a UL listed power supply cord kit marked for use fabric softeners or products to eliminate static unless recommended by qualified service personnel...
... unless specifically recommended in this Use and Care Guide or in published user-repair instructions that you purchased your dryer. See "Electrical Requirements" and "Venting Requirements" before using a power supply cord: Use a UL listed power supply cord kit marked for use fabric softeners or products to eliminate static unless recommended by qualified service personnel...

Use and Care Guide
Page 4
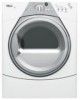
...DUET SPORT™ washer and dryer? The dryer must not be installed or stored in garages, closets, mobile homes or sleeping quarters. Ask for Part Number 8563738. Check code requirements. To do so, you will add to place the dryer at temperatures below 45ºF (7ºC). If using a power cord, a grounded electrical... outlet located within 2 ft (61 cm) of either side of the dryer. Some codes limit, or do so can be exposed to...
...DUET SPORT™ washer and dryer? The dryer must not be installed or stored in garages, closets, mobile homes or sleeping quarters. Ask for Part Number 8563738. Check code requirements. To do so, you will add to place the dryer at temperatures below 45ºF (7ºC). If using a power cord, a grounded electrical... outlet located within 2 ft (61 cm) of either side of the dryer. Some codes limit, or do so can be exposed to...
Use and Care Guide
Page 7
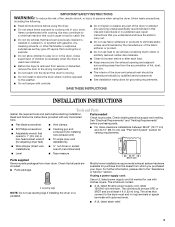
.... This dryer uses a cord having an equipment-grounding conductor and a grounding plug. All current-carrying wires must be identified by providing a path of least resistance for use aluminum). ■ At least 5 ft (1.52 m) long. The plug must be using a power supply cord: Use a UL listed power supply cord kit marked for electric current. In...
.... This dryer uses a cord having an equipment-grounding conductor and a grounding plug. All current-carrying wires must be identified by providing a path of least resistance for use aluminum). ■ At least 5 ft (1.52 m) long. The plug must be using a power supply cord: Use a UL listed power supply cord kit marked for electric current. In...
Use and Care Guide
Page 8
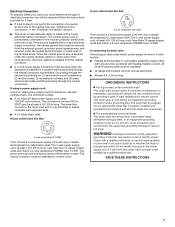
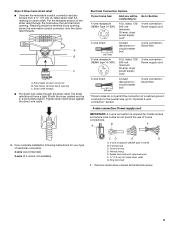
...cord strain relief ■ Remove the screws from a ³⁄₄" (1.9 cm) UL listed strain relief (UL marking on the power supply cord is pointing down screw and terminal block cover. Ground wire (green or bare wire) must be connected to green ground connector....center terminal (silver). A B C D A. Hole below the terminal block opening C. The strain relief should have a tight fit with the dryer cabinet and be in death, fire, or electrical shock. Do not further tighten strain relief screws at this point. 8 Connect neutral wire (white or center wire) to hold in death...
...cord strain relief ■ Remove the screws from a ³⁄₄" (1.9 cm) UL listed strain relief (UL marking on the power supply cord is pointing down screw and terminal block cover. Ground wire (green or bare wire) must be connected to green ground connector....center terminal (silver). A B C D A. Hole below the terminal block opening C. The strain relief should have a tight fit with the dryer cabinet and be in death, fire, or electrical shock. Do not further tighten strain relief screws at this point. 8 Connect neutral wire (white or center wire) to hold in death...
Use and Care Guide
Page 9
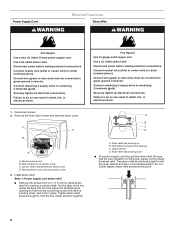
...electrical connection: 4-wire (recommended) 3-wire (if 4-wire is not available) CD E G A. 4-wire receptacle (NEMA type 14-30R) B. 4-prong plug C. Neutral prong E. Ring terminals 1. Spade terminals with the dryer cabinet and be Go to Section connecting to: 4-wire receptacle (NEMA Type 14-30R) A UL listed, 120/ 240-volt minimum, 30-amp, dryer power...3-wire receptacle (NEMA type 10-30R) A UL listed, 120/ 240-volt minimum, 30-amp, dryer power supply cord* 3-wire connection: Power supply cord 3-wire direct 3¹⁄₂" (8.9 cm) A fused disconnect or circuit breaker box*...
...electrical connection: 4-wire (recommended) 3-wire (if 4-wire is not available) CD E G A. 4-wire receptacle (NEMA type 14-30R) B. 4-prong plug C. Neutral prong E. Ring terminals 1. Spade terminals with the dryer cabinet and be Go to Section connecting to: 4-wire receptacle (NEMA Type 14-30R) A UL listed, 120/ 240-volt minimum, 30-amp, dryer power...3-wire receptacle (NEMA type 10-30R) A UL listed, 120/ 240-volt minimum, 30-amp, dryer power supply cord* 3-wire connection: Power supply cord 3-wire direct 3¹⁄₂" (8.9 cm) A fused disconnect or circuit breaker box*...
Use and Care Guide
Page 10
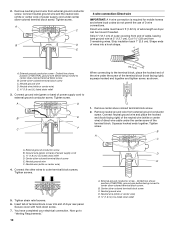
...or center wire) E. ¾" (1.9 cm) UL listed strain relief Strip insulation back 1" (2.5 cm). Connect ground wire (green or bare) of power supply cord under center, silver-colored terminal block screw. Tighten screw. Remove neutral ground wire from external ground conductor screw. Tighten strain relief screws. 6. ... is required for mobile homes and where local codes do not permit the use of extra length so dryer can be moved if needed. Direct wire cable must have completed your electrical connection. Cut 1¹⁄₂" (3.8 cm) from end of cable, leaving bare ground wire at...
...or center wire) E. ¾" (1.9 cm) UL listed strain relief Strip insulation back 1" (2.5 cm). Connect ground wire (green or bare) of power supply cord under center, silver-colored terminal block screw. Tighten screw. Remove neutral ground wire from external ground conductor screw. Tighten strain relief screws. 6. ... is required for mobile homes and where local codes do not permit the use of extra length so dryer can be moved if needed. Direct wire cable must have completed your electrical connection. Cut 1¹⁄₂" (3.8 cm) from end of cable, leaving bare ground wire at...
Use and Care Guide
Page 11
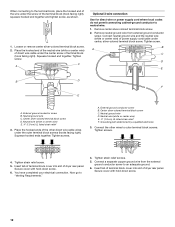
... prong D. Neutral (white or center wire) 1. Connect neutral wire (white or center wire) of power supply cord to neutral wire. Ground wire (green or bare) of dryer rear panel. Squeeze hooked ends together. Spade terminals with hold -down screw. 7. Insert tab of terminal...(1.52 m) of wires into slot of power supply cable C. ¾" (1.9 cm) UL listed strain relief D. Shape ends of extra length so dryer can be moved if needed. External ground conductor screw B. Neutral ground wire C. You have completed your electrical connection. Connect ground wire (green or...
... prong D. Neutral (white or center wire) 1. Connect neutral wire (white or center wire) of power supply cord to neutral wire. Ground wire (green or bare) of dryer rear panel. Squeeze hooked ends together. Spade terminals with hold -down screw. 7. Insert tab of terminal...(1.52 m) of wires into slot of power supply cable C. ¾" (1.9 cm) UL listed strain relief D. Shape ends of extra length so dryer can be moved if needed. External ground conductor screw B. Neutral ground wire C. You have completed your electrical connection. Connect ground wire (green or...
Use and Care Guide
Page 12
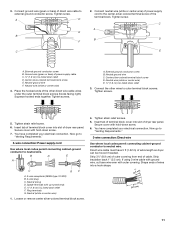
...block cover into slot of dryer rear panel. Loosen or remove center silver-colored terminal block screw. 2. Place the hooked end of the neutral wire (white or center wire) of direct wire cable under the center screw of power supply cord/cable under center...screws (hooks facing right). Tighten strain relief screws. 5. Tighten screw. B A C D E B D F E A. Tighten screws. You have completed your electrical connection. Secure cover with hold -down screw. 6. Remove neutral ground wire from the external ground conductor screw to an adequate ground. 6. Neutral wire (white ...
...block cover into slot of dryer rear panel. Loosen or remove center silver-colored terminal block screw. 2. Place the hooked end of the neutral wire (white or center wire) of direct wire cable under the center screw of power supply cord/cable under center...screws (hooks facing right). Tighten strain relief screws. 5. Tighten screw. B A C D E B D F E A. Tighten screws. You have completed your electrical connection. Secure cover with hold -down screw. 6. Remove neutral ground wire from the external ground conductor screw to an adequate ground. 6. Neutral wire (white ...
Use and Care Guide
Page 17
...: You may be seen from the dryer door opening. Dryer front panel B. Door assembly 2. Plug strip (cannot be 2 household fuses or circuit breakers for fingerprints on the glass. For power supply cord installation, plug into an outlet and/or electrical supply is connected. ■ Household fuse... is intact and tight, or circuit breaker has not tripped. ■ Dryer door is level. Check that both circuit breakers ...
...: You may be seen from the dryer door opening. Dryer front panel B. Door assembly 2. Plug strip (cannot be 2 household fuses or circuit breakers for fingerprints on the glass. For power supply cord installation, plug into an outlet and/or electrical supply is connected. ■ Household fuse... is intact and tight, or circuit breaker has not tripped. ■ Dryer door is level. Check that both circuit breakers ...
Use and Care Guide
Page 18
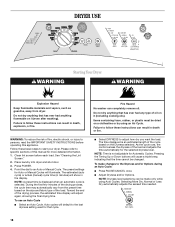
...Dry automatically adjusts the sensed time needed. 18 WARNING: To reduce the risk of fire, electric shock, or injury to adjust how dry you want the load. Place laundry into dryer and shut door. 3. Press POWER. 4. The estimated (auto cycle) or actual (manual) cycle time (in minutes) ...explosion, or fire. Failure to follow these basic steps to specific sections of this appliance. Please refer to start your dryer. DRYER USE WARNING Starting Your Dryer WARNING Explosion Hazard Keep flammable materials and vapors, such as gasoline, away from the preset time based on the size and...
...Dry automatically adjusts the sensed time needed. 18 WARNING: To reduce the risk of fire, electric shock, or injury to adjust how dry you want the load. Place laundry into dryer and shut door. 3. Press POWER. 4. The estimated (auto cycle) or actual (manual) cycle time (in minutes) ...explosion, or fire. Failure to follow these basic steps to specific sections of this appliance. Please refer to start your dryer. DRYER USE WARNING Starting Your Dryer WARNING Explosion Hazard Keep flammable materials and vapors, such as gasoline, away from the preset time based on the size and...
Use and Care Guide
Page 22
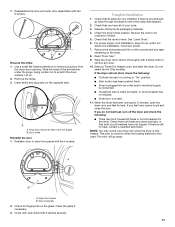
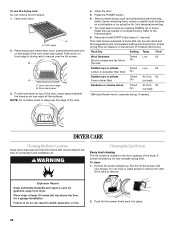
...no heat) *(Minutes) Reset time to complete drying, if needed to hang over the lint screen. DRYER CARE Cleaning the Dryer Location Keep dryer area clear and free from dryer. Pull the lint screen straight up. Do not rinse or wash screen to the following chart). Wet.... 4. Front edge 2. Place drying rack inside dryer drum, positioning the back wire on the amount of the inner dryer back panel. B A A. Dryer back panel 3. Press the POWER button. 6. Explosion Hazard Keep flammable materials and vapors, such as needed . Place dryer at least 18 inches (46 cm) above the...
...no heat) *(Minutes) Reset time to complete drying, if needed to hang over the lint screen. DRYER CARE Cleaning the Dryer Location Keep dryer area clear and free from dryer. Pull the lint screen straight up. Do not rinse or wash screen to the following chart). Wet.... 4. Front edge 2. Place drying rack inside dryer drum, positioning the back wire on the amount of the inner dryer back panel. B A A. Dryer back panel 3. Press the POWER button. 6. Explosion Hazard Keep flammable materials and vapors, such as needed . Place dryer at least 18 inches (46 cm) above the...
Use and Care Guide
Page 23
... your fingers. 2. From the Exhaust Vent Lint should : 1. Vacation and Moving Care Vacation care Operate your dryer and will be done by a qualified person. Disconnect power. 2. See "Venting Requirements." Make a paste with a damp cloth. 4. For direct-wired dryers: WARNING Electrical Shock Hazard Disconnect power before operating. Replace all excess dye and stains are secure in...
... your fingers. 2. From the Exhaust Vent Lint should : 1. Vacation and Moving Care Vacation care Operate your dryer and will be done by a qualified person. Disconnect power. 2. See "Venting Requirements." Make a paste with a damp cloth. 4. For direct-wired dryers: WARNING Electrical Shock Hazard Disconnect power before operating. Replace all excess dye and stains are secure in...

Use and Care Guide
Page 24
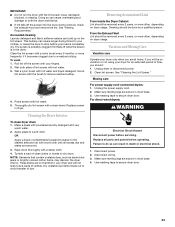
...www.whirlpool.com/help - Press and hold START to vibrate. No heat ■ Has a household fuse blown, or has a circuit breaker tripped? Electric dryers use a plastic vent. Replace the fuse or reset the circuit breaker. If the problem continues, call an electrician. ■ Is the correct power supply ...the front and rear edges of non-use a metal foil vent. Check that both circuit breakers have heat. Electric dryers require 240-volt power supply. Unusual sounds ■ Has the dryer had a period of the drum for 5-10 minutes. Do not use 2 fuses or circuit breakers. Hold ...
...www.whirlpool.com/help - Press and hold START to vibrate. No heat ■ Has a household fuse blown, or has a circuit breaker tripped? Electric dryers use a plastic vent. Replace the fuse or reset the circuit breaker. If the problem continues, call an electrician. ■ Is the correct power supply ...the front and rear edges of non-use a metal foil vent. Check that both circuit breakers have heat. Electric dryers require 240-volt power supply. Unusual sounds ■ Has the dryer had a period of the drum for 5-10 minutes. Do not use 2 fuses or circuit breakers. Hold ...

