
Quick Start Guide
Page 2
... • Wide screen viewing for DVDs CHECK OUT www.westinghousedigital.com for the best quality picture with these or other devices, please refer to change without notice. , Westinghouse and You can attach your LCD TV to a variety of Westinghouse Electric Corporation and are used devices. Audio Output (L/R) Subwoofer Output Use the Source button...
... • Wide screen viewing for DVDs CHECK OUT www.westinghousedigital.com for the best quality picture with these or other devices, please refer to change without notice. , Westinghouse and You can attach your LCD TV to a variety of Westinghouse Electric Corporation and are used devices. Audio Output (L/R) Subwoofer Output Use the Source button...

User Manual
Page 3
... 10 Programming TV Channels 11 Enjoying Wide-Format Movies 11 Reference Guide 13 Connector Descriptions 13 Push-Button Control Descriptions 15 Remote Control Description 16 Picture-in-Picture Description 20 Display Menu 21 Display 23 TV 24 Geometric 25 Audio 26 Miscellaneous 27 Appendices 28 Trouble-Shooting 28 Specifications 30 Wall Mounting...
... 10 Programming TV Channels 11 Enjoying Wide-Format Movies 11 Reference Guide 13 Connector Descriptions 13 Push-Button Control Descriptions 15 Remote Control Description 16 Picture-in-Picture Description 20 Display Menu 21 Display 23 TV 24 Geometric 25 Audio 26 Miscellaneous 27 Appendices 28 Trouble-Shooting 28 Specifications 30 Wall Mounting...

User Manual
Page 4
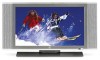
... 27" Wide-Format LCD-TV User Manual Thank you setup and use this LCD-TV, please follow the instructions in -picture and multiple picture arrangements Stereo speakers (8W/channel) Wireless remote control with this product. The first time you and congratulations! To fully explore... the abilities and individual features of picture-in the Installation Guide. Features (typical): Cable-ready 181 channel NTSC TV tuner Built-in progressive scan de-interlacing 720p, 1080i...
... 27" Wide-Format LCD-TV User Manual Thank you setup and use this LCD-TV, please follow the instructions in -picture and multiple picture arrangements Stereo speakers (8W/channel) Wireless remote control with this product. The first time you and congratulations! To fully explore... the abilities and individual features of picture-in the Installation Guide. Features (typical): Cable-ready 181 channel NTSC TV tuner Built-in progressive scan de-interlacing 720p, 1080i...

User Manual
Page 17
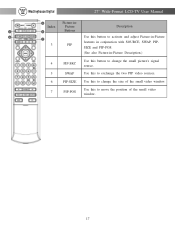
The buttons are grouped in 4 categories: Power & Mute Buttons Picture-in-Picture Buttons Audio & Video Adjustment Buttons Volume & Channel Control Buttons The index number corresponds to the callout number for each button depicted in standby. The power ...
The buttons are grouped in 4 categories: Power & Mute Buttons Picture-in-Picture Buttons Audio & Video Adjustment Buttons Volume & Channel Control Buttons The index number corresponds to the callout number for each button depicted in standby. The power ...
User Manual
Page 18
Use this to change the small picture's signal source. 5 SWAP Use this to exchange the two PIP video sources. 6 PIP-SIZE Use this to change the size of the small video 7 PIP-POS window. 17 27" Wide-Format LCD-TV User Manual 4 Picture-in -Picture Description.) 4 PIP-SRC Use this button to move the position of the small video window. Index Picture 3 5 Buttons Description 6 Use this button to activate and adjust Picture-in-Picture 7 features in conjunction with SOURCE, SWAP, PIP- 3 PIP SIZE and PIP-POS. (See also Picture-in -
Use this to change the small picture's signal source. 5 SWAP Use this to exchange the two PIP video sources. 6 PIP-SIZE Use this to change the size of the small video 7 PIP-POS window. 17 27" Wide-Format LCD-TV User Manual 4 Picture-in -Picture Description.) 4 PIP-SRC Use this button to move the position of the small video window. Index Picture 3 5 Buttons Description 6 Use this button to activate and adjust Picture-in-Picture 7 features in conjunction with SOURCE, SWAP, PIP- 3 PIP SIZE and PIP-POS. (See also Picture-in -
User Manual
Page 21
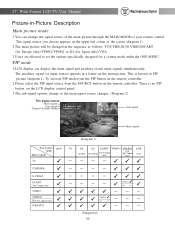
... display control panel. 3.The sub-signal options change the signal source of the main picture through the MAIN MODE of the screen (diagram 1). 2.The main picture will be changed in a frame on the main picture. OFF VGA YPbPr1 YPbPr2 CHANNEL NO. : 25 SAP Sub signal Main signal (Diagram... D4 (For Japan only) VGA (PC) YPbPr2 D4 YPbPr2 D4 (Diagram 2) 20 PIP mode 1.LCD display can change as PIP picture (diagram 1). 27" Wide-Format LCD-TV User Manual Picture-in-Picture Description Main picture mode 1.You can display the main signal and auxiliary visual input signals simultaneously.
... display control panel. 3.The sub-signal options change the signal source of the main picture through the MAIN MODE of the screen (diagram 1). 2.The main picture will be changed in a frame on the main picture. OFF VGA YPbPr1 YPbPr2 CHANNEL NO. : 25 SAP Sub signal Main signal (Diagram... D4 (For Japan only) VGA (PC) YPbPr2 D4 YPbPr2 D4 (Diagram 2) 20 PIP mode 1.LCD display can change as PIP picture (diagram 1). 27" Wide-Format LCD-TV User Manual Picture-in-Picture Description Main picture mode 1.You can display the main signal and auxiliary visual input signals simultaneously.

User Manual
Page 22
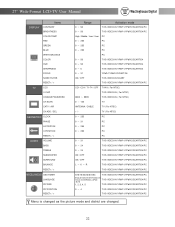
...system mode selected by users appears on the remote control to adjustment the setup of the screen. 2. AUDIO (audio setup) Provides more picture modes and functions based upon your favorite channels. MISCELLANEOUS (other setups) Provides several systems and input signal sources, this function executes the... the following functions: AUTO (automatic adjustment) (can be used under PC mode) Allows you to select the proper mode. DISPLAY (picture display) Provides more audio selections. You can use several options and allows you to set the audio environment for your LCD display....
...system mode selected by users appears on the remote control to adjustment the setup of the screen. 2. AUDIO (audio setup) Provides more picture modes and functions based upon your favorite channels. MISCELLANEOUS (other setups) Provides several systems and input signal sources, this function executes the... the following functions: AUTO (automatic adjustment) (can be used under PC mode) Allows you to select the proper mode. DISPLAY (picture display) Provides more audio selections. You can use several options and allows you to set the audio environment for your LCD display....
User Manual
Page 23
.../SCART/D4/PC 04 TV/S-VIDEO/AV/YPbPr1/YPbPr2/SCART/D4/PC TV/S-VIDEO/AV/YPbPr1/YPbPr2/SCART/D4/PC Menu is changed as the picture mode and district are changed. 22
.../SCART/D4/PC 04 TV/S-VIDEO/AV/YPbPr1/YPbPr2/SCART/D4/PC TV/S-VIDEO/AV/YPbPr1/YPbPr2/SCART/D4/PC Menu is changed as the picture mode and district are changed. 22
User Manual
Page 24
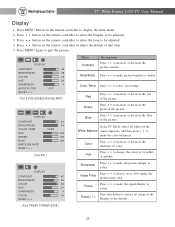
... to increase or decrease the blue of that item. 5. Brightness Press to increase or decrease the green of color. Press to make the picture sharper or softer. Color Press to display the main menu. 2. Press button on the remote controller to increase or decrease the thickness of the... picture. and then press to restore all white for the White Balance center ofpicture; Press this button to make the signal sharper or softer. ...
... to increase or decrease the blue of that item. 5. Brightness Press to increase or decrease the green of color. Press to make the picture sharper or softer. Color Press to display the main menu. 2. Press button on the remote controller to increase or decrease the thickness of the... picture. and then press to restore all white for the White Balance center ofpicture; Press this button to make the signal sharper or softer. ...

User Manual
Page 25
... 24 Press MENU button again to execute the automatic channel scanning. CH Scan (automatic channel scanning) At CH Scan, press button to quit the picture. You can be accompanied by parents NC-17 children under 17 should be aware if the programs are not allowed X former grading, has merged with... NC-17, but can press button to adjust the setup of that item. 4. You'll see the New Password picture. Press button on the remote controller to select the main item (TV) to +(ADD) / - (DEL) the channel. and then press button to set...
... 24 Press MENU button again to execute the automatic channel scanning. CH Scan (automatic channel scanning) At CH Scan, press button to quit the picture. You can be accompanied by parents NC-17 children under 17 should be aware if the programs are not allowed X former grading, has merged with... NC-17, but can press button to adjust the setup of that item. 4. You'll see the New Password picture. Press button on the remote controller to select the main item (TV) to +(ADD) / - (DEL) the channel. and then press button to set...
User Manual
Page 26
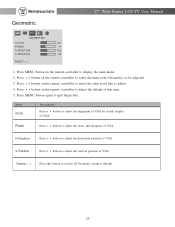
... the focus and sharpness of VGA. Menu Clock Descriptions Press button to adjust. 4. Reset< / > Press this button to restore all Geometric setups to quit the picture. Press MENU button on the remote controller to select the item you'd like to adjust the alignment of VGA for steady display of VGA. Press...
... the focus and sharpness of VGA. Menu Clock Descriptions Press button to adjust. 4. Reset< / > Press this button to restore all Geometric setups to quit the picture. Press MENU button on the remote controller to select the item you'd like to adjust the alignment of VGA for steady display of VGA. Press...
User Manual
Page 27
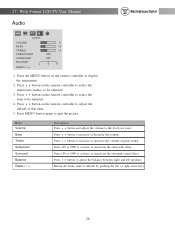
... adjust the volume to activate or inactivate the surround sound effect. Press ON or OFF to the level you want. Press button to quit the picture. Press MENU button again to increase or decrease the volume. 27" Wide-Format LCD-TV User Manual Audio AUDIO VOLUME BASS TREBLE SUBWOOFER SURROUND BALANCE...
... adjust the volume to activate or inactivate the surround sound effect. Press ON or OFF to the level you want. Press button to quit the picture. Press MENU button again to increase or decrease the volume. 27" Wide-Format LCD-TV User Manual Audio AUDIO VOLUME BASS TREBLE SUBWOOFER SURROUND BALANCE...

User Manual
Page 28
... remote controller to select the item to be shown on the remote controller to display the main item (Miscellaneous) to adjust the default of small picture. (5 size) (Please execute this function under PIP Mode) Press button to move the small to upper left, upper right, center, lower left, or lower right... select the size of that item. 5. Menu OSD Timer Language PIP Size PIP Position Reset< / > Descriptions Press button to select the time to quit the picture.
... remote controller to select the item to be shown on the remote controller to display the main item (Miscellaneous) to adjust the default of small picture. (5 size) (Please execute this function under PIP Mode) Press button to move the small to upper left, upper right, center, lower left, or lower right... select the size of that item. 5. Menu OSD Timer Language PIP Size PIP Position Reset< / > Descriptions Press button to select the time to quit the picture.


