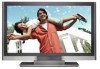
User Manual
Page 2
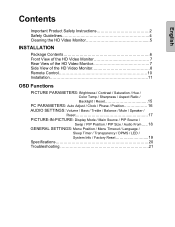
... Ratio / Backlight / Reset 15 PC PARAMETERS: Auto Adjust / Clock / Phase / Position 16 AUDIO SETTINGS: Volume / Bass / Treble / Balance / Mute / Speaker / Reset 17 PICTURE-IN-PICTURE: Display Mode / Main Source / PIP Source / Swap / PIP Position / PIP Size / Audio From..... 18 GENERAL SETTINGS: Menu Position / Menu Timeout / Language / Sleep Timer / Transparency / DPMS / LED / System Info...
... Ratio / Backlight / Reset 15 PC PARAMETERS: Auto Adjust / Clock / Phase / Position 16 AUDIO SETTINGS: Volume / Bass / Treble / Balance / Mute / Speaker / Reset 17 PICTURE-IN-PICTURE: Display Mode / Main Source / PIP Source / Swap / PIP Position / PIP Size / Audio From..... 18 GENERAL SETTINGS: Menu Position / Menu Timeout / Language / Sleep Timer / Transparency / DPMS / LED / System Info...
User Manual
Page 6
... CORD SELECTION The specific power cord for power cords used in the United States and Canada. For LCD Monitors placed directly on a desk or table, type SVT or SJT cord sets may be used. These limits are listed below for the selection criteria for this device. 4 If... to operate this HD Monitor is connected. • Consult the Westinghouse Service Center or an experienced radio/Monitor technician for your specific country. For LCD Monitors that are placed on the floor, only SJT type cord sets may cause harmful interference to radio communications if not installed and used...
... CORD SELECTION The specific power cord for power cords used in the United States and Canada. For LCD Monitors placed directly on a desk or table, type SVT or SJT cord sets may be used. These limits are listed below for the selection criteria for this device. 4 If... to operate this HD Monitor is connected. • Consult the Westinghouse Service Center or an experienced radio/Monitor technician for your specific country. For LCD Monitors that are placed on the floor, only SJT type cord sets may cause harmful interference to radio communications if not installed and used...
User Manual
Page 11
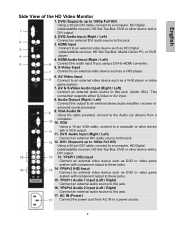
... Audio Input (Right / Left) Connect the audio input if you using a DVI-to an external video device such as HD Digital cable/satellite receiver, HD Set-Top-Box, Media Center PC, or DVD player. 4. This connection supports either S-Video or AV input. 8. DVI1 Audio Input (Right / Left) Connect an external...these jacks. 15. DVI1 (Supports up to 1080p Full HD) Using a 20-pin DVI cable, connect to a computer, HD Digital cable/satellite receiver, HD Set-Top-Box, DVD or other device with component output to a power source. 9 S-Video Input Connect to an external video device such as DVD or video...
... Audio Input (Right / Left) Connect the audio input if you using a DVI-to an external video device such as HD Digital cable/satellite receiver, HD Set-Top-Box, Media Center PC, or DVD player. 4. This connection supports either S-Video or AV input. 8. DVI1 Audio Input (Right / Left) Connect an external...these jacks. 15. DVI1 (Supports up to 1080p Full HD) Using a 20-pin DVI cable, connect to a computer, HD Digital cable/satellite receiver, HD Set-Top-Box, DVD or other device with component output to a power source. 9 S-Video Input Connect to an external video device such as DVD or video...
User Manual
Page 15
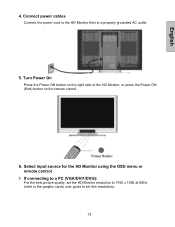
English 4. Turn Power On Press the Power ON button on the right side of the HD Monitor, or press the Power ON (Red) button on the remote control. 6. Select input source for the HD Monitor using the OSD menu or remote control 7. If connecting to a PC (VGA/DVI1/DVI2): For the best picture quality, set this resolution). 13 Connect power cables Connect the power cord to the HD Monitor then to set the HD Monitor resolution to 1920 x 1080 at 60Hz (refer to the graphic card's user guide to a properly grounded AC outlet. 5.
English 4. Turn Power On Press the Power ON button on the right side of the HD Monitor, or press the Power ON (Red) button on the remote control. 6. Select input source for the HD Monitor using the OSD menu or remote control 7. If connecting to a PC (VGA/DVI1/DVI2): For the best picture quality, set this resolution). 13 Connect power cables Connect the power cord to the HD Monitor then to set the HD Monitor resolution to 1920 x 1080 at 60Hz (refer to the graphic card's user guide to a properly grounded AC outlet. 5.
User Manual
Page 16
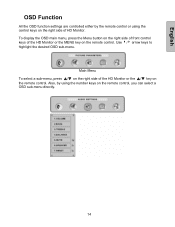
... remote control. Also, by the remote control or using the number keys on the remote control, you can select a OSD sub-menu directly. 14 To display the OSD main menu, press the Menu button on the right side of front control keys of the HD Monitor or the MENU key on... the remote control. Use 3/4 arrow keys to highlight the desired OSD sub-menu. English OSD Function All the OSD function settings are controlled either by using the control keys on the right side of HD Monitor.
... remote control. Also, by the remote control or using the number keys on the remote control, you can select a OSD sub-menu directly. 14 To display the OSD main menu, press the Menu button on the right side of front control keys of the HD Monitor or the MENU key on... the remote control. Use 3/4 arrow keys to highlight the desired OSD sub-menu. English OSD Function All the OSD function settings are controlled either by using the control keys on the right side of HD Monitor.
User Manual
Page 17
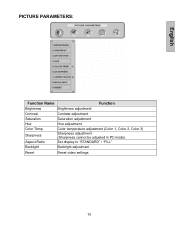
PICTURE PARAMETERS: English Function Name Function Brightness Brightness adjustment Contrast Contrast adjustment Saturation Saturation adjustment Hue Hue adjustment Color Temp Sharpness Aspect Ratio Color temperature adjustment (Color 1, Color 2, Color 3) Sharpness adjustment (Sharpness cannot be adjusted in PC mode) Set display to "STANDARD" / "FILL" Backlight Backlight adjustment Reset Reset video settings 15
PICTURE PARAMETERS: English Function Name Function Brightness Brightness adjustment Contrast Contrast adjustment Saturation Saturation adjustment Hue Hue adjustment Color Temp Sharpness Aspect Ratio Color temperature adjustment (Color 1, Color 2, Color 3) Sharpness adjustment (Sharpness cannot be adjusted in PC mode) Set display to "STANDARD" / "FILL" Backlight Backlight adjustment Reset Reset video settings 15
User Manual
Page 19
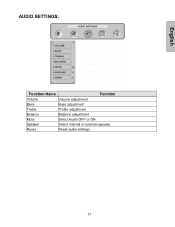
English AUDIO SETTINGS: Function Name Function Volume Volume adjustment Bass Bass adjustment Treble Treble adjustment Balance Balance adjustment Mute Select Audio OFF or ON Speaker Select internal or external speaker Reset Reset audio settings 17
English AUDIO SETTINGS: Function Name Function Volume Volume adjustment Bass Bass adjustment Treble Treble adjustment Balance Balance adjustment Mute Select Audio OFF or ON Speaker Select internal or external speaker Reset Reset audio settings 17

User Manual
Page 21
GENERAL SETTINGS: English Function Name Function Menu Position OSD horizontal/vertical position adjustment Menu Timeout Set the time to turn off the OSD automatically Language OSD language selection Sleep Timer Set sleep timer to turn off the power automatically Transparency Set OSD transparency level DPMS Select DPMS On/Off LED Turn the LED ON or OFF System Info Display Input source, type and signal Factory Reset Restore factory default settings 19
GENERAL SETTINGS: English Function Name Function Menu Position OSD horizontal/vertical position adjustment Menu Timeout Set the time to turn off the OSD automatically Language OSD language selection Sleep Timer Set sleep timer to turn off the power automatically Transparency Set OSD transparency level DPMS Select DPMS On/Off LED Turn the LED ON or OFF System Info Display Input source, type and signal Factory Reset Restore factory default settings 19
User Manual
Page 22
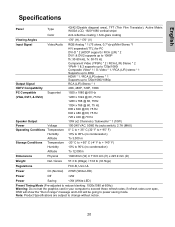
English Specifications Panel Type 42(42.02wable diagonal area), TFT (Thin Film Transistor), Active Matrix WXGA LCD, 1920*1080 vertical stripe Color Anti-reflective coating + Anti-glare coating Viewing Angles 176° (H) / 176° (V) Input Signal Output Signal HDTV Compatibility Video/Audio ...
English Specifications Panel Type 42(42.02wable diagonal area), TFT (Thin Film Transistor), Active Matrix WXGA LCD, 1920*1080 vertical stripe Color Anti-reflective coating + Anti-glare coating Viewing Angles 176° (H) / 176° (V) Input Signal Output Signal HDTV Compatibility Video/Audio ...
User Manual
Page 23
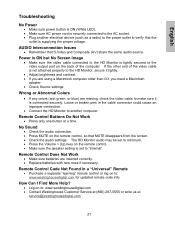
... (Up) key on the remote control. • Make sure the speaker setting is not attached properly to the HD Monitor, secure it is tightly secured to the video output port on to: www.westinghousedigital.com • Contact Westinghouse Customer Service at (866) 287-5555 or write us at a time.... The HD Monitor audio may be set to "internal". Remote Control Code Not Found in the cable connector could cause an improper ...
... (Up) key on the remote control. • Make sure the speaker setting is not attached properly to the HD Monitor, secure it is tightly secured to the video output port on to: www.westinghousedigital.com • Contact Westinghouse Customer Service at (866) 287-5555 or write us at a time.... The HD Monitor audio may be set to "internal". Remote Control Code Not Found in the cable connector could cause an improper ...


