
Brochure
Page 1
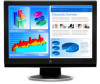
:Win& 7a,„ N:7 Westinghouse Digital Electronics Home Products Support Company Resel LEADING 32" LCD TV BI LTIA32,ta Sweet... M t` Mr1t1 SIZE: FITS INTO THE SAME ARMOIRE AS 27* CRT'S LTV-32w6 HD DESIGN: SLEEK, STYLISH DESIGN TO EP FEATURES: INTEGRATED HD TUNER WITH RESOLUTION AND 4 HO INPUT:
:Win& 7a,„ N:7 Westinghouse Digital Electronics Home Products Support Company Resel LEADING 32" LCD TV BI LTIA32,ta Sweet... M t` Mr1t1 SIZE: FITS INTO THE SAME ARMOIRE AS 27* CRT'S LTV-32w6 HD DESIGN: SLEEK, STYLISH DESIGN TO EP FEATURES: INTEGRATED HD TUNER WITH RESOLUTION AND 4 HO INPUT:
Brochure
Page 2
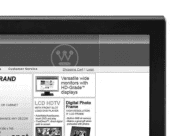
LCDFRAME • Buit•in 8MB d memory •Makes a great giftwhen preload vett photos 111.1:-, , . 5 Customer Service ?AND Shopping Cart I Login Versatile wide monitors with HD-Grade'" displays OR CABINET JHANCE ANY DECOR 1366 x 768 aa a LCD HDTV WITH FRONT SLOT LOAD DVD PLAYER • AutoWaterAutoSoixte: met DVDadplay • Pixetirectlw: area digital path to screen Digital Photo Frame HIGH RESOLUTION 8-
LCDFRAME • Buit•in 8MB d memory •Makes a great giftwhen preload vett photos 111.1:-, , . 5 Customer Service ?AND Shopping Cart I Login Versatile wide monitors with HD-Grade'" displays OR CABINET JHANCE ANY DECOR 1366 x 768 aa a LCD HDTV WITH FRONT SLOT LOAD DVD PLAYER • AutoWaterAutoSoixte: met DVDadplay • Pixetirectlw: area digital path to screen Digital Photo Frame HIGH RESOLUTION 8-
User Manual
Page 2
... PRODUCT SAFETY INSTRUCTIONS 2 SAFETY GUIDELINES 3 FCC COMPLIANCE STATEMENT 3 CLEANING THE LCD MONITOR 4 FEATURES ...5 POWER SAVER 5 PLUG & PLAY 5 INSTALLATION 6 PACKAGE CONTENTS 6 1. CONNECT POWER CABLE 8 4. ATTACHING THE BASE STAND TO THE LCD MONITOR 6 2. CONNECT INPUTS 7 3. TURN THE POWER ON 8 CONTROL PANEL BUTTONS 9 OSD MENU FUNCTIONS 10 IMAGE MENU (WHILE IN A/V INPUTS 11 AUDIO MENU 12 COLOR MENU 13 MISCELLANEOUS MENU (WHILE IN A/V INPUTS 14 IMAGE MENU (WHILE IN PC INPUTS 15 MISCELLANEOUS MENU (WHILE IN PC INPUTS 16 INFO MENU (WHILE IN PC INPUTS 17 APPENDIX...
... PRODUCT SAFETY INSTRUCTIONS 2 SAFETY GUIDELINES 3 FCC COMPLIANCE STATEMENT 3 CLEANING THE LCD MONITOR 4 FEATURES ...5 POWER SAVER 5 PLUG & PLAY 5 INSTALLATION 6 PACKAGE CONTENTS 6 1. CONNECT POWER CABLE 8 4. ATTACHING THE BASE STAND TO THE LCD MONITOR 6 2. CONNECT INPUTS 7 3. TURN THE POWER ON 8 CONTROL PANEL BUTTONS 9 OSD MENU FUNCTIONS 10 IMAGE MENU (WHILE IN A/V INPUTS 11 AUDIO MENU 12 COLOR MENU 13 MISCELLANEOUS MENU (WHILE IN A/V INPUTS 14 IMAGE MENU (WHILE IN PC INPUTS 15 MISCELLANEOUS MENU (WHILE IN PC INPUTS 16 INFO MENU (WHILE IN PC INPUTS 17 APPENDIX...
User Manual
Page 3
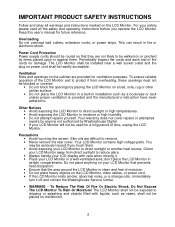
... in airtight compartments. Other Notices • Avoid exposing the LCD Monitor to direct sunlight or high temperatures. • Avoid exposing the LCD Monitor to remove. • Never remove the rear cover. Precautions • Avoid touching the screen. The LCD Monitor shall not be seriously injured if you operate the LCD Monitor Keep this user's manual for ventilation purposes. Overloading Do not overload wall outlets, extension cords, or power strips.
... in airtight compartments. Other Notices • Avoid exposing the LCD Monitor to direct sunlight or high temperatures. • Avoid exposing the LCD Monitor to remove. • Never remove the rear cover. Precautions • Avoid touching the screen. The LCD Monitor shall not be seriously injured if you operate the LCD Monitor Keep this user's manual for ventilation purposes. Overloading Do not overload wall outlets, extension cords, or power strips.
User Manual
Page 4
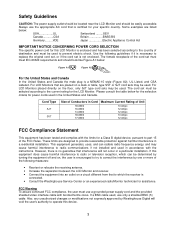
... CSA Britain BASE/BS Germany..........VDE Japan Electric Appliance Control Act IMPORTANT NOTICE CONCERNING POWER CORD SELECTION The specific power cord for the LCD Monitor. FCC Warning To assure continued FCC compliance, the user must be used , use the appropriate AC cord that interference will void the user's authority to replace the original cord set, or if the cord set must use a grounded power supply cord and the provided shielded video interface cable with bonded...
... CSA Britain BASE/BS Germany..........VDE Japan Electric Appliance Control Act IMPORTANT NOTICE CONCERNING POWER CORD SELECTION The specific power cord for the LCD Monitor. FCC Warning To assure continued FCC compliance, the user must be used , use the appropriate AC cord that interference will void the user's authority to replace the original cord set, or if the cord set must use a grounded power supply cord and the provided shielded video interface cable with bonded...
User Manual
Page 5
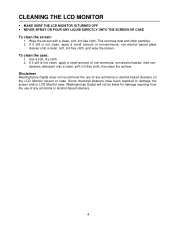
... alcohol-based cleaners on the LCD Monitor screen or case. Use a soft, dry cloth. 2. Some chemical cleaners have been reported to damage the screen and/or LCD Monitor case. Westinghouse Digital will not be liable for damage resulting from the use of non-ammonia, non-alcohol based glass cleaner onto a clean, soft, lint-free cloth, and wipe the screen. CLEANING THE LCD MONITOR • MAKE SURE THE LCD MONITOR IS TURNED OFF...
... alcohol-based cleaners on the LCD Monitor screen or case. Use a soft, dry cloth. 2. Some chemical cleaners have been reported to damage the screen and/or LCD Monitor case. Westinghouse Digital will not be liable for damage resulting from the use of non-ammonia, non-alcohol based glass cleaner onto a clean, soft, lint-free cloth, and wipe the screen. CLEANING THE LCD MONITOR • MAKE SURE THE LCD MONITOR IS TURNED OFF...
User Manual
Page 6
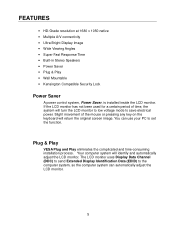
...-Grade resolution at 1680 x 1050 native • Multiple A/V connectivity • Ultra Bright Display Image • Wide Viewing Angles • Super Fast Response Time • Built-in Stereo Speakers • Power Saver • Plug & Play • Wall Mountable • Kensington Compatible Security Lock Power Saver A power control system, Power Saver, is installed inside the LCD monitor. The LCD monitor uses Display Data Channel (DDC) to send Extended Display Identification Data (EDID) to set the function. You can use your...
...-Grade resolution at 1680 x 1050 native • Multiple A/V connectivity • Ultra Bright Display Image • Wide Viewing Angles • Super Fast Response Time • Built-in Stereo Speakers • Power Saver • Plug & Play • Wall Mountable • Kensington Compatible Security Lock Power Saver A power control system, Power Saver, is installed inside the LCD monitor. The LCD monitor uses Display Data Channel (DDC) to send Extended Display Identification Data (EDID) to set the function. You can use your...
User Manual
Page 7
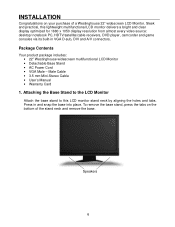
... product package includes: • 22" Westinghouse widescreen multifunctional LCD Monitor • Detachable Base Stand • AC Power Cord • VGA Male - Male Cable • 3.5 mm Mini-Stereo Cable • User's Manual • Warranty Card 1. Speakers 6 Attaching the Base Stand to the LCD Monitor Attach the base stand to this lightweight multifunctional LCD monitor delivers a bright and clear display optimized for 1680 x 1050 display resolution from almost every video source: desktop/ notebook PC, HDTV/satellite/cable receivers, DVD player, camcorder and...
... product package includes: • 22" Westinghouse widescreen multifunctional LCD Monitor • Detachable Base Stand • AC Power Cord • VGA Male - Male Cable • 3.5 mm Mini-Stereo Cable • User's Manual • Warranty Card 1. Speakers 6 Attaching the Base Stand to the LCD Monitor Attach the base stand to this lightweight multifunctional LCD monitor delivers a bright and clear display optimized for 1680 x 1050 display resolution from almost every video source: desktop/ notebook PC, HDTV/satellite/cable receivers, DVD player, camcorder and...
User Manual
Page 8
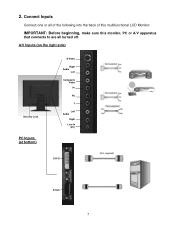
2. A/V Inputs (on the right side) Security Lock PC Inputs (at bottom) S-Video Right Audio Left Composite Video Pr Pb Y Left Audio Right Line-In (PC) DVI-D (Not supplied) D-Sub 7 Connect Inputs Connect one or all of the following into the back of this multifunctional LCD Monitor: IMPORTANT: Before beginning, make sure this monitor, PC or A/V apparatus that connects to are all turned off.
2. A/V Inputs (on the right side) Security Lock PC Inputs (at bottom) S-Video Right Audio Left Composite Video Pr Pb Y Left Audio Right Line-In (PC) DVI-D (Not supplied) D-Sub 7 Connect Inputs Connect one or all of the following into the back of this multifunctional LCD Monitor: IMPORTANT: Before beginning, make sure this monitor, PC or A/V apparatus that connects to are all turned off.
User Manual
Page 9
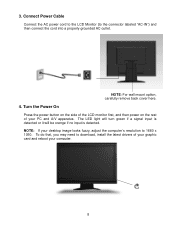
... wall mount option, carefully remove back cover here. 4. To do that, you may need to the connector labeled "AC-IN") and then connect the cord into a properly grounded AC outlet. The LED light will turn green if a signal input is detected or it will be orange if no input is detected. Connect Power Cable Connect the AC power cord to the LCD Monitor (to download, install the latest drivers of your desktop image looks fuzzy, adjust the computer's resolution...
... wall mount option, carefully remove back cover here. 4. To do that, you may need to the connector labeled "AC-IN") and then connect the cord into a properly grounded AC outlet. The LED light will turn green if a signal input is detected or it will be orange if no input is detected. Connect Power Cable Connect the AC power cord to the LCD Monitor (to download, install the latest drivers of your desktop image looks fuzzy, adjust the computer's resolution...
User Manual
Page 10
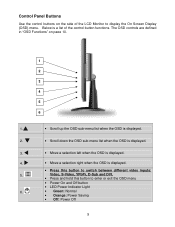
... when the OSD is displayed. • Move a selection right when the OSD is a list of the LCD Monitor to enter or exit the OSD menu • Power On and Off button • LED Power Indicator Light • Green: Normal • Orange: Power Saving • Off: Power Off 9 Below is displayed. • Press this button to switch between different video inputs: Video, S-Video, YPbPr, D-Sub and DVI. • Press and hold this button to display the On Screen Display (OSD) menu.
... when the OSD is displayed. • Move a selection right when the OSD is a list of the LCD Monitor to enter or exit the OSD menu • Power On and Off button • LED Power Indicator Light • Green: Normal • Orange: Power Saving • Off: Power Off 9 Below is displayed. • Press this button to switch between different video inputs: Video, S-Video, YPbPr, D-Sub and DVI. • Press and hold this button to display the On Screen Display (OSD) menu.
User Manual
Page 11
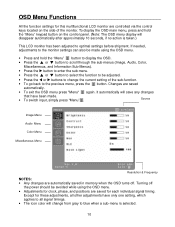
Source Image Menu Audio Menu Color Menu Miscellaneous Menu Resolution & Frequency NOTES: • Any changes are saved automatically. • To exit the OSD menu press "Menu" again. Except for these adjustments, all other adjustments have been made using the OSD menu. • Press and hold the "Menu" keypad button on the side of the sub-function. • To go back to blue when a sub-menu is taken.) This LCD monitor has been adjusted to be avoided while using the...
Source Image Menu Audio Menu Color Menu Miscellaneous Menu Resolution & Frequency NOTES: • Any changes are saved automatically. • To exit the OSD menu press "Menu" again. Except for these adjustments, all other adjustments have been made using the OSD menu. • Press and hold the "Menu" keypad button on the side of the sub-function. • To go back to blue when a sub-menu is taken.) This LCD monitor has been adjusted to be avoided while using the...
User Manual
Page 12
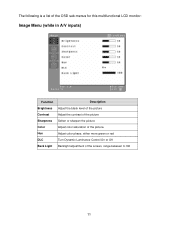
Hue Adjust color phase, either more green or red DLC Turn Dynamic Luminance Control On or Off Back Light Backlight adjustment of the picture. The following is a list of the OSD sub-menus for this multifunctional LCD monitor: Image Menu (while in A/V inputs) Function Description Brightness Adjust the black level of the picture Contrast Adjust the contrast of the picture Sharpness Soften or sharpen the picture Color Adjust color saturation of the screen, range between 0-100 11
Hue Adjust color phase, either more green or red DLC Turn Dynamic Luminance Control On or Off Back Light Backlight adjustment of the picture. The following is a list of the OSD sub-menus for this multifunctional LCD monitor: Image Menu (while in A/V inputs) Function Description Brightness Adjust the black level of the picture Contrast Adjust the contrast of the picture Sharpness Soften or sharpen the picture Color Adjust color saturation of the screen, range between 0-100 11

User Manual
Page 13
Audio Menu Function Description Volume Turn volume up and down Mute Turn volume off and on Treble Adjust the higher-pitched sounds Bass Adjust the lower-pitched sounds Balance Emphasize sounds from left or right speaker 12
Audio Menu Function Description Volume Turn volume up and down Mute Turn volume off and on Treble Adjust the higher-pitched sounds Bass Adjust the lower-pitched sounds Balance Emphasize sounds from left or right speaker 12
User Manual
Page 15
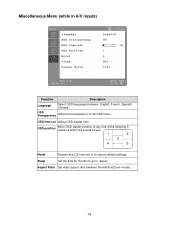
OSD position Move OSD display position to any one of the OSD menu. Sleep Set the time for monitor to go to its factory default settings. Aspect Ratio Set video aspect ratio between : English, French, Spanish, Chinese OSD Transparency Adjust the transparency of the following 5 positions within the overall screen. 1 2 3 4 5 Reset Restore this LCD monitor to "sleep". Miscellaneous Menu (while in A/V inputs) Function Description Language Select OSD languages between Normal/Full/Zoom modes. 14 OSD time-out Adjust OSD display time.
OSD position Move OSD display position to any one of the OSD menu. Sleep Set the time for monitor to go to its factory default settings. Aspect Ratio Set video aspect ratio between : English, French, Spanish, Chinese OSD Transparency Adjust the transparency of the following 5 positions within the overall screen. 1 2 3 4 5 Reset Restore this LCD monitor to "sleep". Miscellaneous Menu (while in A/V inputs) Function Description Language Select OSD languages between Normal/Full/Zoom modes. 14 OSD time-out Adjust OSD display time.
User Manual
Page 16
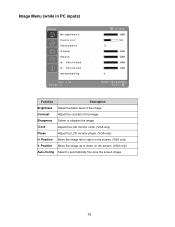
Image Menu (while in PC inputs) Function Description Brightness Adjust the black level of the image. Position Move the image left or right on the screen. (VGA only) Auto-Config Select to automatically fine tune the screen image 15 Position Move the image up or down on the screen. (VGA only) V. Contrast Adjust the contrast of the image. Sharpness Soften or sharpen the image Clock Adjust the LCD monitor clock. (VGA only) Phase Adjust the LCD monitor phase. (VGA only) H.
Image Menu (while in PC inputs) Function Description Brightness Adjust the black level of the image. Position Move the image left or right on the screen. (VGA only) Auto-Config Select to automatically fine tune the screen image 15 Position Move the image up or down on the screen. (VGA only) V. Contrast Adjust the contrast of the image. Sharpness Soften or sharpen the image Clock Adjust the LCD monitor clock. (VGA only) Phase Adjust the LCD monitor phase. (VGA only) H.
User Manual
Page 17
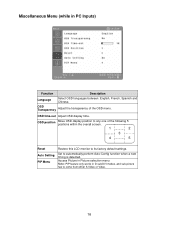
OSD position Move OSD display position to its factory default settings. OSD time-out Adjust OSD display time. Set to come from either S-Video or Video. 16 Miscellaneous Menu (while in D-sub/DVI modes, and sub-picture has to automatically perform Auto-Config function when a new timing is detected. Access Picture in Picture selection menu Note: PIP feature only works in PC Inputs) Function Description Language Select OSD languages between: English, French, Spanish and Chinese. OSD Transparency Adjust the transparency of the...
OSD position Move OSD display position to its factory default settings. OSD time-out Adjust OSD display time. Set to come from either S-Video or Video. 16 Miscellaneous Menu (while in D-sub/DVI modes, and sub-picture has to automatically perform Auto-Config function when a new timing is detected. Access Picture in Picture selection menu Note: PIP feature only works in PC Inputs) Function Description Language Select OSD languages between: English, French, Spanish and Chinese. OSD Transparency Adjust the transparency of the...
User Manual
Page 19
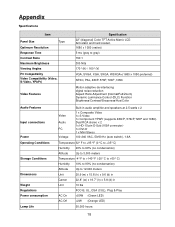
... Resolution Response Time Contrast Ratio Maximum Brightness Viewing Angles PC Compatibility Video Compatibility (Video, S-Video, YPbPr) Video Features Specification 22" (diagonal) Color TFT Active Matrix LCD. Anti-static and hard coated. 1680 x 1050 (native) 5 ms (gray to gray) 700:1 300 Nits 170°(H) / 160°(V) VGA, SVGA, XGA, SXGA, WSXGA+(1680 x 1050 preferred) NTSC, PAL, 480P, 576P, 720P ,1080i Motion adaptive de-interlacing digital noise reduction Aspect Ratio Adjustment...
... Resolution Response Time Contrast Ratio Maximum Brightness Viewing Angles PC Compatibility Video Compatibility (Video, S-Video, YPbPr) Video Features Specification 22" (diagonal) Color TFT Active Matrix LCD. Anti-static and hard coated. 1680 x 1050 (native) 5 ms (gray to gray) 700:1 300 Nits 170°(H) / 160°(V) VGA, SVGA, XGA, SXGA, WSXGA+(1680 x 1050 preferred) NTSC, PAL, 480P, 576P, 720P ,1080i Motion adaptive de-interlacing digital noise reduction Aspect Ratio Adjustment...
User Manual
Page 20
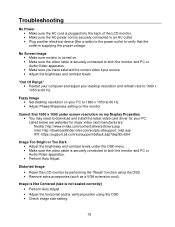
... "Reset" function using the OSD. • Check image size setting. 19 Image is Not Centered (size is securely connected to both the monitor and PC or Audio/Video apparatus. • Make sure you have selected the correct video input source • Adjust the brightness and contrast levels. No Screen Image • Make sure monitor is turned on the monitor Cannot find 1680 x 1050 under the OSD menu. • Make sure the video cable is not scaled correctly) • Perform Auto Adjust • Adjust the horizontal...
... "Reset" function using the OSD. • Check image size setting. 19 Image is Not Centered (size is securely connected to both the monitor and PC or Audio/Video apparatus. • Make sure you have selected the correct video input source • Adjust the brightness and contrast levels. No Screen Image • Make sure monitor is turned on the monitor Cannot find 1680 x 1050 under the OSD menu. • Make sure the video cable is not scaled correctly) • Perform Auto Adjust • Adjust the horizontal...
User Manual
Page 21
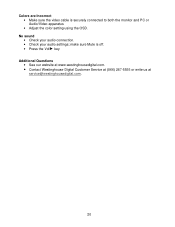
No sound • Check your audio connection. • Check your audio settings; Colors are Incorrect • Make sure the video cable is off. • Press the Vol► key Additional Questions • See our website at www.westinghousedigital.com. • Contact Westinghouse Digital Customer Service at (866) 287-5555 or write us at service@westinghousedigital.com. 20 make sure Mute is securely connected to both the monitor and PC or Audio/Video apparatus • Adjust the color setting using the OSD.
No sound • Check your audio connection. • Check your audio settings; Colors are Incorrect • Make sure the video cable is off. • Press the Vol► key Additional Questions • See our website at www.westinghousedigital.com. • Contact Westinghouse Digital Customer Service at (866) 287-5555 or write us at service@westinghousedigital.com. 20 make sure Mute is securely connected to both the monitor and PC or Audio/Video apparatus • Adjust the color setting using the OSD.


