User Manual
Page 2
CONNECT INPUTS 7 3. TURN THE POWER ON 8 CONTROL PANEL BUTTONS 9 OSD MENU FUNCTIONS 10 IMAGE MENU (WHILE IN A/V INPUTS 11 AUDIO MENU 12 COLOR MENU 13 MISCELLANEOUS MENU (WHILE IN A/V INPUTS 14 IMAGE MENU (WHILE ... PC INPUTS 16 INFO MENU (WHILE IN PC INPUTS 17 APPENDIX 18 SPECIFICATIONS 18 TROUBLESHOOTING 19 1 ATTACHING THE BASE STAND TO THE LCD MONITOR 6 2. CONNECT POWER CABLE 8 4. CONTENTS IMPORTANT PRODUCT SAFETY INSTRUCTIONS 2 SAFETY GUIDELINES 3 FCC COMPLIANCE STATEMENT 3 CLEANING THE LCD MONITOR 4 FEATURES...
CONNECT INPUTS 7 3. TURN THE POWER ON 8 CONTROL PANEL BUTTONS 9 OSD MENU FUNCTIONS 10 IMAGE MENU (WHILE IN A/V INPUTS 11 AUDIO MENU 12 COLOR MENU 13 MISCELLANEOUS MENU (WHILE IN A/V INPUTS 14 IMAGE MENU (WHILE ... PC INPUTS 16 INFO MENU (WHILE IN PC INPUTS 17 APPENDIX 18 SPECIFICATIONS 18 TROUBLESHOOTING 19 1 ATTACHING THE BASE STAND TO THE LCD MONITOR 6 2. CONNECT POWER CABLE 8 4. CONTENTS IMPORTANT PRODUCT SAFETY INSTRUCTIONS 2 SAFETY GUIDELINES 3 FCC COMPLIANCE STATEMENT 3 CLEANING THE LCD MONITOR 4 FEATURES...
User Manual
Page 9
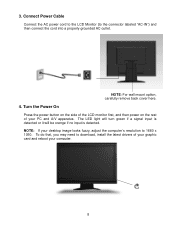
... do that, you may need to download, install the latest drivers of your PC and A/V apparatus. Turn the Power On Press the power button on the side of the LCD monitor first, and then power on the rest of your graphic card and reboot your desktop image looks fuzzy, adjust the computer's resolution to... grounded AC outlet. The LED light will turn green if a signal input is detected or it will be orange if no input is detected. Connect Power Cable Connect the AC power cord to the LCD Monitor (to 1680 x 1050. NOTE: For wall mount option, carefully remove back cover here. 4.
... do that, you may need to download, install the latest drivers of your PC and A/V apparatus. Turn the Power On Press the power button on the side of the LCD monitor first, and then power on the rest of your graphic card and reboot your desktop image looks fuzzy, adjust the computer's resolution to... grounded AC outlet. The LED light will turn green if a signal input is detected or it will be orange if no input is detected. Connect Power Cable Connect the AC power cord to the LCD Monitor (to 1680 x 1050. NOTE: For wall mount option, carefully remove back cover here. 4.
User Manual
Page 10
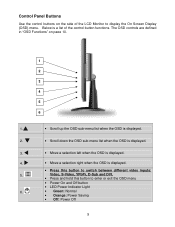
... switch between different video inputs: Video, S-Video, YPbPr, D-Sub and DVI. • Press and hold this button to display the On Screen Display (OSD) menu. Control Panel Buttons Use the control buttons on page 10. 1 2 3 4 5 6 1.▲ 2. ▼ 3. 4. 5. 6. • Scroll up the OSD sub-menu list when the... is a list of the LCD Monitor to enter or exit the OSD menu • Power On and Off button • LED Power Indicator Light • Green: Normal • Orange: Power Saving • Off: Power Off 9 The OSD controls are defined in "OSD Functions" on the side of the control...
... switch between different video inputs: Video, S-Video, YPbPr, D-Sub and DVI. • Press and hold this button to display the On Screen Display (OSD) menu. Control Panel Buttons Use the control buttons on page 10. 1 2 3 4 5 6 1.▲ 2. ▼ 3. 4. 5. 6. • Scroll up the OSD sub-menu list when the... is a list of the LCD Monitor to enter or exit the OSD menu • Power On and Off button • LED Power Indicator Light • Green: Normal • Orange: Power Saving • Off: Power Off 9 The OSD controls are defined in "OSD Functions" on the side of the control...
User Manual
Page 11
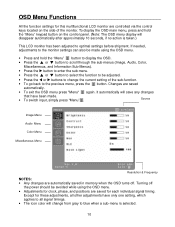
... "Menu" . Except for each individual signal timing. Changes are automatically saved in memory when the OSD turns off the power should be adjusted. • Press the or buttons to change from gray to blue when a sub-menu is taken.) This LCD monitor has been adjusted to optimal settings before... 10 seconds, if no action is selected. 10 To display the OSD main menu, press and hold the "Menu" button to display the OSD. • Press the ▲ or ▼ button to scroll through the sub-menus (Image, Audio, Color, Miscellaneous, and Information Sub-Menus). • Press the...
... "Menu" . Except for each individual signal timing. Changes are automatically saved in memory when the OSD turns off the power should be adjusted. • Press the or buttons to change from gray to blue when a sub-menu is taken.) This LCD monitor has been adjusted to optimal settings before... 10 seconds, if no action is selected. 10 To display the OSD main menu, press and hold the "Menu" button to display the OSD. • Press the ▲ or ▼ button to scroll through the sub-menus (Image, Audio, Color, Miscellaneous, and Information Sub-Menus). • Press the...


