Brochure
Page 2
, . 5 Customer Service ?AND Shopping Cart I Login Versatile wide monitors with HD-Grade'" displays OR CABINET JHANCE ANY DECOR 1366 x 768 aa a LCD HDTV WITH FRONT SLOT LOAD DVD PLAYER • AutoWaterAutoSoixte: met DVDadplay • Pixetirectlw: area digital path to screen Digital Photo Frame HIGH RESOLUTION 8- LCDFRAME • Buit•in 8MB d memory •Makes a great giftwhen preload vett photos 111.1:-,
, . 5 Customer Service ?AND Shopping Cart I Login Versatile wide monitors with HD-Grade'" displays OR CABINET JHANCE ANY DECOR 1366 x 768 aa a LCD HDTV WITH FRONT SLOT LOAD DVD PLAYER • AutoWaterAutoSoixte: met DVDadplay • Pixetirectlw: area digital path to screen Digital Photo Frame HIGH RESOLUTION 8- LCDFRAME • Buit•in 8MB d memory •Makes a great giftwhen preload vett photos 111.1:-,
User Manual
Page 2
... IMPORTANT PRODUCT SAFETY INSTRUCTIONS 2 SAFETY GUIDELINES 3 FCC COMPLIANCE STATEMENT 3 CLEANING THE LCD MONITOR 4 FEATURES ...5 POWER SAVER 5 PLUG & PLAY 5 INSTALLATION 6 PACKAGE CONTENTS 6 1. TURN THE POWER ON 8 CONTROL PANEL BUTTONS 9 OSD MENU FUNCTIONS 10 IMAGE MENU (WHILE IN A/V INPUTS 11 ...
... IMPORTANT PRODUCT SAFETY INSTRUCTIONS 2 SAFETY GUIDELINES 3 FCC COMPLIANCE STATEMENT 3 CLEANING THE LCD MONITOR 4 FEATURES ...5 POWER SAVER 5 PLUG & PLAY 5 INSTALLATION 6 PACKAGE CONTENTS 6 1. TURN THE POWER ON 8 CONTROL PANEL BUTTONS 9 OSD MENU FUNCTIONS 10 IMAGE MENU (WHILE IN A/V INPUTS 11 ...
User Manual
Page 3
... safety, please read all warnings and instructions marked on the LCD Monitor, video cables, or power cord. • If the LCD Monitor emits smoke, abnormal noise, or a strange odor, immediately turn it off and contact the Westinghouse Service Center. • WARNING - Periodically inspect the cords and...8226; Do not place the LCD Monitor in a built-in a well-ventilated area; Orient your LCD Monitor away from overheating, these openings must not be blocked or covered. • Do not block the openings by Westinghouse Digital. • If your LCD Monitor in installation such as vases, ...
... safety, please read all warnings and instructions marked on the LCD Monitor, video cables, or power cord. • If the LCD Monitor emits smoke, abnormal noise, or a strange odor, immediately turn it off and contact the Westinghouse Service Center. • WARNING - Periodically inspect the cords and...8226; Do not place the LCD Monitor in a built-in a well-ventilated area; Orient your LCD Monitor away from overheating, these openings must not be blocked or covered. • Do not block the openings by Westinghouse Digital. • If your LCD Monitor in installation such as vases, ...
User Manual
Page 4
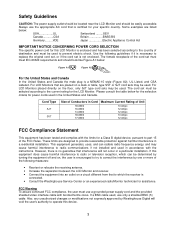
For LCD Monitors that are placed on a desk or table, type SVT or SJT cord sets may be determined by turning the equipment off and on, the user is encouraged to try to correct the interference by Westinghouse Digital will not occur in a particular installation. Please consult the table...For the United States and Canada In the United States and Canada the male plug is connected. • Consult the Westinghouse Service Center or an experienced radio/Monitor technician for assistance. Cord Type SJT SVT Size of Conductors in accordance with the instructions. This equipment generates, uses, ...
For LCD Monitors that are placed on a desk or table, type SVT or SJT cord sets may be determined by turning the equipment off and on, the user is encouraged to try to correct the interference by Westinghouse Digital will not occur in a particular installation. Please consult the table...For the United States and Canada In the United States and Canada the male plug is connected. • Consult the Westinghouse Service Center or an experienced radio/Monitor technician for assistance. Cord Type SJT SVT Size of Conductors in accordance with the instructions. This equipment generates, uses, ...
User Manual
Page 5
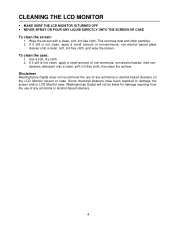
... If it still is not clean, apply a small amount of any ammonia or alcohol-based cleaners on the LCD Monitor screen or case. Use a soft, dry cloth. 2. Disclaimer Westinghouse Digital does not recommend the use of non-ammonia, non-alcohol based, mild non- This removes dust and other ...particles. 2. Some chemical cleaners have been reported to damage the screen and/or LCD Monitor case. If it still is not clean, apply...
... If it still is not clean, apply a small amount of any ammonia or alcohol-based cleaners on the LCD Monitor screen or case. Use a soft, dry cloth. 2. Disclaimer Westinghouse Digital does not recommend the use of non-ammonia, non-alcohol based, mild non- This removes dust and other ...particles. 2. Some chemical cleaners have been reported to damage the screen and/or LCD Monitor case. If it still is not clean, apply...
User Manual
Page 6
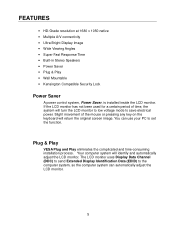
...8226; Wall Mountable • Kensington Compatible Security Lock Power Saver A power control system, Power Saver, is installed inside the LCD monitor. You can automatically adjust the LCD monitor. 5 Plug & Play VESA Plug and Play eliminates the complicated and time-consuming installation process. Your computer system will turn the ...Identification Data (EDID) to the computer system, so the computer system can use your PC to save electrical power. If the LCD monitor has not been used for a certain period of the mouse or pressing any key on the keyboard will return the original screen image...
...8226; Wall Mountable • Kensington Compatible Security Lock Power Saver A power control system, Power Saver, is installed inside the LCD monitor. You can automatically adjust the LCD monitor. 5 Plug & Play VESA Plug and Play eliminates the complicated and time-consuming installation process. Your computer system will turn the ...Identification Data (EDID) to the computer system, so the computer system can use your PC to save electrical power. If the LCD monitor has not been used for a certain period of the mouse or pressing any key on the keyboard will return the original screen image...
User Manual
Page 7
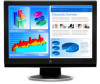
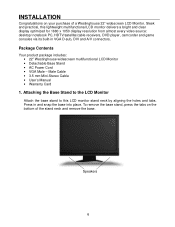
INSTALLATION Congratulations on the bottom of a Westinghouse 22" widescreen LCD Monitor. Sleek and practical, this LCD monitor stand neck by aligning the holes and tabs. To remove the base stand, press the tabs on your purchase of the stand neck and remove ... the base into place. Male Cable • 3.5 mm Mini-Stereo Cable • User's Manual • Warranty Card 1. Package Contents Your product package includes: • 22" Westinghouse widescreen multifunctional LCD Monitor • Detachable Base Stand • AC Power Cord • VGA Male -
INSTALLATION Congratulations on the bottom of a Westinghouse 22" widescreen LCD Monitor. Sleek and practical, this LCD monitor stand neck by aligning the holes and tabs. To remove the base stand, press the tabs on your purchase of the stand neck and remove ... the base into place. Male Cable • 3.5 mm Mini-Stereo Cable • User's Manual • Warranty Card 1. Package Contents Your product package includes: • 22" Westinghouse widescreen multifunctional LCD Monitor • Detachable Base Stand • AC Power Cord • VGA Male -
User Manual
Page 8
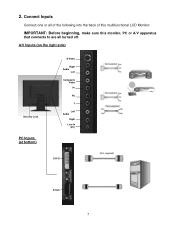
A/V Inputs (on the right side) Security Lock PC Inputs (at bottom) S-Video Right Audio Left Composite Video Pr Pb Y Left Audio Right Line-In (PC) DVI-D (Not supplied) D-Sub 7 Connect Inputs Connect one or all of the following into the back of this multifunctional LCD Monitor: IMPORTANT: Before beginning, make sure this monitor, PC or A/V apparatus that connects to are all turned off. 2.
A/V Inputs (on the right side) Security Lock PC Inputs (at bottom) S-Video Right Audio Left Composite Video Pr Pb Y Left Audio Right Line-In (PC) DVI-D (Not supplied) D-Sub 7 Connect Inputs Connect one or all of the following into the back of this multifunctional LCD Monitor: IMPORTANT: Before beginning, make sure this monitor, PC or A/V apparatus that connects to are all turned off. 2.
User Manual
Page 9
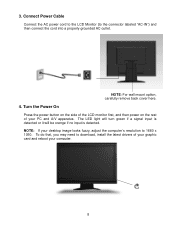
... your PC and A/V apparatus. NOTE: For wall mount option, carefully remove back cover here. 4. Connect Power Cable Connect the AC power cord to the LCD Monitor (to 1680 x 1050. NOTE: If your computer. 8 Turn the Power On Press the power button on the side of the LCD... monitor first, and then power on the rest of your graphic card and reboot your desktop image looks fuzzy, adjust the computer's resolution to the connector ...
... your PC and A/V apparatus. NOTE: For wall mount option, carefully remove back cover here. 4. Connect Power Cable Connect the AC power cord to the LCD Monitor (to 1680 x 1050. NOTE: If your computer. 8 Turn the Power On Press the power button on the side of the LCD... monitor first, and then power on the rest of your graphic card and reboot your desktop image looks fuzzy, adjust the computer's resolution to the connector ...
User Manual
Page 10
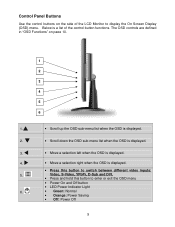
... the OSD is displayed. • Move a selection left when the OSD is displayed. • Move a selection right when the OSD is a list of the LCD Monitor to enter or exit the OSD menu • Power On and Off button • LED Power Indicator Light • Green: Normal • Orange: Power Saving...
... the OSD is displayed. • Move a selection left when the OSD is displayed. • Move a selection right when the OSD is a list of the LCD Monitor to enter or exit the OSD menu • Power On and Off button • LED Power Indicator Light • Green: Normal • Orange: Power Saving...
User Manual
Page 11
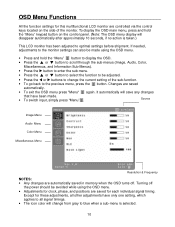
... controlled via the control keys located on the control panel. (Note: The OSD menu display will change the current setting of the monitor. Changes are automatically saved in memory when the OSD turns off the power should be adjusted. • Press the or buttons to change from ...gray to blue when a sub-menu is taken.) This LCD monitor has been adjusted to the monitor settings can also be made . • To switch input, simply press "Menu" . It automatically will save any changes that have only ...
... controlled via the control keys located on the control panel. (Note: The OSD menu display will change the current setting of the monitor. Changes are automatically saved in memory when the OSD turns off the power should be adjusted. • Press the or buttons to change from ...gray to blue when a sub-menu is taken.) This LCD monitor has been adjusted to the monitor settings can also be made . • To switch input, simply press "Menu" . It automatically will save any changes that have only ...
User Manual
Page 12
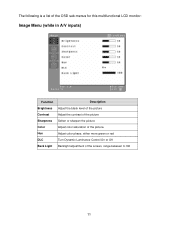
Hue Adjust color phase, either more green or red DLC Turn Dynamic Luminance Control On or Off Back Light Backlight adjustment of the picture. The following is a list of the OSD sub-menus for this multifunctional LCD monitor: Image Menu (while in A/V inputs) Function Description Brightness Adjust the black level of the picture Contrast Adjust the contrast of the picture Sharpness Soften or sharpen the picture Color Adjust color saturation of the screen, range between 0-100 11
Hue Adjust color phase, either more green or red DLC Turn Dynamic Luminance Control On or Off Back Light Backlight adjustment of the picture. The following is a list of the OSD sub-menus for this multifunctional LCD monitor: Image Menu (while in A/V inputs) Function Description Brightness Adjust the black level of the picture Contrast Adjust the contrast of the picture Sharpness Soften or sharpen the picture Color Adjust color saturation of the screen, range between 0-100 11
User Manual
Page 15
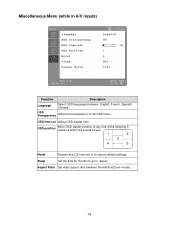
Aspect Ratio Set video aspect ratio between : English, French, Spanish, Chinese OSD Transparency Adjust the transparency of the following 5 positions within the overall screen. 1 2 3 4 5 Reset Restore this LCD monitor to its factory default settings. Sleep Set the time for monitor to go to any one of the OSD menu. Miscellaneous Menu (while in A/V inputs) Function Description Language Select OSD languages between Normal/Full/Zoom modes. 14 OSD position Move OSD display position to "sleep". OSD time-out Adjust OSD display time.
Aspect Ratio Set video aspect ratio between : English, French, Spanish, Chinese OSD Transparency Adjust the transparency of the following 5 positions within the overall screen. 1 2 3 4 5 Reset Restore this LCD monitor to its factory default settings. Sleep Set the time for monitor to go to any one of the OSD menu. Miscellaneous Menu (while in A/V inputs) Function Description Language Select OSD languages between Normal/Full/Zoom modes. 14 OSD position Move OSD display position to "sleep". OSD time-out Adjust OSD display time.
User Manual
Page 16
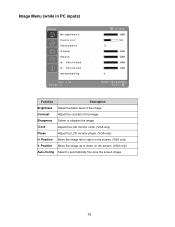
Image Menu (while in PC inputs) Function Description Brightness Adjust the black level of the image. Position Move the image left or right on the screen. (VGA only) Auto-Config Select to automatically fine tune the screen image 15 Position Move the image up or down on the screen. (VGA only) V. Contrast Adjust the contrast of the image. Sharpness Soften or sharpen the image Clock Adjust the LCD monitor clock. (VGA only) Phase Adjust the LCD monitor phase. (VGA only) H.
Image Menu (while in PC inputs) Function Description Brightness Adjust the black level of the image. Position Move the image left or right on the screen. (VGA only) Auto-Config Select to automatically fine tune the screen image 15 Position Move the image up or down on the screen. (VGA only) V. Contrast Adjust the contrast of the image. Sharpness Soften or sharpen the image Clock Adjust the LCD monitor clock. (VGA only) Phase Adjust the LCD monitor phase. (VGA only) H.
User Manual
Page 17
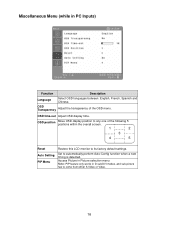
... a new timing is detected. OSD Transparency Adjust the transparency of the following 5 positions within the overall screen. 1 2 3 4 5 Reset Auto Setting PIP Menu Restore this LCD monitor to its factory default settings. OSD position Move OSD display position to any one of the OSD menu. Access Picture in Picture selection menu Note...
... a new timing is detected. OSD Transparency Adjust the transparency of the following 5 positions within the overall screen. 1 2 3 4 5 Reset Auto Setting PIP Menu Restore this LCD monitor to its factory default settings. OSD position Move OSD display position to any one of the OSD menu. Access Picture in Picture selection menu Note...
User Manual
Page 20
...the horizontal and/or vertical position using the OSD. • Remove extra accessories (such as a VGA extension cord). Distorted Image • Reset the LCD monitor by performing the "Reset" function using the OSD. • Check image size setting. 19 Fuzzy Image • Set desktop resolution on . • ...Make sure the video cable is supplying the proper voltage. Image is Not Centered (size is securely connected to both the monitor and PC or Audio/Video apparatus. • Make sure you have selected the correct video input source • Adjust the brightness and contrast ...
...the horizontal and/or vertical position using the OSD. • Remove extra accessories (such as a VGA extension cord). Distorted Image • Reset the LCD monitor by performing the "Reset" function using the OSD. • Check image size setting. 19 Fuzzy Image • Set desktop resolution on . • ...Make sure the video cable is supplying the proper voltage. Image is Not Centered (size is securely connected to both the monitor and PC or Audio/Video apparatus. • Make sure you have selected the correct video input source • Adjust the brightness and contrast ...
User Manual
Page 21
Colors are Incorrect • Make sure the video cable is off. • Press the Vol► key Additional Questions • See our website at www.westinghousedigital.com. • Contact Westinghouse Digital Customer Service at (866) 287-5555 or write us at [email protected]. 20 No sound • Check your audio connection. • Check your audio settings; make sure Mute is securely connected to both the monitor and PC or Audio/Video apparatus • Adjust the color setting using the OSD.
Colors are Incorrect • Make sure the video cable is off. • Press the Vol► key Additional Questions • See our website at www.westinghousedigital.com. • Contact Westinghouse Digital Customer Service at (866) 287-5555 or write us at [email protected]. 20 No sound • Check your audio connection. • Check your audio settings; make sure Mute is securely connected to both the monitor and PC or Audio/Video apparatus • Adjust the color setting using the OSD.


