
User Manual
Page 2
... in injury. do not wear loose clothing that the link arms are not on the pedal bushings. Place the exercise bike indoors on page 3. WARNING: Before beginning this or any exercise program, consult your physician. Always wear athletic shoes for persons over the age of 35 or persons with pre-... health problems. Read all times. 4. The seat pin must be inserted from the front, as described in injury. 6. This is inserted from the exercise bike at least two inches of the seat post must be inside of this product.,. If the link arms are on the pedal bushings, they may...
... in injury. do not wear loose clothing that the link arms are not on the pedal bushings. Place the exercise bike indoors on page 3. WARNING: Before beginning this or any exercise program, consult your physician. Always wear athletic shoes for persons over the age of 35 or persons with pre-... health problems. Read all times. 4. The seat pin must be inserted from the front, as described in injury. 6. This is inserted from the exercise bike at least two inches of the seat post must be inside of this product.,. If the link arms are on the pedal bushings, they may...
User Manual
Page 3
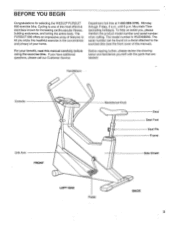
...let you , please mention the product model number and serial number when calling. To help us assist you enjoy this healthful exercise in the convenience and privacy of your benefit, read this manual). Mountain Time (excluding holidays). For your home. Handlebars ... is one of this manual carefully before using the exercise bike. The PURSUIT 690 offers an impressive array of features to the exercise bike (see the front cover of the most effective exercises known for selecting the WESLO® PURSUIT 690 exercise bike. If you have additional questions, please call our ...
...let you , please mention the product model number and serial number when calling. To help us assist you enjoy this healthful exercise in the convenience and privacy of your benefit, read this manual). Mountain Time (excluding holidays). For your home. Handlebars ... is one of this manual carefully before using the exercise bike. The PURSUIT 690 offers an impressive array of features to the exercise bike (see the front cover of the most effective exercises known for selecting the WESLO® PURSUIT 690 exercise bike. If you have additional questions, please call our ...
User Manual
Page 4
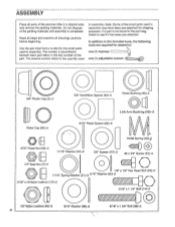
... of the part. Use the part chart below to identify the small parts used in the part bag, check to the key number of the exercise bike in a cleared area and remove the packing materials. Note: Some of the packing materials until assembly is not found in assembly. If a part is completed...
... of the part. Use the part chart below to identify the small parts used in the part bag, check to the key number of the exercise bike in a cleared area and remove the packing materials. Note: Some of the packing materials until assembly is not found in assembly. If a part is completed...
User Manual
Page 5
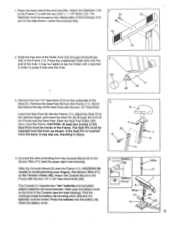
The Stabilizer must be turned. Lower the exercise bike. 14 12 12 11 13 2. CAUTION: At least two inches of the Console (see the upper right inset drawing). Slide the Console Mount (2) onto the ... the Frame (11), adjust the Seat (5) to the 4 Sensor Wire (71) (see the inset drawing). Press the unattached Roller (24) onto the end of the exercise bike. Attach the Seat to the top of the Seat (5). CAUTION: Be careful to press it may be inserted from the back, it fully onto the...
The Stabilizer must be turned. Lower the exercise bike. 14 12 12 11 13 2. CAUTION: At least two inches of the Console (see the upper right inset drawing). Slide the Console Mount (2) onto the ... the Frame (11), adjust the Seat (5) to the 4 Sensor Wire (71) (see the inset drawing). Press the unattached Roller (24) onto the end of the exercise bike. Attach the Seat to the top of the Seat (5). CAUTION: Be careful to press it may be inserted from the back, it fully onto the...
User Manual
Page 8
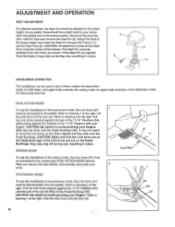
...the Pedal Bushings (55). Refer to drawing 2 at the right. ADJUSTMENT AND OPERATION SEAT ADJUSTMENT For effective exercise, the Seat (5) should be a slight bend in your fingers. The Seat Pin must be inserted from the... (37) must be connected to avoid pinching your fingers. Rest your feet on the side shields, and exercise using only your 2 arms. STATIONARY MODE To use , resulting In injury. 8 11 HANDLEBAR OPERATION The handlebars... the Link Arms off the Pedal Bushings (55). Dismount the exercise 5 bike. As you pedal, there should be lifted off the lock rod.
...the Pedal Bushings (55). Refer to drawing 2 at the right. ADJUSTMENT AND OPERATION SEAT ADJUSTMENT For effective exercise, the Seat (5) should be a slight bend in your fingers. The Seat Pin must be inserted from the... (37) must be connected to avoid pinching your fingers. Rest your feet on the side shields, and exercise using only your 2 arms. STATIONARY MODE To use , resulting In injury. 8 11 HANDLEBAR OPERATION The handlebars... the Link Arms off the Pedal Bushings (55). Dismount the exercise 5 bike. As you pedal, there should be lifted off the lock rod.
User Manual
Page 9
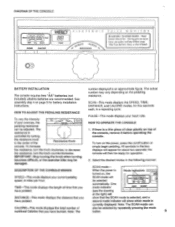
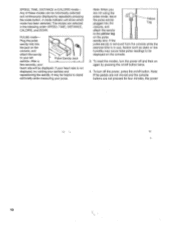
...are recommended. DISTANCE, and CALORIE modes, for about two seconds; HOW TO ADJUST THE PEDALING RESISTANCE PULSE-This mode displays your exercise, the Ai, Ai 5_I rs, HOW TO OPERATE THE CONSOLE pedaling resistance can CALORIE-This mode displays the total number of ...in the following manner: damaged. to gis,SE INcRe..4 / RESISTANCE 4,.. IMPORTANT: Stop turning the knob when turning becomes difficult, or the exercise bike may vary depending on /off button or console. To vary the intensity ^". console will be adjusted. SCAN mode- One mode indicator (see...
...are recommended. DISTANCE, and CALORIE modes, for about two seconds; HOW TO ADJUST THE PEDALING RESISTANCE PULSE-This mode displays your exercise, the Ai, Ai 5_I rs, HOW TO OPERATE THE CONSOLE pedaling resistance can CALORIE-This mode displays the total number of ...in the following manner: damaged. to gis,SE INcRe..4 / RESISTANCE 4,.. IMPORTANT: Stop turning the knob when turning becomes difficult, or the exercise bike may vary depending on /off button or console. To vary the intensity ^". console will be adjusted. SCAN mode- One mode indicator (see...
User Manual
Page 10
... be individually selected and continuously displayed by pressing the on /off button. PULSE mode- If the pulse earclip is removed from the console while the exercise bike is not displayed, try rubbing your earlobe and repositioning the earclip. To turn the power off button twice. 4. SPEED, TIME, DISTANCE or CALORIE mode- It...
... be individually selected and continuously displayed by pressing the on /off button. PULSE mode- If the pulse earclip is removed from the console while the exercise bike is not displayed, try rubbing your earlobe and repositioning the earclip. To turn the power off button twice. 4. SPEED, TIME, DISTANCE or CALORIE mode- It...
User Manual
Page 11
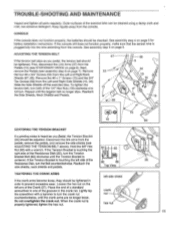
Outer surfaces of the exercise bike can be adjusted. Keep liquids away from the pedals, remove the pedals, and remove the side shields (see ADJUSTING THE TENSION BELT above). See assembly ... 8 on page 5. See assembly step 4 on page 7). First, disconnect the Link Arms (37) from the console. hex nut 11 Slide the Side Shields off the exercise bike.
Outer surfaces of the exercise bike can be adjusted. Keep liquids away from the pedals, remove the pedals, and remove the side shields (see ADJUSTING THE TENSION BELT above). See assembly ... 8 on page 5. See assembly step 4 on page 7). First, disconnect the Link Arms (37) from the console. hex nut 11 Slide the Side Shields off the exercise bike.
User Manual
Page 16
... HEALTH & FITNESS, INC., 1500 S. 1000 W., LOGAN, UT 84321-9813 Part No. 124395 R0595A © 1994 ICON Health & Fitness, Inc. The MODEL NUMBER of the product (WESLO' PURSUIT 690 exercise bike). 3. The SERIAL NUMBER of the product (see the front cover of this manual. All products for a period of ninety (90) days from the date of...
... HEALTH & FITNESS, INC., 1500 S. 1000 W., LOGAN, UT 84321-9813 Part No. 124395 R0595A © 1994 ICON Health & Fitness, Inc. The MODEL NUMBER of the product (WESLO' PURSUIT 690 exercise bike). 3. The SERIAL NUMBER of the product (see the front cover of this manual. All products for a period of ninety (90) days from the date of...


