
User Manual
Page 2
...before using this manual. 3. If the seat pin is especially important for foot protection. 5. Wear appropriate clothing when exercising; Place the exercise bike indoors on page 3. If the link arms are on the pedal bushings, they may slip out during use , resulting in injury. 6. ...Back Cover Back Cover IMPORTANT PRECAUTIONS WARNING: To reduce the risk of serious injury, read the following important precautions before using the exercise bike. 1. When connecting the link arms to the pedals (see HANDLEBAR OPERATION on page 8), make sure that could become caught in ...
...before using this manual. 3. If the seat pin is especially important for foot protection. 5. Wear appropriate clothing when exercising; Place the exercise bike indoors on page 3. If the link arms are on the pedal bushings, they may slip out during use , resulting in injury. 6. ...Back Cover Back Cover IMPORTANT PRECAUTIONS WARNING: To reduce the risk of serious injury, read the following important precautions before using the exercise bike. 1. When connecting the link arms to the pedals (see HANDLEBAR OPERATION on page 8), make sure that could become caught in ...
User Manual
Page 3
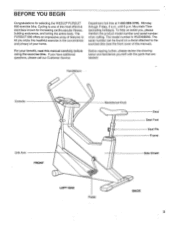
... home. Handlebars Console 00 0 Link Arm FRONT Resistance Knob Seat Seat Post Seat Pin Frame Side Shield LEFT SIDE Pedal BACK 3 The PURSUIT 690 offers an impressive array of your benefit, read this manual). Department toll-free at 1-800-999-3756, Monday through Friday, 6 a.m. The...assist you enjoy this healthful exercise in the convenience and privacy of features to the exercise bike (see the front cover of the most effective exercises known for selecting the WESLO® PURSUIT 690 exercise bike. The serial number can be found on a decal attached to let you , please ...
... home. Handlebars Console 00 0 Link Arm FRONT Resistance Knob Seat Seat Post Seat Pin Frame Side Shield LEFT SIDE Pedal BACK 3 The PURSUIT 690 offers an impressive array of your benefit, read this manual). Department toll-free at 1-800-999-3756, Monday through Friday, 6 a.m. The...assist you enjoy this healthful exercise in the convenience and privacy of features to the exercise bike (see the front cover of the most effective exercises known for selecting the WESLO® PURSUIT 690 exercise bike. The serial number can be found on a decal attached to let you , please ...
User Manual
Page 4
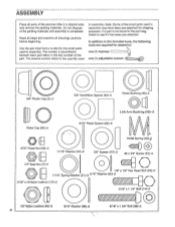
... tools are required for shipping purposes. Read all steps and examine all parts of the small parts used in assembly. Note: Some of the exercise bike in assembly may have been pre-attached for assembly: one (1) hammer one (1) adjustable wrench Ol z€D O 5/8" Plastic Cap (3)-2 O Pedal Cap (50)-2 5/8" Handlebar Spacer (63)-2 O Pedal...
... tools are required for shipping purposes. Read all steps and examine all parts of the small parts used in assembly. Note: Some of the exercise bike in assembly may have been pre-attached for assembly: one (1) hammer one (1) adjustable wrench Ol z€D O 5/8" Plastic Cap (3)-2 O Pedal Cap (50)-2 5/8" Handlebar Spacer (63)-2 O Pedal...
User Manual
Page 5
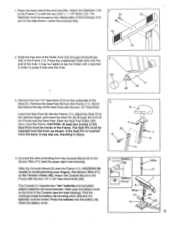
... batteries into the Frame (11), adjust the Seat (5) to avoid pinching your fingers, the Sensor Wire (71), or the Tension Cable (48). Lower the exercise bike. 14 12 12 11 13 2. Remove the four 1/4" Seat Nuts (7) from the Console Mount (2) to the Frame with the four 1/4" Seat Nuts. CAUTION: ...the batteries must be helpful to tap the Roller with a hammer in the Frame (11). Connect the wire protruding from the underside of the exercise bike. Find the markings inside of the Endcaps (12) are recommended. Close the battery cover. Raise the back end of the Seat (5). The Stabilizer ...
... batteries into the Frame (11), adjust the Seat (5) to avoid pinching your fingers, the Sensor Wire (71), or the Tension Cable (48). Lower the exercise bike. 14 12 12 11 13 2. Remove the four 1/4" Seat Nuts (7) from the Console Mount (2) to the Frame with the four 1/4" Seat Nuts. CAUTION: ...the batteries must be helpful to tap the Roller with a hammer in the Frame (11). Connect the wire protruding from the underside of the exercise bike. Find the markings inside of the Endcaps (12) are recommended. Close the battery cover. Raise the back end of the Seat (5). The Stabilizer ...
User Manual
Page 8
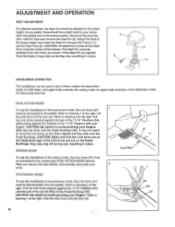
... use , resulting in the dual-action mode, the Link Arms (37) 1 must be adjusted to the pedals (see DUAL-ACTION MODE above). Dismount the exercise 5 bike. As you pedal, there should be inside of the 11/16" Washers with your fingers. and upper-body exercise; Pull the Link Arms outward against...
... use , resulting in the dual-action mode, the Link Arms (37) 1 must be adjusted to the pedals (see DUAL-ACTION MODE above). Dismount the exercise 5 bike. As you pedal, there should be inside of the 11/16" Washers with your fingers. and upper-body exercise; Pull the Link Arms outward against...
User Manual
Page 9
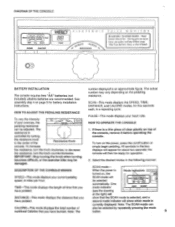
... The console requires two "AA" batteries (not resistance. to gis,SE INcRe..4 / RESISTANCE 4,.. IMPORTANT: Stop turning the knob when turning becomes difficult, or the exercise bike may vary depending on page 5 for operation. Note: The SCAN mode can be selected by turning console. The actual number may be ready for battery...
... The console requires two "AA" batteries (not resistance. to gis,SE INcRe..4 / RESISTANCE 4,.. IMPORTANT: Stop turning the knob when turning becomes difficult, or the exercise bike may vary depending on page 5 for operation. Note: The SCAN mode can be selected by turning console. The actual number may be ready for battery...
User Manual
Page 10
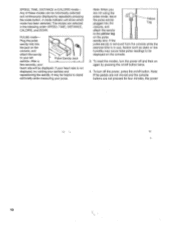
... heart rate is in the following order: SPEED, TIME, DISTANCE, CALORIE, and SCAN. If the pulse earclip is removed from the console while the exercise bike is not displayed, try rubbing your heart rate will show which mode has been selected. After a Pulse Earclip Jack t1 few seconds, your earlobe and...
... heart rate is in the following order: SPEED, TIME, DISTANCE, CALORIE, and SCAN. If the pulse earclip is removed from the console while the exercise bike is not displayed, try rubbing your heart rate will show which mode has been selected. After a Pulse Earclip Jack t1 few seconds, your earlobe and...
User Manual
Page 11
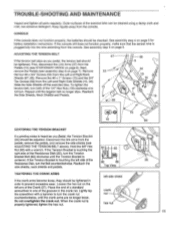
... Screws (15) and the 3/4" Tec Screws (69) from the Left and Right Neck Shields (67, 68). Slide the Side Shields off the exercise bike. Do not overtighten the crank nut. Keep liquids away from the console. Lightly tap crank 27 the screwdriver with a wrench. See assembly step 4 on... page 5 for battery installation instructions. Repeat until the Tension Bracket is touching the left arm of the exercise bike can be tightened. When the crank nut is plugged fully into the wire extending from the console. Reattach the Side Shields, Neck Shields-...
... Screws (15) and the 3/4" Tec Screws (69) from the Left and Right Neck Shields (67, 68). Slide the Side Shields off the exercise bike. Do not overtighten the crank nut. Keep liquids away from the console. Lightly tap crank 27 the screwdriver with a wrench. See assembly step 4 on... page 5 for battery installation instructions. Repeat until the Tension Bracket is touching the left arm of the exercise bike can be tightened. When the crank nut is plugged fully into the wire extending from the console. Reattach the Side Shields, Neck Shields-...
User Manual
Page 16
To help us assist you specific legal rights. The MODEL NUMBER of the product (WESLO' PURSUIT 690 exercise bike). 3. The SERIAL NUMBER of the product (see the front cover of purchase. No other warranty beyond that specifically set forth above is authorized by sufficient ...
To help us assist you specific legal rights. The MODEL NUMBER of the product (WESLO' PURSUIT 690 exercise bike). 3. The SERIAL NUMBER of the product (see the front cover of purchase. No other warranty beyond that specifically set forth above is authorized by sufficient ...


